

There is something truly magical about the golden hour, when the sun dips low and the garden is bathed in a warm, amber glow. It’s during these quiet moments, with the smell of sawdust in the air and a cool drink in hand, that I feel most at home. Our outdoor spaces are more than just grass and fences; they are extensions of our souls, places where memories are etched into the wood of a handmade bench or the petals of a blooming hydrangea. This season, I’ve been obsessed with projects that blend functionality with that effortless, lived-in aesthetic.
Whether you have a sprawling backyard or a cozy balcony, creating a sanctuary doesn’t require a massive budget—it just takes a little imagination and a weekend of rolling up your sleeves. From the rhythmic sound of a hammer hitting a nail to the satisfying splash of paint on a tired patio, these projects are designed to ground you in the present. Let’s dive into a collection of DIYs that will turn your home into a personal retreat, where every corner tells a story of creativity and care.
How to Build a Playful Mud Kitchen for Endless Outdoor Childhood Memories
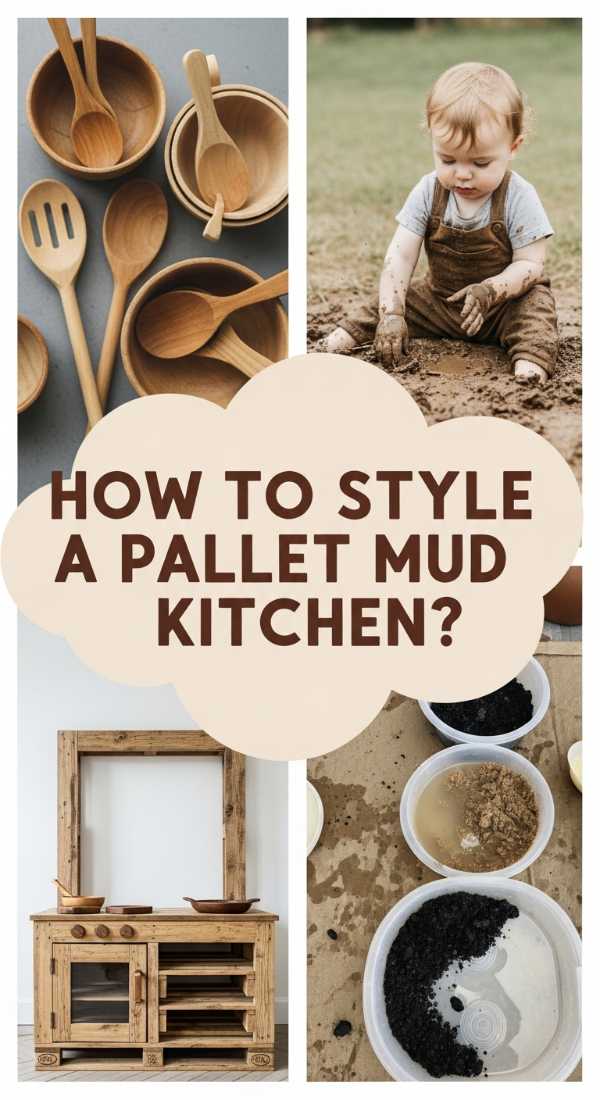
Why we love this
There is nothing quite like the earthy, nostalgic scent of rain-dampened soil and the joyful sound of wooden spoons clacking against old metal pots. A mud kitchen is a portal to a world where dirt becomes chocolate cake and pebbles turn into precious jewels, encouraging a tactile connection with nature that screens just can’t replicate. We love the way the rough texture of the cedar wood contrasts with the smooth, cool surface of stainless steel bowls, creating a sensory playground that ages beautifully under the sun. It’s a dedicated space for messy, unbridled creativity that keeps the chaos outside while fostering hours of deep, imaginative play.
Essential Elements:
- Heat-treated cedar or redwood pallets (weather-resistant)
- Two large stainless steel mixing bowls (to serve as sinks)
- Assorted vintage hooks and knobs
- Outdoor-rated wood screws and water-based sealant
- Reclaimed kitchen utensils, pots, and pans
- A small chalkboard for the “daily menu”
How to make it
- Frame Construction: Start by sourcing two uniform pallets. Disassemble one to use the planks for shelving and use the other as your main vertical backboard. Build a sturdy rectangular base frame using 2x4s, ensuring the height is ergonomic for a child (usually 20-24 inches from the ground). Check for stability by applying weight to the corners; it shouldn’t wobble.
- The Countertop: Lay cedar planks across your base frame. Before securing them, place your stainless steel bowls upside down on the planks and trace their circumference. Use a jigsaw to carefully cut out the circles, then sand the edges until they are buttery smooth to prevent any splinters during play.
- Assembly: Screw the counter planks into the base frame from underneath to keep the surface screw-free. Attach the backboard pallet vertically to the rear of the base. This acts as your “backsplash” where you can later mount shelves and hooks.
- Plumbing (The Fun Part): Drop your bowls into the pre-cut holes. If you want a functional tap, you can attach a simple garden hose adapter to a vintage faucet mounted on the backboard. This allows for a controlled flow of water that doesn’t overwhelm the space.
- Finishing Touches: Sand the entire unit with 120-grit sandpaper, then apply a non-toxic, clear outdoor sealant. Once dry, screw in your hooks for hanging pans and attach a chalkboard to the top. Professional tip: Use a countersink bit for all screws to ensure they sit flush with the wood for ultimate safety.
How to Design Lush Front Yard Flower Beds for Instant Neighborhood Curb Appeal
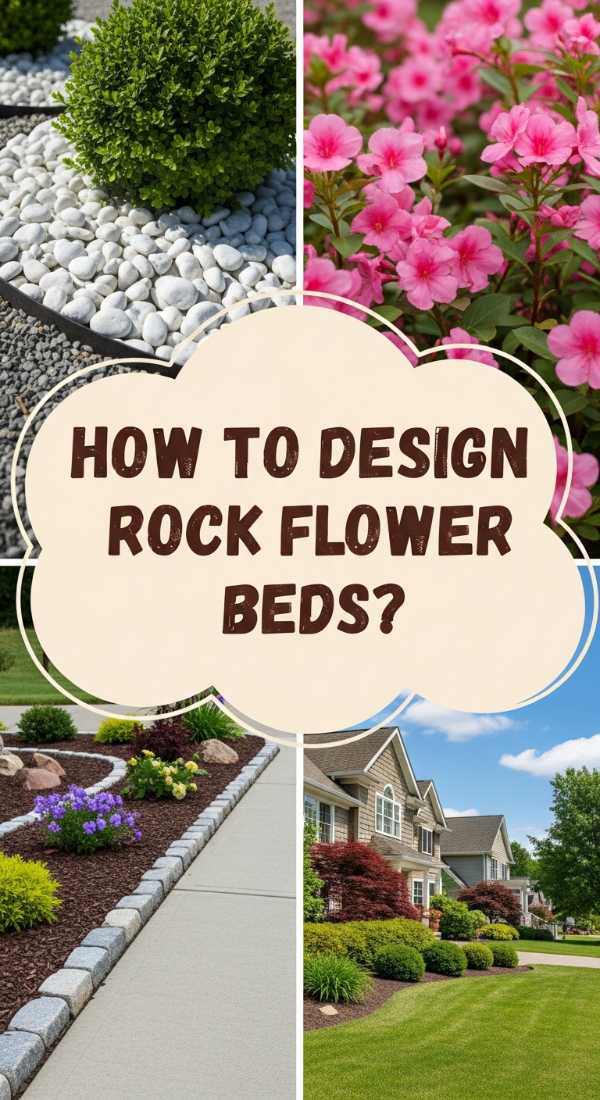
Why we love this
Walking up to a home framed by a riot of color and soft, swaying textures immediately shifts your mood from the stresses of the day to a state of tranquility. We love the layering of heights—the way tall, airy ornamental grasses dance behind the sturdy, velvet-like leaves of sage and the bright, cheerful faces of black-eyed Susans. The aroma of damp mulch and sweet jasmine wafting toward the sidewalk creates a welcoming embrace for neighbors and guests alike. It’s a living canvas that changes with the seasons, offering a tactile reminder of growth and the quiet beauty of a well-tended garden.
Essential Elements:
- A mix of perennials (Hostas, Coneflowers, Lavender)
- Organic compost and high-quality topsoil
- Natural stone or metal landscape edging
- Hardwood mulch (dark brown or black for contrast)
- Soaker hoses or a drip irrigation kit
- Slow-release organic fertilizer
How to make it
- The Layout: Use a garden hose to mock up the shape of your beds on the grass. Curved lines feel more organic and high-end than sharp angles. Once satisfied, use a sharp spade to cut a clean edge along the hose line and remove the sod.
- Soil Preparation: This is the most critical step for lush growth. Till the existing soil to a depth of 10 inches and mix in a 3-inch layer of organic compost. Pro tip: Test your soil pH beforehand; most flowering perennials thrive in a slightly acidic to neutral range (6.0-7.0).
- The “Thrill, Fill, and Spill” Strategy: Arrange your plants while they are still in their nursery pots. Place “thrillers” (tall plants like Foxgloves) at the back, “fillers” (mounded plants like Geraniums) in the middle, and “spillers” (creeping phlox or ivy) along the front edge. Space them according to their mature width to avoid overcrowding.
- Planting: Dig a hole twice as wide as the root ball. Gently tease the roots if they are circling the pot. Set the plant so the top of the root ball is flush with the soil surface, then backfill and firm the soil gently with your hands to remove air pockets.
- Mulching and Hydration: Install your soaker hose around the base of the plants, then cover the entire bed with 2-3 inches of mulch. Mulch keeps moisture in and weeds out, while also giving the bed a professional, finished look. Water deeply immediately after planting to settle the roots.
How to Create a Secluded Hot Tub Haven for the Ultimate Backyard Relaxation

Why we love this
There is a profound sense of luxury in stepping into steaming, bubbling water while the cool night air kisses your shoulders and the stars twinkle overhead. This secluded haven is all about creating a private sanctuary where the world falls away, replaced by the gentle hum of the jets and the soft glow of amber string lights. We love the contrast of the warm cedar privacy screens against the dark, glossy leaves of surrounding evergreens, providing a cocoon-like feeling of safety and serenity. It’s a multisensory experience that combines the weightlessness of water with the grounding presence of natural wood and soft, outdoor textiles.
Essential Elements:
- Horizontal slat privacy screens (Cedar or Pressure-treated)
- Weatherproof outdoor rug (sisal or recycled plastic)
- Solar-powered warm-white Edison bulbs
- Large potted palms or bamboo for natural screening
- A waterproof side table for drinks and towels
- Outdoor aromatherapy (eucalyptus or lavender bundles)
How to make it
- Foundation and Placement: Ensure your hot tub is on a level, reinforced concrete pad or a heavy-duty deck designed to hold the weight (which can exceed 5,000 lbs when full). Position it in a corner of the yard to maximize natural privacy and minimize wind exposure.
- Building Privacy Screens: Install 4×4 posts into the ground using concrete footings. Screw 1×4 cedar slats horizontally across the posts, leaving a 1/2-inch gap between each board. This allows for airflow and a “peek-a-boo” light effect while maintaining total seclusion.
- Lighting Design: String heavy-duty, waterproof outdoor lights from the top of your privacy screens to a nearby tree or the house. Use a dimmer switch to control the ambiance. Pro tip: Position the lights so they reflect off the water’s surface for a shimmering, ethereal effect.
- Softscaping: Surround the base of the hot tub with oversized planters filled with tall grasses or bamboo. This softens the hard edges of the tub and creates a lush, tropical forest vibe. Layer a textured outdoor rug at the entry point to keep feet clean and add a pop of design.
- Climate Control: Add a simple pergola or an oversized cantilever umbrella over one section of the tub. This provides shade during sunny day soaks and protects you from light drizzle, making your haven a year-round destination.
How to Install a Serene Rock River Bed for a Natural Landscape Design
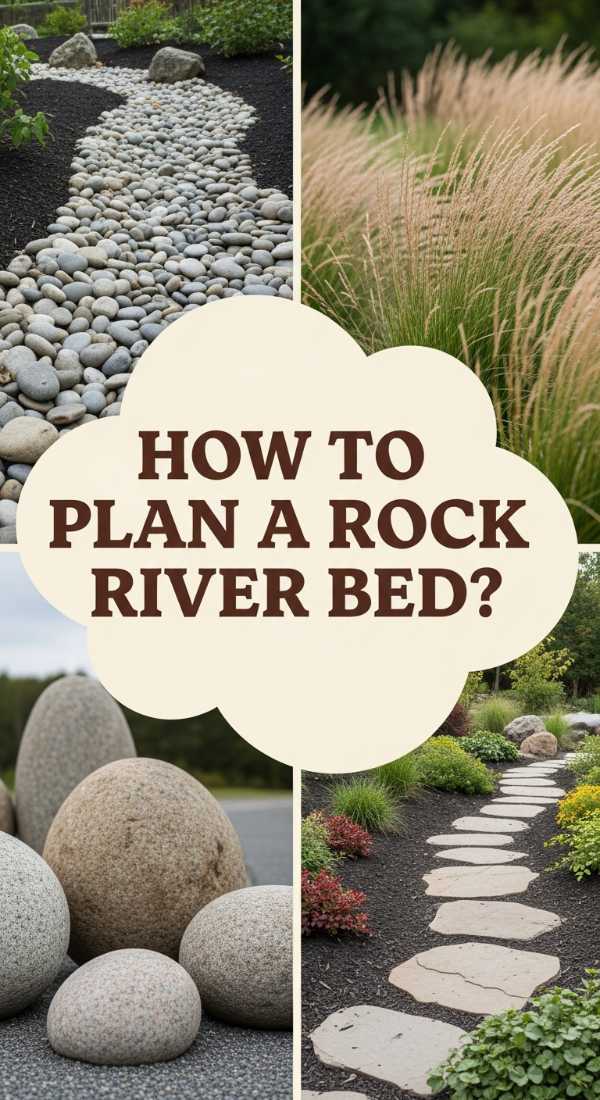
Why we love this
A rock river bed brings a sense of ancient, weathered beauty to a modern landscape, mimicking the path of a dried-up mountain stream. We love the tactile variety of the stones—the smooth, cool roundness of river pebbles mixed with the jagged, crystalline edges of larger feature boulders. When it rains, the stones darken and glisten, turning the garden into a dynamic watercolor painting that manages drainage with effortless grace. It’s a low-maintenance feature that provides a structural backbone to the yard, offering a resting place for the eyes amidst the vibrant chaos of green foliage.
Essential Elements:
- Heavy-duty landscape fabric (weed barrier)
- Assorted sizes of river rock (from 1-inch pebbles to 6-inch cobbles)
- 3-4 large feature boulders (for focal points)
- Crushed granite or pea gravel for the base layer
- Landscaping pins to secure the fabric
How to make it
- Trenching: Mark a meandering path through your garden using spray paint. Dig a shallow trench about 4-6 inches deep, making it wider at the bends to mimic natural erosion patterns. Ensure the trench slopes slightly away from your home’s foundation to assist with drainage.
- Lining the Bed: Lay down professional-grade landscape fabric. Overlap the seams by at least 12 inches and secure every 2 feet with steel landscaping pins. This is crucial to prevent weeds from poking through your stones later.
- Boulder Placement: Place your largest boulders first. Dig them into the ground slightly so they look like they’ve been there for decades rather than just sitting on top. Group them in odd numbers (3 or 5) at the “bends” of your river for the most natural appearance.
- Layering the Stones: Fill the bottom of the trench with a thin layer of pea gravel. Then, place your medium-sized cobbles along the edges. Finally, fill the center with smaller river rocks. Pro tip: Mix colors slightly—using only one shade of stone looks artificial. A blend of greys, tans, and blues looks most authentic.
- Edging and Planting: Tuck low-growing plants like Blue Star Creeper or Sedum between the rocks at the edges. This “blurs” the line between the stone and the rest of the garden, making the river bed look like a permanent, organic part of the ecosystem.
How to Refresh a Plain Concrete Patio for a High End Designer Look
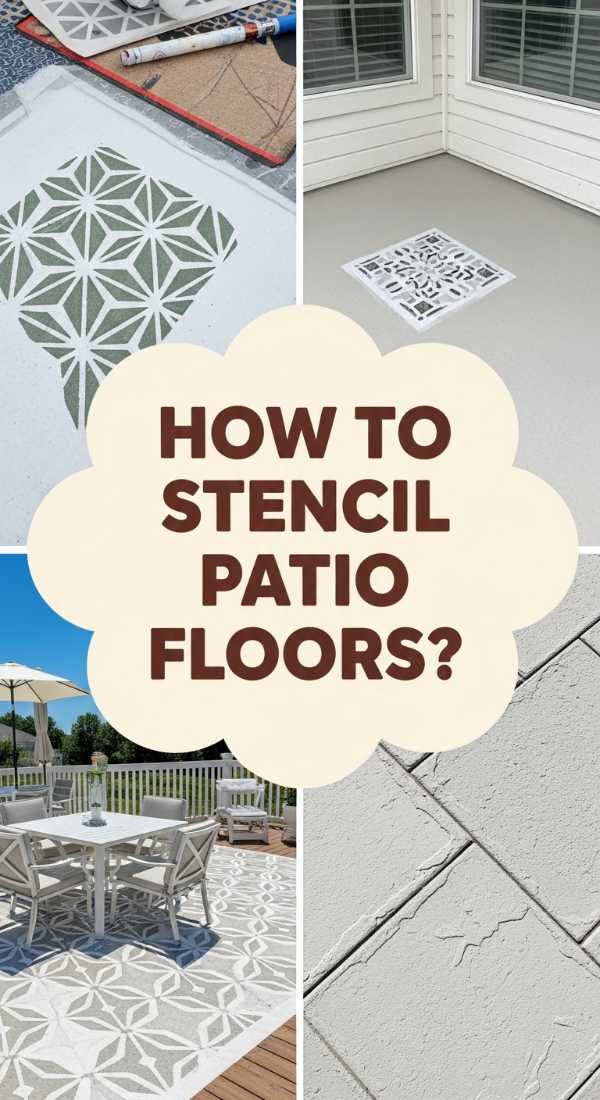
Why we love this
There is a hidden potential in a boring concrete slab, and unlocking it feels like a total home transformation. We love the sophisticated, matte finish of a freshly stenciled patio, which mimics the expensive look of hand-poured Moroccan tiles or reclaimed limestone. The cool, gritty texture underfoot on a summer morning, combined with the crisp, clean lines of a geometric pattern, elevates the entire backyard into a high-end lounge. It’s a project that offers instant gratification, turning a utilitarian gray space into a chic, designer-worthy floor that serves as the perfect backdrop for mid-century modern outdoor furniture.
Essential Elements:
- Heavy-duty concrete cleaner and degreaser
- High-quality porch and patio floor paint (Base and Pattern colors)
- Large-scale floor stencil (Mandala or Tile patterns)
- Dense foam rollers and stencil brushes
- Low-tack painter’s tape
- Water-based polyurethane concrete sealer (Slip-resistant)
How to make it
- Deep Cleaning: Use a pressure washer and a concrete degreaser to remove every speck of dirt, oil, and old paint. Concrete is porous; if it isn’t perfectly clean, the paint will peel within a season. Let it dry completely for 24-48 hours before proceeding.
- Base Coat: Apply two thin, even coats of your base color using a long-handled roller. Wait the full recommended drying time between coats. Use an outdoor-rated paint that is specifically formulated to handle foot traffic and UV rays.
- Stenciling Technique: Find the center of your patio and start there. Secure the stencil with painter’s tape. Use a “dry brush” technique: dip your foam roller in the pattern paint, then roll most of it off onto a paper towel until the roller is almost dry. This prevents the paint from bleeding under the stencil edges.
- Repetitive Precision: Carefully lift the stencil and move it to the next section, aligning the registration marks. If the back of the stencil gets gunky, stop and wipe it down to keep your lines crisp. Work in small sections and don’t rush.
- Sealing: Once the pattern is completely dry (usually 24 hours), apply two coats of clear, slip-resistant concrete sealer. This protects your hard work from the elements and makes the patio much easier to sweep and mop. Pro tip: Add a packet of “anti-skid” grit to the final coat of sealer to prevent the surface from becoming slippery when wet.
How to Craft Whimsical Garden Art for a Charming Personal Backyard Touch

Why we love this
Garden art is the jewelry of the outdoor world, adding those tiny glints of personality and sparkle that make a space feel truly lived-in. We love the way a sun-catcher catches the light at 4 PM, casting dancing rainbows across the lawn, or how a rustic copper sculpture oxidizes over time into a beautiful sea-foam green. There is a playful, tactile joy in combining hard materials like wire and glass with the soft, flowing textures of a wildflower meadow. These pieces act as focal points that draw the eye, sparking conversation and bringing a sense of childlike wonder to even the most formal of garden designs.
Essential Elements:
- Copper or galvanized steel wire (various gauges)
- Glass beads, crystals, and tumbled sea glass
- Driftwood or reclaimed cedar posts
- Needle-nose pliers and wire cutters
- Outdoor-grade epoxy or waterproof adhesive
How to make it
- Design Concept: Decide on a theme—abstract spirals, beaded dragonflies, or stacked stone totems. Sketch your design on paper first to determine how much wire and how many beads you’ll need.
- Structural Base: If you are making a “beaded tree,” start by twisting together several long strands of heavy-gauge copper wire to form a “trunk.” If you are making a totem, drill a small hole through the center of several flat river stones or pieces of driftwood.
- Beading and Detailing: Thread your glass beads and crystals onto thinner wire. Use needle-nose pliers to create small loops at the ends of the wire to keep the beads from sliding off. Pro tip: Use varied shapes and sizes of beads to create a more organic, artisanal look rather than something that looks mass-produced.
- Assembly: Attach your beaded “branches” or wires to your main structural base. If you are using adhesive for glass-on-stone art, ensure the surfaces are bone dry and clean before applying the epoxy. Hold the pieces in place with painter’s tape until the glue is fully cured (usually 24 hours).
- Placement: Position your art where it will interact with the elements. Place glass pieces where the sun will hit them, and wind-chime style art where the breeze can catch it. Secure the base firmly into the ground or onto a fence post so it doesn’t topple during a summer storm.
How to Build a Tropical Pool Bar for the Ultimate Summer Party Vibe

Why we love this
There’s an instant shift in energy when you step up to a bar clad in natural bamboo, the air smelling of fresh lime and coconut cream. We love the way a tropical bar acts as a social magnet, drawing friends together under the shade of a thatched roof while the pool water shimmers just inches away. The texture of a smooth, sanded wood countertop feels incredible under the hands, and the sound of a blender whirring in the background is the universal signal that vacation has officially begun. It’s a piece of functional architecture that turns a standard backyard into a five-star resort, encouraging long afternoons of laughter and relaxation.
Essential Elements:
- Pressure-treated 2x4s for the internal frame
- Bamboo fencing or half-round bamboo poles for cladding
- Solid wood countertop (Cedar or Acacia)
- Synthetic or natural palm thatch roofing
- Outdoor-rated mini-fridge or built-in ice chest
- Stainless steel bar sink and hardware
How to make it
- The Frame: Build a sturdy rectangular frame using 2×4 lumber. The standard bar height is 42 inches. Ensure you include vertical supports every 24 inches to handle the weight of the countertop. If you’re including a fridge, measure the unit carefully and build a “cubby” into the frame to fit it perfectly.
- Cladding: Cut your bamboo poles or fencing to size using a fine-tooth saw to prevent splintering. Attach them to the exterior of the frame using a brad nailer or exterior screws hidden in the joints. This immediately hides the structural lumber and gives it that island aesthetic.
- Countertop Installation: Secure your solid wood countertop from underneath the frame so no screw heads are visible on top. Pro tip: Use a marine-grade spar urethane to seal the wood. Apply 4-5 coats, sanding lightly between each, to create a waterproof, glass-like finish that can withstand spilled drinks and sun.
- The Thatch Roof: Construct a simple 4-post gabled roof frame above the bar. Lay the palm thatch starting from the bottom and overlapping each layer as you move toward the peak. This ensures water runs off the sides rather than dripping through.
- Utility Hookups: If you are adding a sink, run a dedicated outdoor-rated extension cord and a RV-style water hookup. Install LED strip lighting under the bar lip for a neon, nighttime glow that makes the bamboo pop.
How to Master Beach Day Hacks for a Stress Free Family Outing

Why we love this
The beach should be about the rhythm of the waves and the feeling of salt on your skin, not the frustration of sandy sandwiches and tangled towels. We love the clever, “aha!” moments that come from simple hacks—like the cooling sensation of frozen grapes on a scorching afternoon or the magic of talcum powder whisking away damp sand effortlessly. There is a deep satisfaction in a perfectly organized beach bag, where everything has its place and the transition from car to shore is seamless. It’s about reclaiming the joy of the ocean by removing the friction, allowing you to fully soak in the sun and the shared laughter of your family.
Essential Elements:
- A large mesh tote bag (for toys and sand-shedding)
- Talcum-free baby powder (for sand removal)
- Frozen water bottles (serve as ice packs, then drinks)
- Fitted bed sheet (to create a sand-free zone)
- Ziploc bags in various sizes for electronics and snacks
- Spray bottle filled with fresh water (for cooling and rinsing salt)
How to make it
- The Sand-Free Fortress: Instead of separate towels, bring an old fitted sheet. Place a heavy item (like a cooler or bag) in each of the four corners to stretch the sheet tight. The raised “walls” created by the elastic corners act as a barrier against blowing sand.
- Temperature Control: Fill your water bottles 2/3 full and freeze them upright overnight. In the morning, top them off with cold water. They will act as ice blocks for your fruit and sandwiches and melt slowly, providing ice-cold water all day long.
- The Powder Trick: Keep a container of baby powder in your car or bag. When it’s time to leave, sprinkle it on sandy legs and feet. The powder absorbs the moisture that makes sand stick, allowing it to be brushed off with a single swipe of your hand.
- Electronic Safety: Place your phone and car keys in a clear, quart-sized Ziploc bag. You can still use the touchscreen through the plastic, and it stays protected from both sand and salt spray. Pro tip: Blow a little air into the bag before sealing so it floats if it falls in the water.
- Cleanup Routine: Designate one “wet bag” for swimsuits and one mesh bag for toys. Give the mesh bag a good shake before putting it in the trunk to leave the beach at the beach. Rinse everyone off with a quick spray of fresh water from your spray bottle before the car ride home to prevent that “itchy” post-beach feeling.
How to Transform Your Sidewalk with Artistic Chalk Designs for Neighborhood Joy
![]()
Why we love this
Sidewalk chalk is the ultimate ephemeral art form, a bright burst of temporary color that turns a gray pavement into a communal gallery. We love the dusty, vibrant pigment on our fingertips and the way a simple drawing can make a stranger stop and smile during their morning walk. The texture of the chalk scraping against the rough concrete is oddly satisfying, and the way the colors pop after a light mist of water creates a stained-glass effect that is truly mesmerizing. It’s a low-stakes, high-reward way to spread a little bit of neighborhood magic, reminding us that art doesn’t have to be permanent to be powerful.
Essential Elements:
- High-pigment artist-grade chalk pastels
- Bucket of water and assorted paintbrushes
- Microfiber cloths (for blending and erasing)
- Painter’s tape (for crisp geometric edges)
- Kneeling pad for comfort
How to make it
- Preparation: Sweep the sidewalk thoroughly to remove loose grit. If the concrete is very hot, lightly mist it with water. Chalk adheres better and looks more vibrant on a slightly damp surface.
- Outline and Grid: Use a light-colored piece of chalk to sketch your basic shapes. If you are doing a large mural, use the “grid method” by drawing a series of squares to help keep your proportions accurate. For a modern look, use painter’s tape to create a “stained glass” frame.
- Layering Color: Don’t just draw lines; fill in areas with solid color. Apply the chalk heavily, then use a dry paintbrush or a microfiber cloth to blend the colors together. This creates a smooth, professional finish that looks like a painting rather than a scribble.
- The “Wet Chalk” Technique: Dip your chalk directly into a cup of water before drawing. This creates a creamy, paint-like consistency that dries into an incredibly bright, opaque layer. This is perfect for highlights or small details that need to stand out.
- Finishing Touches: Remove any painter’s tape while the chalk is still slightly damp for the sharpest lines. If you want the design to last through a light breeze (but still wash away with rain), you can lightly mist the finished work with a cheap, aerosol hairspray.
How to Style a Nostalgic Throwback Bedroom for the Ultimate Retro Aesthetic

Why we love this
Stepping into a retro-themed bedroom feels like a warm hug from the past, combining the bold, optimistic colors of the 70s with the cozy, tactile textures of vintage textiles. We love the juxtaposition of a shaggy orange rug against a sleek, mid-century walnut bed frame, and the way a spinning disco ball creates a constellation of light on the ceiling. The air feels lighter in a room filled with nostalgia, where every object—from a record player to a lava lamp—tells a story of a different era. It’s a design style that celebrates personality over perfection, inviting you to surround yourself with things that spark genuine, old-school joy.
Essential Elements:
- A warm color palette (mustard yellow, burnt orange, avocado green)
- Texture-rich fabrics (velvet, corduroy, macramé)
- Vintage-inspired lighting (mushroom lamps or neon signs)
- Curated wall art (vinyl records, retro travel posters)
- Natural wood furniture with tapered legs
How to make it
- Define Your Decade: Choose a primary influence (e.g., 60s Mod, 70s Boho, or 80s Pop). This keeps the room feeling cohesive rather than cluttered. Start with a neutral wall color like warm white to let your colorful accessories shine.
- Furniture Anchor: Sourcing a vintage bed frame or dresser is key. Look for pieces with clean lines and tapered wooden legs. If you can’t find authentic vintage, you can easily “retro-fit” modern furniture by replacing generic knobs with brass or colorful resin pulls.
- Textural Layering: This is where the “warmth” comes from. Layer a thick, shag rug over hardwood floors. Use velvet throw pillows in contrasting jewel tones and a chunky knit or macramé wall hanging to add depth to the space.
- The Sound and Light: A retro room is a vibe for all senses. Set up a dedicated vinyl listening station with a record player and a crate of your favorite albums. For lighting, replace harsh overhead bulbs with multiple small light sources—a mushroom lamp on the nightstand and a warm-toned LED strip behind the headboard.
- Curated Clutter: Display your collections! Use floating shelves to show off vintage cameras, colorful glass vases, or old-school alarm clocks. Pro tip: Group items in threes with varying heights to create a visually pleasing “vignette” that looks styled, not messy.
The Joy of a Hand-Crafted Life
At the end of the day, our homes are the shells we inhabit, and filling them with hand-crafted touches is how we make them truly our own. Whether you’re building a mud kitchen for your little ones or painting a patio for your next gathering, remember that the process is just as important as the result. I hope these projects inspire you to pick up a tool, try a new technique, and find the beauty in the sawdust and the sunsets. Happy creating!