
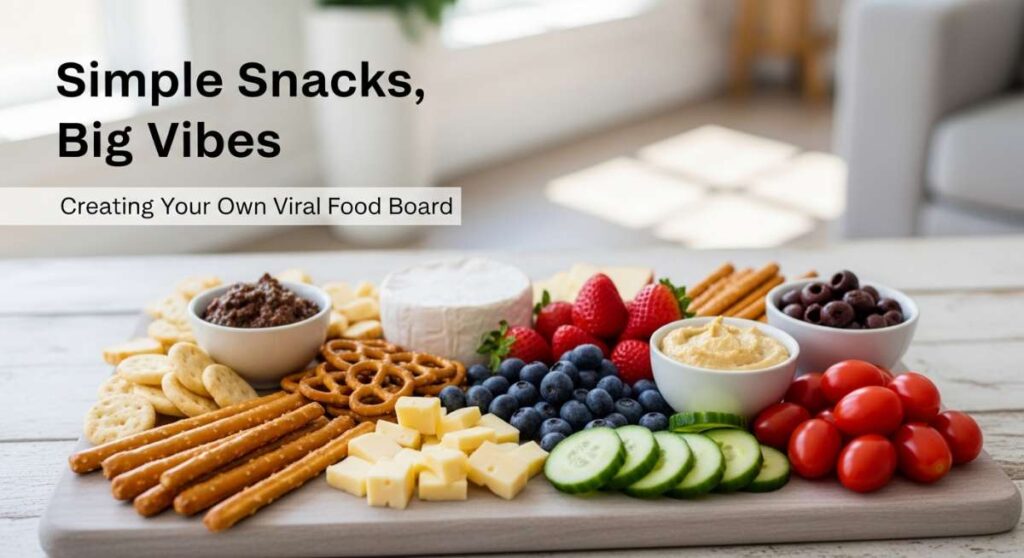
Simple Snacks, Big Vibes: Creating Your Own Viral Food Board
There is something inherently magical about a shared meal that isn’t quite a meal, but rather a curated collection of flavors, colors, and textures spread across a beautiful board. We’ve all seen them scrolling through our feeds—those effortless-looking platters that seem to hum with the energy of a perfect golden hour. They represent more than just food; they are an invitation to slow down, to graze, and to connect with the people we love in a way that feels both elevated and deeply relaxed.
Creating your own viral-worthy food board isn’t about professional culinary training; it’s about the ‘big vibes’ that come from mixing home-cooked staples with fresh, seasonal ingredients. Whether you’re hosting a backyard movie night or just treating yourself to a fancy Tuesday, the secret lies in the variety. From the warmth of a homemade pie to the savory kick of a classic dip, these elements come together to create a visual and literal feast that stays in your guests’ memories long after the last crumb is gone.
How to make strawberry pie?

Why we love this
This strawberry pie is the ultimate celebration of spring and summer, capturing the essence of sun-ripened berries in every bite. When you slice into it, the aroma of sweet, macerated fruit fills the air, while the bright red filling glistens like rubies against the pale, golden crust. The texture is a delightful contrast between the buttery, flaky pastry and the jammy, tender strawberries that melt in your mouth. It feels nostalgic and fresh all at once, making it the perfect centerpiece for a dessert-focused board.
Ingredients
- 2 pints fresh strawberries, hulled and halved
- 1 cup granulated sugar
- 3 tablespoons cornstarch
- 1/4 teaspoon salt
- 1 tablespoon lemon juice
- Double crust pie dough (homemade or store-bought)
- 1 egg (for egg wash)
- Turbinado sugar for topping
How to make it
- Begin by preparing your berries; ensure they are completely dry after washing so the filling doesn’t become watery. Toss them in a large bowl with sugar, cornstarch, salt, and lemon juice until evenly coated.
- Roll out your bottom pie crust on a lightly floured surface until it is about 12 inches in diameter. Carefully drape it over a 9-inch pie plate, pressing it gently into the corners without stretching the dough.
- Pour the strawberry mixture into the crust, mounding them slightly in the center to account for shrinkage during the baking process.
- Roll out the second piece of dough and either place it whole over the top (cutting vents for steam) or cut it into strips to create a lattice pattern for a more professional, viral look.
- Crimp the edges of the dough together to seal in the juices. Brush the top with a beaten egg wash and sprinkle generously with turbinado sugar for a crunchy, glittering finish.
- Place the pie on a parchment-lined baking sheet to catch any drips and bake in a preheated oven at 400°F (200°C) for 20 minutes, then reduce the heat to 375°F (190°C) and bake for another 35-45 minutes until the crust is deep golden brown and the filling is bubbling thick.
How to make rotel dip?
Why we love this
Rotel dip is the undisputed king of comfort appetizers, offering a creamy, velvety texture with just the right amount of spicy kick. The way the melted cheese wraps around the savory bits of sausage and tangy tomatoes creates a flavor profile that is addictive and universally loved. It’s the kind of dish that brings everyone to the center of the table, dipping chips with abandon while the steam rises from the bowl, carrying the spicy scent of green chilies and melted cheddar.
Ingredients
- 1 lb Velveeta cheese, cubed
- 1 can (10 oz) Ro*Tel Original Diced Tomatoes and Green Chilies
- 1 lb ground breakfast sausage or chorizo
- 1/2 cup whole milk (optional for consistency)
- Fresh cilantro for garnish
How to make it
- In a large skillet over medium-high heat, brown the ground sausage, breaking it into very small crumbles with a wooden spoon. Ensure it is cooked thoroughly until no pink remains and it has a slightly crispy texture.
- Drain the excess grease from the skillet carefully; leaving too much oil will result in a greasy dip.
- Lower the heat to medium-low and add the cubed Velveeta cheese and the entire can of Ro*Tel (do not drain the liquid from the can, as it provides essential flavor).
- Stir constantly with a heat-resistant spatula. The key here is low and slow heat; if the temperature is too high, the cheese will scorch or become grainy.
- As the cheese melts, add a splash of milk if you prefer a thinner, more pourable consistency. Continue stirring until the mixture is completely smooth and the sausage is evenly distributed.
- Once fully melted and steaming, transfer immediately to a pre-warmed serving bowl or a small slow cooker set to ‘warm’ to maintain that perfect silky texture throughout your gathering.
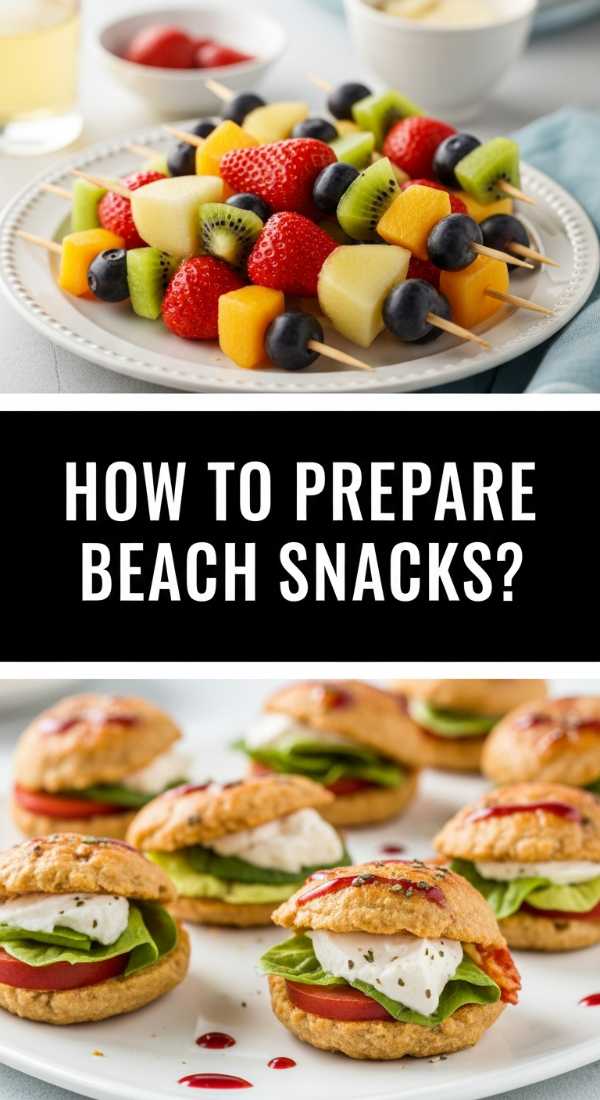
How to prepare beach snacks?
Why we love this
Beach snacks need to be resilient, refreshing, and incredibly easy to handle with sandy fingers. We love this approach because it focuses on hydrating fruits and salty bites that replenish your energy after a dip in the ocean. The combination of cold, crisp textures and portable packaging makes these snacks feel like a luxury picnic on the sand, turning a simple day at the shore into a gourmet experience under the sun.
Ingredients
- Frozen grapes and watermelon cubes
- Individual hummus cups
- Pre-cut cucumber and bell pepper strips
- Salted almonds or trail mix
- Sparkling water cans
- Hard cheeses (like aged cheddar)
How to make it
- Start the night before by washing and freezing grapes; they act as edible ice packs in your cooler and provide a refreshing burst of cold juice.
- Cut watermelon into thick batons rather than triangles; this makes them easier to grip and reduces the amount of rind you have to dispose of at the beach.
- Utilize airtight, stackable containers to prevent sand from infiltrating your food. Place heavier items like drinks at the bottom of the cooler and fragile items like fruit on top.
- Pre-portion your snacks into individual servings. This prevents ‘communal’ bags which are magnets for sand and helps keep the board clean when you lay it out on a flat surface or a cooler lid.
- Keep a separate ‘dry’ bag for items like crackers or nuts to ensure they stay crunchy despite the humidity of the ocean air.
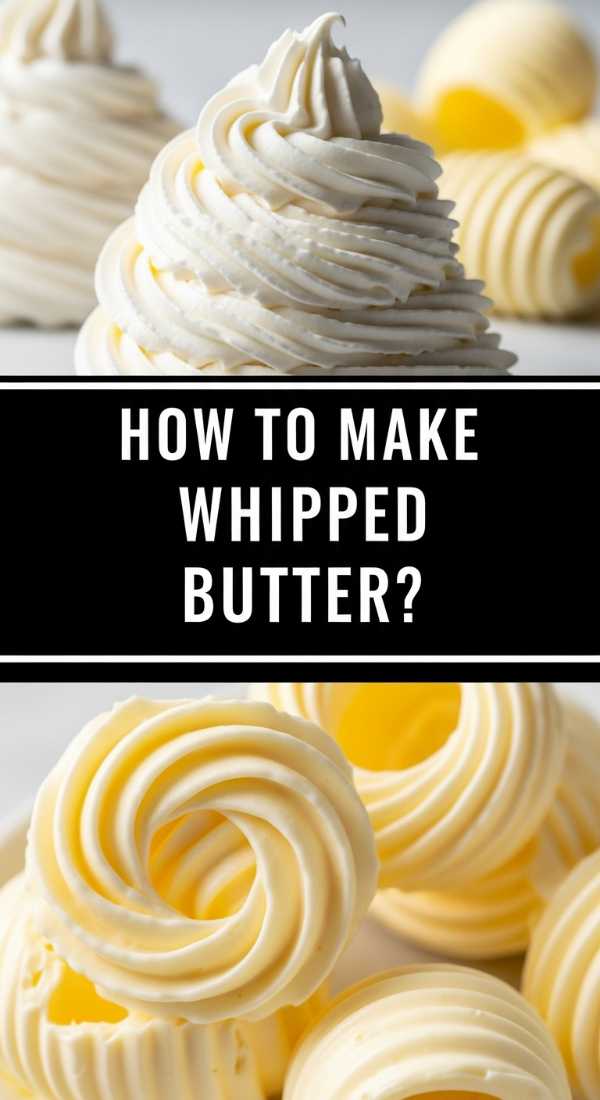
How to make whipped butter?
Why we love this
Whipped butter is a total game-changer for any food board, elevating a humble condiment into a cloud-like, decadent spread. The aeration process makes the butter light and incredibly easy to spread on even the softest breads without tearing them. It feels luxurious on the palate, melting instantly and releasing a rich, salty flavor that is far superior to standard cold butter. Plus, it looks absolutely stunning when piped or swirled into a bowl.
Ingredients
- 1 cup high-quality unsalted butter (softened to room temperature)
- 1/2 teaspoon flaky sea salt
- 2 tablespoons heavy cream or whole milk
- Optional: Honey or chopped herbs for flavoring
How to make it
- Ensure your butter is perfectly softened—not melted, but soft enough that a finger leaves an easy indentation. This is critical for achieving the right volume.
- Place the butter in the bowl of a stand mixer fitted with the whisk attachment (or use a hand mixer). Begin whipping on medium speed for about 2 minutes until the butter becomes pale and smooth.
- Increase the speed to high and slowly drizzle in the heavy cream and salt. The cream helps stabilize the air bubbles and adds a velvety richness.
- Continue whipping for another 3-5 minutes. You are looking for the butter to double in volume and take on a bright white, fluffy appearance similar to stiff whipped cream.
- If adding honey or herbs, fold them in gently by hand at the very end to maintain the airy structure. Serve immediately at room temperature for the best spreadability.
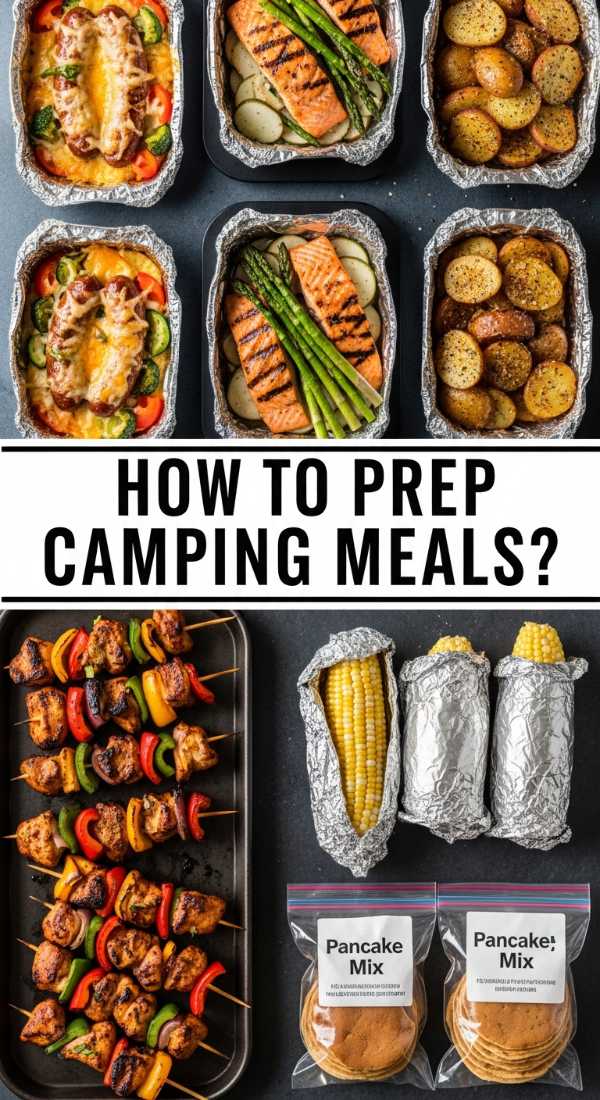
How to prep camping meals?
Why we love this
Camping meals bring a sense of adventure to the table, emphasizing hearty flavors and the smoky aroma of an open flame. There is something deeply satisfying about preparing food in the great outdoors, where the simplicity of the ingredients shines through. Prepping ahead of time allows you to enjoy the campfire vibes without the stress of complex cleanup, turning a rustic setting into a gourmet retreat.
Ingredients
- Pre-marinated steak or chicken skewers
- Foil packet potatoes (sliced with onions and butter)
- Pre-mixed pancake batter in a squeeze bottle
- Pre-washed and chopped veggies
- Heavy-duty aluminum foil
How to make it
- The secret to successful camping prep is the ‘marinate and freeze’ method. Place your proteins in vacuum-sealed bags with marinade and freeze them flat; they act as ice in your cooler and will be perfectly thawed and flavored by dinner time.
- Chop all vegetables at home and store them in reusable silicone bags. This eliminates the need for cutting boards and knives at the campsite, which can be a safety hazard in low light.
- Assemble foil packets for side dishes by placing sliced potatoes, butter, and seasonings on a large sheet of heavy-duty foil. Fold the edges tightly to create a steam-sealed environment.
- Label every container with the contents and the intended meal (e.g., ‘Friday Dinner’) using a waterproof marker so there’s no guesswork in the dark.
- Pack your cooler in reverse chronological order: the last meal goes on the bottom, and the first meal goes on top to minimize the time the lid stays open.
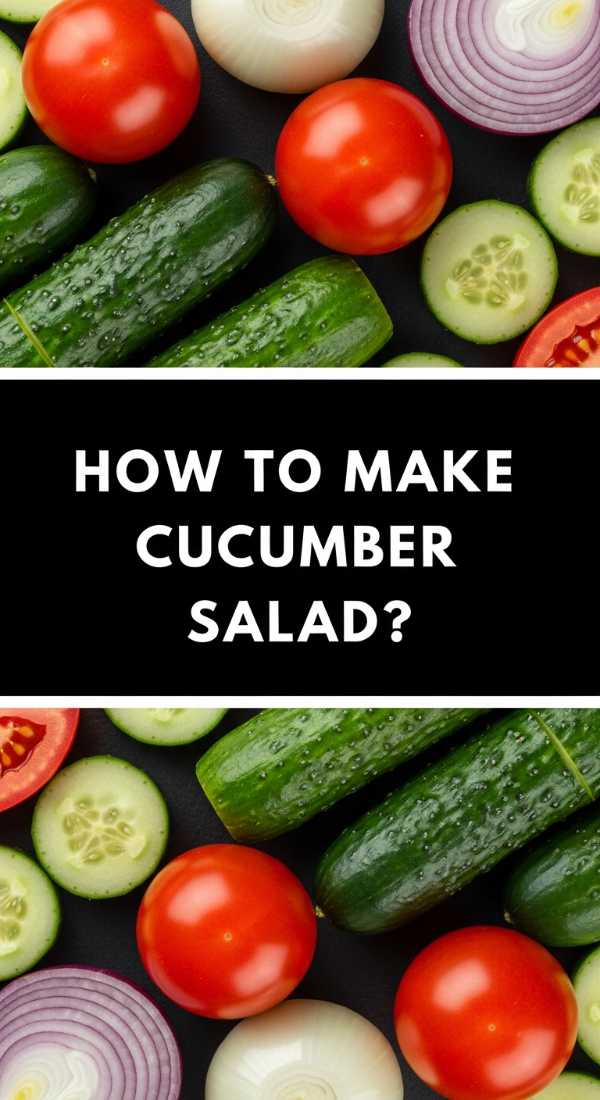
How to make cucumber salad?
Why we love this
This cucumber salad is the ultimate palate cleanser, offering a crisp, refreshing crunch that cuts through richer items on your food board. The aroma of fresh dill combined with the sharp tang of vinegar creates an intoxicatingly clean scent. It’s light, hydrating, and visually vibrant, with translucent green slices that look like stained glass when tossed in a light, acidic dressing. It’s the perfect ‘cool’ companion to a spicy dip or grilled meats.
Ingredients
- 2 large English cucumbers, thinly sliced
- 1/2 red onion, shaved into rings
- 1/2 cup rice vinegar
- 2 tablespoons sugar
- 1/2 cup fresh dill, chopped
- 1 teaspoon red pepper flakes
- Salt and pepper to taste
How to make it
- Using a mandoline slicer is highly recommended for this dish to ensure paper-thin, uniform slices of cucumber and onion, which allows the dressing to penetrate more effectively.
- Place the cucumber slices in a colander and sprinkle with a little salt. Let them sit for 10 minutes to draw out excess moisture, then pat them dry with a paper towel. This step ensures your salad remains crunchy rather than soggy.
- In a small glass bowl, whisk together the rice vinegar, sugar, and red pepper flakes until the sugar is completely dissolved.
- Combine the cucumbers, red onions, and fresh dill in a large mixing bowl. Pour the dressing over the top and toss gently with tongs.
- Refrigerate the salad for at least 30 minutes before serving. This ‘marinating’ time allows the flavors to meld and the cucumbers to slightly pickle, giving them a more complex flavor profile.
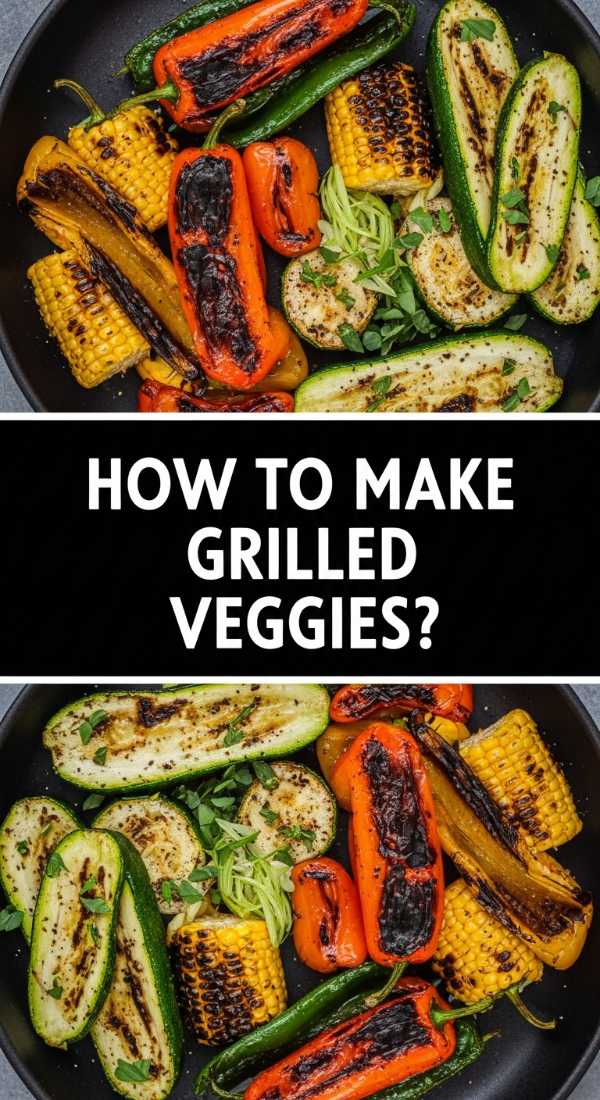
How to make grilled veggies?
Why we love this
Grilled vegetables bring a sophisticated, smoky depth to a food board that raw veggies simply can’t match. The high heat of the grill caramelizes the natural sugars in the produce, creating charred edges and a tender, juicy interior. The smell of fire-roasted peppers and zucchini is quintessentially summer, and the blackened grill marks add a rustic, professional aesthetic to your presentation that screams ‘viral food goals’.
Ingredients
- Bell peppers (red, yellow, orange), quartered
- Zucchini and yellow squash, sliced lengthwise
- Asparagus spears, trimmed
- Olive oil
- Balsamic glaze for drizzling
- Dried oregano and garlic powder
How to make it
- Preheat your grill to medium-high heat (around 400°F). Make sure the grates are clean and lightly oiled to prevent sticking.
- Toss all your prepared vegetables in a large bowl with a generous amount of olive oil, garlic powder, oregano, salt, and pepper. Ensure every piece is well-coated to facilitate even charring.
- Place the vegetables directly on the grates. Start with the denser veggies like peppers and squash, saving the delicate asparagus for last.
- Grill for 3-5 minutes per side. You are looking for distinct, dark grill marks while maintaining a slight ‘snap’ to the vegetable—overcooking will lead to mushiness.
- Remove from the grill and immediately drizzle with a high-quality balsamic glaze. The residual heat will help the glaze thicken and stick to the vegetables, creating a glossy, savory-sweet finish.
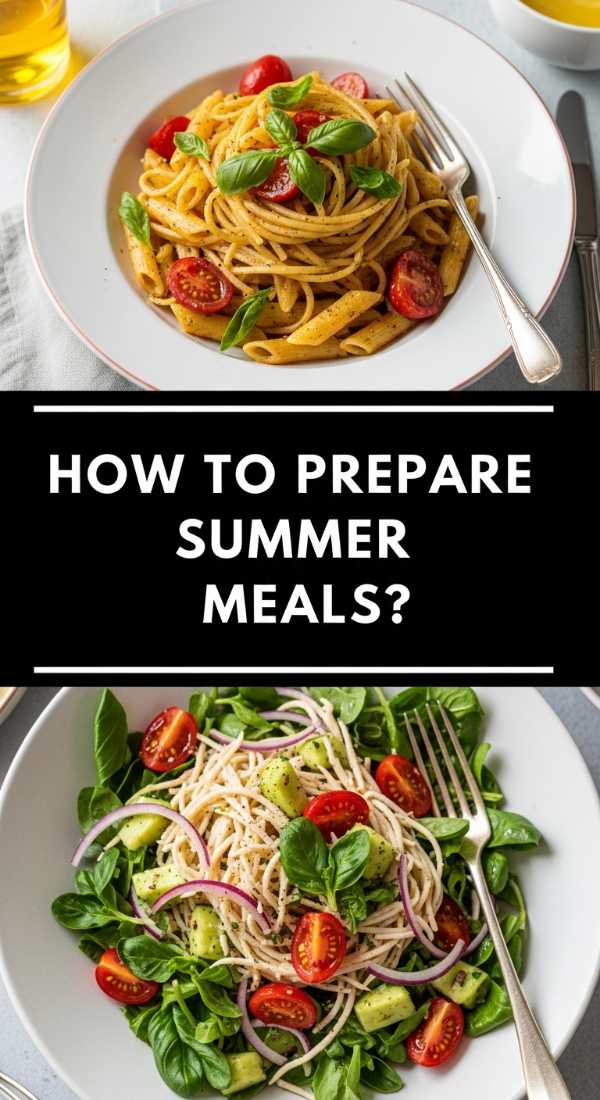
How to prepare summer meals?

Why we love this
Summer meals are all about celebrating the harvest and keeping the kitchen cool. We love this style of eating because it’s communal and bright, often requiring minimal cooking and maximum assembly. It’s about the joy of eating with your hands, the juice of a perfect peach running down your chin, and the vibrant colors of heirloom tomatoes. These meals feel effortless and light, perfect for those long, humid evenings where you want to linger at the table forever.
Ingredients
- Heirloom tomatoes and fresh mozzarella
- Prosciutto or cold cuts
- Fresh stone fruits (peaches, plums)
- Artisan sourdough bread
- Fresh basil and mint
- Extra virgin olive oil
How to make it
- Focus on sourcing. Since summer meals rely on raw ingredients, the quality of your produce is paramount. Visit a local farmer’s market for tomatoes that are heavy for their size and fragrant.
- Use ‘assembly-style’ preparation. Instead of plating individual portions, lay everything out on a large wooden board. Group items by color to create a visual gradient that looks stunning in photos.
- Slice bread into thick slabs and lightly toast them with a brush of olive oil. Rub a raw garlic clove over the toasted surface for a subtle, professional flavor boost.
- Incorporate fresh herbs as both a flavor component and a garnish. Scatter whole basil leaves and sprigs of mint across the board to add a pop of green and a fresh aroma.
- Keep dressings simple: a high-quality olive oil and a sprinkle of flaky sea salt are often all you need to highlight the peak-season flavors of the ingredients.
How to bake strawberry pie?

Why we love this
The act of baking a strawberry pie is a sensory journey that transforms raw dough and fruit into a masterpiece of golden pastry and bubbling jam. We love the transformation that happens in the oven—the way the kitchen begins to smell like toasted butter and sweet berries. Watching the crust turn from a pale cream to a rich, burnished gold is incredibly satisfying, and the sound of the filling gently sizzling as it thickens is the ultimate culinary ASMR.
Ingredients
- Prepared strawberry pie (see section 1)
- Baking sheet
- Aluminum foil (for crust shield)
- Timer
How to make it
- Placement is key for an even bake. Place your oven rack in the lower third of the oven. This ensures the bottom crust gets enough direct heat to bake through and become crisp, avoiding the dreaded ‘soggy bottom’.
- Preheat your oven thoroughly to 400°F. High initial heat is necessary to set the structure of the pastry and create those distinct, flaky layers.
- After the first 20 minutes of baking, slide a pie shield or a ring of aluminum foil over the edges of the crust. This prevents the thin edges from burning while the center continues to cook.
- Lower the oven temperature to 375°F. This allows the fruit filling to reach a full boil, which is necessary to activate the cornstarch thickener without over-baking the pastry.
- Check for doneness by looking for thick, slow-popping bubbles in the center of the pie. If the juices are thin and watery, it needs more time.
- Crucial Tip: Once baked, the pie must cool completely at room temperature for at least 4 hours. This allows the pectin and starch to set, ensuring you get a clean, viral-worthy slice instead of a fruit soup.
How to serve rotel dip?
[IMAGE_10]
Why we love this
Serving rotel dip is where the ‘big vibes’ truly come to life. We love it because it’s the ultimate social catalyst; it’s impossible to be formal when you’re all crowded around a bowl of warm, gooey cheese. The presentation can be elevated from a simple bowl to a focal point on your board by surrounding it with a rainbow of dipping options. It’s the warmth of the dish that provides a cozy, comforting anchor to the entire spread, making guests feel immediately at home.
Ingredients
- Prepared warm rotel dip (see section 2)
- Sturdy tortilla chips (lime-flavored is a plus)
- Sliced radishes and celery sticks for crunch
- Toasted baguette slices
- Optional toppings: Diced avocado, pickled jalapeños
How to make it
- Temperature control is the most important part of serving. Use a small crockpot or a ceramic fondue pot with a tea light underneath to keep the dip fluid. If it cools too much, it will thicken into a block.
- Choose your vessel wisely. A wide, shallow bowl is better than a deep, narrow one, as it allows more people to dip simultaneously and prevents ‘chip breakage’ at the bottom of the bowl.
- Create a ‘dipping station’ on your board. Arrange chips in a fan pattern on one side and fresh, cold veggies on the other to offer a variety of textures and calorie options.
- Top the dip right before serving with a sprinkle of fresh cilantro and a few slices of fresh jalapeño. This adds a professional ‘finished’ look and a hit of freshness.
- Provide small individual plates or napkins nearby, as cheesy dips can be messy. Having a dedicated spoon in the bowl allows guests to scoop dip onto their own plates if they prefer.
Conclusion
Building a viral food board is all about the balance between the ‘simple’ and the ‘sensational.’ By combining these ten elements—from the sweet crunch of a strawberry pie to the savory, melted heart of a rotel dip—you create a landscape of flavor that invites everyone to dig in. Remember, the best food boards aren’t perfect; they are abundant, messy, and filled with the things you actually love to eat. So, grab a board, start prepping, and let the big vibes roll!