
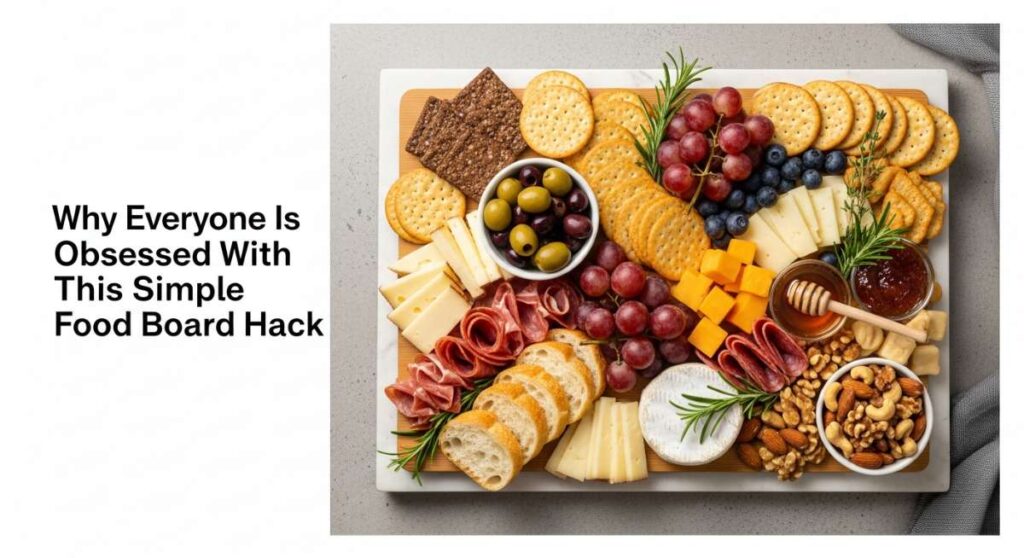
There is something undeniably magical about the way food brings people together, especially when it is served in a way that feels effortless yet abundant. Lately, my social media feeds have been exploding with this one simple food board hack that has completely changed how I entertain: the ‘Nostalgia Board.’ Instead of fancy, expensive cheeses no one can pronounce, we are leaning into the comfort foods that defined our childhoods and the easy, breezy snacks that make summer feel like forever.
I remember sitting around the kitchen table with my grandmother, watching her assemble simple ingredients into something that felt like a feast. This hack isn’t just about the food; it’s about the feeling of home. By arranging these classic dishes on a large wooden board, you create a visual tapestry of colors and textures that invites everyone to dig in, share stories, and linger just a little bit longer over a second helping of something delicious.
How to make Shoneys strawberry pie?

Why we love this
This pie is a literal slice of sunshine, boasting a vibrant, ruby-red glaze that catches the light and promises a burst of sweetness in every bite. We love the contrast between the crisp, buttery shortbread-style crust and the mountain of fresh, whole strawberries that remain plump and juicy underneath the gelatinous glaze. It smells like a field of berries in mid-July, and the cool, silky texture of the whipped cream topping provides a cloud-like finish that balances the tartness of the fruit perfectly.
Ingredients
- 9-inch pre-baked pie shell
- 1 quart fresh strawberries, hulled
- 1 cup granulated sugar
- 3 tablespoons cornstarch
- 1 cup water
- 3 ounces strawberry-flavored gelatin (like Jell-O)
- Whipped cream for garnish
How to make it
- Prepare your strawberries by washing them thoroughly, removing the green hulls, and patting them completely dry with a paper towel to ensure the glaze sticks properly.
- In a medium saucepan over medium heat, whisk together the sugar and cornstarch until no lumps remain, then slowly pour in the water while stirring constantly.
- Cook the mixture, stirring frequently, until it comes to a gentle boil; continue to cook for about 2-3 minutes until the liquid becomes thick and translucent.
- Remove the pan from the heat and immediately stir in the strawberry gelatin powder, whisking vigorously until the powder is fully dissolved and the color is a deep, uniform red.
- Allow the glaze to cool to room temperature (about 15-20 minutes) so it doesn’t wilt the berries, but don’t let it set completely.
- Arrange the whole strawberries tip-side up in the pre-baked pie shell, packing them tightly so there are no large gaps.
- Slowly pour the cooled glaze over the strawberries, ensuring every single berry is coated and the gaps are filled, then refrigerate for at least 4 hours until the pie is firm and set.
How to cook Rotel dip?

Why we love this
Rotel dip is the ultimate crowd-pleaser because it hits every sensory note: it’s salty, spicy, creamy, and incredibly savory all at once. The aroma of browned sausage mixed with melting cheese and zesty green chilies is enough to bring everyone running to the kitchen the moment the lid is lifted. It has a thick, velvety texture that clings perfectly to a tortilla chip, offering a satisfying crunch followed by a warm, gooey melt-in-your-mouth experience that is simply addictive.
Ingredients
- 1 pound ground breakfast sausage or ground beef
- 16 ounces Velveeta cheese, cubed
- 1 can (10 oz) Ro*Tel Diced Tomatoes and Green Chilies
- 1/2 cup whole milk (optional, for creaminess)
- Fresh cilantro for garnish
How to make it
- Place a large skillet or Dutch oven over medium-high heat and add the ground meat, breaking it up with a wooden spoon as it cooks until it is thoroughly browned and no pink remains.
- Carefully drain the excess fat from the pan to ensure the dip isn’t greasy, then return the pan to the stove over low heat.
- Add the cubed Velveeta cheese to the meat and stir constantly; the low heat is crucial here to prevent the cheese from scorching or becoming grainy.
- Pour in the can of Ro*Tel, including the liquid from the can, which provides that signature acidity and spice that cuts through the rich cheese.
- Continue stirring until the cheese is completely melted and smooth; if the dip feels too thick, whisk in a splash of milk until you reach your desired consistency.
- Transfer the dip to a small slow cooker on the ‘warm’ setting to keep it liquid and dippable throughout your gathering, garnishing with fresh cilantro just before serving.
How to pack beach snacks?

Why we love this
Packing the perfect beach snack board is an art form that transforms a simple day by the ocean into a luxury picnic. We love the tactical satisfaction of opening a sand-free container to reveal a rainbow of hydrating fruits, salty nuts, and chilled treats that feel like a reward after a swim. The smell of sea salt mixes with the scent of fresh cut watermelon and lime, creating a sensory memory of summer ease where everything is bite-sized, refreshing, and perfectly portioned for sharing.
Ingredients
- Hard-sided airtight containers
- Frozen grapes and watermelon chunks
- Individual hummus or dip cups
- Precut bell pepper strips and cucumbers
- Sturdy crackers or pita chips
- Reusable ice packs
How to make it
- Start by freezing your grapes and watermelon chunks the night before; these act as edible ice packs that stay cold for hours and provide a cooling burst of hydration.
- Select a heavy-duty, insulated cooler and place a layer of flat ice packs at the very bottom to create a cold foundation.
- Pack dense, heavy items like glass jars or heavy dip containers on the bottom, followed by your airtight snack boxes in the middle layer.
- Place delicate items like berries or soft crackers at the very top to prevent them from being crushed during transport.
- Use individual portions for dips like hummus or guacamole to prevent cross-contamination and ensure that sand doesn’t ruin the entire batch if one person has ‘sandy fingers.’
- Seal each container tightly and fill any remaining air gaps in the cooler with extra ice or frozen water bottles to maintain a consistent internal temperature.
How to whip creamy butter?
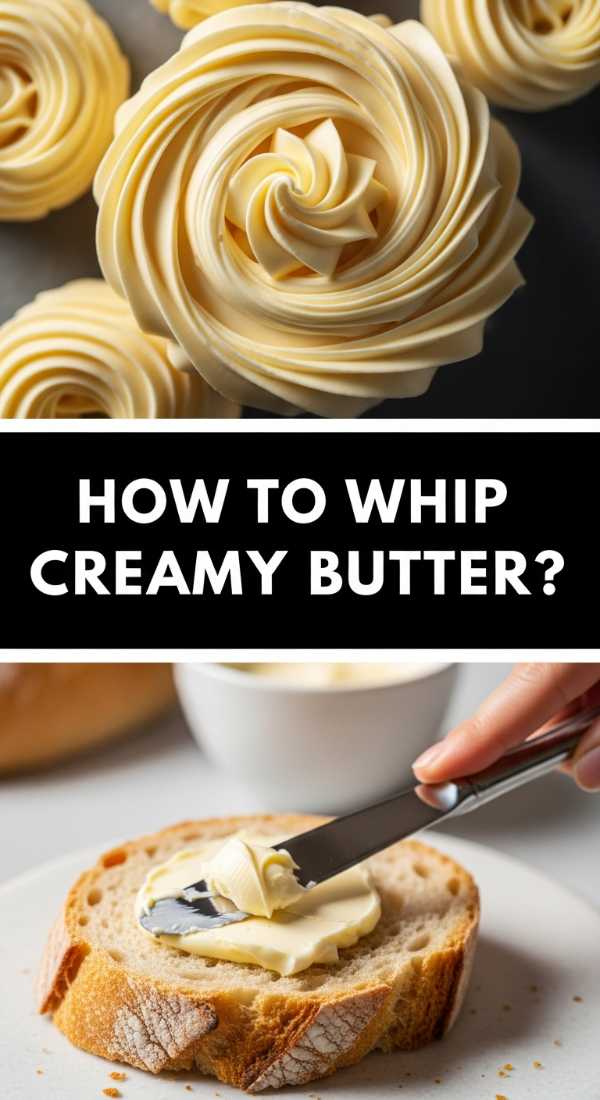
Why we love this
Whipped butter is a simple luxury that makes any piece of bread feel like a five-star meal, offering a light-as-air texture that literally dissolves on the tongue. There is something so satisfying about the way it spreads effortlessly without tearing your toast, smelling faintly of sweet cream and flaky sea salt. The mouthfeel is ethereal—voluminous, silky, and far more decadent than standard chilled butter, making it the perfect centerpiece for a breakfast or brunch-themed food board.
Ingredients
- 1 cup (2 sticks) high-quality unsalted butter, softened
- 2 tablespoons whole milk or heavy cream
- 1/2 teaspoon fine sea salt
- Optional: Honey or fresh herbs for flavoring
How to make it
- Ensure your butter is truly at room temperature; it should be soft to the touch but not melting, as this allows the air to be incorporated effectively.
- Place the softened butter in the bowl of a stand mixer fitted with the whisk attachment (or use a hand mixer in a deep bowl to avoid splatter).
- Start the mixer on low speed to break up the sticks, then gradually increase to high speed for about 2-3 minutes until the butter begins to look pale and fluffy.
- Slowly drizzle in the milk or heavy cream and add the salt; the liquid helps create that extra-creamy, spreadable texture that mimics restaurant-style butter.
- Continue whipping on high for another 2 minutes, stopping to scrape down the sides of the bowl with a spatula to ensure every bit of butter is aerated.
- Once the butter has doubled in volume and looks like stiff whipped cream, transfer it to a serving bowl or pipe it into small ramekins using a star tip for a beautiful presentation.
How to prep camping meals?
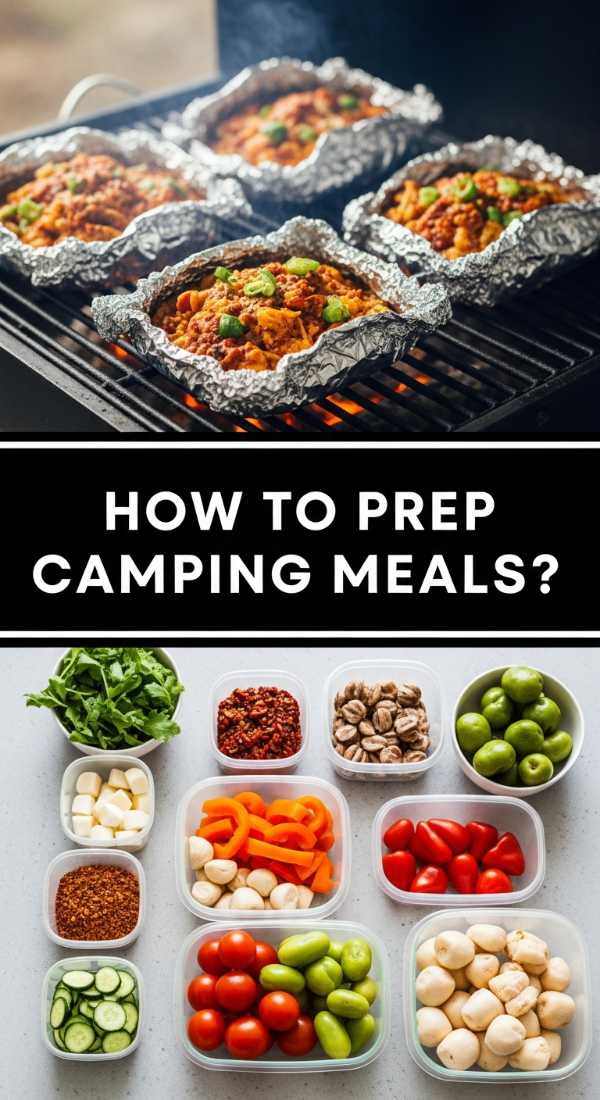
Why we love this
There is a rugged, primitive joy in eating a meal prepared over an open flame, surrounded by the scent of pine and woodsmoke. Prepping camping meals ahead of time takes the stress out of outdoor cooking, allowing you to focus on the crackle of the fire and the darkening sky rather than chopping onions in the dark. These meals are hearty, warming, and designed to satisfy the deep hunger that comes from a day of hiking, bringing a sense of accomplishment and coziness to the wilderness.
Ingredients
- Pre-marinated proteins (steak, chicken, or tofu)
- Chopped hardy vegetables (carrots, potatoes, onions)
- Heavy-duty aluminum foil or cast iron skillet
- Pre-mixed spice blends in small containers
- Cooking oil or butter
How to make it
- At home, chop all of your vegetables into uniform, bite-sized pieces so they cook evenly; hardy veggies work best as they won’t turn to mush in your cooler.
- Place your proteins in heavy-duty zip-top bags with marinade, ensuring all air is squeezed out; this allows the meat to tenderize while it travels to the campsite.
- Create ‘foil packets’ by placing a portion of meat and veggies onto a large square of foil, drizzling with oil, and seasoning generously before folding the edges into a tight seal.
- Label each packet with a permanent marker so you know exactly what’s inside without having to open them and release the cold air.
- Once at camp, wait for your fire to burn down to a bed of glowing coals rather than active flames, as this provides a more consistent, indirect heat.
- Place the foil packets directly on the grate or the edge of the coals, cooking for 15-20 minutes and flipping halfway through using long-handled tongs until the meat is cooked through and veggies are tender.
How to make cucumber salad?
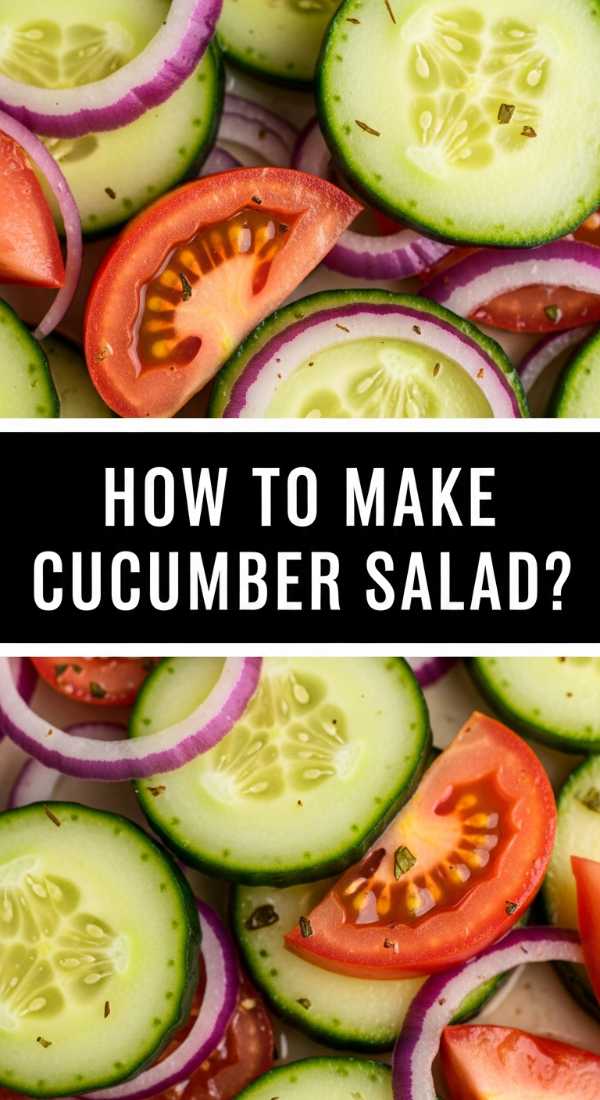
Why we love this
This salad is the definition of refreshing, acting as the perfect palate cleanser for a board filled with heavier, richer foods. The sharp, vinegary tang of the dressing combined with the cool, watery crunch of the cucumbers creates a sensation that is incredibly revitalizing on a hot afternoon. With the added aroma of fresh dill and the slight bite of red onion, it smells like a garden in bloom and looks beautiful with its translucent green slices and bright white flecks of onion.
Ingredients
- 2 large English cucumbers, thinly sliced
- 1/2 small red onion, thinly sliced into half-moons
- 1/2 cup white vinegar or apple cider vinegar
- 2 tablespoons granulated sugar
- 1 teaspoon salt
- 1/4 cup fresh dill, chopped
How to make it
- Wash the cucumbers and slice them very thinly using a mandoline or a sharp chef’s knife; English cucumbers are preferred because they have thinner skins and fewer seeds.
- Place the sliced cucumbers in a colander and sprinkle with a little salt, letting them sit for 10 minutes to draw out excess moisture; this ensures your salad stays crunchy and doesn’t become watery.
- In a small bowl, whisk together the vinegar, sugar, and salt until the sugar is completely dissolved to create your pickling liquid.
- Rinse the cucumbers slightly and pat them dry, then place them in a large mixing bowl along with the thinly sliced red onions and fresh dill.
- Pour the vinegar mixture over the vegetables and toss thoroughly to ensure every slice is coated in the dressing.
- Cover the bowl and refrigerate for at least 30 minutes before serving; this allows the flavors to meld and the onions to soften slightly while the cucumbers stay crisp.
How to grill fresh veggies?
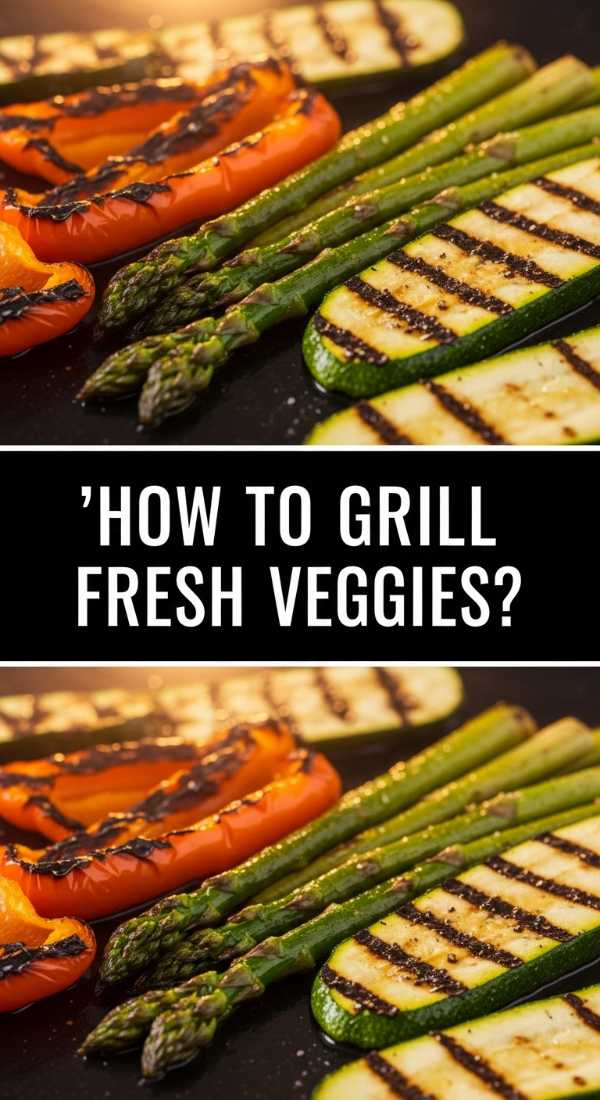
Why we love this
Grilled vegetables are a masterclass in flavor transformation, where the intense heat of the grill caramelizes the natural sugars in the produce to create a sweet, smoky profile that raw veggies simply can’t match. We love the visual appeal of those dark, distinct char marks against the bright oranges of peppers and deep greens of asparagus. The texture remains tender-crisp, offering a smoky aroma that signals the start of summer and pairs beautifully with any protein on your food board.
Ingredients
- Assorted vegetables (bell peppers, zucchini, asparagus, corn)
- 3 tablespoons olive oil
- 2 cloves garlic, minced
- 1 teaspoon dried oregano
- Salt and black pepper to taste
- Balsamic glaze for drizzling
How to make it
- Preheat your grill to medium-high heat (about 400°F) and ensure the grates are clean and lightly oiled to prevent sticking.
- Cut your vegetables into large, flat pieces or long spears; this provides more surface area for charring and prevents them from falling through the grill grates.
- In a large bowl, whisk together the olive oil, minced garlic, oregano, salt, and pepper, then toss the vegetables in the mixture until they are evenly coated.
- Place the hardiest vegetables, like corn or carrots, on the grill first as they take longer to cook, followed by the softer zucchini and peppers.
- Grill the vegetables for 3-5 minutes per side, using tongs to flip them only once you see deep, dark grill marks formed on the underside.
- Once the vegetables are tender but still have a slight bite, remove them from the heat and arrange them on your board, finishing with a light drizzle of balsamic glaze for a hit of acidity.
How to cook summer meals?

Why we love this
Summer meals are all about minimalism and letting high-quality, seasonal ingredients shine without over-complicating the process. We love the ease of a ‘no-cook’ or ‘low-heat’ approach that keeps the house cool while still providing a meal that feels vibrant and nourishing. The fragrance of basil, the sweetness of vine-ripened tomatoes, and the lightness of lemon zest define this style of cooking, creating dishes that feel as breezy and enjoyable as a sunset walk on the beach.
Ingredients
- Fresh seasonal produce (tomatoes, peaches, corn)
- Quick-cooking proteins (shrimp, thin-cut chicken, canned beans)
- Fresh herbs (basil, mint, cilantro)
- Citrus fruits for bright dressings
- Cold grains like quinoa or couscous
How to make it
- Focus on ‘assembly’ rather than ‘cooking’ by utilizing a base of pre-cooked grains or a large platter of fresh greens that require no heat at all.
- Incorporate a variety of textures—crunchy raw nuts, creamy cheeses, and juicy fruits—to make the meal feel complex and satisfying without heavy sauces.
- For proteins, use quick-sear methods like pan-frying shrimp for 2 minutes per side or using a rotisserie chicken to keep your kitchen cool.
- Always finish your summer dishes with a ‘bright’ element; a squeeze of fresh lemon juice or a splash of white wine vinegar wakes up the flavors of the produce.
- Utilize the ‘food board’ method by laying out all components—sliced baguette, a bowl of fruit, some grilled protein—and letting family members build their own plates.
- Serve everything at room temperature or slightly chilled, which is more refreshing when the outdoor temperature is high.
How to bake strawberry pie?

Why we love this
Unlike its chilled counterpart, a baked strawberry pie is a warm, comforting embrace of a dessert, featuring berries that have softened into a thick, jammy consistency. The aroma of bubbling fruit and toasted pastry filling the kitchen is pure nostalgia, evoking memories of Sunday dinners and family celebrations. The golden-brown, flaky crust provides a buttery, structural base that shatters deliciously with every forkful, releasing the deep, concentrated sweetness of the cooked berries.
Ingredients
- Double crust pie pastry (homemade or store-bought)
- 2 pounds fresh strawberries, sliced
- 3/4 cup granulated sugar
- 1/4 cup cornstarch
- 1 tablespoon lemon juice
- 1 egg (for egg wash)
- 1 tablespoon coarse sugar for topping
How to make it
- Preheat your oven to 400°F (200°C) and place a baking sheet on the bottom rack to catch any juices that might bubble over during the baking process.
- In a large bowl, gently toss the sliced strawberries with the sugar, cornstarch, and lemon juice; let them sit for 15 minutes to allow the juices to start flowing.
- Roll out your bottom pie crust and fit it into a 9-inch pie plate, then pour the strawberry mixture in, mounding it slightly in the center.
- Roll out the second crust and place it over the top, either as a solid piece with steam vents cut into it or as a decorative lattice for a professional look.
- Crimp the edges of the crust tightly to seal in the fruit, then brush the top of the pastry with a beaten egg and sprinkle with coarse sugar for a sparkly, crunchy finish.
- Bake for 45-55 minutes, or until the crust is a deep golden brown and the strawberry juices are thick and bubbling through the vents.
- Crucially, allow the pie to cool completely on a wire rack for at least 3-4 hours; this is essential for the filling to set so you don’t end up with a watery mess when you slice it.
How to make cheesy dip?

Why we love this
A warm cheesy dip is the ultimate anchor for any food board, providing a gooey, decadent center that everyone naturally gravitates toward. We love the sight of that first ‘cheese pull’ as a crusty piece of bread is lifted from the bowl, trailing strings of melted mozzarella and sharp cheddar. It smells of toasted garlic and rich dairy, and the flavor is a deep, savory hug that makes everything it touches—from pretzels to broccoli—taste like a celebration.
Ingredients
- 8 ounces cream cheese, softened
- 1 cup shredded sharp cheddar cheese
- 1 cup shredded mozzarella cheese
- 1/2 cup sour cream
- 1/2 teaspoon garlic powder
- 1/4 cup grated parmesan for the crust
How to make it
- Preheat your oven to 375°F (190°C) and lightly grease a small oven-safe baking dish or a cast iron skillet.
- In a medium mixing bowl, beat the softened cream cheese and sour cream together until smooth and free of lumps.
- Fold in the cheddar cheese, mozzarella, and garlic powder, ensuring the shredded cheese is evenly distributed throughout the creamy base.
- Spread the mixture into your prepared baking dish and sprinkle the top generously with the grated parmesan cheese.
- Bake for 20-25 minutes until the dip is bubbling around the edges and the cheese on top has melted into a golden-brown crust.
- For an extra-special finish, turn the broiler on for the last 2 minutes of cooking to create those sought-after toasted cheese spots on the surface.
- Serve immediately while the cheese is at its most molten and stretchy, surrounded by a variety of dippers on your board.
The Final Board Philosophy
At the end of the day, the obsession with the ‘Simple Food Board’ isn’t about being a master chef—it’s about the joy of variety and the beauty of shared experiences. Whether you are piling up a warm baked strawberry pie or a bowl of spicy Rotel dip, the goal is to create a space where everyone feels welcome to reach in and grab a bite. Life is busy, but these simple hacks allow us to slow down, enjoy the sensory delights of good food, and make memories that last long after the board is empty.