
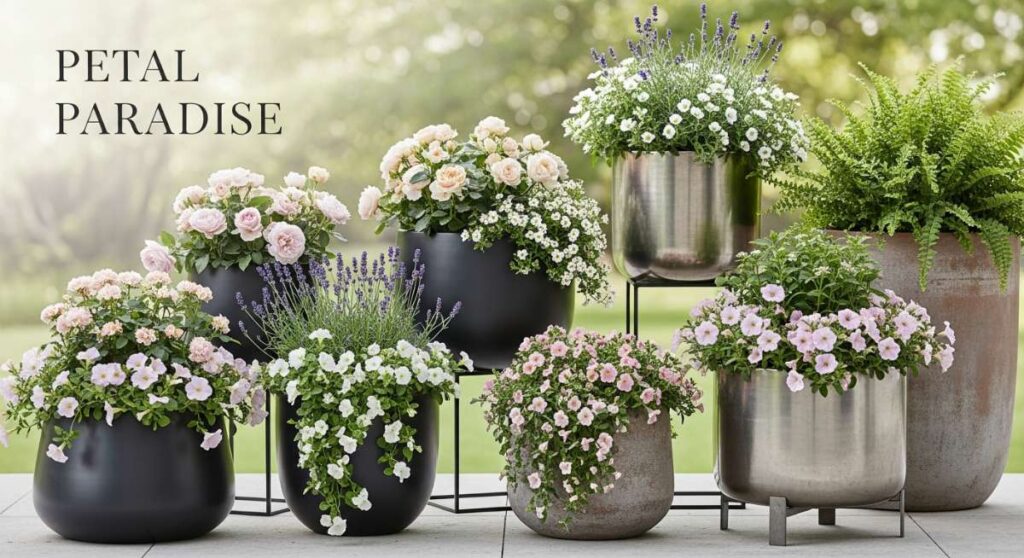
Petal Paradise: The Ultimate Guide to Dreamy Container Gardens
There is something inherently magical about waking up to the sight of a vibrant garden, even if you do not have acres of rolling hills. For many of us, the dream of a lush sanctuary feels out of reach in our bustling, concrete-filled lives, but I am here to tell you that your little slice of heaven is just a planter away. Container gardening has completely transformed my perspective on what it means to ‘grow home,’ turning my small balcony and sunny windowsills into a living, breathing tapestry of colors and scents that soothe my soul every single day.
Imagine stepping outside with your morning coffee, the steam rising to meet the cool, dew-kissed leaves of your very own urban oasis. It’s about the tactile joy of getting your hands in the dirt, the anticipation of seeing a new bud unfurl, and the quiet pride of harvesting your own herbs for a sunset dinner. Whether you are a seasoned green thumb or a total beginner, this guide is designed to help you curate a petal-filled paradise that reflects your unique style and brings a touch of whimsical nature into your daily routine. Let’s dig in together and turn those gray corners into a flourishing escape!
How to Create a Lush Urban Patio for Peaceful Mornings
Why we love this
There is nothing quite like the soft rustle of leaves against a backdrop of city sounds to ground you in the present moment. We love this urban patio setup because it transforms a cold, concrete space into an intimate retreat where time seems to slow down completely. The sensory experience of brushing against fragrant leaves while the morning sun warms your skin creates a meditative atmosphere that is essential for modern wellness. It’s not just a garden; it’s a sanctuary where you can reclaim your peace before the day begins, surrounded by the cooling greens and textures of a carefully curated plant family.
Essential Elements:
- Large, weather-resistant resin or ceramic planters.
- A mix of tall privacy plants like Bamboo or Areca Palms.
- Soft, textured low-growers like Ferns or Hostas.
- Comfortable outdoor seating with weather-proof cushions.
- Outdoor rugs and string lights for ambiance.
How to make it
- Begin by thoroughly cleaning your patio surface to remove dust and debris, creating a fresh canvas for your greenery.
- Strategically place your largest containers in the corners or along the perimeter to create a sense of privacy and ‘walls’ for your outdoor room.
- Fill the bottom third of large pots with lightweight filler (like recycled plastic bottles) to save on soil costs and keep the pots movable, then top with high-quality potting mix.
- Install your focal point plants first, ensuring the root ball is level with the soil surface and gently teasing out any bound roots to encourage outward growth.
- Layer in your ‘fillers’ around the base of the tall plants, choosing varieties with contrasting textures, such as the delicate fronds of a fern against the broad leaves of a hosta.
- Water each container deeply until moisture runs out of the drainage holes, ensuring the soil settles around the roots and eliminates air pockets.
- Finalize the space by arranging your furniture toward the best view of your plants, adding a small table for your coffee or tea.
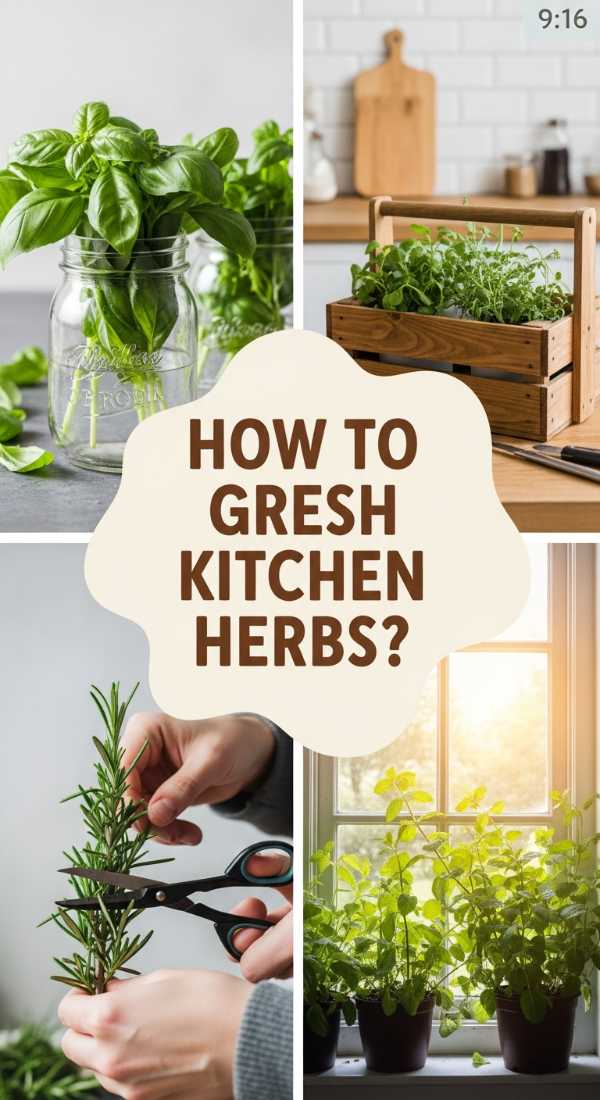
How to Grow Fresh Kitchen Herbs for Gourmet Home Cooking
Why we love this
The aroma of freshly crushed basil or the woody scent of rosemary wafting through a kitchen is the ultimate luxury for any home chef. We adore this kitchen herb garden because it bridges the gap between the garden and the plate, elevating simple meals into gourmet experiences with zero effort. There is a profound sense of satisfaction in snipping a handful of vibrant mint for a mojito or cilantro for a spicy salsa right when you need it. These tiny pots of green not only brighten your windowsills with their lush foliage but also fill your home with an organic, clean fragrance that store-bought extracts can never replicate.
Essential Elements:
- Terra cotta pots with saucer trays.
- Culinary herb starters: Basil, Mint, Parsley, Thyme, and Rosemary.
- Organic herb-specific potting soil.
- A sunny windowsill or a dedicated grow light.
- Precision pruning shears.
How to make it
- Select a location that receives at least 6 to 8 hours of bright, direct sunlight; south-facing windows are usually the gold standard for indoor herbs.
- Soak your terra cotta pots in water for an hour before planting to prevent the clay from wicking all the moisture away from the soil immediately.
- Fill each pot with organic soil, leaving about an inch of space from the rim to allow for easy watering without overflow.
- Remove the herb starts from their nursery containers, gently massaging the roots if they are circling the bottom to stimulate new growth.
- Place the herb in the center, firming the soil around it just enough to provide support without over-compacting the earth, which can suffocate delicate roots.
- Group ‘thirsty’ herbs like Mint and Basil together, and ‘dry-loving’ Mediterranean herbs like Rosemary and Thyme in separate areas to customize your watering schedule.
- Prune the top inch of your herbs regularly—just above a leaf node—to encourage bushy growth rather than ‘leggy’ stalks, ensuring a constant supply of fresh leaves.
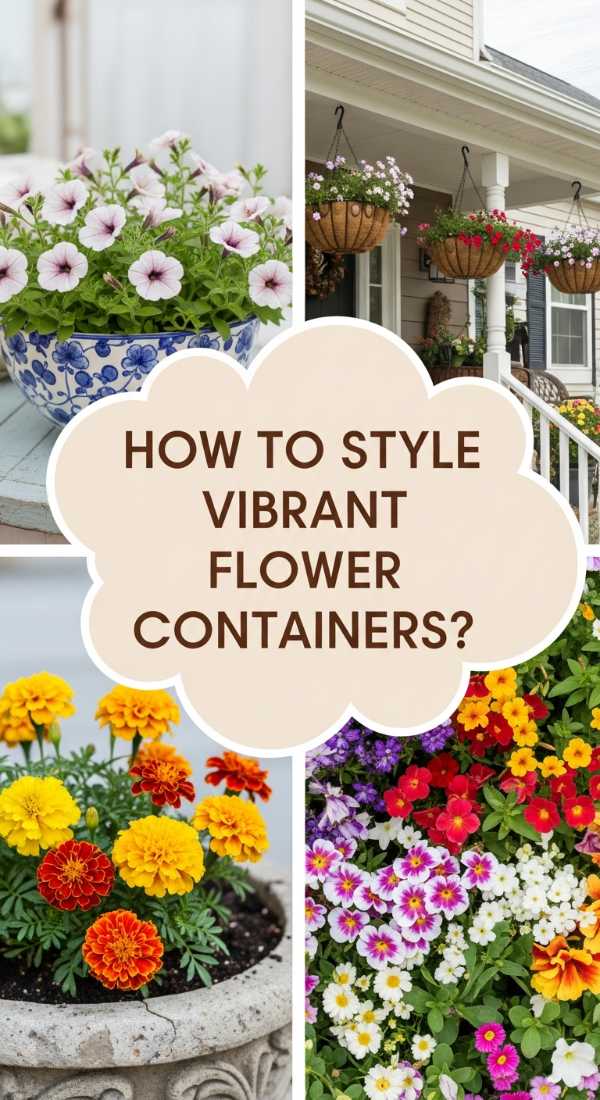
How to Style Vibrant Flower Containers for Stunning Curb Appeal
Why we love this
First impressions are everything, and nothing says ‘welcome home’ quite like a riot of color flanking your front door. We love this approach because it allows for high-impact visual storytelling that changes the entire mood of your home’s exterior. The sight of trailing petunias and bold geraniums creates an instant boost in curb appeal, making your home feel cared for and vibrant. The way the colors catch the afternoon light provides a joyful greeting every time you pull into the driveway, and the sweet perfume of blooming flowers invites neighbors to stop and admire the beauty you’ve cultivated.
Essential Elements:
- Matching statement urns or decorative wooden barrels.
- Thriller plants: Purple Fountain Grass or Canna Lilies.
- Filler plants: Geraniums, Marigolds, or Petunias.
- Spiller plants: Sweet Potato Vine or Creeping Jenny.
- Slow-release flowering fertilizer.
How to make it
- Choose containers that complement your home’s architecture; for example, sleek black urns for a modern look or rustic barrels for a farmhouse vibe.
- Utilize the ‘Thriller, Filler, Spiller’ design method for a professional, multi-dimensional look that fills the entire visual field of the pot.
- Plant your ‘Thriller’ (the tallest, most dramatic plant) in the center or slightly toward the back of the pot to establish the height and structure.
- Surround the thriller with ‘Fillers’—mid-height mounding flowers—ensuring you pack them tightly enough to look lush but with enough room to breathe.
- Position your ‘Spillers’ at the edges of the container, tilting them slightly outward so they naturally begin to drape over the sides of the pot.
- Incorporate a high-potash slow-release fertilizer into the top inch of soil to ensure your blooms stay vibrant and plentiful throughout the entire season.
- Deadhead (remove) spent blooms every few days to signal to the plant that it should continue producing new flowers instead of shifting its energy to seed production.
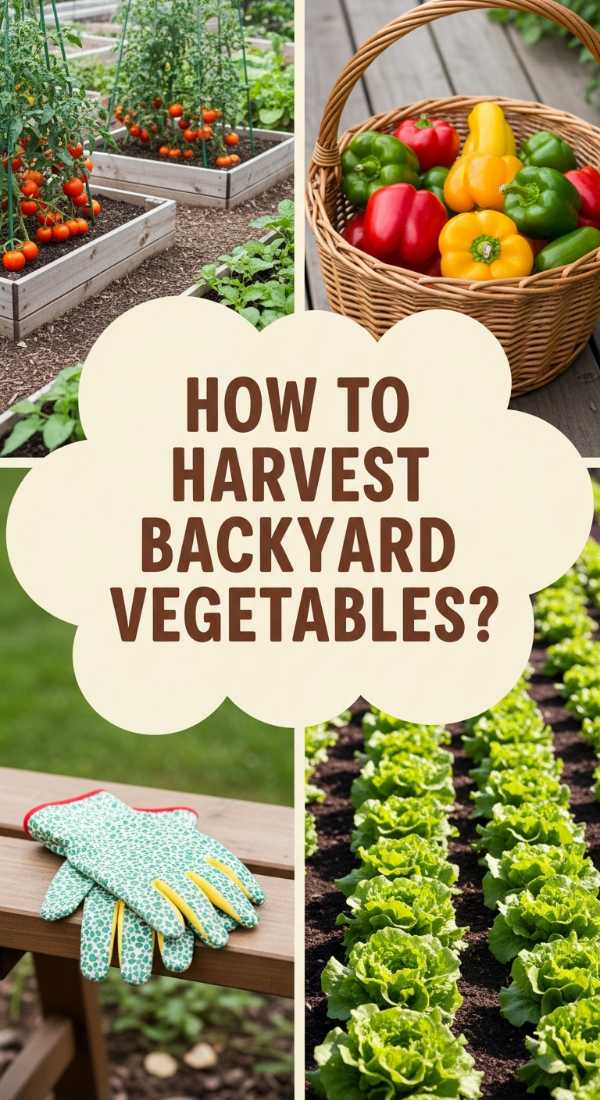
How to Harvest Backyard Vegetables for Healthy Family Dinners
Why we love this
There is a unique kind of magic in showing your family exactly where their food comes from, right in the comfort of your backyard. We love container vegetable gardening because it makes the ‘farm-to-table’ lifestyle accessible to everyone, regardless of yard size or soil quality. The taste of a sun-warmed tomato, plucked seconds before being sliced into a salad, is a revelation of sweetness and texture that you simply cannot find in a supermarket. It turns dinner time into an interactive event, fostering a deep connection to the earth and a genuine appreciation for the nutrition provided by home-grown harvests.
Essential Elements:
- Deep, 5-gallon containers or fabric grow bags.
- Vegetable starts: Cherry Tomatoes, Bell Peppers, and Kale.
- Support structures like tomato cages or bamboo stakes.
- Nutrient-rich vegetable compost blend.
- A consistent water source or drip irrigation system.
How to make it
- Choose the deepest pots available, as most vegetables require significant root space to produce high yields and remain stable during heavy fruit production.
- Mix a generous amount of organic compost into your potting soil to provide the heavy-feeding vegetables with the nitrogen and minerals they crave.
- For tomatoes, plant the starts deep—covering the bottom few inches of the stem with soil—as this encourages extra root growth along the buried stem for a stronger plant.
- Install your cages or stakes immediately after planting; waiting until the plant is large can damage the sensitive root system when you try to force the stakes down.
- Water at the base of the plants, avoiding the leaves, to prevent fungal diseases that often plague backyard vegetable gardens in humid weather.
- Monitor for pests daily, checking the undersides of leaves for eggs or small insects, and treat with organic neem oil at the first sign of trouble.
- Harvest your vegetables as soon as they reach peak ripeness to encourage the plant to keep producing more fruit for your family to enjoy.
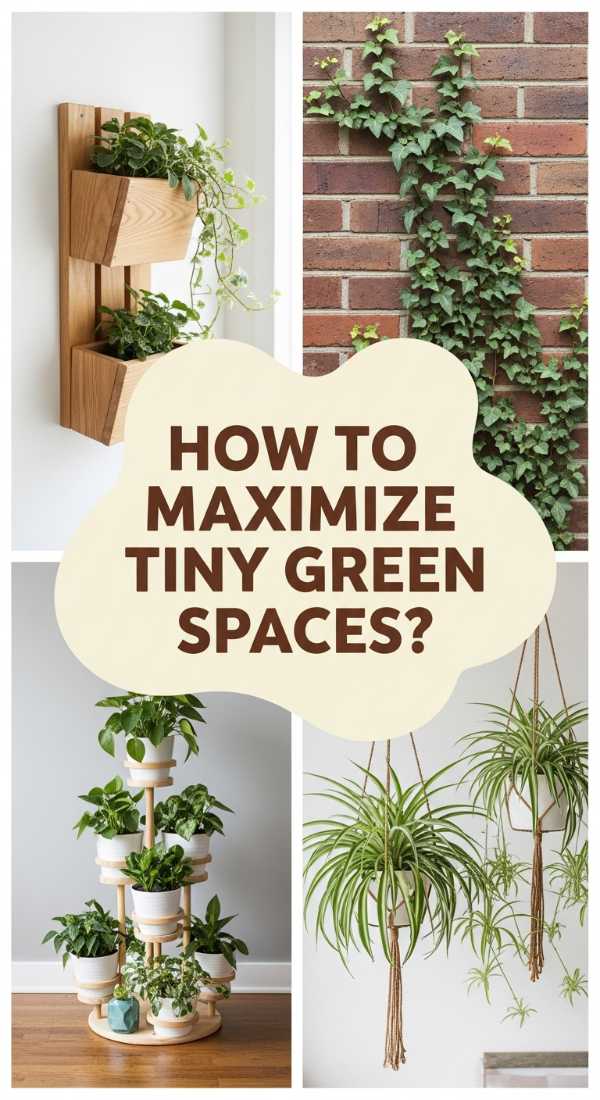
How to Maximize Tiny Green Spaces for Vertical Beauty

Why we love this
Vertical gardening is the ultimate ‘life hack’ for small-space living, turning blank walls into living tapestries of green. We love this technique because it defies the limitations of floor space, allowing you to grow a lush jungle even on the tiniest balcony or patio. The visual impact of a vertical garden is breathtaking, drawing the eye upward and making a small area feel much larger and more immersive. It’s like living inside a work of art, where the textures of climbing ivy and the delicate blooms of jasmine create a private, shaded cocoon that protects you from the outside world.
Essential Elements:
- Wall-mounted planters or a tiered shelving unit.
- Climbing plants: Star Jasmine, English Ivy, or Clematis.
- Lightweight potting mix with perlite.
- Heavy-duty wall anchors and hooks.
- Trellises or wire mesh for support.
How to make it
- Identify a sturdy wall or fence that can support the combined weight of wet soil and growing plants; use a stud finder if mounting to a building exterior.
- Install your vertical structure, whether it’s a series of individual wall pockets, a wooden trellis, or a metal grid, ensuring everything is level and secure.
- Select plants with naturally vining or cascading habits; these will naturally fill the vertical space without requiring constant manual intervention.
- When planting in wall pockets, use a lightweight mix to reduce the total load on the mounting hardware while maintaining excellent drainage.
- Gently weave the initial stems of your climbers through the trellis or wire, using soft garden ties to secure them until they develop their own tendrils or grip.
- Implement a top-down watering strategy, as the upper levels of a vertical garden will often drain into the lower levels, preventing over-saturation at the bottom.
- Prune aggressively at the start of the growing season to encourage the plant to branch out laterally, filling the entire vertical surface for a ‘wall of green’ effect.
How to Design Hardy Succulent Displays for Effortless Style

Why we love this
Succulents are the ‘cool kids’ of the plant world, offering an architectural, modern aesthetic that fits perfectly into a busy lifestyle. We love these displays because they prove that style doesn’t have to be high-maintenance; their thick, waxy leaves and incredible geometric shapes look like living sculptures. The dusty blues, muted pinks, and deep greens of a succulent arrangement provide a sophisticated color palette that feels both desert-chic and incredibly calming. They are the perfect solution for those of us who might forget to water occasionally but still crave the organic beauty of a flourishing garden.
Essential Elements:
- Shallow concrete, stone, or ceramic bowls.
- A variety of succulents: Echeveria, Jade, Haworthia, and Sedum.
- Specialized cactus and succulent gritty soil mix.
- Decorative top-dressing like pea gravel or river stones.
- A small spray bottle or a long-necked watering can.
How to make it
- Ensure your container has at least one large drainage hole; if not, use a masonry bit to carefully drill one, as succulents will rot quickly in standing water.
- Fill the container with a gritty, fast-draining soil mix specifically designed for cacti; never use standard moisture-retaining potting soil for succulents.
- Plan your arrangement on a flat surface first, placing the largest ‘hero’ succulent off-center for a more natural, artistic look.
- Plant your succulents close together for an instant ‘carpet’ effect, but be careful not to bury the bottom leaves, which can lead to moisture trap and rot.
- Once planted, use a small brush to sweep away any stray soil from the delicate leaves to keep the display looking pristine and professional.
- Add a layer of decorative stones over the soil surface; this not only looks beautiful but also keeps the succulent leaves off the damp soil.
- Wait at least a week before the first watering to allow any roots damaged during the move to callous over and heal.
How to Build a Charming Cottage Garden for Whimsical Vibes
Why we love this
A cottage garden is the floral equivalent of a warm hug—it’s messy, romantic, and utterly charming. We love this style because it embraces imperfection, encouraging a wild, overflowing abundance that feels like it stepped out of a storybook. The mix of heights, the bees buzzing between foxgloves, and the scent of lavender on the breeze create a sensory experience that is purely nostalgic. It’s a celebration of nature’s exuberance, where every pot tells a story and the ‘more is more’ philosophy leads to a breathtaking, whimsical landscape that feels deeply personal and lived-in.
Essential Elements:
- Weathered terra cotta pots in varying sizes.
- Classic cottage flowers: Lavender, Foxgloves, Snapdragons, and Roses.
- Natural mulch like shredded bark or straw.
- Vintage garden ornaments or a small birdbath.
- Organic liquid bloom booster.
How to make it
- Group your pots in clusters rather than neat lines to create the ‘overflowing’ look characteristic of a classic English cottage garden.
- Use pots of varying heights—propping some up on bricks or inverted pots—to create layers of color that mimic a traditional garden border.
- Select a mix of perennials (like Roses) and self-seeding annuals to ensure the garden feels dynamic and ever-changing throughout the spring and summer.
- Plant densely; in a cottage garden, you want the foliage of one plant to touch the next, hiding the soil and creating a lush, seamless tapestry.
- Incorporate scented plants near seating areas or walkways so the fragrance is released whenever you brush past or sit down to enjoy the view.
- Apply a layer of organic mulch to the top of the pots to retain moisture and provide a rustic, finished look that ties the various containers together.
- Let some of your flowers go to seed at the end of the season; this adds to the ‘wild’ aesthetic and can often lead to surprise seedlings next year.
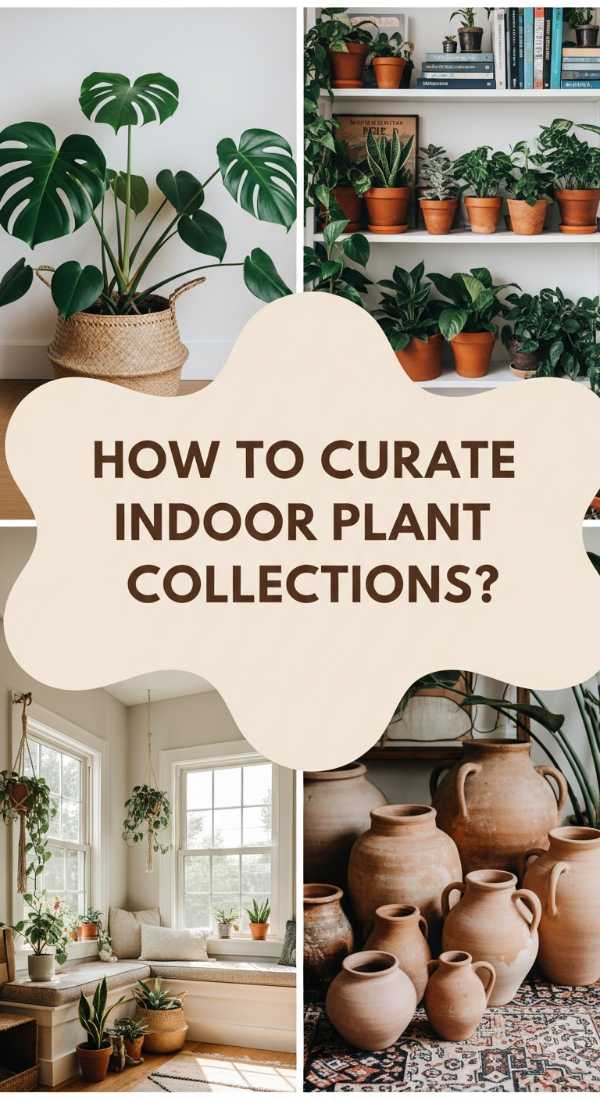
How to Curate Indoor Plant Collections for a Refreshing Home Sanctuary
Why we love this
Bringing the outdoors in is the ultimate way to refresh your home’s energy and improve your indoor air quality. We love an indoor plant sanctuary because it breathes life into every corner, from the bedroom to the home office, creating a calming ‘green screen’ against the digital world. The lush, broad leaves of a Monstera or the delicate trails of a Pothos soften hard interior lines and make a house feel like a home. It’s a living decor that grows with you, providing a sense of companionship and a quiet, leafy presence that reduces stress and sparks creativity every single day.
Essential Elements:
- Stylish indoor planters (ceramic, woven baskets, or mid-century stands).
- Low-light to bright-light plants: Snake Plant, Monstera, Pothos, and Calathea.
- High-quality indoor potting mix with extra drainage.
- Microfiber cloths for leaf cleaning.
- A humidity tray or mister.
How to make it
- Assess the light levels in each room—taking note of where the sun hits at different times of day—to match the right plant to the right environment.
- Repot new plants into containers that are 1-2 inches wider than their nursery pots, using a mix that contains perlite to ensure the roots stay oxygenated.
- For plants in decorative baskets, keep them in their plastic nursery liners and use a saucer inside the basket to prevent water damage to your floors or furniture.
- Create ‘plant communities’ by grouping several pots together; this not only looks great but also creates a micro-climate of higher humidity which many indoor plants love.
- Wipe the leaves of your plants once a month with a damp microfiber cloth to remove dust, which allows the plant to photosynthesize more efficiently and look its best.
- Rotate your plants a quarter-turn every time you water them to ensure even growth and prevent them from leaning too heavily toward the light source.
- Check the soil moisture with your finger before watering; most indoor plants prefer to dry out slightly rather than sit in constantly soggy soil.
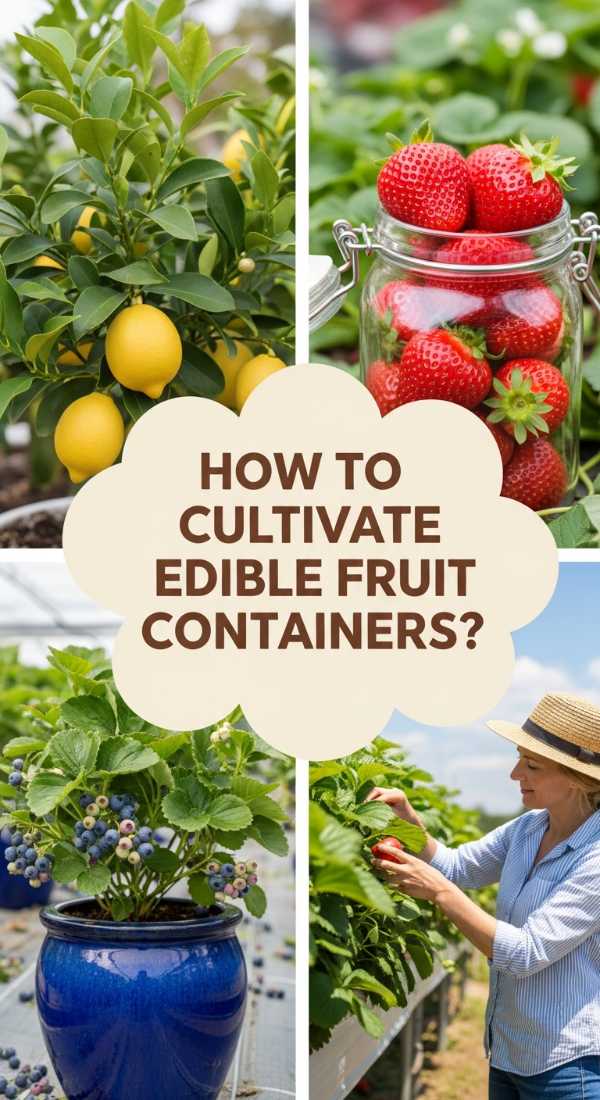
How to Cultivate Edible Fruit Containers for Sweet Summer Treats
Why we love this
There is nothing more rewarding than picking fruit from your own ‘orchard’ on a sunny afternoon. We love edible fruit containers because they make harvesting dwarf citrus or sweet strawberries possible even on a balcony. The sight of tiny white blossoms turning into bright berries or lemons is a beautiful process to witness, and the flavor of tree-ripened fruit is infinitely superior to anything from a store. These plants provide a double benefit: they are stunningly beautiful with their glossy leaves and fragrant flowers, and they reward your care with healthy, delicious treats that feel like a gift from the garden.
Essential Elements:
- Dwarf fruit tree varieties: Meyer Lemon, Calamondin Orange, or Patio Peach.
- Strawberry starts (Ever-bearing varieties are best).
- Potting soil with a slightly acidic pH (for citrus and berries).
- High-potassium organic fruit fertilizer.
- Large, heavy pots to prevent tipping in the wind.
How to make it
- Select ‘dwarf’ or ‘columnar’ varieties specifically bred for container living; standard fruit trees will quickly outgrow a pot and fail to produce fruit.
- Choose a location with maximum sun exposure—fruit trees generally need at least 8 to 10 hours of direct light to develop the sugars needed for sweet fruit.
- When planting, ensure the ‘graft union’ (the bump on the lower trunk) remains well above the soil line to prevent the tree from rotting or reverting to the rootstock.
- Feed your fruit-bearing plants regularly during the growing season with a specialized organic fertilizer, as they use a tremendous amount of energy to produce fruit.
- For strawberries, use a ‘strawberry jar’ with multiple side pockets to maximize space and keep the berries off the damp soil where they might rot.
- If you are growing indoors or on a screened porch, you may need to ‘be the bee’ and hand-pollinate blossoms using a small paintbrush to ensure fruit set.
- Prune your fruit trees in the late winter to maintain their shape and remove any ‘suckers’—small shoots growing from the base of the tree that drain energy.
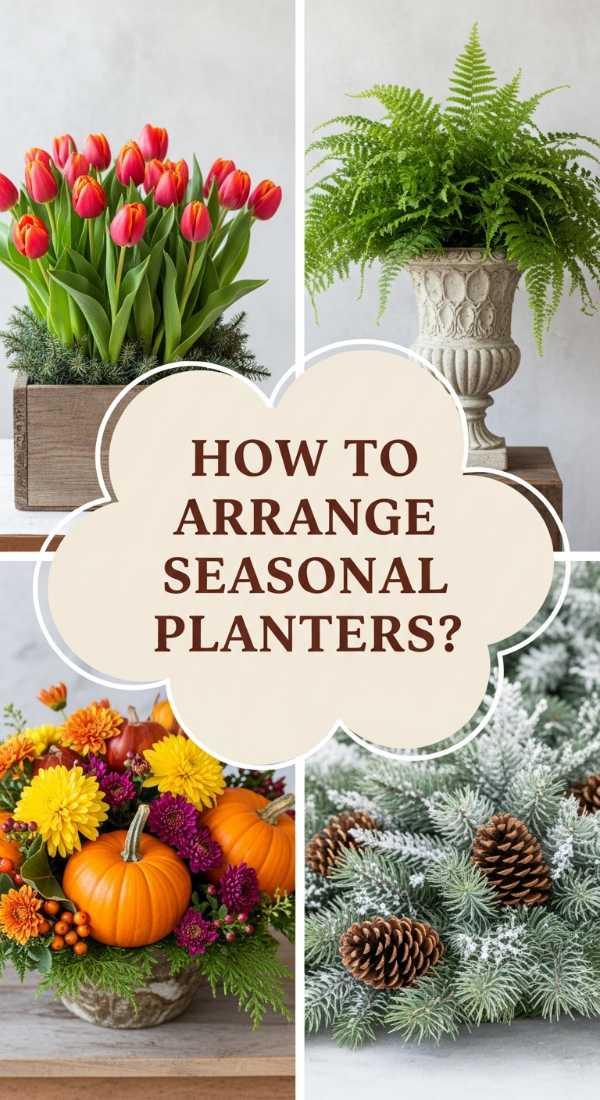
How to Arrange Seasonal Planters for Everlasting Garden Magic
[IMAGE_10]
Why we love this
The garden should be a source of joy all year round, not just in the summer. We love seasonal planters because they allow your home’s ‘outfit’ to change with the seasons, keeping your outdoor space fresh and exciting. From the first tulips of spring to the hardy evergreens of winter, these arrangements celebrate the passing of time and ensure there is always something beautiful to look at through the window. It turns gardening into a creative ritual, a way to mark the holidays and the shifting weather with colors and textures that perfectly capture the mood of the moment.
Essential Elements:
- A set of durable, year-round ‘base’ containers.
- Spring bulbs (Tulips, Daffodils).
- Summer annuals (Zinnias, Sunflowers).
- Autumn accents (Mums, Ornamental Peppers, Kale).
- Winter structure (Pine boughs, Birch branches, Winterberry).
How to make it
- Invest in high-quality pots that can withstand freezing temperatures without cracking, as these will serve as the foundation for your year-round displays.
- Refresh the top 4 inches of soil with every seasonal change to replenish nutrients and keep the environment healthy for new arrivals.
- In early spring, plant pre-sprouted bulbs for instant gratification, or tuck dormant bulbs deep into the soil the previous fall for a surprise spring awakening.
- As summer fades, swap out tired annuals for cool-weather lovers like Mums and Ornamental Cabbages, which can survive the first light frosts of autumn.
- For the winter transition, you don’t always need living roots; utilize ‘cut’ elements like evergreen branches, red-twig dogwood, and pinecones for a festive look.
- Integrate non-plant elements like pumpkins in the fall or battery-operated outdoor candles in the winter to add thematic depth to your arrangements.
- Always keep one ‘constant’ in your seasonal rotations—like a central boxwood or a beautiful piece of garden art—to provide a sense of continuity throughout the year.
Conclusion: Your Garden, Your Rules
As we wrap up our journey through these petal-filled paradises, remember that the most important element in any garden is *you*. There are no mistakes in container gardening, only learning opportunities and new ways to express your creativity. Whether you start with a single pot of basil on your kitchen counter or go all-in with a vertical jungle on your patio, the act of nurturing something living is a profound way to bring joy, peace, and beauty into your life. So go ahead—get your hands a little dirty, breathe in the scent of the earth, and watch as your very own dreamy garden flourishes right before your eyes. Happy planting!