
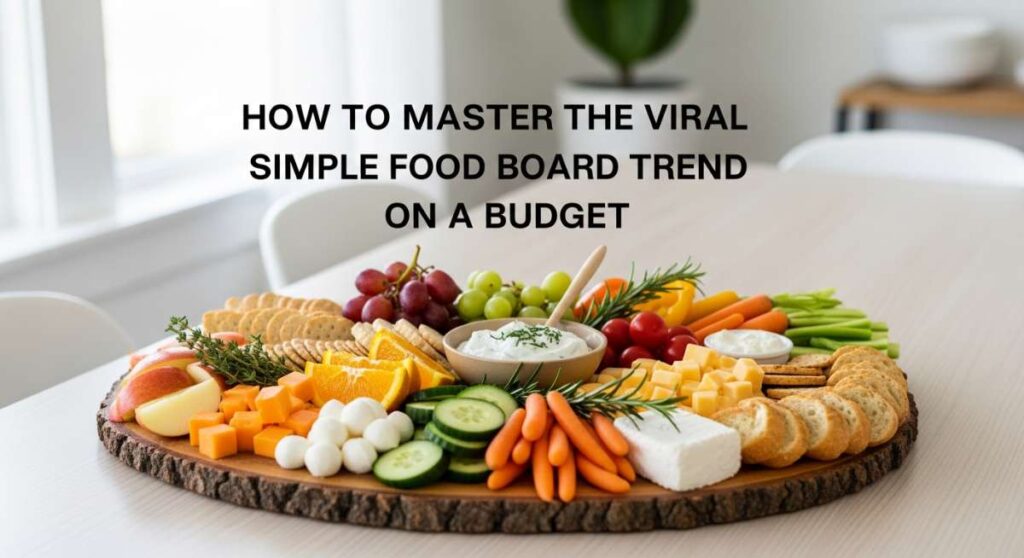
How to Master the Viral Simple Food Board Trend on a Budget
There is something truly magical about gathering around a table overflowing with color, texture, and flavor. Lately, my social media feed has been dominated by these gorgeous ‘Simple Food Boards’—you know the ones, where everything looks like a piece of art but feels like a cozy home-cooked meal. It is that perfect balance of aesthetic appeal and soulful nourishment that makes me want to put down my phone and just dig in with friends. But let’s be honest, those Pinterest-perfect boards can look intimidatingly expensive and complex.
I am here to tell you that you can master this viral trend without draining your bank account or spending twelve hours in the kitchen. It is all about using high-quality techniques on simple, accessible ingredients to create a communal eating experience that feels luxurious. Whether you are hosting a weekend brunch or just want to make a Tuesday night feel special, these boards are the ultimate way to celebrate the joy of eating together. Let’s dive into my favorite budget-friendly components that will make your board the talk of the town!
How to make steak bowl?

Why we love this
A steak bowl is the ultimate anchor for any food board, offering a rich, savory aroma that immediately draws everyone to the table. We love the contrast between the juicy, pink center of the beef and the charred, salty crust that forms in a hot pan. Each bite is a luxurious explosion of umami, especially when paired with fluffy grains that soak up all those delicious juices. It feels like a high-end steakhouse meal but served in a relaxed, communal way that encourages everyone to build their own perfect forkful.
Ingredients
- 1 lb flank steak or top sirloin
- 2 cups cooked jasmine rice
- 1 tablespoon olive oil
- 2 cloves garlic, smashed
- 1 sprig fresh rosemary
- Salt and cracked black pepper
- Sliced radishes and microgreens for garnish
How to make it
- Take the steak out of the refrigerator 30 minutes before cooking to bring it to room temperature; this ensures even cooking throughout the cut.
- Pat the meat extremely dry with paper towels; moisture is the enemy of a good sear, and you want that deep brown crust.
- Season generously with salt and pepper on all sides, pressing the seasoning into the grain of the meat.
- Heat a heavy cast-iron skillet over medium-high heat until it is wispy with smoke, then add the olive oil and swirl to coat.
- Place the steak in the pan and sear for 4 minutes without moving it, then flip and add the garlic and rosemary sprig to the oil.
- Baste the steak with the infused oil for another 3-4 minutes for medium-rare, or until an instant-read thermometer hits 130°F (54°C).
- Remove the steak to a cutting board and let it rest for at least 10 minutes—this is crucial to keep the juices inside the meat.
- Slice against the grain into thin strips and arrange over a bed of warm jasmine rice in a wide, shallow bowl, garnishing with radishes and microgreens.
How to cook crispy chicken?
Why we love this
There is nothing quite as satisfying as the audible crunch of perfectly fried chicken. This version uses a budget-friendly breading technique that results in a golden-brown exterior that is light and airy rather than greasy. The chicken remains incredibly moist on the inside, providing a neutral yet savory base that pairs beautifully with any dipping sauce on your board. It brings a nostalgic, comfort-food vibe to the presentation while still looking sophisticated and intentional.
Ingredients
- 2 large chicken breasts, sliced into strips
- 1 cup Panko breadcrumbs
- 1/2 cup all-purpose flour
- 2 eggs, beaten
- 1 teaspoon smoked paprika
- 1/2 teaspoon garlic powder
- Vegetable oil for frying
How to make it
- Set up a dredging station with three shallow bowls: one with flour, salt, and spices; one with the beaten eggs; and one with the Panko breadcrumbs.
- Pat the chicken strips dry and lightly dust them in the flour, shaking off any excess so the coating stays thin.
- Dip the floured chicken into the egg wash, ensuring every nook and cranny is covered, then press firmly into the Panko breadcrumbs for a thick, even coating.
- Heat about half an inch of vegetable oil in a wide skillet over medium heat; test the heat by dropping a breadcrumb in—if it sizzles immediately, you are ready.
- Carefully place the chicken in the oil, being careful not to overcrowd the pan, which would drop the temperature and lead to soggy chicken.
- Fry for 3-4 minutes per side until the coating is a deep, golden mahogany and the internal temperature reaches 165°F (74°C).
- Drain the strips on a wire rack rather than paper towels; the airflow prevents the bottom from becoming soggy.
- Sprinkle with a tiny pinch of flaky salt while still hot to enhance the flavor before adding to your food board.
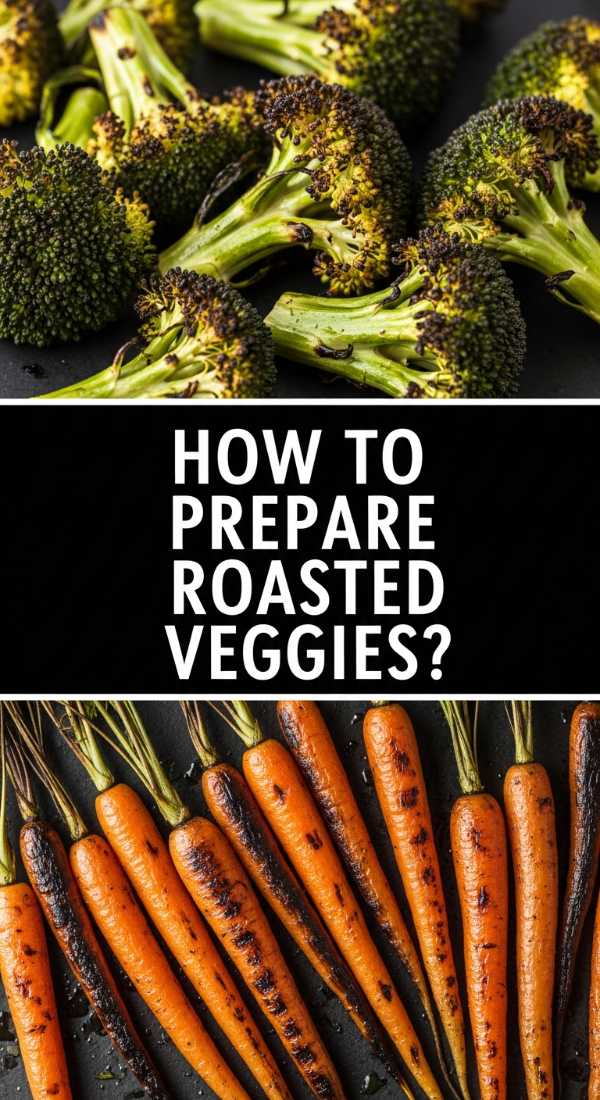
How to prepare roasted veggies?
Why we love this
Roasted vegetables are the unsung heroes of the food board, bringing vibrant color and a concentrated sweetness that raw veggies just can’t match. We love the way the edges of bell peppers and onions caramelize in the oven, creating a soft, jammy texture that melts in your mouth. The earthy aroma of roasted root vegetables combined with a hint of charred bitterness adds a sophisticated layer of flavor that balances out the richer meats on the board perfectly.
Ingredients
- 2 bell peppers, sliced
- 1 red onion, wedged
- 1 zucchini, sliced into rounds
- 1 bunch asparagus, woody ends trimmed
- 3 tablespoons olive oil
- 1 tablespoon balsamic glaze
- Dried oregano and thyme
How to make it
- Preheat your oven to 425°F (220°C); a high temperature is essential for achieving caramelization without turning the vegetables into mush.
- Toss all the prepared vegetables in a large mixing bowl with olive oil, salt, pepper, and dried herbs until every piece is glistening.
- Spread the vegetables in a single layer on a large parchment-lined baking sheet, ensuring they aren’t touching; if they are crowded, they will steam instead of roast.
- Place in the center rack of the oven and roast for 15 minutes.
- Remove the tray and use a spatula to toss the veggies, then return to the oven for another 10-15 minutes until the edges are charred and the centers are tender.
- Look for the visual cue of the onion edges turning translucent and dark brown—that is where all the concentrated sugar lives.
- Drizzle with a small amount of balsamic glaze immediately after removing from the oven for a hit of acidity and shine.
- Allow them to cool slightly to room temperature before placing them on the board, as this helps the flavors settle.
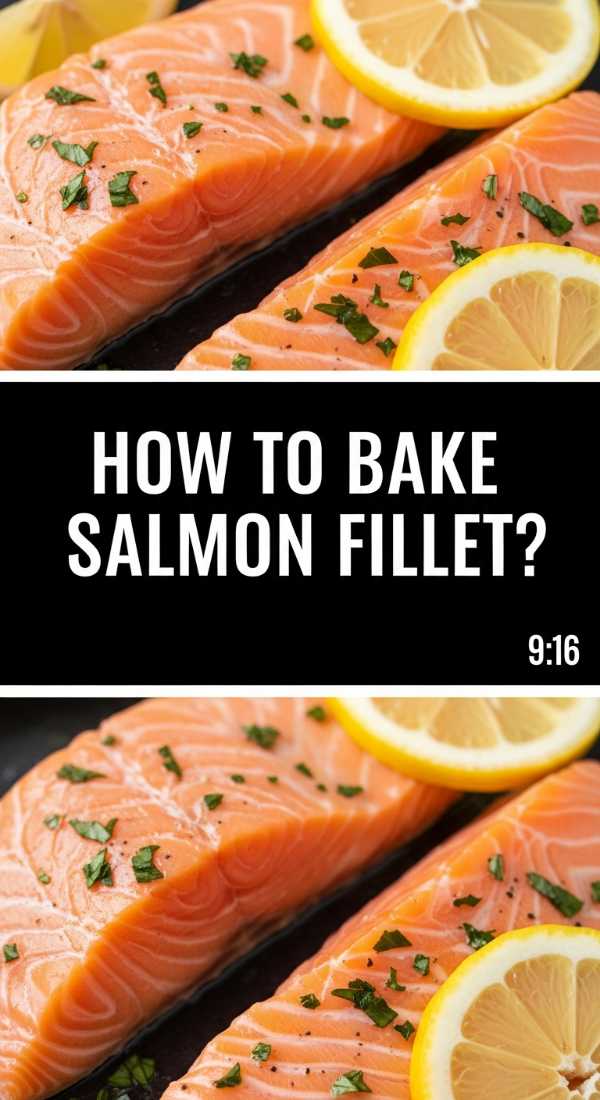
How to bake salmon fillet?
Why we love this
Salmon adds an elegant, healthy touch to a food board, offering a buttery texture and a vibrant pink hue that looks stunning under soft lighting. When baked correctly, the flakes pull apart effortlessly, revealing a moist and succulent interior that carries the bright scents of lemon and fresh herbs. It is a lighter protein option that feels celebratory and expensive, even when you find the fillets on sale at your local market.
Ingredients
- 2 salmon fillets (6 oz each)
- 1 lemon, thinly sliced
- 2 tablespoons melted butter
- 1 teaspoon honey
- Fresh dill, chopped
- Salt and pepper
How to make it
- Preheat your oven to 400°F (200°C) and line a small baking dish with parchment paper or foil for easy cleanup.
- Whisk together the melted butter, honey, salt, and pepper in a small bowl to create a simple glaze that will help keep the fish moist.
- Place the salmon fillets skin-side down in the dish and brush the honey-butter mixture generously over the top of each piece.
- Layer 2-3 thin lemon slices over each fillet; as they bake, the lemon juice will infuse into the fish, cutting through the natural richness.
- Bake for 12-15 minutes, depending on the thickness of your fillets.
- Check for doneness by pressing the side of the fillet with a fork; if the flesh flakes easily and is no longer translucent in the center, it is done.
- For a slightly crispy top, you can turn on the broiler for the last 60 seconds, watching closely to ensure the honey doesn’t burn.
- Top with fresh dill and a squeeze of fresh lemon juice before serving to brighten the fatty flavors.
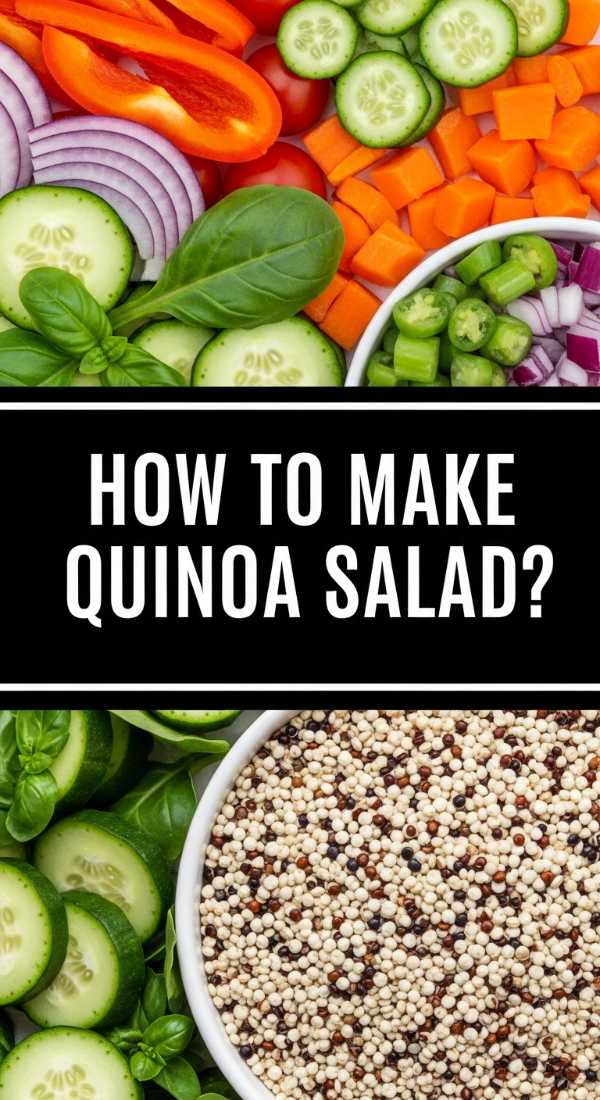
How to make quinoa salad?

Why we love this
This quinoa salad acts as a refreshing palate cleanser amidst the heavier elements of the board. We love the nutty flavor of the grains combined with the crisp snap of fresh cucumbers and the tangy burst of feta cheese. It provides a wonderful textural contrast—light, fluffy, and slightly crunchy—that keeps the meal feeling balanced. Plus, its ability to hold up at room temperature makes it the perfect stress-free addition to a long, leisurely grazing session.
Ingredients
- 1 cup dry quinoa, rinsed
- 2 cups water or vegetable broth
- 1 English cucumber, diced
- 1 cup cherry tomatoes, halved
- 1/4 cup crumbled feta cheese
- 2 tablespoons lemon juice
- 3 tablespoons extra virgin olive oil
- Fresh parsley, chopped
How to make it
- Combine the rinsed quinoa and water in a medium saucepan and bring to a boil over high heat.
- Reduce the heat to low, cover the pot tightly, and simmer for 15 minutes or until all the liquid has been absorbed.
- Remove the pan from the heat and let it sit, covered, for 5 minutes; this allows the steam to finish the cooking process, resulting in fluffier grains.
- Fluff the quinoa gently with a fork and spread it out on a plate to cool slightly so it doesn’t wilt the fresh vegetables.
- In a large bowl, whisk together the lemon juice, olive oil, salt, and pepper to create a bright, zesty vinaigrette.
- Add the cooled quinoa, diced cucumber, tomatoes, and parsley to the bowl and toss thoroughly to ensure even distribution of the dressing.
- Gently fold in the crumbled feta cheese last so it remains in distinct chunks rather than blending into the salad.
- Transfer to a small bowl that fits comfortably on your board, garnishing with an extra sprinkle of parsley for a pop of green.
How to roast garlic shrimp?

Why we love this
Garlic shrimp are the ultimate ‘wow’ factor on a budget board because they cook in minutes and smell absolutely heavenly. The aroma of sizzling garlic and butter is intoxicating, immediately signaling to your guests that a feast is ready. We love the snappy, firm texture of the shrimp against the silky, garlicky oil, and they provide a bite-sized convenience that makes them perfect for a communal board where people are picking and choosing their favorites.
Ingredients
- 1 lb large shrimp, peeled and deveined
- 4 cloves garlic, minced
- 3 tablespoons butter, melted
- 1/2 teaspoon red pepper flakes
- 1 tablespoon fresh lemon juice
- Fresh parsley for garnish
How to make it
- Preheat your oven to 400°F (200°C) and grab a rimmed baking sheet.
- In a large bowl, toss the shrimp with minced garlic, melted butter, red pepper flakes, and a pinch of salt.
- Spread the shrimp out on the baking sheet in a single layer, ensuring they aren’t piled on top of each other so the heat can circulate.
- Roast for just 6-8 minutes; keep a close eye on them, as shrimp go from perfect to rubbery very quickly.
- The visual cue for doneness is when the shrimp turn opaque and form a ‘C’ shape; if they curl into a tight ‘O’, they are overcooked.
- Immediately after removing from the oven, drizzle the lemon juice over the hot shrimp to create a light sauce with the pan juices.
- Toss them once more on the tray to coat them in the garlic butter that has collected on the bottom.
- Transfer to a small serving dish or pile them directly onto the board, finishing with a handful of chopped parsley.
How to steam lemon broccoli?

Why we love this
Steamed lemon broccoli brings a much-needed vibrance and crunch to your spread, acting as the perfect healthy counterpoint to the more indulgent items. We love the bright, emerald green color it adds to the board, making the whole presentation look fresh and alive. The flavor is clean and grassy, enhanced by the sharp acidity of lemon, which helps to cut through the richness of meats and cheeses. It is simple, effective, and incredibly satisfying when cooked to a perfect fork-tender consistency.
Ingredients
- 1 large head of broccoli, cut into florets
- 1 lemon (zest and juice)
- 1 tablespoon olive oil
- Pinch of red pepper flakes
- Sea salt
How to make it
- Fill a large pot with about an inch of water and place a steamer basket inside, ensuring the water does not touch the bottom of the basket.
- Bring the water to a vigorous boil over high heat, then add the broccoli florets to the basket.
- Cover the pot with a tight-fitting lid and steam for exactly 5-6 minutes.
- Check for doneness by piercing a stem with a fork; it should go in easily but still have a slight resistance—this is ‘tender-crisp.’
- Immediately remove the broccoli from the heat and plunge it into a bowl of ice water if you want to stop the cooking and preserve the bright green color, or simply transfer to a mixing bowl.
- Toss the warm broccoli with olive oil, lemon zest, lemon juice, and a sprinkle of sea salt.
- The heat from the broccoli will release the oils in the lemon zest, creating a fantastic aroma.
- Arrange the florets in clusters on the board to fill in gaps and add height to your display.
How to grill pesto chicken?

Why we love this
Grilling chicken with pesto creates a complex, herbaceous flavor profile that feels deeply artisanal. We love the charred grill marks that add a smoky depth to the bright basil and garlic notes of the sauce. The pesto acts as both a marinade and a finishing glaze, ensuring the chicken stays incredibly juicy while developing a beautiful, rustic appearance. It is a crowd-pleaser that looks like it took hours of preparation, yet it is one of the easiest ways to elevate basic chicken breast.
Ingredients
- 1 lb chicken thighs or breasts, pounded to even thickness
- 1/2 cup prepared basil pesto
- 1 tablespoon lemon juice
- Olive oil for the grill
- Extra pesto for serving
How to make it
- In a zip-top bag or bowl, combine the chicken with 1/4 cup of the pesto and the lemon juice, ensuring every piece is well-coated.
- Let the chicken marinate for at least 30 minutes in the refrigerator, allowing the oils and herbs to penetrate the meat.
- Heat your grill or a heavy grill pan over medium-high heat and lightly oil the grates to prevent sticking.
- Place the chicken on the grill and cook for 5-7 minutes per side; do not move the chicken until it naturally releases from the grates to ensure clean grill marks.
- Use a meat thermometer to ensure the thickest part reaches 165°F (74°C).
- During the last minute of cooking, brush a little extra fresh pesto over the top of each piece for a vibrant green finish.
- Remove from the grill and let the chicken rest for 5 minutes before slicing it into thick, juicy medallions.
- Arrange the medallions in a shingled pattern on the board, revealing the moist interior and charred edges.
How to fry zucchini fries?
Why we love this
Zucchini fries are the perfect way to sneak some veggies onto the board while maintaining that irresistible finger-food appeal. We love the contrast between the salty, parmesan-infused crust and the soft, almost creamy interior of the zucchini. They offer a lighter alternative to potato fries but still satisfy that craving for something crispy and savory. Served with a simple yogurt dip or marinara, they become an addictive addition that guests won’t be able to stop reaching for.
Ingredients
- 2 medium zucchinis, cut into 3-inch sticks
- 1/2 cup flour
- 2 eggs, beaten
- 1 cup Italian breadcrumbs
- 1/4 cup grated Parmesan cheese
- 1 teaspoon dried oregano
How to make it
- Preheat your oven to 425°F (220°C) and place a wire rack on top of a baking sheet—this allows hot air to circulate under the fries, making them crispy on all sides.
- Toss the zucchini sticks in flour, then dip them into the beaten eggs, and finally roll them in a mixture of breadcrumbs, Parmesan, and oregano.
- Press the breading firmly onto the zucchini to ensure it sticks during the baking process.
- Arrange the fries on the wire rack in a single layer, making sure they aren’t touching.
- Lightly spray the fries with olive oil spray to help them brown and crisp up.
- Bake for 20-25 minutes until the coating is golden and crunchy.
- Halfway through, rotate the pan to ensure even browning.
- Serve them immediately while they are at their peak crispness, piling them into a small parchment-lined crate or bowl on your food board.
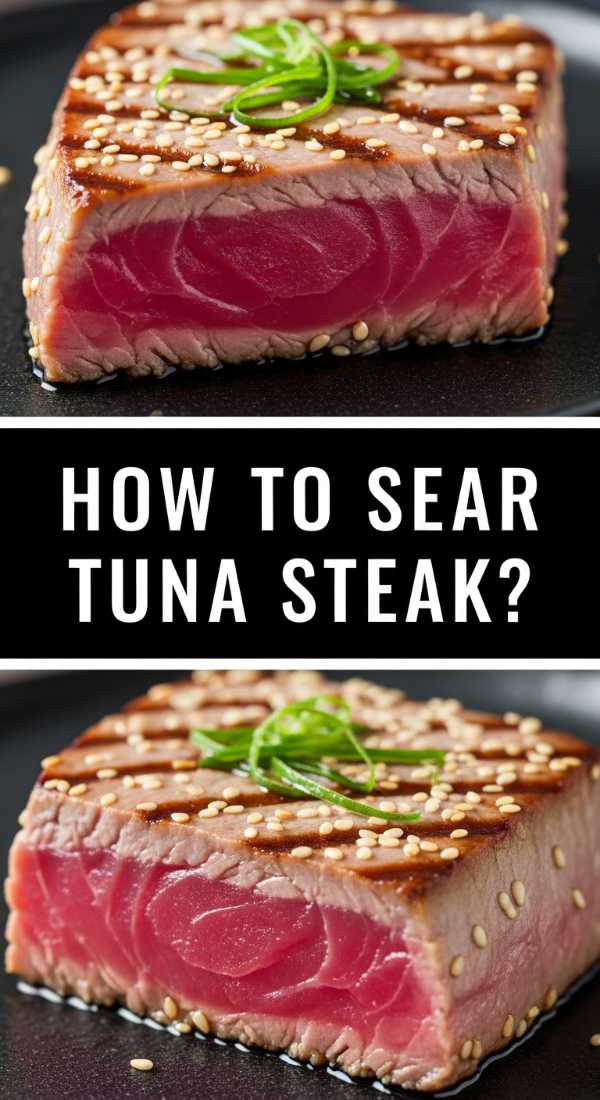
How to sear tuna steak?
[IMAGE_10]
Why we love this
A perfectly seared tuna steak is a true showstopper, offering a sophisticated, restaurant-quality experience that is surprisingly simple to achieve at home. We love the dramatic look of the dark, seasoned exterior against the bright, ruby-red rare center. The texture is silky and melt-in-your-mouth, providing a clean and light protein option that feels incredibly upscale. It is the kind of dish that makes a simple food board feel like a curated culinary event.
Ingredients
- 2 Ahi tuna steaks (about 1 inch thick)
- 2 tablespoons sesame seeds (black and white mixed)
- 1 tablespoon soy sauce
- 1 tablespoon toasted sesame oil
- High-heat oil (like avocado oil) for searing
How to make it
- Pat the tuna steaks completely dry with paper towels to ensure a clean sear.
- Brush the steaks lightly with a mixture of soy sauce and toasted sesame oil for flavor and to help the seeds stick.
- Press the top and bottom of each steak firmly into the sesame seeds until they are evenly coated.
- Heat a heavy skillet or cast-iron pan over very high heat until it is nearly smoking; you want the pan extremely hot for a fast sear.
- Add a tablespoon of high-heat oil and carefully place the tuna in the pan.
- Sear for only 1 to 1.5 minutes per side; the goal is to create a crust on the outside while keeping the center raw and cool.
- Don’t forget to quickly sear the edges of the steak for about 10 seconds each to seal in the appearance.
- Transfer to a cutting board and use a very sharp knife to slice into 1/2-inch thick pieces, revealing the beautiful pink interior, and arrange them elegantly on your board.
The Art of the Budget Board
Mastering the viral food board trend isn’t about how much you spend; it’s about the love and attention you put into the preparation of each element. By focusing on a mix of textures, colors, and cooking techniques, you can turn humble ingredients like zucchini, chicken, and quinoa into a feast that looks like a million bucks. Remember to fill the gaps on your board with inexpensive extras like seasonal fruit, nuts, or even just some fresh herbs. The goal is to create a sense of abundance and joy that invites people to linger, talk, and enjoy every single bite. Happy boarding!