

From Pantry to Viral: The Simplest Food Board You’ll Ever Create
There is something inherently magical about the way food brings us together, especially when it is served on a sprawling, messy-yet-beautiful board that invites everyone to dig in. I remember the first time I hosted a dessert night; I was so stressed about everything being perfect that I forgot to actually enjoy the company. That all changed when I realized that the most ‘viral’ moments don’t come from hours of complicated catering, but from the heart-warming simplicity of treats made right in your own kitchen with staples you already have in the pantry.
Today, we are crafting the ultimate dessert board—a curated selection of ten decadent treats that will make your followers drool and your guests feel like royalty. This isn’t just about food; it is about the aroma of warming cinnamon filling your home, the sound of a crisp tart shell snapping, and the shared laughter over a gooey lava cake. Let’s turn your kitchen into the most popular spot on the internet with these foolproof, stunning recipes.
How to make chocolate truffles?
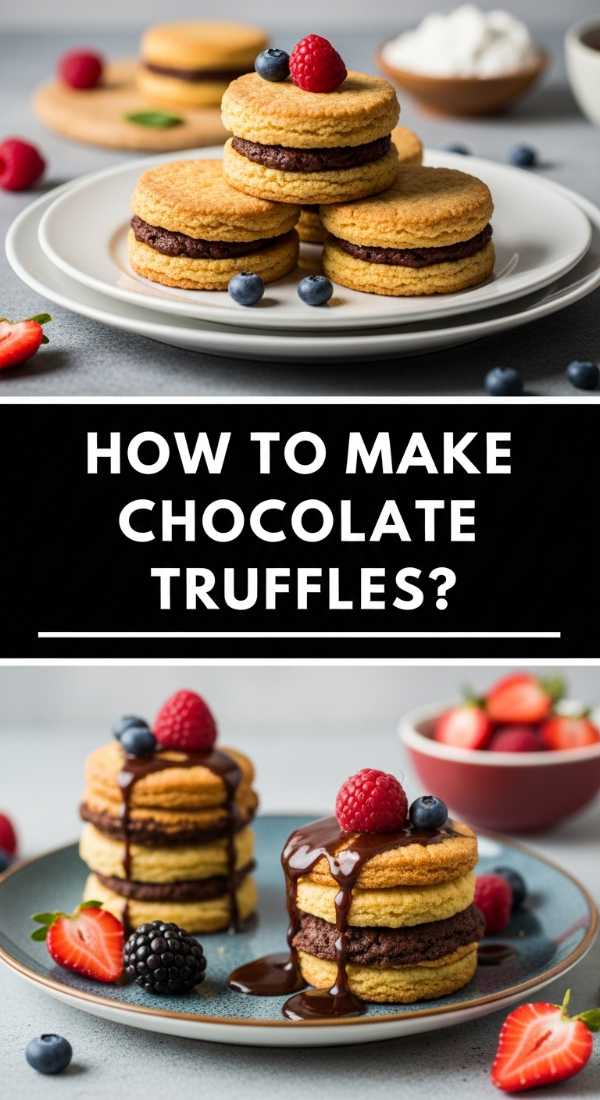
Why we love this
There is an undeniable elegance to a chocolate truffle that belies just how simple they are to construct. Imagine biting through a thin, slightly firm dusting of bitter cocoa powder into a center so silky and dark that it practically evaporates on your tongue. The richness of the heavy cream blended with high-quality dark chocolate creates a velvety ganache that feels like pure luxury, offering a deep, earthy aroma that lingers long after the first bite. It is the ultimate bite-sized indulgence for any sophisticated dessert board.
Ingredients
- 8 oz high-quality dark chocolate (60% cacao or higher), finely chopped
- 1/2 cup heavy whipping cream
- 1/2 teaspoon pure vanilla extract
- Pinch of sea salt
- Optional coatings: Unsweetened cocoa powder, crushed hazelnuts, or melted chocolate
How to make it
- Place the finely chopped chocolate in a medium-sized heat-proof glass or metal bowl. Ensure the pieces are uniform in size to encourage even melting.
- In a small saucepan over medium heat, bring the heavy cream to a gentle simmer. You are looking for small bubbles forming around the edges; do not let it reach a rolling boil as this can scorch the cream and ruin the chocolate’s temper.
- Immediately pour the hot cream over the chopped chocolate and let it sit undisturbed for 5 full minutes. This allows the heat to penetrate the cocoa butter evenly.
- Add the vanilla and salt, then gently whisk from the center outward in small circles until the mixture is glossy and completely smooth.
- Cover the bowl and refrigerate for at least 2 hours until the ganache is firm enough to scoop.
- Use a small melon baller or a teaspoon to scoop rounded portions. Quickly roll them between your palms to form balls (the heat from your hands will soften them, so work fast!).
- Roll the finished truffles in cocoa powder or your choice of toppings and store in the fridge until ready to serve.
How to bake fluffy brownies?
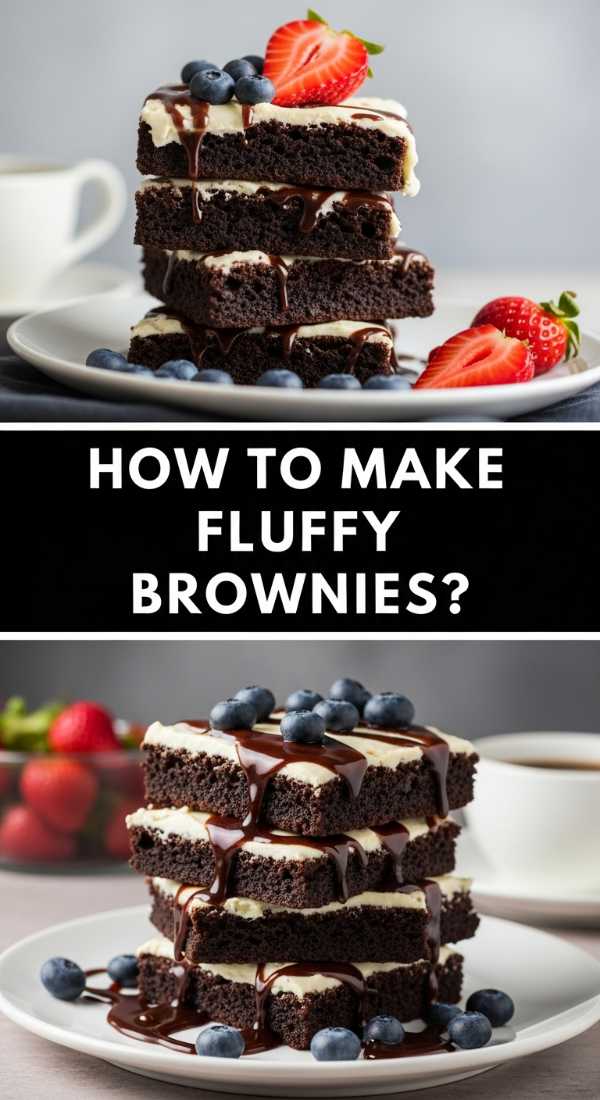
Why we love this
A truly fluffy brownie is a masterclass in texture, striking that perfect balance between a light, airy cake and a dense, fudgy delight. When you pull these from the oven, the top should have that iconic, paper-thin crinkle that shatters at the touch of a fork, revealing a moist interior that smells of toasted sugar and premium cocoa. The sensation of the warm, soft crumb against a cold glass of milk is a nostalgic trip to childhood, updated with a sophisticated depth of flavor that makes them absolutely irresistible.
Ingredients
- 1 cup unsalted butter, melted and cooled slightly
- 2 cups granulated sugar
- 4 large eggs, at room temperature
- 1 teaspoon vanilla extract
- 3/4 cup unsweetened cocoa powder
- 1 cup all-purpose flour
- 1/2 teaspoon salt
- 1/2 teaspoon baking powder
How to make it
- Preheat your oven to 350°F (175°C) and grease a 9×9 inch baking pan, lining it with parchment paper for easy removal.
- In a large mixing bowl, whisk together the melted butter and sugar vigorously for about 2 minutes. This aeration is the secret to the “fluffy” texture and the shiny top.
- Add the eggs one at a time, beating well after each addition until the batter looks pale and thickened. Stir in the vanilla.
- Sift the cocoa powder, flour, salt, and baking powder together in a separate bowl. Sifting is crucial here to prevent lumps and keep the batter light.
- Gently fold the dry ingredients into the wet ingredients using a spatula. Stop the moment you no longer see streaks of flour; over-mixing will develop gluten and make the brownies tough instead of fluffy.
- Spread the batter evenly into the prepared pan and bake for 25-30 minutes.
- Test for doneness by inserting a toothpick; it should come out with a few moist crumbs attached. If it’s wet, give it 5 more minutes. Let cool completely in the pan before slicing.
How to make creamy cheesecake?
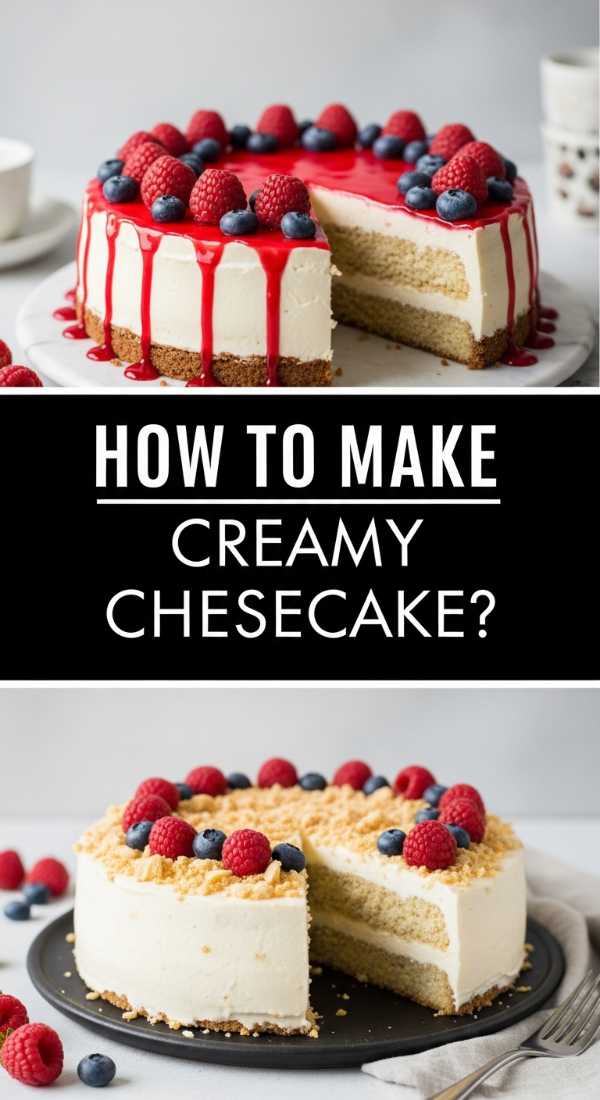
Why we love this
There is nothing quite like the decadent, ivory-smooth surface of a perfectly baked cheesecake. Each bite is a symphony of tangy cream cheese and sweet vanilla, supported by the buttery, salty crunch of a golden graham cracker crust. The texture is what wins people over—it should be dense enough to feel substantial but so creamy that it melts like butter in your mouth. As you slice into it, the aroma of baked custard and citrus zest wafts up, promising a dessert experience that is both refreshing and deeply satisfying.
Ingredients
- 1.5 cups graham cracker crumbs
- 1/4 cup melted butter
- 24 oz (3 blocks) cream cheese, softened to room temperature
- 1 cup granulated sugar
- 1 cup sour cream
- 1 teaspoon vanilla extract
- 3 large eggs
- 1 tablespoon lemon juice
How to make it
- Preheat your oven to 325°F (160°C). Mix graham cracker crumbs with melted butter and press firmly into the bottom of a 9-inch springform pan. Bake for 10 minutes, then cool.
- In a large bowl, beat the softened cream cheese and sugar on medium-low speed until completely smooth. Do not use high speed, as incorporating too much air will cause the cake to crack.
- Add the sour cream, vanilla, and lemon juice, mixing until just combined.
- Add eggs one at a time, mixing on low just until the yellow disappears. Scrape the sides of the bowl frequently to ensure no lumps remain.
- Pour the batter over the crust. To prevent cracks, place the springform pan inside a larger roasting pan and fill the roasting pan with 1 inch of hot water (a water bath).
- Bake for 60-70 minutes until the edges are set but the center still has a slight, gelatinous jiggle when shaken.
- Turn off the oven and prop the door open slightly, letting the cheesecake cool inside for an hour. Then, refrigerate for at least 6 hours (or overnight) before releasing from the pan.
How to make lemon bars?

Why we love this
Lemon bars are like a sunbeam on a plate, offering a vibrant, zesty explosion that cuts through the richness of any dessert board. The contrast between the shortbread crust—which is crumbly, buttery, and slightly salty—and the bright, translucent lemon curd topping is perfection. As you take a bite, the initial snap of the crust gives way to a silky, tart filling that dances on your palate, leaving a refreshing aftertaste of fresh citrus. Dusted with powdered sugar, they look like little jewels that invite everyone to reach for just one more.
Ingredients
- 1 cup unsalted butter, softened
- 1/2 cup granulated sugar (for crust)
- 2 cups all-purpose flour (divided)
- 4 large eggs
- 1.5 cups granulated sugar (for filling)
- 1/2 cup fresh lemon juice (about 3-4 lemons)
- 1 tablespoon lemon zest
- Powdered sugar for dusting
How to make it
- Preheat oven to 350°F (175°C) and line an 8×8 or 9×9 inch pan with parchment.
- For the crust, cream the softened butter and 1/2 cup sugar until light. Stir in 1.5 cups of flour until a soft dough forms. Press this evenly into the bottom of the pan and bake for 15-20 minutes until the edges are just barely golden.
- While the crust bakes, whisk the eggs and 1.5 cups of sugar together until smooth.
- Whisk in the remaining 1/2 cup of flour, the lemon juice, and the lemon zest. Ensure there are no flour clumps; the mixture should be thin and pale yellow.
- Pour the lemon mixture over the hot crust as soon as it comes out of the oven. This helps the layers bond.
- Bake for another 20-25 minutes. The filling should be set and no longer jiggly in the middle.
- Allow the bars to cool completely at room temperature, then chill in the fridge for 2 hours. Dust generously with powdered sugar before slicing into squares.
How to make peanut bars?
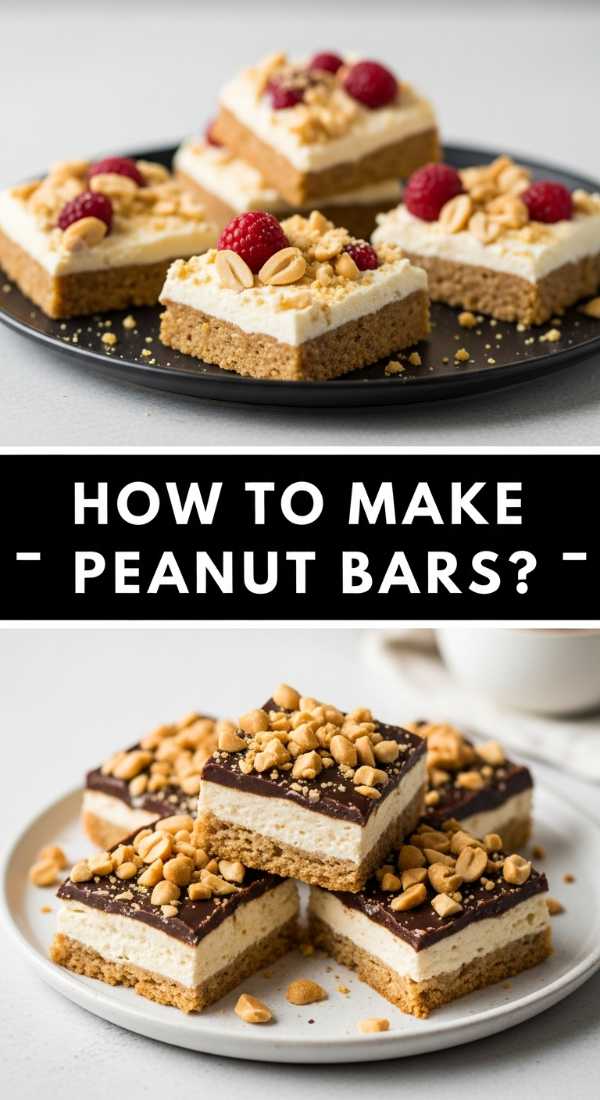
Why we love this
Peanut bars are the ultimate comfort food for those who crave the classic combination of salty and sweet. These bars feature a chewy, oat-filled base topped with a thick layer of creamy peanut butter and often a decadent chocolate drizzle. The aroma of roasted peanuts is intoxicating, filling the kitchen with a warm, nutty scent that feels like a hug. Every bite offers a satisfying crunch from the nuts and a soft, yielding texture from the base, making these a high-energy, high-flavor addition to your viral board.
Ingredients
- 1/2 cup butter, melted
- 1/2 cup brown sugar, packed
- 1 cup all-purpose flour
- 1 cup rolled oats
- 1 cup creamy peanut butter
- 1/2 cup honey or maple syrup
- 1 cup roasted peanuts, chopped
- 1/2 cup chocolate chips (optional)
How to make it
- Preheat your oven to 350°F (175°C) and grease an 8-inch square baking dish.
- In a bowl, combine melted butter, brown sugar, flour, and oats. Mix until crumbly. Reserve 1/2 cup of this mixture for the topping.
- Press the remaining oat mixture firmly into the bottom of the dish and bake for 10 minutes.
- In a small microwave-safe bowl, warm the peanut butter and honey together for 30 seconds until easy to pour. Stir until smooth.
- Pour the peanut butter mixture over the pre-baked crust, spreading it to the corners.
- Sprinkle the chopped peanuts and the reserved oat crumble (and chocolate chips if using) over the top.
- Bake for an additional 15-18 minutes until the edges are golden brown. Let them cool completely before cutting to ensure they hold their shape.
How to make fudge cake?

Why we love this
This is the cake for true chocolate obsessives—a dense, moist, and incredibly dark fudge cake that looks like a decadent shadow on your dessert board. Unlike a light sponge, this cake has a tight crumb and an almost truffle-like consistency that feels heavy and satisfying on the fork. The aroma is dominated by roasted cocoa beans and vanilla, and when paired with a rich chocolate ganache frosting, it becomes an unstoppable force of flavor. It is the kind of cake that demands your full attention with every rich, chocolatey mouthful.
Ingredients
- 2 cups all-purpose flour
- 2 cups granulated sugar
- 3/4 cup unsweetened cocoa powder
- 2 teaspoons baking soda
- 1 teaspoon baking powder
- 1 teaspoon salt
- 1 cup buttermilk, room temperature
- 1/2 cup vegetable oil
- 2 large eggs
- 1 cup hot coffee (or boiling water)
How to make it
- Preheat oven to 350°F (175°C). Grease and flour two 9-inch round cake pans or one large rectangular pan.
- In a large bowl, whisk together the flour, sugar, cocoa, baking soda, baking powder, and salt until no streaks remain.
- Add the buttermilk, oil, and eggs. Mix on medium speed for about 2 minutes until the batter is smooth and slightly thick.
- Reduce speed to low and carefully pour in the hot coffee. The batter will be very thin and watery—this is exactly what you want for a moist fudge cake.
- Pour the batter into the prepared pans. Bake for 30-35 minutes.
- Check with a toothpick; because this is a fudge cake, a few moist crumbs are better than a completely clean toothpick which might indicate dryness.
- Cool in the pans for 10 minutes, then turn out onto wire racks to cool completely before frosting with your favorite chocolate ganache.
How to make berry tarts?

Why we love this
Berry tarts bring a splash of vibrant color and a fresh, tart contrast to the heavier elements of a dessert board. Imagine a crisp, buttery shortcrust pastry shell filled with a smooth, cool vanilla pastry cream, topped with a glistening arrangement of raspberries, blueberries, and strawberries. The crunch of the shell followed by the burst of fresh juice from the berries creates a multi-textured experience that is as beautiful as it is delicious. The scent of fresh fruit and sweet cream is light and inviting, making these the perfect palate cleanser between richer bites.
Ingredients
- 1.5 cups all-purpose flour
- 1/2 cup cold unsalted butter, cubed
- 1/4 cup powdered sugar
- 1 egg yolk
- 2 cups milk
- 1/2 cup sugar
- 4 egg yolks (for cream)
- 1/4 cup cornstarch
- Fresh berries and apricot jam for glazing
How to make it
- For the crust: Pulse flour, powdered sugar, and cold butter in a food processor until it looks like crumbs. Add the egg yolk and pulse until the dough forms a ball. Wrap and chill for 30 minutes.
- Roll out the dough and press into mini tart pans. Prick the bottoms with a fork and bake at 375°F (190°C) for 12-15 minutes until golden. Let cool completely.
- For the pastry cream: Whisk 4 egg yolks, sugar, and cornstarch until pale.
- Heat milk in a pan until simmering, then slowly whisk it into the egg mixture (tempering). Pour everything back into the pan and whisk constantly over medium heat until it thickens into a pudding. Stir in vanilla, then chill with plastic wrap touching the surface.
- Fill the cooled tart shells with the chilled pastry cream.
- Arrange fresh berries on top in a decorative pattern.
- Melt a tablespoon of apricot jam with a splash of water and brush over the berries for a professional, viral-ready shine.
How to make cinnamon rolls?
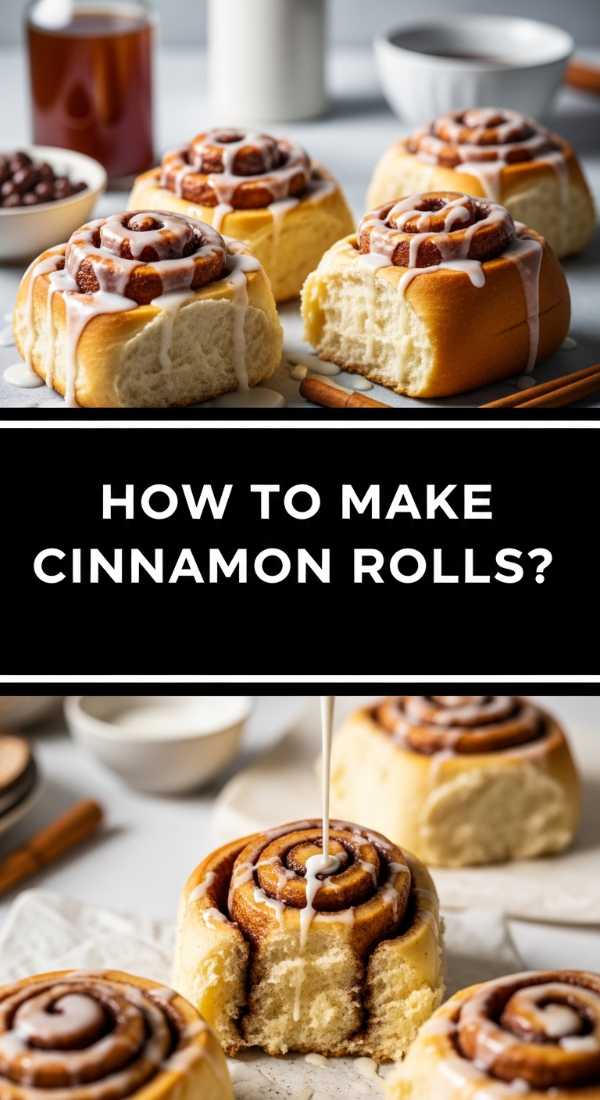
Why we love this
There is no aroma more inviting than cinnamon rolls baking in a warm oven; it is the scent of cozy mornings and pure comfort. These rolls feature a soft, pillowy dough swirled with a potent mix of spicy cinnamon and dark brown sugar that caramelizes into a sticky, gooey treat. When topped with a generous smear of cream cheese frosting that melts into the warm crevices, they become a tactile delight. Pulling a roll apart with your fingers, feeling the steam rise and the soft dough yield, is a sensory experience that defines lifestyle-blogger perfection.
Ingredients
- 4 cups all-purpose flour
- 1/3 cup softened butter
- 1/2 cup sugar
- 1 packet (2.25 tsp) active dry yeast
- 1 cup warm milk (110°F)
- 2 eggs
- 1 cup brown sugar
- 2.5 tablespoons ground cinnamon
- 4 oz cream cheese, softened
How to make it
- Dissolve yeast in warm milk with a tablespoon of sugar. Let it sit for 5-10 minutes until foamy.
- In a stand mixer, combine the yeast mixture with the sugar, butter, eggs, and flour. Knead with a dough hook for 5-7 minutes until the dough is smooth, elastic, and slightly tacky but not sticking to the bowl.
- Place dough in a greased bowl, cover, and let rise in a warm spot for 1 hour or until doubled in size.
- Roll the dough out on a floured surface into a large rectangle (about 12×18 inches). Spread with softened butter, then sprinkle generously with the brown sugar and cinnamon mix.
- Roll the dough tightly from the long end and slice into 12 even rolls using unflavored dental floss or a sharp knife.
- Place in a greased baking pan, cover, and let rise for another 30 minutes.
- Bake at 350°F (175°C) for 20-25 minutes until lightly browned. While warm, slather with a mixture of cream cheese, powdered sugar, and vanilla.
How to make lava cakes?

Why we love this
The lava cake is the ultimate “wow” factor for any viral food video or board. On the outside, it looks like a humble, dark chocolate cake, but once the side is pierced, a warm, molten river of chocolate flows out, creating a dramatic and indulgent spectacle. The contrast between the cooked, cakey exterior and the liquid, velvety interior is a decadent surprise. The intense aroma of high-quality cocoa and the warmth of the flowing center make this a high-stakes dessert that never fails to impress with its rich, gooey texture.
Ingredients
- 6 oz high-quality semi-sweet chocolate, chopped
- 1/2 cup unsalted butter
- 2 large eggs + 2 egg yolks
- 1/4 cup granulated sugar
- Pinch of salt
- 2 tablespoons all-purpose flour
How to make it
- Preheat your oven to 425°F (218°C). This high heat is essential for cooking the outside while leaving the inside molten. Grease two 6-oz ramekins with butter and dust with cocoa powder.
- Melt the chopped chocolate and butter together in a microwave-safe bowl in 30-second increments, stirring until smooth.
- In a separate bowl, beat the eggs, yolks, sugar, and salt with a whisk or electric mixer until thick and pale yellow (about 2 minutes).
- Gently fold the melted chocolate into the egg mixture using a spatula.
- Sift the flour over the batter and gently fold it in just until combined. Do not over-mix, or the cake will lose its tender texture.
- Divide the batter between the ramekins and bake for 12-14 minutes. The sides should be firm, but the center should still look soft and slightly sunken.
- Let cool for 1 minute, then run a knife around the edge and invert onto a plate. Serve immediately while the “lava” is hot!
How to make caramel cookies?
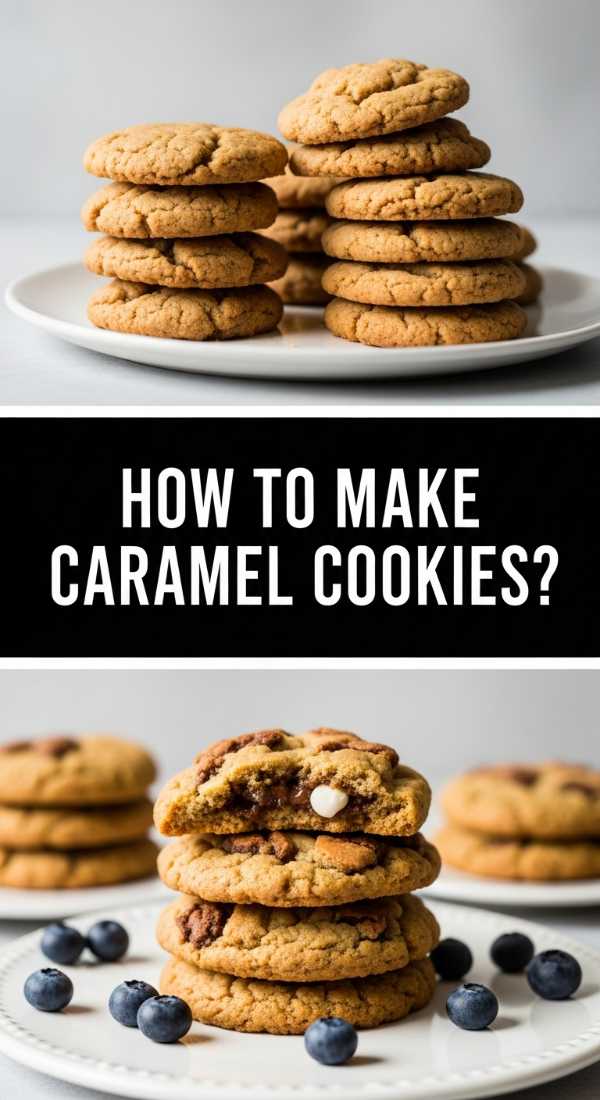
Why we love this
Caramel cookies offer a sophisticated twist on the classic chocolate chip, focusing on the deep, toasted notes of brown butter and chewy caramel. These cookies feature golden, crispy edges that give way to a soft, bendable center filled with pockets of melted caramel. The scent is heavenly—a mixture of caramelized sugar, vanilla, and a hint of sea salt that balances the sweetness perfectly. Each bite provides a satisfying chew that makes them a crowd favorite, looking beautifully rustic and artisanal on your final food board arrangement.
Ingredients
- 1 cup unsalted butter, browned and cooled
- 3/4 cup brown sugar, packed
- 1/2 cup granulated sugar
- 1 large egg + 1 egg yolk
- 2 teaspoons vanilla extract
- 2.5 cups all-purpose flour
- 1 teaspoon baking soda
- 1/2 teaspoon sea salt
- 1 cup caramel bits or chopped soft caramels
How to make it
- Start by browning the butter in a skillet over medium heat. Whisk constantly until it smells nutty and you see brown flecks. Pour into a bowl and let it cool completely until it reaches a soft solid state.
- Cream the browned butter with both sugars until fluffy. Add the egg, yolk, and vanilla, beating until well combined.
- In a separate bowl, whisk the flour, baking soda, and sea salt.
- Gradually add the dry ingredients to the wet, mixing on low speed. Fold in the caramel bits by hand.
- Scoop rounded tablespoons of dough onto a parchment-lined baking sheet. For the best texture, chill the dough balls in the fridge for at least 30 minutes before baking.
- Bake at 350°F (175°C) for 10-12 minutes. The edges should be golden, but the centers should still look slightly underbaked.
- Sprinkle with an extra pinch of flaky sea salt as soon as they come out of the oven. Let them cool on the pan for 5 minutes to set the caramel before moving to a rack.
Creating Your Viral Moment: The Assembly
Now that you have your repertoire of treats, it’s all about the assembly. Grab a large wooden board or a clean marble slab. Start by placing the larger items—like the fudge cake or the cheesecake—in the center or at opposing corners to create balance. Fill the gaps with the smaller items like truffles, lemon bars, and cookies. Don’t be afraid to let things overlap; a crowded board looks more abundant and appetizing! Finally, add some sprigs of mint or extra berries for a pop of color that will make your photos pop on any social feed.