

We’ve all been there—scrolling through social media, mesmerized by those sprawling, colorful grazing boards that look more like works of art than a Tuesday night dinner. There is something so deeply comforting about a table overflowing with options, inviting everyone to lean in, share stories, and pick their favorite bites. It’s about more than just the food; it’s about the atmosphere of togetherness and the effortless charm of a meal that doesn’t feel forced. I remember the first time I hosted a ‘board night’ for my closest friends; the laughter didn’t stop until the very last crumb of cheese was gone.
The secret to the perfect aesthetic food board isn’t actually about hours spent over a hot stove—it’s about the curation. While the assembly requires no ‘cooking’ in the traditional sense of a five-course meal, having a few homemade, show-stopping elements can elevate your board from simple to legendary. Whether you are aiming for a Mediterranean vibe or a comfort-food feast, these viral components are the building blocks of a board that will have everyone reaching for their cameras before their forks.
How to cook creamy pasta?

Why we love this
There is nothing quite as soul-soothing as a bowl of silky, cream-laden pasta that coats every single strand in a velvet embrace. Imagine the aroma of sautéed garlic and shallots swirling through your kitchen, mingling with the nutty scent of freshly grated Parmesan cheese. Each bite offers a luxurious texture—soft yet firm pasta meeting a sauce so rich it feels like a warm hug on a plate. It’s the ultimate comfort food that adds a touch of sophisticated elegance to any gathering, making it a centerpiece that guests will gravitate toward instantly.
Ingredients
- 1 lb Fettuccine or Pappardelle
- 2 cups heavy cream
- 1/2 cup unsalted butter
- 1 cup freshly grated Parmesan cheese
- 4 cloves minced garlic
- Salt and cracked black pepper to taste
- Fresh parsley for garnish
How to make it
- Fill a large pot with water and a generous amount of salt (it should taste like the sea); bring to a rolling boil over high heat. Add your pasta and cook for 1-2 minutes less than the package directions to achieve a perfect ‘al dente’ texture.
- While the pasta cooks, place a large skillet over medium-low heat and melt the butter until it begins to foam slightly. Add the minced garlic, stirring constantly for about 60 seconds until fragrant but not browned, as burnt garlic will turn the sauce bitter.
- Slowly pour in the heavy cream, whisking continuously to incorporate the butter. Bring the mixture to a very gentle simmer—do not let it boil vigorously, or the cream may break. Let it reduce for about 5 minutes until it slightly thickens and can coat the back of a spoon.
- Stir in the Parmesan cheese one handful at a time, whisking vigorously after each addition until the sauce is glossy and smooth. Season with plenty of cracked black pepper and a pinch of salt.
- Using tongs, transfer the pasta directly from the boiling water into the skillet. Toss the pasta in the sauce for 2 minutes over low heat, adding a splash of reserved pasta water if needed to reach a silky consistency. Garnish with parsley and serve immediately.
How to make crispy chicken?

Why we love this
The sound of that first crunch into a perfectly fried piece of chicken is arguably one of the best sounds in the culinary world. We adore this because of the dramatic contrast between the jagged, golden-brown exterior and the steaming, tender juice that follows. The aroma is nostalgic and savory, filled with the scent of toasted flour and a secret blend of spices that tickles the senses. It’s a tactile experience—picking up a piece with your fingers, feeling the heat, and savoring that seasoned, crackling crust that stays crispy long after it leaves the pan.
Ingredients
- 2 lbs chicken thighs or tenders
- 2 cups buttermilk
- 2 cups all-purpose flour
- 1/2 cup cornstarch
- 1 tbsp paprika, 1 tsp cayenne, 1 tbsp garlic powder
- Vegetable oil for frying
- Salt and pepper
How to make it
- Begin by marinating the chicken in buttermilk, salt, pepper, and a dash of hot sauce in a large bowl. Cover and refrigerate for at least 2 hours (or overnight) to allow the lactic acid to tenderize the meat fibers.
- In a shallow dish, whisk together the flour, cornstarch, and all the spices. The cornstarch is the secret to a lighter, crispier crust. Take the chicken from the buttermilk, let the excess drip off, and dredge thoroughly in the flour mixture, pressing down hard to ensure ‘shags’ of flour attach to the meat.
- Fill a heavy-bottomed cast-iron skillet or Dutch oven with about 2 inches of oil. Heat the oil to exactly 350°F (175°C); use a candy thermometer to monitor this, as temperature consistency is vital for non-greasy chicken.
- Carefully lower the chicken pieces into the oil using tongs, being careful not to overcrowd the pan. Fry for 6-8 minutes per side for thighs, or 3-4 minutes per side for tenders. Look for a deep, amber-gold color and an internal temperature of 165°F.
- Remove the chicken and place it on a wire cooling rack set over a baking sheet. This allows air to circulate around the chicken so the bottom doesn’t get soggy. Sprinkle with a final touch of flaky sea salt while still hot.
How to make street tacos?

Why we love this
Street tacos represent the peak of vibrant, fresh, and customizable eating, making them a star player for any aesthetic food board. The combination of warm, charred corn tortillas and savory, seasoned meat topped with a punch of citrus and fresh herbs creates a flavor explosion. We love the ritual of assembling them—the bright green of the cilantro, the sharp white of the diced onions, and the zingy spray of lime juice. It’s a sensory delight that balances smoky, salty, and acidic notes in one perfect, handheld package.
Ingredients
- 1 lb flank steak or chicken breast
- Small corn tortillas
- 1 cup finely diced white onion
- 1/2 cup chopped fresh cilantro
- 2 limes, cut into wedges
- Taco seasoning (cumin, chili powder, oregano)
- Olive oil
How to make it
- Dice your meat into very small, uniform cubes (about 1/2 inch). This ensures high surface area for seasoning and quick, even browning. Toss the meat in a bowl with olive oil and a heavy coating of taco seasoning.
- Heat a heavy stainless steel or cast-iron skillet over high heat until it is nearly smoking. Add the meat in a single layer. Do not stir immediately; let the meat sear for 2-3 minutes to develop a dark, flavorful crust (the Maillard reaction).
- Once charred, flip the meat and cook for another 2 minutes until fully cooked through. Remove from the heat and let it rest for a few minutes so the juices redistribute.
- For the tortillas, place them directly over a gas flame for 10-15 seconds per side using tongs, or heat them in a dry skillet until they puff slightly and show charred spots. Wrap them in a clean kitchen towel to keep them warm and pliable.
- Assemble by placing a generous spoonful of meat onto two stacked tortillas (the street style), topping with a sprinkle of onions and cilantro. Serve with a lime wedge on the side to be squeezed just before eating for maximum freshness.
How to cook butter chicken?

Why we love this
Butter chicken is the epitome of culinary luxury, characterized by a sauce so smooth and vibrant it looks like liquid gold. The aroma is intoxicating, filled with the warmth of garam masala, ginger, and the sweetness of tomatoes softened by heavy cream. We love it for the way the tender morsels of chicken practically melt in your mouth, bathed in a sauce that strikes a perfect balance between spicy and sweet. It’s a dish that demands a piece of bread to swipe up every last drop, making it a communal favorite.
Ingredients
- 1.5 lbs chicken thighs, bite-sized
- 1 cup Greek yogurt
- 1 can (15 oz) tomato sauce or puree
- 1 cup heavy cream
- 4 tbsp butter
- Garam masala, turmeric, cumin, ginger-garlic paste
- Fresh cilantro for garnish
How to make it
- Marinate the chicken pieces in Greek yogurt, lemon juice, turmeric, and cumin for at least 1 hour. The yogurt enzymes help break down the protein for a tender result.
- In a large pot, melt the butter over medium heat. Add the ginger-garlic paste and sauté for 1 minute until fragrant. Add the tomato puree and a teaspoon of sugar to balance the acidity; simmer for 10 minutes on low heat until the sauce darkens.
- While the sauce simmers, sear the marinated chicken in a separate pan over medium-high heat until browned on all sides (it doesn’t need to be cooked through yet).
- Add the seared chicken and any juices into the tomato sauce. Stir in the garam masala and chili powder. Cover and simmer for 15 minutes, allowing the chicken to finish cooking and the spices to meld.
- Lower the heat to the minimum and stir in the heavy cream. Whisk gently until the sauce turns a beautiful bright orange. Let it sit for 2 minutes to thicken slightly, then garnish with cilantro and serve in a shallow bowl.
How to make cheesy lasagna?

Why we love this
A great lasagna is a structural masterpiece of flavor layers, providing a deep sense of satisfaction as you cut through the bubbling cheese crust. The smell of slow-simmered tomato sauce mixed with the creamy scent of ricotta and melted mozzarella is enough to bring anyone to the kitchen. We love the contrast of the crispy, browned edges of the top pasta layer against the soft, cheesy interior. It’s a hearty, impressive dish that feels celebratory and generous, perfect for a centerpiece on a large wooden board.
Ingredients
- 1 box lasagna noodles
- 1 lb ground beef or Italian sausage
- 2 jars marinara sauce
- 15 oz ricotta cheese
- 1 egg
- 4 cups shredded mozzarella
- 1 cup grated Parmesan
How to make it
- Cook the lasagna noodles in boiling salted water for 2 minutes less than the ‘firm’ directions; they will finish cooking in the oven and stay structurally sound. Drain and lay them flat on parchment paper.
- In a large skillet, brown the ground meat over medium-high heat. Drain the excess fat, then stir in the marinara sauce and simmer for 10 minutes. In a separate bowl, mix the ricotta, egg, and 1/2 cup of Parmesan to create a stable, creamy filling.
- Preheat your oven to 375°F (190°C). In a 9×13 baking dish, spread a thin layer of meat sauce on the bottom. Arrange a layer of noodles on top, slightly overlapping.
- Spread a third of the ricotta mixture over the noodles, followed by a layer of meat sauce and a generous sprinkle of mozzarella. Repeat these layers until you reach the top of the dish.
- Finish with a heavy layer of mozzarella and the remaining Parmesan. Cover with foil (tented so it doesn’t touch the cheese) and bake for 25 minutes. Remove the foil and bake for another 15 minutes until the cheese is golden and bubbling. Let it rest for 15 minutes before slicing to ensure the layers hold together.
How to make loaded fries?

Why we love this
Loaded fries are the ultimate ‘party food’—a messy, glorious pile of indulgence that invites everyone to dig in at once. There is a playful joy in navigating through the layers of melted cheese, salty bacon bits, and cool sour cream. We love the variety of textures: the initial crunch of the potato, the gooey pull of the cheese, and the fresh pop of green onions. It’s a dish that feels like a celebration of all things savory, designed to be shared and enjoyed with zero formalities.
Ingredients
- 1 bag of frozen extra-crispy fries
- 2 cups shredded cheddar cheese
- 1/2 cup cooked bacon bits
- 1/2 cup sour cream
- 1/4 cup sliced green onions
- Pickled jalapeños (optional)
How to make it
- Bake the fries according to the package instructions, but aim for the ‘extra crispy’ end of the spectrum. I recommend using a convection setting if available, or cranking the heat an extra 25 degrees for the last 5 minutes to ensure they can hold up under the toppings.
- Once the fries are done, immediately pile them into a heat-proof platter or a cast-iron skillet. While they are still piping hot, toss them with a pinch of salt.
- Generously sprinkle the shredded cheddar cheese over the hot fries. Return the platter to the oven (or under the broiler) for 2-3 minutes until the cheese is completely melted and beginning to bubble.
- Remove from the oven and immediately top with the bacon bits and jalapeños. The heat from the fries will warm these toppings slightly without losing their texture.
- Finish by drizzling the sour cream over the top in a zig-zag pattern and scattering the green onions. Serve immediately while the cheese is at its peak ‘stretchiness.’
How to bake artisan pizza?

Why we love this
Baking an artisan pizza at home feels like magic—watching a simple ball of dough transform into a charred, bubbly crust in a matter of minutes. The aroma of fermenting yeast and roasting tomatoes is incredible. We love the simplicity of high-quality ingredients: the stretch of fresh mozzarella, the peppery bite of fresh basil, and the drizzle of extra virgin olive oil. It’s an interactive experience that results in a rustic, beautiful pie that looks like it came straight from a Neapolitan wood-fired oven.
Ingredients
- 1 ball of pizza dough (room temperature)
- 1/2 cup San Marzano tomato sauce
- 4 oz fresh mozzarella pearls or slices
- Fresh basil leaves
- Cornmeal for dusting
- Olive oil
How to make it
- Place a pizza stone or an inverted baking sheet in your oven and preheat to its highest possible setting (usually 500°F or 550°F) for at least 45 minutes. This ‘heat soak’ is crucial for a crispy bottom.
- On a floured surface, gently stretch the room-temperature dough by hand. Avoid using a rolling pin, as it crushes the air bubbles. Stretch until the dough is thin in the center with a slightly thicker ‘cornicione’ (rim).
- Dust a pizza peel or a piece of parchment paper with cornmeal and slide the dough onto it. Spread a thin layer of sauce, leaving 1 inch around the edge. Add the mozzarella and a light drizzle of olive oil.
- Carefully slide the pizza onto the hot stone/sheet in the oven. Bake for 8-12 minutes, or until the crust is charred in spots and the cheese is blistered.
- Remove from the oven and immediately top with fresh basil leaves (adding them after baking prevents them from turning black). Let it sit for 2 minutes before slicing with a sharp wheel.
How to fry perfect dumplings?
Why we love this
Dumplings are the perfect bite-sized treasure, offering a delightful surprise of seasoned filling inside a delicate wrapper. We love the ‘potsticker’ method because it provides two textures in one: a golden, crispy, fried bottom and a soft, steamed top. The scent of sesame oil and ginger that escapes when you bite into one is heavenly. They are incredibly versatile and look stunning lined up in rows on a board, served with a dark, glossy dipping sauce that promises a hit of umami.
Ingredients
- 1 pack of frozen or fresh dumplings
- 2 tbsp neutral oil (like canola)
- 1/2 cup water
- 1 tbsp sesame oil
- Soy sauce and chili oil for dipping
How to make it
- Heat a non-stick skillet over medium-high heat and add the neutral oil. Once the oil shimmers, place the dumplings in the pan, flat-side down, in a circular or linear pattern. Ensure they aren’t touching.
- Fry the dumplings undisturbed for 2-3 minutes until the bottoms are a deep golden brown. Lift one to check the color; it should look like a well-toasted piece of bread.
- Carefully pour the water into the pan (it will hiss and steam violently, so have a lid ready) and immediately cover with a tight-fitting lid. Lower the heat to medium and let the dumplings steam for 5-6 minutes until the water has mostly evaporated.
- Remove the lid and continue to cook for another 1-2 minutes. This ‘re-crisps’ the bottom after the steaming process. Drizzle with a little sesame oil for shine and aroma.
- Slide the dumplings onto a plate or board. Serve with a side of soy sauce mixed with chili oil and a few toasted sesame seeds for a professional finish.
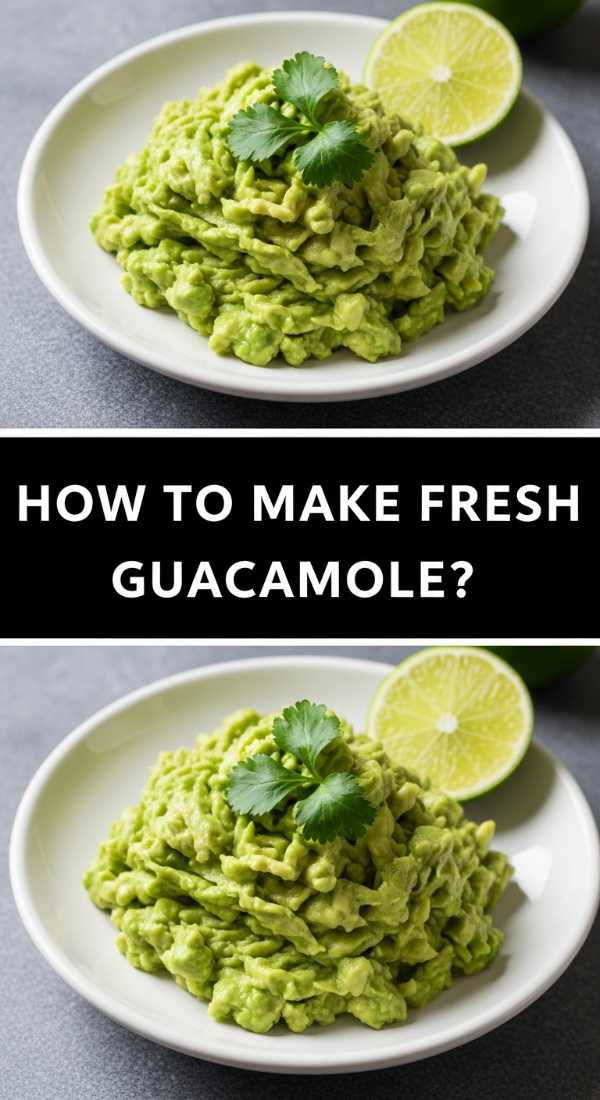
How to make fresh guacamole?

Why we love this
Freshly made guacamole is the vibrant, green heartbeat of any snack board. It’s all about that perfect, chunky-yet-creamy texture that store-bought versions just can’t replicate. We love the brightness of the lime against the rich, buttery fat of the avocados, and the sharp crunch of red onion and jalapeño. It smells of summer and sunshine, and its cooling properties make it the perfect companion to spicier board elements like tacos or loaded fries. It’s a clean, healthy, and visually stunning dip.
Ingredients
- 3 ripe Hass avocados
- 1/2 red onion, finely diced
- 1 jalapeño, seeded and minced
- 1/4 cup chopped cilantro
- 1 lime, juiced
- 1/2 tsp salt
How to make it
- Cut the avocados in half, remove the pits, and scoop the flesh into a large bowl. Using a fork or a potato masher, gently crush the avocado. Pro tip: Keep it slightly chunky for a more authentic, rustic texture rather than a smooth puree.
- Immediately add the lime juice over the avocado. The acidity not only adds flavor but acts as an antioxidant to prevent the avocado from browning.
- Fold in the finely diced red onion, minced jalapeño, and chopped cilantro. Using a spatula, mix gently so you don’t over-process the avocado into a mush.
- Taste the mixture and add salt gradually. Salt is what brings out the ‘nutty’ flavor of the avocado, so don’t be too shy with it.
- Transfer to a serving bowl and press a piece of plastic wrap directly onto the surface if not serving immediately. This prevents air contact. Top with a few extra sprigs of cilantro or a dusting of paprika before placing on your board.
How to bake garlic naan?
[IMAGE_10]
Why we love this
Garlic naan is the ultimate vessel for sauces, and making it at home fills your space with the irresistible scent of charred dough and roasted garlic. We love those characteristic blackened bubbles that form on the surface, giving the bread a smoky flavor and a chewy, pillowy texture. Brushed with melted butter and topped with fresh herbs, it’s a beautiful, rustic addition that feels much more special than standard crackers. It’s warm, comforting, and incredibly satisfying to tear apart with your hands.
Ingredients
- 2 cups all-purpose flour
- 1/2 cup warm water
- 1/4 cup Greek yogurt
- 1 tsp yeast, 1 tsp sugar
- 3 tbsp melted butter
- 3 cloves minced garlic
- Fresh cilantro
How to make it
- In a small bowl, combine warm water, sugar, and yeast. Let it sit for 5-10 minutes until it becomes foamy. In a large bowl, mix the flour, yogurt, and yeast mixture until a dough forms.
- Knead the dough on a floured surface for about 5 minutes until smooth and elastic. Place in a greased bowl, cover, and let rise in a warm spot for 1 hour or until doubled in size.
- Divide the dough into 6 equal balls. Use a rolling pin to roll each ball into an oval shape, about 1/4 inch thick.
- Heat a cast-iron skillet over high heat until very hot. Lightly brush one side of the dough with water and place it water-side down in the pan. Cover with a lid for 1 minute (this creates steam to help it puff).
- Remove the lid, flip the naan, and cook for another 30-60 seconds until charred spots appear. While hot, brush with a mixture of melted butter and minced garlic. Sprinkle with cilantro and serve warm, stacked high on your board.
Wrapping Up Your Aesthetic Board
Creating the perfect food board is an art form that rewards creativity and a love for good food. By combining these detailed recipes with a bit of styling—think sprigs of fresh herbs, clusters of grapes, and little bowls of dipping sauces—you can turn a simple meal into an unforgettable experience. Remember, the ‘no cooking’ secret is that while the components take some effort, the presentation should always feel effortless and inviting. Now, go grab your biggest platter and start building!
Frequently Asked Questions
Got questions about your board? We’ve got answers to help you troubleshoot and style like a pro!