

I remember scrolling through my feed late last Tuesday night, feeling that familiar itch for something fresh, beautiful, and—most importantly—easy. We’ve all seen those mesmerizing ‘board’ videos on TikTok, where a simple wooden platter transforms into a communal feast that looks almost too good to eat. There’s a certain magic in the way a shared meal brings us together, grounding us in the present moment amidst the digital noise of our daily lives.
This isn’t just about food; it’s about the aesthetic of effortless hosting. Whether you are gathering your best friends for a Sunday brunch or just trying to make a Tuesday night feel a little more special, these ‘viral boards’ are the answer. Today, I’m breaking down the ultimate components to build a board that will have your guests reaching for their phones to snap a photo before they even take a bite. Let’s dive into the flavors of the season!
How to make spring salmon?

Why we love this
There is something truly ethereal about a perfectly cooked piece of spring salmon; it carries the light, refreshing promise of the season in every bite. When done right, the skin achieves a glass-like shatter while the flesh remains buttery, translucent, and incredibly moist, infused with the bright, zesty aroma of Meyer lemons and fresh dill. It’s a dish that feels elegant yet rustic, providing a rich source of healthy fats that leave you feeling nourished rather than weighed down, making it the perfect centerpiece for a vibrant lifestyle board.
Ingredients
- 2 lbs fresh wild-caught salmon fillet (center cut)
- 3 tablespoons extra virgin olive oil
- 1 Meyer lemon, thinly sliced
- 4 cloves garlic, minced
- 1 bunch fresh dill, chopped
- Flaky sea salt and cracked black pepper
How to make it
- Begin by removing the salmon from the refrigerator at least 20 minutes before cooking to bring it to room temperature, which ensures even cooking throughout the fillet.
- Preheat your oven to 375°F (190°C) and line a rimmed baking sheet with parchment paper to prevent sticking and make cleanup a breeze.
- Pat the salmon skin extremely dry with paper towels; moisture is the enemy of crispiness, so take your time with this step until the surface feels tacky.
- Whisk together the olive oil, minced garlic, and half of the fresh dill in a small bowl, then brush the mixture generously over the top of the fish.
- Arrange the Meyer lemon slices across the fillet in an overlapping pattern, creating a beautiful citrus scales effect that protects the fish while infusing it with juice.
- Roast in the center of the oven for 12-15 minutes; you are looking for an internal temperature of 145°F, or until the fish just begins to flake easily with a fork in the thickest part.
- Remove from the oven and let it rest for 5 minutes before serving, then garnish with the remaining fresh dill and a generous sprinkle of flaky sea salt.
How to cook spring soup?

Why we love this
A bowl of spring soup is like a liquid garden, capturing the fleeting essence of new growth in a velvety, vibrant green puree. The aroma is instantly rejuvenating, smelling of sweet snap peas, earthy leeks, and a cooling whisper of mint that dances across the palate with a clean finish. It provides a stunning pop of color to any table setting, offering a silky texture that feels luxurious and sophisticated while remaining incredibly light and packed with seasonal nutrients that energize the body.
Ingredients
- 1 lb fresh shelled English peas
- 2 large leeks, white and light green parts only, cleaned and sliced
- 4 cups high-quality vegetable or chicken stock
- 1/2 cup heavy cream or coconut milk
- 1/4 cup fresh mint leaves
- 2 tablespoons unsalted butter
- Salt and white pepper to taste
How to make it
- In a large heavy-bottomed pot, melt the butter over medium-low heat until it begins to foam, then add the sliced leeks and a pinch of salt.
- Sauté the leeks slowly for about 8-10 minutes, stirring frequently until they are soft and translucent but have not developed any brown color; this preserves the soup’s bright green hue.
- Pour in the stock and increase the heat to medium-high, bringing the liquid to a gentle rolling simmer for about 5 minutes to meld the flavors.
- Add the fresh peas to the simmering liquid and cook for only 3-5 minutes until they are bright green and tender; overcooking will result in a dull, olive color.
- Stir in the fresh mint leaves during the last 30 seconds of cooking, then immediately remove the pot from the heat to preserve the herb’s volatile oils.
- Use an immersion blender (or transfer in batches to a high-speed blender) to puree the soup until it is completely smooth and aerated.
- Stir in the cream, season carefully with salt and white pepper, and serve warm or chilled for a refreshing seasonal treat.
How to prep pasta salad?
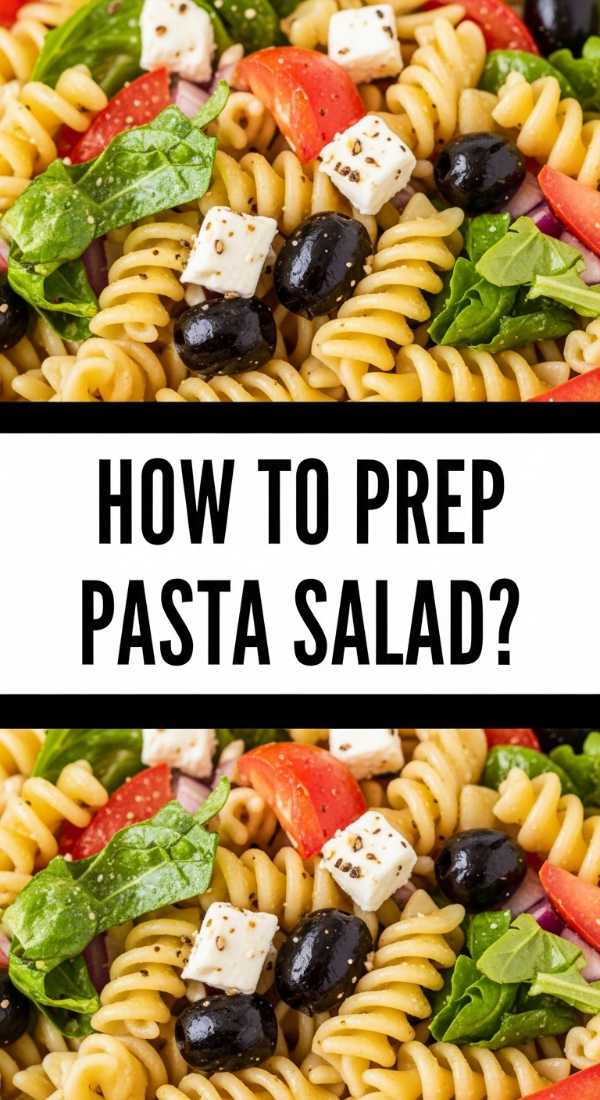
Why we love this
Pasta salad is the ultimate canvas for culinary creativity, offering a satisfying combination of chewy textures and crisp, raw vegetables that pop in every mouthful. The scent of a zesty herb vinaigrette clinging to every noodle is intoxicating, promising a tangy, savory experience that only gets better as the flavors meld over time. It’s the perfect ‘make-ahead’ dish for a busy lifestyle, providing a hearty, portable base that feels sunshine-bright thanks to the addition of sun-ripened tomatoes and sharp, salty feta cheese.
Ingredients
- 1 lb fusilli or rotini pasta
- 1 cup cherry tomatoes, halved
- 1 English cucumber, diced
- 1/2 red onion, finely minced
- 1/2 cup Kalamata olives, sliced
- 1/2 cup crumbled feta cheese
- Dressing: 1/2 cup olive oil, 3 tbsp red wine vinegar, 1 tsp dried oregano, 1 clove garlic minced
How to make it
- Bring a large pot of heavily salted water to a boil; the water should ‘taste like the sea’ to properly season the pasta from the inside out.
- Cook the pasta according to the package instructions until it is just slightly past al dente; for cold salads, a slightly softer noodle absorbs the dressing better.
- Drain the pasta and immediately rinse it under cold running water to stop the cooking process and wash away excess starch, preventing the noodles from sticking together.
- In a large mixing bowl, whisk together the olive oil, red wine vinegar, minced garlic, and oregano until the dressing is emulsified and thick.
- Add the cooled pasta to the bowl along with the tomatoes, cucumbers, onions, and olives, tossing vigorously to ensure every crevice of the pasta is coated.
- Fold in the crumbled feta cheese gently so it maintains some of its structure rather than dissolving into the dressing.
- Let the salad sit in the refrigerator for at least one hour before serving to allow the pasta to absorb the vinaigrette, then give it a final toss and a splash of olive oil before plating.
How to grill juicy chicken?

Why we love this
There is no aroma quite as evocative of summer as the smell of marinated chicken hitting a searing hot grill, sending plumes of smoky, savory air into the backyard. When executed perfectly, the exterior develops a beautiful, caramelized char while the interior remains incredibly succulent, releasing a fountain of flavorful juices with every slice. It is the protein powerhouse of any food board, offering a versatile foundation that pairs beautifully with everything from spicy salsas to cooling tzatziki, making every bite a celebration of fire and flavor.
Ingredients
- 2 lbs boneless, skinless chicken thighs
- 1/4 cup olive oil
- Juice of 2 limes
- 3 cloves garlic, smashed
- 1 tablespoon smoked paprika
- 1 teaspoon cumin
- 1 teaspoon honey
- Kosher salt and black pepper
How to make it
- In a large zip-top bag or shallow dish, whisk together the olive oil, lime juice, smashed garlic, paprika, cumin, and honey to create a balanced, acidic marinade.
- Place the chicken thighs in the marinade, ensuring every piece is fully coated, and refrigerate for at least 4 hours—or ideally overnight—to break down the fibers and infuse deep flavor.
- Clean your grill grates thoroughly and preheat the grill to medium-high heat (about 400°F), then lightly oil the grates using a folded paper towel dipped in oil.
- Remove the chicken from the marinade, shaking off excess liquid, and place the thighs on the hottest part of the grill to sear for 5-6 minutes.
- Flip the chicken and move it to a slightly cooler part of the grill, allowing it to finish cooking for another 5-7 minutes until the internal temperature reaches 165°F.
- The key to juiciness is the rest: transfer the grilled chicken to a plate and tent it loosely with foil for 10 minutes to allow the juices to redistribute throughout the meat.
- Slice the chicken against the grain and finish with a squeeze of fresh lime juice and a sprinkle of salt before adding it to your board.
How to bake strawberry pie?

Why we love this
A strawberry pie is the crown jewel of spring baking, a masterpiece of textures that ranges from the flaky, golden-brown shatter of a buttery crust to the jammy, ruby-red explosion of sun-drenched berries. As it bakes, the kitchen fills with a heavy, sweet perfume of caramelized sugar and warm fruit that feels like a hug for the soul. Each slice offers a perfect balance of tartness and sweetness, topped with a dollop of cold whipped cream that melts into the warm filling, creating a decadent, nostalgic experience that defines the joy of seasonal eating.
Ingredients
- 2 deep-dish pie crusts (homemade or store-bought)
- 6 cups fresh strawberries, hulled and halved
- 3/4 cup granulated sugar
- 1/4 cup cornstarch
- 1 tablespoon lemon juice
- 1 teaspoon vanilla extract
- 1 egg (for egg wash) + 1 tablespoon coarse sugar
How to make it
- Preheat your oven to 425°F (220°C) and place a baking sheet on the lower rack to catch any juices that might bubble over during the baking process.
- In a large bowl, gently toss the halved strawberries with the sugar, cornstarch, lemon juice, and vanilla extract until the berries are evenly coated in a thick, pink slurry.
- Roll out your bottom pie crust and fit it into a 9-inch pie plate, trimming the edges to leave a 1-inch overhang.
- Pour the strawberry mixture into the crust, mounding the berries slightly in the center to account for shrinkage as they soften in the heat.
- Roll out the second crust and cut into strips to create a lattice top, which allows steam to escape and prevents the crust from becoming soggy.
- Crimp the edges of the pie to seal, brush the lattice with a beaten egg wash, and sprinkle generously with coarse sugar for a professional, sparkling finish.
- Bake at 425°F for 15 minutes, then reduce the heat to 375°F and continue baking for 35-45 minutes until the crust is deep golden and the filling is bubbling thick and slow.
How to mix summer drinks?

Why we love this
Summer drinks are all about the sensory experience of cold condensation on a glass and the vibrant, clinking sound of ice cubes against the backdrop of a sunset. These beverages are designed to be as beautiful as they are refreshing, featuring muddled botanicals, floating citrus wheels, and delicate edible flowers that turn a simple hydration break into a celebratory ritual. The flavor profiles are crisp and effervescent, cutting through the heat with a sharp acidity and a gentle sweetness that awakens the palate and keeps the conversation flowing at any gathering.
Ingredients
- 1 cup fresh berries (raspberries or blueberries)
- 1 bunch fresh basil or mint
- 2 tablespoons agave nectar or simple syrup
- 2 cups sparkling water or club soda
- Juice of 1 large lemon
- Large ice cubes
- Optional: Edible pansies for garnish
How to make it
- In a large glass pitcher, combine the fresh berries and the herb of your choice (basil pairs wonderfully with berries) with the agave nectar.
- Use a muddler or the back of a wooden spoon to gently crush the berries and bruise the herbs, releasing their essential oils and colorful juices without pulverizing them.
- Add the freshly squeezed lemon juice to the pitcher and stir well to dissolve the sweetener into the citrus.
- Fill the pitcher halfway with large ice cubes; using large cubes ensures the drink stays cold without diluting too quickly in the summer heat.
- Slowly pour the sparkling water over the ice, allowing the bubbles to naturally mix the ingredients together without losing too much carbonation.
- Give the drink one very gentle stir from the bottom up to distribute the fruit and herbs evenly throughout the pitcher.
- Pour into individual glasses and garnish each with a fresh sprig of herbs and an edible flower for a high-end, viral-ready presentation.
How to char grilled asparagus?
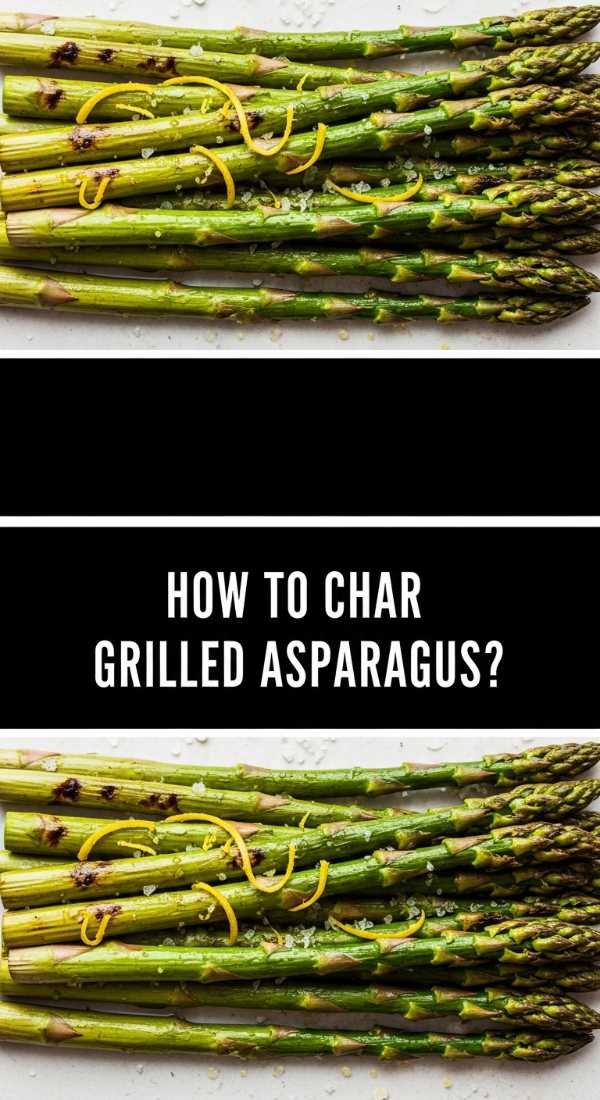
Why we love this
Grilled asparagus is the ultimate side dish because it transforms a simple vegetable into something smoky, sophisticated, and deeply savory with minimal effort. The high heat of the grill creates a beautiful contrast between the tender, juicy stems and the crisp, charred tips that crumble delightfully on the tongue like salty chips. Infused with the brightness of lemon zest and the richness of a balsamic glaze, it provides a sophisticated green element to your board that feels elevated and gourmet, perfect for snapping those ‘lifestyle’ photos.
Ingredients
- 1 bunch thick-stemmed asparagus, woody ends trimmed
- 2 tablespoons avocado oil (high smoke point)
- Zest of 1 lemon
- 1 tablespoon balsamic glaze
- 1/4 cup shaved parmesan cheese
- Salt and cracked black pepper
How to make it
- Preheat your grill or a heavy cast-iron grill pan to high heat; you want the surface to be smoking slightly before the vegetables hit the pan.
- Toss the trimmed asparagus in a bowl with avocado oil, salt, and pepper, ensuring each spear is lightly coated to facilitate even browning and prevent sticking.
- Place the asparagus spears across the grill grates in a single layer, perpendicular to the grates so they don’t fall through the gaps.
- Grill for 3-5 minutes without moving them to develop those signature deep char marks that provide the smoky flavor profile.
- Use tongs to roll the spears over and grill for an additional 2-3 minutes; the asparagus should be bright green and ‘tender-crisp,’ meaning it has a slight bite but isn’t mushy.
- Remove the spears from the heat and immediately toss with fresh lemon zest while they are still steaming to release the citrus oils.
- Arrange on your serving board and drizzle with balsamic glaze and a flurry of shaved parmesan for a restaurant-quality finish.
How to use sourdough discard?

Why we love this
There is a profound sense of satisfaction in turning ‘discard’ into something delicious, embodying a zero-waste lifestyle that feels both ancient and trendy. Sourdough discard adds a complex, fermented tang to recipes that regular flour simply cannot match, creating a depth of flavor that is at once sour, savory, and nutty. Whether it’s turned into crispy crackers or lacy pancakes, the texture is always superior—offering a delicate crunch and a tender crumb that makes your homemade board components stand out as truly artisanal and lovingly crafted.
Ingredients
- 1 cup sourdough discard (unfed)
- 1/4 cup melted butter or olive oil
- 1/2 teaspoon sea salt
- 1 tablespoon dried herbs (rosemary or za’atar)
- 1/4 teaspoon garlic powder
How to make it
- Preheat your oven to 325°F (165°C) and prepare a large baking sheet with a piece of parchment paper or a silicone baking mat.
- In a medium bowl, combine the sourdough discard with the melted butter, salt, herbs, and garlic powder, whisking until the mixture is smooth and resembles a thick batter.
- Pour the mixture onto the center of the parchment paper and use an offset spatula to spread it as thinly and evenly as possible across the entire sheet.
- The thinner the layer, the crispier the final product will be; aim for a thickness that is almost translucent in some spots.
- Bake for 10 minutes, then remove from the oven and use a pizza cutter to score the surface into squares or rectangles, which makes breaking them apart easier later.
- Return to the oven for another 20-30 minutes, or until the edges are golden brown and the center feels completely dry and firm to the touch.
- Allow the crackers to cool completely on the pan to reach maximum crispness before snapping them along the score lines and serving with your favorite dips.
How to make street tacos?

Why we love this
Street tacos are the heartbeat of communal eating, offering a riot of colors, textures, and bold spices that ignite the senses. The smell of corn tortillas charring over an open flame is instantly nostalgic, leading into the savory depth of slow-cooked meat and the sharp, clean crunch of raw white onions and cilantro. It’s a handheld experience that encourages guests to customize their bites, making it the ultimate interactive element for a viral food board that is as fun to assemble as it is to devour.
Ingredients
- 12 small corn tortillas
- 2 lbs slow-cooked pork carnitas or grilled steak
- 1 cup white onion, finely diced
- 1/2 cup fresh cilantro, chopped
- 2 radishes, thinly sliced
- 1/2 cup crumbled cotija cheese
- Lime wedges for serving
How to make it
- The most important step for authentic street tacos is preparing the tortillas: heat each corn tortilla directly over a gas flame for 10-15 seconds per side until charred edges appear and they become pliable.
- Stack the warmed tortillas in a clean kitchen towel or a tortilla warmer to keep them soft and steaming while you prepare the fillings.
- If using carnitas, sear the meat in a hot pan with a little oil for 2-3 minutes to get those crispy, ‘burnt ends’ that provide an essential texture contrast.
- Double-stack the tortillas (use two per taco) just like they do at the best taco trucks; this provides structural integrity for the juicy fillings.
- Place a generous spoonful of meat in the center, then top with a sprinkle of onions and a heavy handful of fresh cilantro.
- Garnish with a slice of radish for crunch and a dusting of salty cotija cheese for a creamy, funky finish.
- Serve with plenty of lime wedges on the side, as the hit of fresh acid is crucial for cutting through the richness of the meat.
How to bake spring cookies?

Why we love this
Spring cookies are like little bites of sunshine, often featuring soft, pillowy textures and pastel decorations that brighten up any dessert spread. They carry the delicate scents of vanilla bean and almond, with a sweetness that isn’t overpowering but rather elegant and refined. There’s a whimsical joy in seeing a tray of flower-shaped or sugar-dusted treats that look like they belong in a fairytale, providing a soft, comforting end to a meal that feels both youthful and sophisticated at the same time.
Ingredients
- 2 1/2 cups all-purpose flour
- 1 cup unsalted butter, softened
- 1 cup granulated sugar
- 1 large egg
- 2 teaspoons vanilla extract
- 1/2 teaspoon almond extract
- 1 teaspoon baking powder
- Pastel royal icing or powdered sugar for dusting
How to make it
- In the bowl of a stand mixer, cream together the softened butter and granulated sugar on medium-high speed for at least 3-5 minutes until the mixture is pale and fluffy.
- Add the egg, vanilla extract, and almond extract, beating until fully incorporated and the batter smells like a high-end bakery.
- In a separate bowl, whisk together the flour and baking powder, then gradually add to the wet ingredients on low speed until a soft dough forms.
- Crucial Step: Wrap the dough in plastic wrap and chill in the refrigerator for at least 1 hour; this prevents the cookies from spreading too much and losing their shape in the oven.
- Preheat the oven to 350°F (175°C) and roll the chilled dough out on a floured surface to about 1/4-inch thickness.
- Use your favorite spring-themed cutters (flowers, butterflies, or circles) to cut the dough and place them on a parchment-lined baking sheet.
- Bake for 8-10 minutes—remove them while the edges are still pale for a soft, melt-in-your-mouth texture. Once cooled, decorate with pastel icing or a simple dusting of powdered sugar.
Conclusion
Building the perfect food board is more than just a trend; it’s a lifestyle choice that celebrates the beauty of fresh ingredients and the joy of sharing. By combining these viral-worthy dishes—from the smoky char of asparagus to the sweet, jammy delight of strawberry pie—you’re not just serving a meal; you’re creating an experience. So, grab your biggest wooden board, invite your favorite people over, and let these simple, seasonal flavors take center stage at your table. Don’t forget to take a photo before it’s all gone!