
Do you ever look out your back window and wish you were stepping into a storybook instead of just a patch of grass? I remember my yard used to be a place I only visited to pull weeds or mow the lawn—it lacked soul, that spark of magic that makes you want to linger with a cup of tea while the sun dips low. There is something deeply healing about a garden that feels like a secret sanctuary, a place where the line between reality and whimsy begins to blur.
The transformation from an ordinary backyard to an otherworldly escape doesn’t require a massive budget or a professional landscaping crew; it requires a bit of imagination and the willingness to get your hands a little dirty. In this guide, I am sharing the exact projects that turned my outdoor space into a fairy-tale haven. We’re talking about textures that invite you to touch, colors that dance in the sunlight, and the gentle glow of lanterns that make every evening feel like a celebration.
Whether you have a sprawling estate or a tiny balcony, these DIY projects are designed to infuse your life with a sense of wonder. Let’s explore how to weave magic into every corner of your garden, using sustainable materials and a touch of artistic flair to create a retreat that is uniquely yours. Grab your gardening gloves and let’s get started on this enchanting journey!
How to Create Whimsical Garden Decor for a Fairy Tale Backyard
Why we love this
There is nothing more enchanting than a hidden fairy dwelling tucked away beneath the gnarled roots of an old tree. This project invites a sense of playfulness and discovery into your garden, encouraging visitors to lean in close and notice the tiny details. The scent of damp moss and the earthy aroma of pine bark ground the experience, while the visual of a miniature cedar-shingle roof and a tiny pebble pathway creates an instant narrative. It feels like stepping into a Victorian children’s novel, where every corner holds a secret and the air is thick with the sweet perfume of blooming jasmine and lavender.
Essential Elements:
- Natural hollow logs or large pieces of tree bark
- Flat river stones and colorful pebbles
- Preserved sheet moss and reindeer moss
- Miniature wooden doors and windows (hand-carved or purchased)
- Waterproof wood glue and exterior-grade sealant
- Small succulent cuttings like Echeveria or Sedum
How to make it
- Select a sheltered spot at the base of a tree or against a garden wall to serve as your foundation, clearing away any debris or weeds.
- Arrange your hollow log or bark structure to create the main ‘house’ body, ensuring it is stable and slightly recessed into the soil for a natural look.
- Apply waterproof wood glue to the back of your miniature door and press it firmly onto the center of the log, holding it for 60 seconds until the bond sets.
- Create a ‘living roof’ by layering sheet moss over the top of the log, securing it with floral pins or a light application of glue.
- Lay a winding path of river stones leading away from the door, tucking tiny bits of colorful reindeer moss between the stones to simulate miniature shrubbery.
- Plant your succulent cuttings around the perimeter of the house, choosing varieties with soft textures to mimic a lush, miniature landscape.
- Finish by spraying the entire structure with a light mist of water to help the moss settle and give the stones a polished, wet glow.
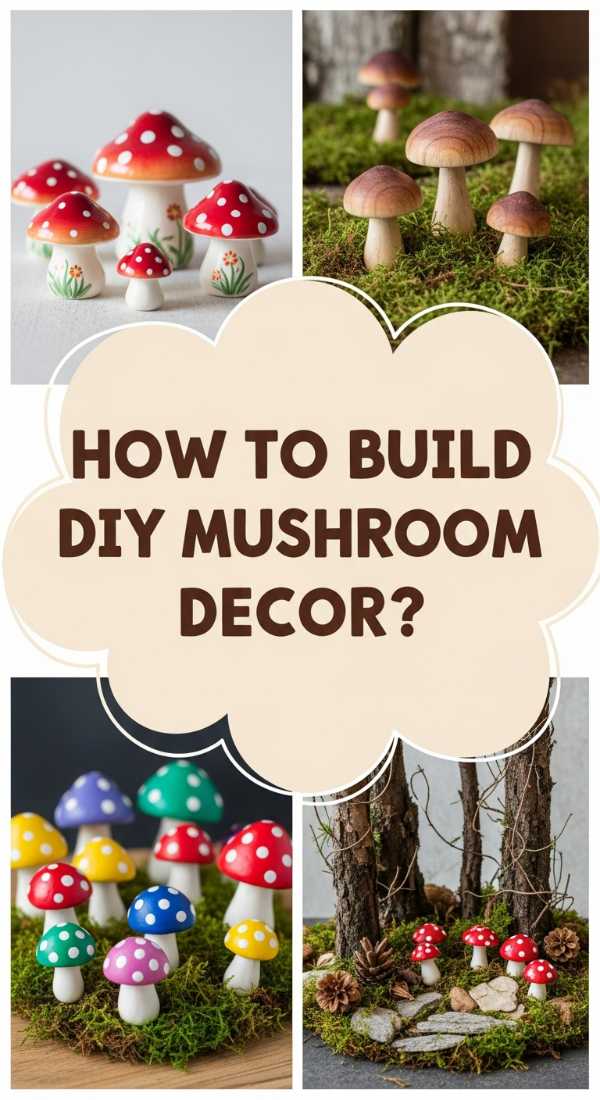
How to Build DIY Mushroom Garden Decor for Enchanting Outdoor Spaces

Why we love this
These oversized, handcrafted mushrooms add an instant pop of color and a surreal, Alice-in-Wonderland vibe to any shaded corner. The smooth, domed caps catch the dappled sunlight filtering through the canopy, creating a striking contrast against the rough, organic texture of the garden floor. We love how they look nestled among ferns; the vibrant reds and creamy whites stand out against the deep forest greens. There is a tactile joy in touching the cool, sealed surface of the ceramic caps, and they provide a whimsical structural element that remains beautiful even when the flowers have faded for the season.
Essential Elements:
- Terra cotta saucers in varying sizes (for the caps)
- Terra cotta pots (for the stems)
- Exterior-grade acrylic paint (Red, White, and Cream)
- High-gloss outdoor polyurethane sealant
- Strong construction adhesive (like E6000 or Liquid Nails)
- Sandpaper (medium grit)
How to make it
- Begin by lightly sanding the surfaces of both the saucers and the pots to remove any factory glaze, ensuring the paint adheres perfectly.
- Invert the pots and paint them with a creamy white or light tan exterior paint; apply two coats, allowing at least two hours of drying time between each.
- Paint the undersides and tops of the saucers with a bold scarlet red, ensuring full coverage over the rim for a professional finish.
- Once the red paint is dry to the touch, use a round sponge brush or a thumbprint to add varying sizes of white polka dots across the top of the saucer cap.
- After the paint has cured for 24 hours, apply a thick coat of high-gloss polyurethane sealant to protect the mushrooms from rain and UV rays.
- Apply a generous bead of construction adhesive to the rim of the inverted pot and carefully center the saucer on top, pressing down firmly to create a seal.
- Let the adhesive cure in a dry, room-temperature environment for 48 hours before placing the mushrooms in your garden beds.
How to Design Country Garden Decor for Rustic Home Charm

Why we love this
Rustic charm is all about celebrating the patina of time and the beauty of utility. We love using galvanized metal and weathered wood because they tell a story of heritage and hard work, blending seamlessly into a cottage-style landscape. The sound of a metal handle clinking against a bucket filled with blooming hydrangeas is quintessential country living. These elements provide a sturdy, grounded aesthetic that feels warm and inviting. The cool grey of the zinc-coated steel looks stunning against the soft pastels of sweet peas and the silver-green foliage of sage, creating a sensory experience that is both visual and nostalgic.
Essential Elements:
- Vintage galvanized wash tubs or buckets
- Reclaimed wood crates or pallets
- Cast iron garden faucets or hooks
- Coconut coir liners for drainage
- Burlap ribbon or twine for accents
- Drill with a metal-piercing bit
How to make it
- Source vintage galvanized tubs from flea markets, ensuring they have a desirable aged patina without excessive structural rust holes.
- Use a drill with a 1/2-inch metal bit to create 5-7 drainage holes in the bottom of the tub; this is crucial to prevent root rot in your country blooms.
- Line the bottom of the tub with two inches of coarse gravel to further improve drainage and add weight to prevent tipping during windstorms.
- Fill the tub with a high-quality potting mix enriched with compost, leaving about two inches of space below the rim for watering.
- Plant a ‘thriller’ like a tall foxglove in the center, surrounded by ‘fillers’ like marigolds and ‘spillers’ like creeping jenny for a full, lush look.
- Arrange reclaimed wood crates at varying heights around the base of the tub to create a multi-dimensional display that draws the eye upward.
- Tie a thick burlap bow around the handle of the bucket for a final touch of farmhouse elegance before placing the arrangement on your porch or patio.
How to Start Garden Decor Projects for Sustainable Outdoor Beauty

Why we love this
Sustainability and beauty go hand-in-hand when you repurpose glass bottles into light-catching garden borders. This project transforms everyday waste into a shimmering work of art that defines your garden paths with a jewel-toned glow. When the sun hits the glass, it casts ethereal blue, green, and amber shadows across the mulch, creating a mesmerizing kaleidoscope effect. We love the eco-conscious spirit of this project; it’s a way to honor the earth while enhancing it. The smooth, cool glass feels sophisticated against the rough texture of the soil, offering a modern twist on traditional stone edging.
Essential Elements:
- Collected glass bottles (wine, soda, or sparkling water bottles)
- A rubber mallet
- Garden twine and stakes for alignment
- A hand trowel or narrow shovel
- Warm soapy water and a scrub brush
- Sand or fine gravel
How to make it
- Soak your collected glass bottles in warm, soapy water for several hours to easily peel off labels and remove any sticky residue.
- Dry the bottles thoroughly and sort them by color or size to create a planned pattern (e.g., all cobalt blue or an alternating rainbow).
- Mark your intended border path using garden stakes and twine to ensure a perfectly straight or gracefully curved line.
- Dig a narrow trench along the twine line, approximately 6 inches deep and 4 inches wide, using your hand trowel.
- Fill the bottom of the trench with a one-inch layer of sand to provide a stable, level base for the bottles to sit on.
- Invert the bottles (neck down) into the trench, pressing them firmly into the sand and ensuring they are touching each other for stability.
- Use a rubber mallet to gently tap the bottom of each bottle until they are all at a uniform height, then backfill the trench with soil and pack it down tightly.
How to Master Garden Decoration Ideas for Year Round Curb Appeal

Why we love this
Curb appeal shouldn’t disappear when the sun goes down or the flowers fade in winter. Solar-powered lantern trees provide a structural, sculptural beauty that illuminates your home’s entrance throughout every season. We love the warm, amber glow these lanterns cast against the snow in winter or the lush greenery of summer. It creates a welcoming atmosphere that beckons guests toward your door. The sight of flickering ‘flame’ bulbs or steady fairy lights suspended from iron branches adds height and drama to your landscaping, ensuring your home looks curated and cared for 24/7.
Essential Elements:
- Wrought iron shepherd hooks of varying heights (3ft to 6ft)
- Weather-resistant solar lanterns with auto-on sensors
- Heavy-duty zip ties or decorative S-hooks
- Evergreen shrubs (like Boxwood or Yew) for the base
- Decorative river stones or mulch
How to make it
- Strategically place shepherd hooks in a staggered cluster near the front of your garden bed to create depth and visual interest.
- Drive the hooks at least 10 inches into the ground using a rubber mallet to ensure they remain upright during heavy winds or snow.
- Select solar lanterns that feature a high lumen count for better brightness; ensure the solar panels are on top and unobstructed by foliage.
- Attach the lanterns to the hooks using decorative S-hooks, ensuring they hang level and are securely fastened.
- Test the placement by checking if the solar panels receive at least 6-8 hours of direct sunlight during the day for maximum nighttime performance.
- Plant evergreen shrubs around the base of the hooks to hide the metal stakes and provide a green anchor that stays vibrant even in the coldest months.
- Layer dark mulch or polished river stones around the base to create a clean, professional look that highlights the ‘tree’ structure.
How to Craft DIY Garden Decor for Personalized Patio Style

Why we love this
Stepping stones are the ultimate canvas for self-expression. By creating custom mosaic stones, you turn a functional path into a gallery of memories and personal style. We love the tactile process of pressing smooth sea glass, colorful ceramic shards, and vintage marbles into cool, wet concrete. The finished product is a durable piece of art that withstands the elements while telling a story. Each stone feels solid and permanent underfoot, providing a rhythmic sense of movement as you walk through your patio area, surrounded by the scent of potted herbs and the sound of the wind in the trees.
Essential Elements:
- Pre-mixed stepping stone concrete or Quikrete
- Stepping stone molds (round or square)
- Mosaic materials: stained glass, sea glass, flat marbles, or broken china
- Contact paper (optional for design planning)
- Vaseline or mold release spray
- Rubber gloves and a dust mask
How to make it
- Thoroughly coat the inside of your mold with Vaseline or mold release spray to ensure the stone pops out easily once cured.
- If you have a complex design, lay it out on a piece of contact paper cut to the size of the mold, sticky side up, then press your mosaic pieces onto it face-down.
- Mix the concrete in a large bucket according to the package directions, aiming for a consistency similar to thick peanut butter.
- Pour the concrete into the mold, filling it halfway, then gently tap the sides of the mold to release any trapped air bubbles that could cause cracking.
- Place your contact paper design on top of the wet concrete (glass side down) or manually press your mosaic pieces into the surface, ensuring they are flush with the concrete.
- Allow the stone to cure in a shaded, dry area for at least 48 to 72 hours; rushing this step can lead to structural failure.
- Carefully flip the mold to release the stone, peel off the contact paper if used, and use a damp sponge to wipe away any excess concrete film from the glass surfaces.
How to Arrange Outdoor Garden Decor for Serene Nature Retreats

Why we love this
A serene nature retreat is incomplete without the soothing, rhythmic sound of trickling water. A DIY bamboo water feature brings a Zen-like atmosphere to your backyard, masking neighborhood noise and attracting local birds. We love the organic look of the pale bamboo against dark, wet river rocks. The sensory experience is profound: the coolness of the water, the gentle ‘clack’ of the bamboo, and the visual of a steady stream reflecting the sky. It transforms a chaotic mind into a peaceful one, making your garden feel like a remote mountain sanctuary where time slows down and the air feels fresher.
Essential Elements:
- A large, decorative ceramic or stone basin (no drainage holes)
- Submersible water pump with tubing
- Bamboo poles (various thicknesses)
- Large river rocks and smaller pebbles
- Hand saw and wood drill bit
- Aquarium-safe silicone sealant
How to make it
- Place your water pump at the bottom of the basin and run the power cord out the back, concealing it later with plants or stones.
- Cut a thick bamboo pole to span the width of the basin and a thinner piece to act as the spout; drill a hole in the thick pole to fit the spout.
- Thread the pump tubing through the bamboo poles so that the water will exit through the spout and fall back into the basin.
- Use aquarium-safe silicone to seal the joints between the bamboo pieces and let it dry completely for 24 hours.
- Fill the basin with large river rocks to anchor the pump in place and provide a surface for the water to splash against, which creates that beautiful sound.
- Fill the basin with distilled water (to prevent mineral buildup) and turn on the pump to test the flow rate, adjusting the pump setting as needed.
- Surround the base of the fountain with ferns or hostas to create a lush, integrated look that hides the mechanical components.
How to Curate Whimsical Garden Decor for Magical Twilight Evenings

Why we love this
When twilight falls, the garden undergoes a transformation, and a fairy light canopy is the key to capturing that magic. We love how thousands of tiny, warm-white LEDs mimic the look of fireflies trapped in a net overhead. It creates an intimate, ethereal ‘outdoor room’ that feels completely detached from the rest of the world. The soft light blurs the edges of the garden, making the trees look like silent guardians. Sitting under this canopy with the smell of night-blooming jasmine in the air is a transformative experience, turning a simple dinner into a celestial event.
Essential Elements:
- Commercial-grade LED fairy lights (warm white)
- Heavy-duty outdoor extension cords
- Guidewire or aircraft cable for support
- Screw hooks or eye bolts
- Tall trees or wooden 4×4 posts
- Zip ties and a ladder
How to make it
- Identify four anchor points in your garden, such as sturdy tree trunks or installed wooden posts, to form a square or rectangular perimeter.
- Install eye bolts at a height of at least 8-10 feet to ensure guests can walk comfortably beneath the light canopy without snagging.
- Run a stainless steel guidewire between the anchor points, tensioning it with turnbuckles to prevent the heavy light strings from sagging over time.
- Drape the fairy lights back and forth across the guidewires in a ‘zig-zag’ or ‘criss-cross’ pattern, securing them every few feet with clear zip ties.
- Ensure all electrical connections are housed in weatherproof boxes and that cords are safely tucked away or buried in protective conduit.
- Use a plug-in timer or a smart outdoor outlet to program the lights to turn on exactly at sunset for a seamless daily transformation.
- Add a few hanging glass orbs with tea lights from the wires at varying heights to add layers of flickering light to the steady glow of the LEDs.
How to Style Country Garden Decor for Cozy Cottage Vibes

Why we love this
The essence of a cozy cottage garden lies in its verticality and the romantic way plants interact with structures. Woven willow trellises offer a rustic, handmade aesthetic that feels ancient and soulful. We love the way climbing roses or sweet peas wrap their delicate tendrils around the dark, flexible willow branches. The visual of a blooming archway provides a sense of enclosure and privacy, making the garden feel like a warm hug. The scent of wood and flowers mingling in the sun, combined with the organic, slightly imperfect shape of the weave, embodies the ‘perfectly imperfect’ spirit of cottage living.
Essential Elements:
- Fresh, flexible willow or hazel branches (whips)
- Garden twine or raffia
- Pruning shears
- Sturdy wooden stakes for the base
- Fast-growing climbers (Clematis, Morning Glory, or Honeysuckle)
How to make it
- Select your longest, thickest willow branches to serve as the vertical uprights; soak them in a tub of water for 24 hours if they are not freshly cut to ensure flexibility.
- Push the uprights at least 12 inches into the soil in a circular or linear pattern, depending on whether you want a ‘tepee’ or a ‘wall’ trellis.
- Take thinner willow whips and begin weaving them horizontally through the uprights in an over-under pattern, starting from the bottom and working up.
- Secure the joints with garden twine or raffia, tying tight knots that will hold as the wood dries and shrinks slightly.
- For a tepee style, gather all the vertical tops together and bind them tightly with a decorative wrap of twine to create a pointed apex.
- Plant your climbers at the base of each upright, gently guiding the first few inches of growth onto the willow with soft plant ties.
- Trim any protruding twigs with pruning shears to maintain a neat but natural silhouette that will eventually be covered in blossoms.
How to Fabricate DIY Garden Decor for Artistic Backyard Expression
[IMAGE_10]
Why we love this
Artistic expression in the garden is about breaking the rules and adding a splash of bold, unexpected color. Upcycled tire planters are a fantastic way to turn industrial waste into vibrant, geometric art. We love the way a bright turquoise or sunny yellow tire pops against the natural greens of the lawn. These planters are incredibly durable, weather-resistant, and provide a deep root space for trailing flowers like petunias or calibrachoa. The texture of the rubber treads, when painted, takes on a modern, sculptural quality that makes a statement. It’s a project that celebrates creativity, reuse, and the joy of a high-contrast palette.
Essential Elements:
- Old tires (thoroughly cleaned and degreased)
- Outdoor-rated spray paint (high-gloss or neon colors)
- Heavy-duty landscape fabric
- Staple gun or industrial adhesive
- Power drill for drainage
- Potting soil and trailing flowers
How to make it
- Scrub the tires with a stiff brush and a degreasing soap to remove all road grime and oils; this is vital for ensuring the paint doesn’t peel.
- Once dry, apply a coat of plastic-bonding primer to the entire surface of the tire to provide a professional-grade base for your color.
- Spray 2-3 thin coats of your chosen vibrant exterior paint, allowing 30 minutes of flash-dry time between each coat to prevent drips.
- Drill several 1-inch holes through the sidewall that will be facing the ground to ensure water doesn’t pool and drown your plants.
- Cut a circular piece of landscape fabric slightly larger than the tire’s opening and staple or glue it to the inside bottom to hold the soil in place.
- Stack the tires in an offset pyramid or hang them vertically from a sturdy fence to create a multi-level artistic installation.
- Fill with a lightweight potting mix and plant ‘spiller’ flowers that will eventually drape over the colorful rims, creating a living work of art.
Conclusion
Transforming your garden from an ordinary outdoor space into an otherworldly retreat is a journey of small, intentional steps. By blending natural textures, upcycled materials, and a bit of DIY magic, you create more than just a landscape—you create a sanctuary that feeds your soul and sparks your imagination. Remember, there are no mistakes in a whimsical garden, only opportunities for more character. Whether it’s the glow of a lantern or the secret door of a fairy house, these details are what make a house feel like a home and a garden feel like a dream. Happy gardening!