
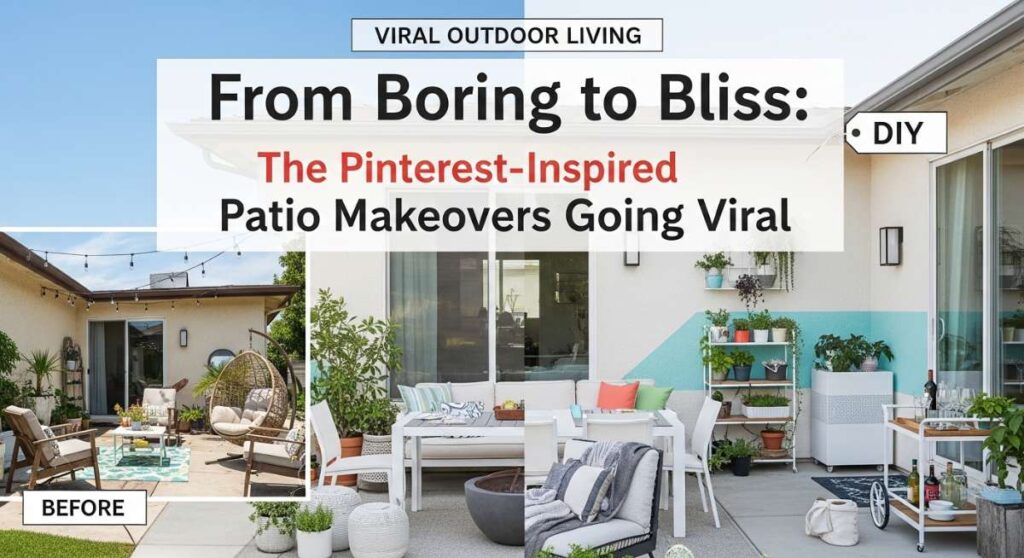
We’ve all been there—staring out the back window at a patch of grass that feels more like a chore than a retreat. For years, my own patio was nothing more than a graveyard for rusted folding chairs and a lonely grill. But there is a specific kind of magic that happens when you stop seeing your outdoor space as an ‘extra’ area and start treating it like the soul of your home. It’s about more than just aesthetics; it’s about creating a sanctuary where the morning air feels fresher and the evening glass of wine tastes a little bit sweeter.
Lately, my Pinterest feed has been exploding with DIY outdoor projects that look like they belong in a five-star resort, yet they’re being built by everyday people on weekend budgets. From the soothing sound of a bird sanctuary to the sleek lines of custom modern planters, these makeovers are going viral for a reason: they are attainable, sustainable, and deeply transformative. It turns out that you don’t need a massive renovation budget to turn your boring backyard into a blissful oasis—you just need a bit of inspiration and some sawdust on your hands.
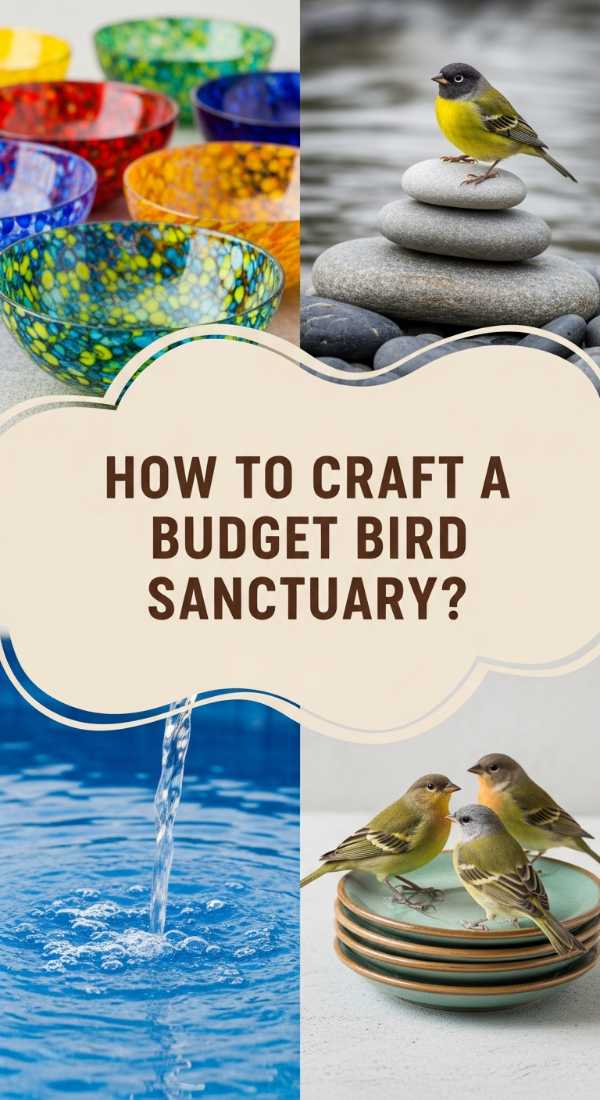
How to Craft a Budget Bird Sanctuary for an Enchanting Backyard
Why we love this
There is nothing quite like waking up to the gentle, rhythmic melody of songbirds right outside your window to start the day on a peaceful note. Creating a bird sanctuary adds a layer of kinetic energy and natural beauty to your yard that static furniture simply cannot provide. Imagine the vibrant flash of a cardinal’s wing against the green leaves and the delicate, rustling sound of feathers as they splash in a shallow bath. This project brings the wild, untamed essence of nature into your domestic life, offering a sensory experience that grounds you in the present moment while supporting your local ecosystem.
Essential Elements:
- Varied bird feeders (tube, hopper, and suet).
- A shallow stone or ceramic birdbath.
- Native shrubs or small trees for cover.
- High-quality birdseed mix and sunflower seeds.
- Solar-powered water dripper or fountain.
How to make it
- Identify a quiet, low-traffic area of your yard that is visible from a window but offers enough cover for birds to feel safe from predators like neighborhood cats.
- Install a multi-hook shepherd’s pole to hang different types of feeders at varying heights, ensuring you use squirrel baffles to protect the seed supply.
- Place your birdbath in a shaded spot to keep the water cool; ensure it is no deeper than two inches, as birds prefer shallow water for bathing and drinking.
- Add a solar-powered water bubbler to the bath; the sound of moving water is a powerful attractant that birds can hear from a distance.
- Plant native berry-producing shrubs nearby to provide both a natural food source and a quick escape route for birds if they feel threatened.
How to Design Front Yard Flower Beds for Instant Curb Appeal

Why we love this
Your front yard is the handshake of your home, and a well-designed flower bed is like a warm, floral embrace for every guest who walks up the path. The visual impact of layered heights, contrasting textures, and a carefully curated palette of blooms can stop traffic and instantly elevate the perceived value of your entire property. There is a deep satisfaction in seeing the first perennials poke through the mulch in spring, promising a season of color and the sweet, heavy scent of jasmine or lavender wafting toward the front door. It transforms a house into a home with a sense of curated, living history.
Essential Elements:
- Curved garden edging (plastic, metal, or stone).
- Rich organic garden soil and premium mulch.
- A mix of “thriller, filler, and spiller” plants.
- Landscape fabric for weed suppression.
- Slow-release granular fertilizer.
How to make it
- Lay out the shape of your beds using a garden hose to create soft, organic curves rather than rigid straight lines; this creates a more professional, high-end look.
- Remove all grass and weeds within the perimeter using a sharp spade, then till the existing soil to a depth of 6 inches, mixing in generous amounts of organic compost.
- Arrange your plants while they are still in their nursery pots; place the tallest “thriller” plants in the back, medium “fillers” in the center, and trailing “spillers” along the front edge.
- Dig holes twice as wide as the root balls, set the plants so the top of the root ball is level with the soil, and firm the earth around them to eliminate air pockets.
- Apply a 3-inch layer of hardwood mulch across the entire bed, keeping it an inch away from plant stems to prevent rot, and water deeply with a gentle spray.
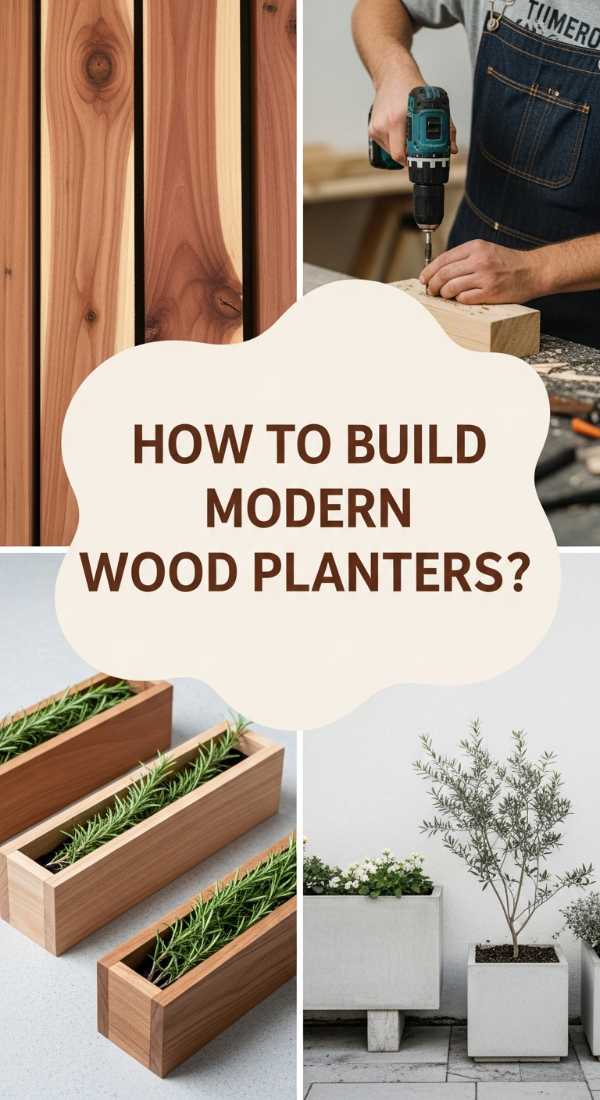
How to Build Custom Wood Planters for a Modern Garden Aesthetic
Why we love this
Modern garden design is all about clean lines and the warm, organic texture of wood, and custom planters allow you to achieve that high-end architectual look for a fraction of the cost. These structures provide a structured home for architectural plants like snake plants or ornamental grasses, creating a sophisticated contrast between the rigid geometry of the wood and the fluid movement of the greenery. The smell of freshly cut cedar or redwood combined with the tactile smoothness of a finished surface makes this project a delight for the senses, providing a permanent, upscale feel to any patio or deck.
Essential Elements:
- Rot-resistant wood (Cedar, Redwood, or Pressure-treated).
- Exterior-grade wood screws and waterproof wood glue.
- Plastic pond liner or heavy-duty landscape plastic.
- Drill with pilot bit and a miter saw.
- Coarse gravel for drainage and potting soil.
How to make it
- Measure and cut your wood into four side panels and a bottom base, ensuring you use a miter saw at a 45-degree angle for the corners if you want a seamless, high-end “box” finish.
- Drill pilot holes to prevent the wood from splitting, then assemble the sides using exterior screws and a bead of waterproof glue for maximum structural integrity.
- Attach the bottom panel, making sure to drill several half-inch drainage holes throughout the base to prevent water from pooling and rotting the roots.
- Staple a plastic liner to the interior walls of the planter to protect the wood from constant moisture, but remember to poke holes in the liner that align with your drainage holes.
- Sand the exterior with 120-grit sandpaper for a smooth finish and apply a UV-resistant clear coat or stain to preserve the wood’s natural color against sun damage.
How to Create an Outdoor Play Paradise for Joyful Childhood Memories

Why we love this
Creating a dedicated play paradise is about reclaiming the magic of childhood and providing a space where imagination can run wild under the open sky. There is a specific, nostalgic joy in the sound of bare feet hitting soft grass and the feeling of sun-warmed wood under sticky fingers. By designing a zone that encourages movement and creative exploration, you are building a stage for years of laughter, sun-kissed cheeks, and the kind of deep, healthy play that only happens outdoors. It’s a gift that keeps children active, engaged, and connected to the natural world around them.
Essential Elements:
- Soft landing surfacing (rubber mulch, wood chips, or artificial turf).
- Weatherproof play structures or a simple wooden fort.
- Outdoor chalkboard or a large vertical weaving frame.
- A designated “digging zone” or sandbox.
- Shade sails or a large umbrella for UV protection.
How to make it
- Zoning is key; designate a specific corner of the yard for play to keep toys contained and ensure the area is within a clear line of sight from your main seating area.
- Level the ground and install a border of pressure-treated timbers to hold in at least 6 inches of soft-fall material like certified playground wood chips for safety.
- Install a main anchor piece, such as a sturdy wooden climbing frame or a cedar playhouse, ensuring all anchors are buried deep and set in concrete if necessary for stability.
- Add sensory stations, such as a vertical herb garden at child-height or a low-mounted outdoor chalkboard using weather-resistant slate paint on plywood.
- Include a comfortable “quiet nook” with outdoor cushions and a small crate of nature books where children can decompress in the shade after high-energy play.
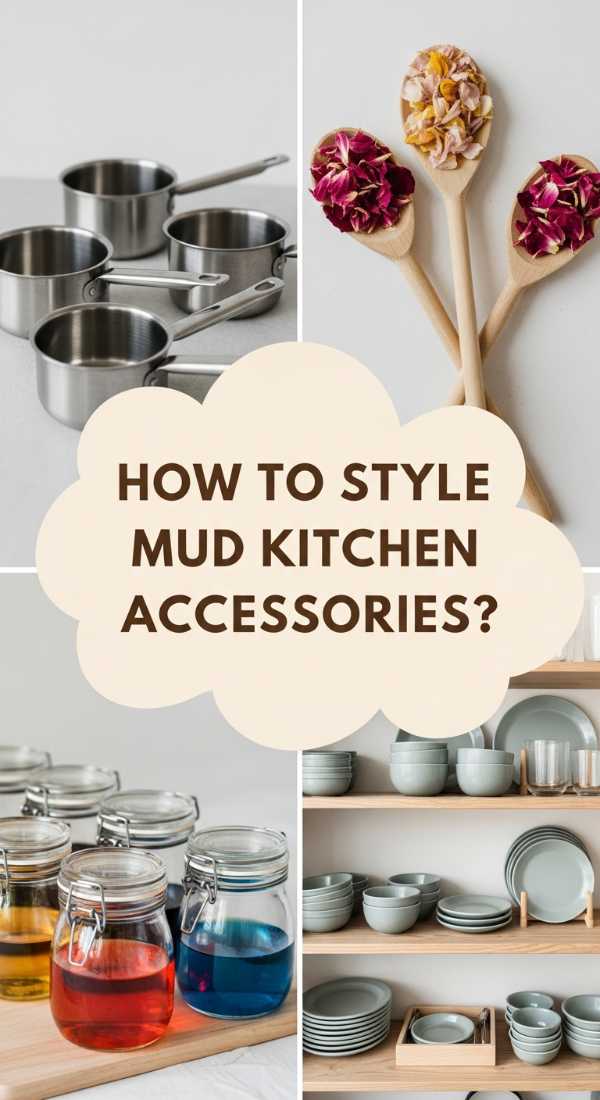
How to Style Mud Kitchen Accessories for Creative Nature Play
Why we love this
A mud kitchen is the ultimate sensory playground, where the earthy scent of damp soil meets the boundless creativity of a child’s mind. There is something deeply satisfying about the tactile experience of squishing mud, the clink of metal spoons against old pots, and the artistic arrangement of dandelion “garnish” on a dirt cupcake. It’s messy, it’s beautiful, and it fosters a unique connection to the elements that screen-time simply cannot replicate. Styling this space with vintage-inspired accessories turns a simple play area into a charming, rustic vignette that enhances the overall aesthetic of your garden.
Essential Elements:
- Stainless steel or cast iron pots and pans (thrifted).
- Old-fashioned hand whisks, ladles, and wooden spoons.
- A collection of jars filled with “natural ingredients” (petals, acorns, pebbles).
- S-hooks for hanging utensils on a backboard.
- A large, functional water dispenser or pump.
How to make it
- Source your accessories from thrift stores; look for durable, heavy materials like stainless steel or enamelware that can withstand the elements and rough play without rusting instantly.
- Install a vertical pegboard or a simple wooden rail with S-hooks above the main work surface to organize spoons and whisks, teaching children a sense of order within their play.
- Create a “spice rack” by securing small wooden crates to the back of the kitchen to hold clear jars filled with colorful natural items like dried lavender, sand, and smooth river stones.
- Provide a large, easy-to-operate water container with a spigot so children can control the flow of water for their “recipes” without needing constant adult assistance.
- Set up a small “cleaning station” next to the kitchen with a dedicated scrub brush and a low-hanging towel to encourage the habit of cleaning up the “dishes” after a session of mud-making.
How to Elevate Your Hot Tub Area for the Ultimate Home Spa Experience

Why we love this
Transforming a basic hot tub into a home spa is about creating an immersive environment that melts away the stress of the day the moment you step outside. Imagine the contrast of the crisp night air against the rising steam and the soothing glow of amber string lights reflected in the bubbling water. By adding layers of privacy, texture, and scent, you turn a plastic tub into a high-end retreat that engages all the senses. The aroma of nearby jasmine and the plush feel of a thick robe waiting on a hook make every soak feel like an expensive getaway in your own backyard.
Essential Elements:
- Privacy screens (slatted wood or tall bamboo).
- Outdoor-rated string lights or recessed LED deck lighting.
- Weatherproof towel rack or a small wooden cabinet.
- Large potted tropical plants (like Palms or Bird of Paradise).
- A waterproof Bluetooth speaker for ambient sounds.
How to make it
- Install tall, slatted privacy screens around at least two sides of the hot tub to create a sense of enclosure and intimacy without completely blocking the breeze.
- String warm-toned Edison bulbs overhead, ensuring they are securely fastened and connected to an outdoor-rated GFCI outlet for safety in wet environments.
- Place large, oversized planters around the base of the tub filled with lush greenery to soften the hard edges of the unit and provide a natural, “jungle spa” aesthetic.
- Add a sturdy side table or a custom-built wrap-around ledge to the tub for holding drinks, aromatherapy oils, and a waterproof speaker for calming music.
- Mount a row of heavy-duty hooks nearby for plush robes and towels, and place a weather-resistant rug or teak floor mat at the entry point to keep feet clean and prevent slips.
How to Assemble a Rustic Pallet Kitchen for Sustainable Backyard Fun

Why we love this
The rustic pallet kitchen is a celebration of sustainability and the rugged beauty of reclaimed materials, bringing a warm, lived-in feel to your outdoor dining space. There is a soulful quality to the weathered grain of pallet wood, especially when it becomes the backdrop for family barbecues and summer evening prep work. This project isn’t just about utility; it’s about the tactile pleasure of a chunky wooden countertop and the convenience of having everything you need for outdoor cooking right at your fingertips. It transforms a simple grill setup into a professional-feeling culinary zone with a charming, farmhouse edge.
Essential Elements:
- Heat-treated (HT marked) wooden pallets.
- Heavy-duty casters for mobility.
- Food-safe butcher block or a concrete paver for the countertop.
- Magnetic tool bar for grilling utensils.
- Exterior-grade wood sealer or wax.
How to make it
- Source two or three pallets that are in good condition and ensure they have the “HT” (Heat Treated) stamp rather than chemical treatments for safety around food.
- Sanitize the wood thoroughly with a bleach-water solution and sand every surface vigorously with 80-grit then 120-grit sandpaper to remove splinters and rough patches.
- Stack the pallets to your desired counter height—usually around 36 inches—and secure them together using long timber screws and internal bracing for absolute stability.
- Install a durable, heat-resistant top; a large concrete paver or a piece of treated butcher block works perfectly as a work surface for prepping meats and vegetables.
- Attach heavy-duty locking casters to the bottom four corners so you can easily move the kitchen into the shade or under cover during the winter months.
How to Construct a DIY Water Table for Endless Summer Cool Down
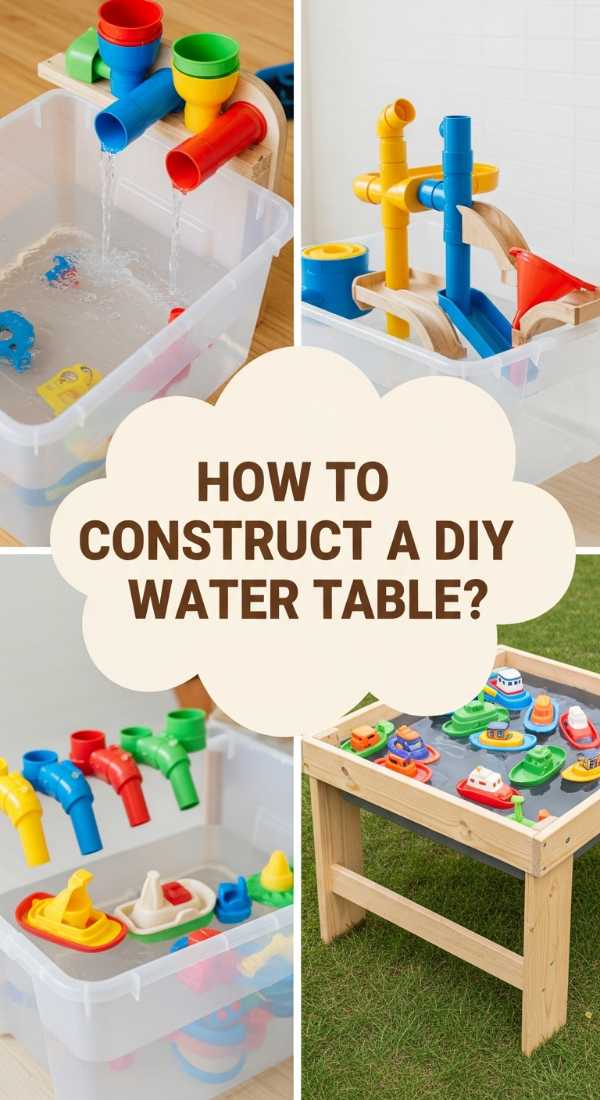
Why we love this
When the heat of July hits, there is no greater relief than the cool, sparkling splash of water against hot skin, and a DIY water table brings that joy directly to your patio. It’s a sensory masterpiece: the glistening ripples of clear water, the rhythmic ‘glug’ of pouring, and the refreshing mist that hangs in the air. Unlike plastic store-bought versions, a custom-built wooden water table feels like a beautiful piece of garden furniture that kids and adults alike will gravitate toward. It’s the ultimate cool-down station that turns a sweltering afternoon into an active, refreshing adventure for the little ones.
Essential Elements:
- Deep plastic storage bins or galvanized metal troughs.
- Pressure-treated 2x4s for the frame.
- Small submersible water pump and clear vinyl tubing.
- PVC pipes and connectors for a “waterfall” feature.
- Marine-grade sealant for all wooden joints.
How to make it
- Build a sturdy rectangular frame out of pressure-treated 2x4s that is sized perfectly to allow the lip of your plastic bin to rest securely on the wood.
- Add legs to the frame at a height comfortable for your children (usually 18-24 inches), using diagonal bracing on the back to ensure the table doesn’t wobble when filled with heavy water.
- Create a “second story” or a vertical backboard where you can zip-tie PVC pipes and funnels to create a gravity-fed water maze for the water to flow through.
- Install a small submersible pump in the main bin and run the tubing to the top of your PVC maze to create a continuous, recirculating waterfall effect.
- Apply two coats of marine-grade spar urethane to the entire wooden structure to protect it from the constant splashing and prevent the wood from warping or rotting over time.
How to Arrange Garden Borders for a Professional Landscape Finish
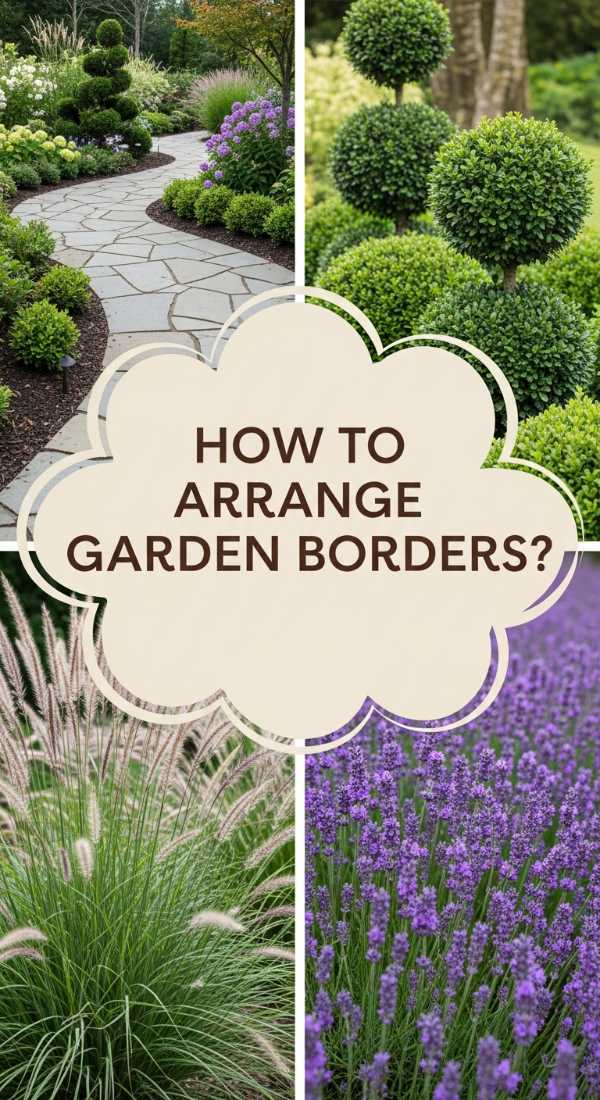
Why we love this
Garden borders are the unsung heroes of a polished landscape, providing the crisp, clean lines that separate the wild beauty of your plants from the manicured perfection of your lawn. There is a profound visual satisfaction in seeing a sharp, dark edge of mulch meet the lush green of the grass—it’s the difference between a yard and a designed garden. The structured beauty of stone or brick borders adds a sense of permanence and architectural weight to your outdoor space, making even the simplest flower bed look like it was designed by a high-end professional. It brings a sense of order and peace to the natural chaos of the garden.
Essential Elements:
- Edging material (Paver stones, bricks, or heavy-duty metal edging).
- Leveling sand or fine crushed stone.
- Rubber mallet and a string line with stakes.
- Edging spade or a power edger.
- Landscaping spikes or pins.
How to make it
- Set a string line using wooden stakes to mark a perfectly straight or consistently curved path for your border; this ensures your edging doesn’t “wander” as you install it.
- Dig a trench along the string line that is slightly wider than your edging material and deep enough so that about one-third of the stone or brick will be buried for stability.
- Pour a 1-inch layer of leveling sand into the bottom of the trench and tamp it down firmly to create a solid, flat base that will prevent the border from shifting over time.
- Set your stones or bricks into the trench one by one, using a rubber mallet to tap them into place and a spirit level to ensure each piece is perfectly even with its neighbor.
- Fill any gaps behind the border with soil or mulch and pack it down tightly to lock the stones in place, then sweep extra sand into the joints of the bricks to prevent weed growth.
How to Finish Wood Projects for Weatherproof Outdoor Durability
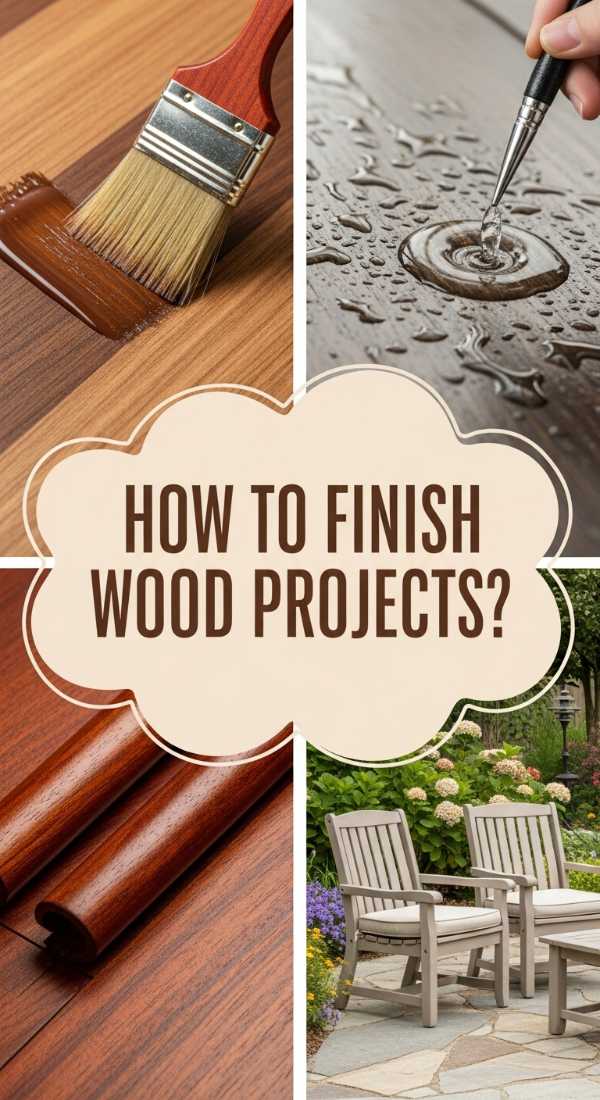
Why we love this
The finish on a wood project is where the true character of the material comes to life, revealing the intricate patterns of the grain while providing a protective shield against the elements. There is a deep, tactile pleasure in running your hand over a perfectly sanded, sealed surface that feels as smooth as glass yet retains the warmth of the wood. Knowing that your hard work is protected against the grey-out of the sun and the rot of the rain allows you to enjoy your outdoor creations with peace of mind. It’s the final, vital step that transforms a weekend DIY into a long-lasting legacy for your home.
Essential Elements:
- Electric orbital sander and sandpaper (80, 120, and 220 grit).
- Tack cloth or a microfiber rag.
- High-quality exterior stain or Spar Urethane.
- Synthetic filament brushes or a lint-free staining pad.
- Mineral spirits for cleanup.
How to make it
- Progressive sanding is crucial; start with 80-grit to remove imperfections, move to 120-grit to smooth the surface, and finish with 220-grit for a professional, buttery-soft feel.
- Use a tack cloth to meticulously remove every speck of dust from the wood surface; any debris left behind will create bumps and bubbles in your final finish.
- Apply your stain or sealer in thin, even coats, always working in the direction of the wood grain to avoid unsightly streaks or blotches.
- Allow the first coat to dry completely—usually 4 to 24 hours depending on humidity—then lightly sand with 220-grit paper before applying a second coat for maximum protection.
- Ensure you seal the end-grain (the cut ends) of the wood especially well, as this is where moisture is most likely to penetrate and cause rot or splitting over time.
From Backyard to Bliss
Your outdoor space is an extension of your creative spirit, and as we’ve seen, it doesn’t take a massive renovation to make it feel like a high-end sanctuary. Whether you’re building a play paradise for your kids or a sophisticated spa area for yourself, the key is to focus on quality materials and thoughtful details. By taking these projects one weekend at a time, you’ll find that the process of building is just as rewarding as the final, viral-worthy result. So grab your tools, get outside, and start turning that boring patio into your own personal bliss.