
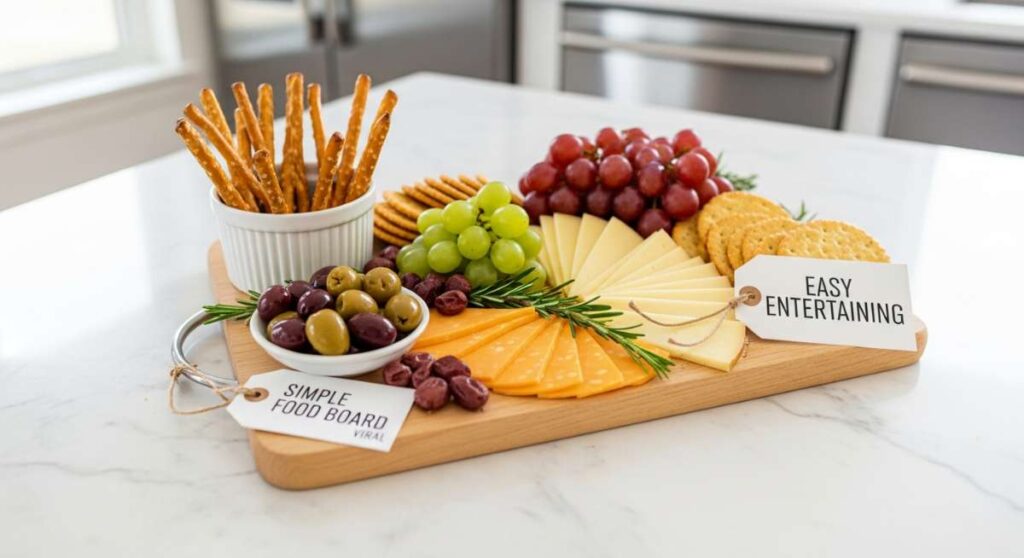
Easy Entertaining: How to Recreate the Viral Simple Food Board
There is something undeniably magical about the sound of laughter echoing through a kitchen, the clink of glasses, and the shared sigh of contentment when everyone digs into a meal that feels both effortless and indulgent. We’ve all been there—trying to host the perfect dinner party only to end up stressed, stuck behind the stove while our favorite people catch up in the other room. That is exactly why I fell in love with the viral simple food board concept; it’s not just a meal, it’s a lifestyle shift that prioritizes connection over complicated plating.
This board is the ultimate hosting hack, blending variety with visual appeal in a way that feels organic and welcoming. It’s about taking those wholesome, beautifully prepped components we love and laying them out like a tapestry of flavors. Whether it’s a casual Sunday brunch or a Friday night get-together, these individual components allow every guest to customize their plate, making everyone feel seen and nourished without the host ever breaking a sweat. Let’s dive into the elements that make this board a social media sensation and a staple in my home.
How to prep healthy chicken bowls

Why we love this
There is a specific, mouthwatering satisfaction that comes from a perfectly seared piece of chicken, where the golden-brown crust gives way to a succulent, tender interior. This bowl component brings a rustic, herbaceous aroma to your food board, filled with the scents of toasted oregano and bright lemon zest. It’s the kind of protein that feels grounding and clean, providing a satisfying chew that pairs beautifully with crunchy greens or fluffy grains, ensuring your guests leave the table feeling energized rather than weighed down.
Ingredients
- 1.5 lbs chicken breasts or thighs, cut into bite-sized cubes
- 3 tbsp olive oil
- 2 cloves garlic, minced
- 1 tsp dried oregano
- 1/2 tsp smoked paprika
- Salt and cracked black pepper to taste
- Zest and juice of one lemon
How to make it
- Begin by patting your chicken dry with paper towels; removing surface moisture is the secret to getting that professional-grade golden sear rather than steaming the meat.
- In a large bowl, whisk together the olive oil, minced garlic, oregano, paprika, salt, pepper, and lemon zest to create a vibrant marinade that infuses every fiber of the chicken.
- Toss the chicken cubes in the marinade, ensuring every piece is coated, and let it sit for at least 20 minutes (or up to 2 hours in the fridge) to allow the acids to tenderize the proteins.
- Heat a heavy-bottomed skillet or cast-iron pan over medium-high heat until a drop of water sizzles and evaporates instantly; add a splash of oil if your pan isn’t non-stick.
- Add the chicken in a single layer, being careful not to overcrowd the pan, which would drop the temperature and prevent browning.
- Let the chicken cook undisturbed for 4-5 minutes until a deep golden crust forms, then flip and cook for another 3-4 minutes until the internal temperature reaches 165°F (74°C).
- Remove from the heat and immediately drizzle with the fresh lemon juice, scraping up any flavorful browned bits (fond) from the bottom of the pan to glaze the chicken.
How to make simple egg bites

Why we love this
These egg bites are like little clouds of savory heaven, boasting a velvety, custard-like texture that practically melts on the tongue. The aroma of melted gruyère and sharp cheddar wafting through the kitchen creates an instant sense of cozy morning luxury. They are visually stunning on a board—perfectly uniform and speckled with colorful herbs—offering a rich, umami-packed bite that feels far more sophisticated than a standard scramble, making them a centerpiece favorite for any brunch-inspired food board.
Ingredients
- 6 large organic eggs
- 1/2 cup cottage cheese (for that viral velvety texture)
- 1/2 cup shredded Gruyère or sharp cheddar cheese
- 1/4 cup finely chopped spinach
- 1/4 cup diced bell peppers
- Salt and white pepper to taste
- A pinch of nutmeg
How to make it
- Preheat your oven to 300°F (150°C) and place a baking dish filled with an inch of hot water on the bottom rack; this creates a steam-filled environment essential for that silky, non-rubbery texture.
- Place the eggs, cottage cheese, salt, pepper, and nutmeg into a blender and pulse on high for 30 seconds until the mixture is completely aerated and frothy.
- Grease a silicone muffin tray thoroughly with non-stick spray or a light coating of butter to ensure the delicate bites release easily after baking.
- Distribute your chopped spinach and peppers evenly into the bottom of the muffin cups, then pour the egg mixture over the top until each cup is about 3/4 full.
- Top each cup with a generous sprinkle of the shredded cheese, which will melt into a savory, golden crust.
- Place the muffin tray on the middle rack and bake for 20-25 minutes; you are looking for the edges to be set while the centers still have a very slight, gentle jiggle.
- Allow the bites to cool in the tray for 5-10 minutes before gently popping them out; this cooling period allows the proteins to fully set, ensuring they hold their shape on your board.
How to prep steak and rice
Why we love this
This combination is the epitome of comfort meets class, offering a robust, savory experience that anchors the entire board. The steak provides a deep, caramelized exterior with a juicy, pink center that releases a rich, buttery aroma, while the rice acts as the perfect neutral canvas, soaking up all those delicious meat juices. The contrast between the firm, seared texture of the beef and the light, fluffy grains of rice creates a rhythmic eating experience that is both deeply satisfying and incredibly elegant in its simplicity.
Ingredients
- 1 lb flank steak or sirloin, brought to room temperature
- 2 cups Basmati or Jasmine rice
- 3 cups beef broth (for cooking the rice)
- 2 tbsp high-smoke point oil (like avocado oil)
- 3 tbsp unsalted butter
- 3 cloves garlic, smashed
- 2 sprigs fresh rosemary or thyme
- Salt and coarse black pepper
How to make it
- Start with the rice: Rinse the grains in a fine-mesh sieve under cold water until the water runs clear; this removes excess starch and guarantees individual, non-clumping grains.
- Combine rice and beef broth in a pot, bring to a boil, then reduce to the lowest simmer, cover tightly, and cook for 15 minutes. Let it sit, covered, for 5 minutes before fluffing with a fork.
- While the rice rests, liberally season your room-temperature steak with salt and coarse pepper, pressing the spices into the meat to create a flavorful crust.
- Heat your cast-iron skillet over high heat until it is wisps of smoke begin to rise; add the oil and carefully lay the steak away from you into the pan.
- Sear for 3-4 minutes without moving it to develop a crust, then flip. Immediately add the butter, smashed garlic, and herbs to the pan.
- Tilt the pan and use a large spoon to continuously baste the steak with the foaming, herb-infused butter for another 3-4 minutes (for medium-rare).
- Transfer the steak to a cutting board and let it rest for a full 10 minutes; this is critical to allow the juices to redistribute so they don’t run out when you slice it.
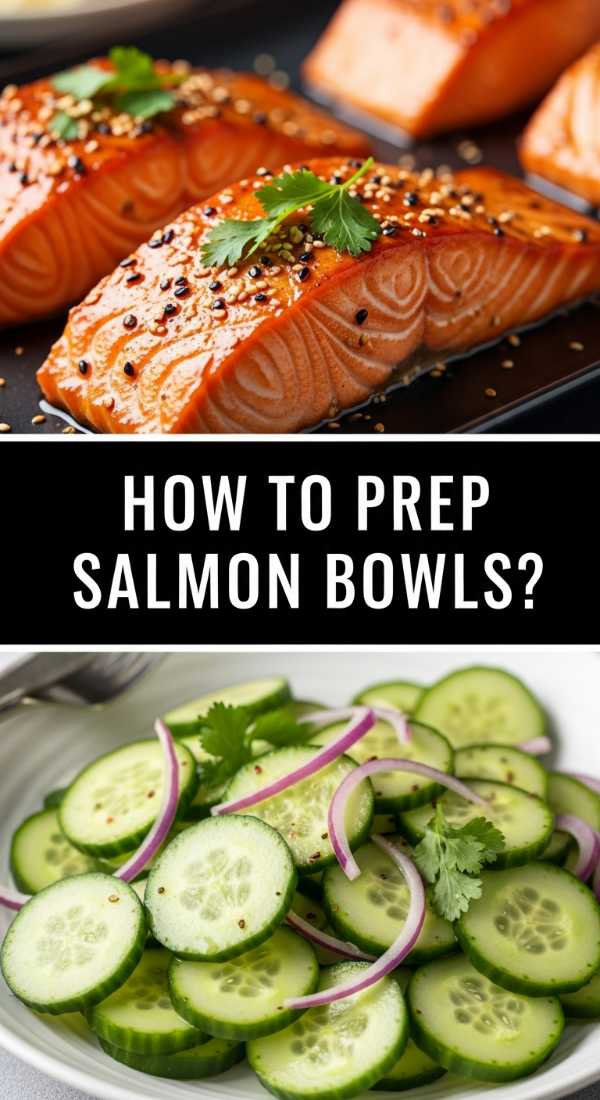
How to cook salmon meal prep
Why we love this
Salmon is the crown jewel of any healthy food board, offering a striking coral hue and a flavor profile that is both delicate and incredibly rich. When cooked correctly, the skin becomes a salty, potato-chip-crisp delight while the flesh remains buttery and translucent, flaking away at the mere suggestion of a fork. The scent of roasted citrus and fresh dill accompanying the fish brings a bright, coastal energy to the spread, making the entire meal feel like a high-end spa retreat in the comfort of your home.
Ingredients
- 4 salmon fillets (6 oz each), skin-on
- 2 tbsp olive oil
- 1 lemon, thinly sliced into rounds
- 2 tsp garlic powder
- 1 tsp dried dill or 2 tbsp fresh dill
- Kosher salt and cracked pepper
- Honey for drizzling (optional)
How to make it
- Preheat your oven to 400°F (200°C) and line a sheet pan with parchment paper to prevent the delicate skin from sticking.
- Pat the salmon fillets extremely dry on both sides; any moisture on the skin will result in a soggy texture rather than a crisp one.
- Drizzle the flesh side with olive oil and season generously with garlic powder, salt, pepper, and dill, rubbing the spices in gently.
- Place the fillets on the baking sheet skin-side down and top each piece with a thin slice of lemon, which will caramelize and infuse the fish with bright acidity.
- Roast for 12-15 minutes, depending on the thickness; watch for the white albumin (protein) to just start appearing, which indicates the fish is reaching a perfect medium.
- For an extra viral “glow,” turn on the broiler for the final 60 seconds to slightly char the lemon and crisp the top edges of the spices.
- Remove from the oven and let rest for 3 minutes before serving; the skin should be rigid and the center should be moist and tender.
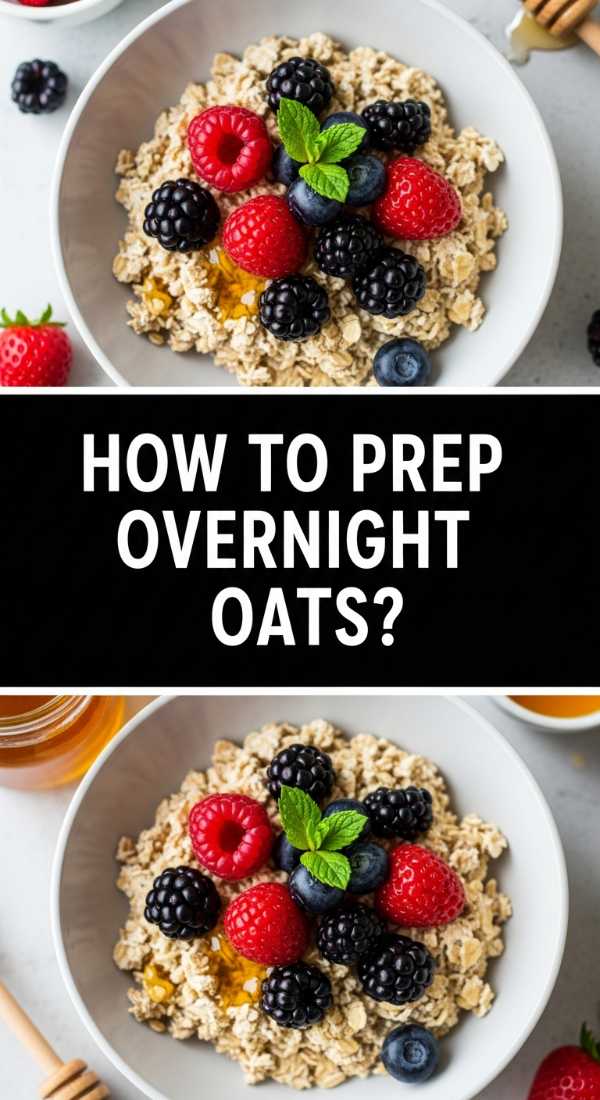
How to prep overnight oats
Why we love this
Overnight oats are the ultimate “cool girl” addition to a food board, providing a creamy, refreshing counterpoint to the warm, savory elements. Imagine a texture that is thick and velvety, almost like a healthy rice pudding, punctuated by the snap of chia seeds and the sweetness of fresh fruit. The aroma is clean and comforting—reminiscent of vanilla and almond—and because they are served chilled, they offer a delightful temperature contrast that cleanses the palate between bites of richer foods.
Ingredients
- 2 cups rolled oats (not instant or steel-cut)
- 2 cups unsweetened almond or oat milk
- 1/2 cup Greek yogurt
- 2 tbsp chia seeds
- 1/4 cup maple syrup or honey
- 1 tsp pure vanilla extract
- Toppings: Berries, nut butter, and granola
How to make it
- In a large mixing bowl or individual wide-mouth mason jars, combine the rolled oats and chia seeds; the chia seeds are vital for absorbing liquid and creating that thick, spoonable consistency.
- Whisk together the milk, Greek yogurt, maple syrup, and vanilla in a separate jug until smooth, ensuring no yogurt lumps remain.
- Pour the liquid mixture over the oats and stir vigorously to ensure every oat is submerged and the chia seeds are evenly distributed.
- Seal the containers tightly and refrigerate for a minimum of 6 hours, though 12 hours (overnight) is the sweet spot for the creamiest results.
- Before serving on your board, give the oats a good stir; if they seem too thick, splash in an extra tablespoon of milk to loosen the texture.
- Portion them into small aesthetic glass bowls and layer with fresh berries and a drizzle of nut butter just before placing them on the board to keep the toppings fresh and vibrant.
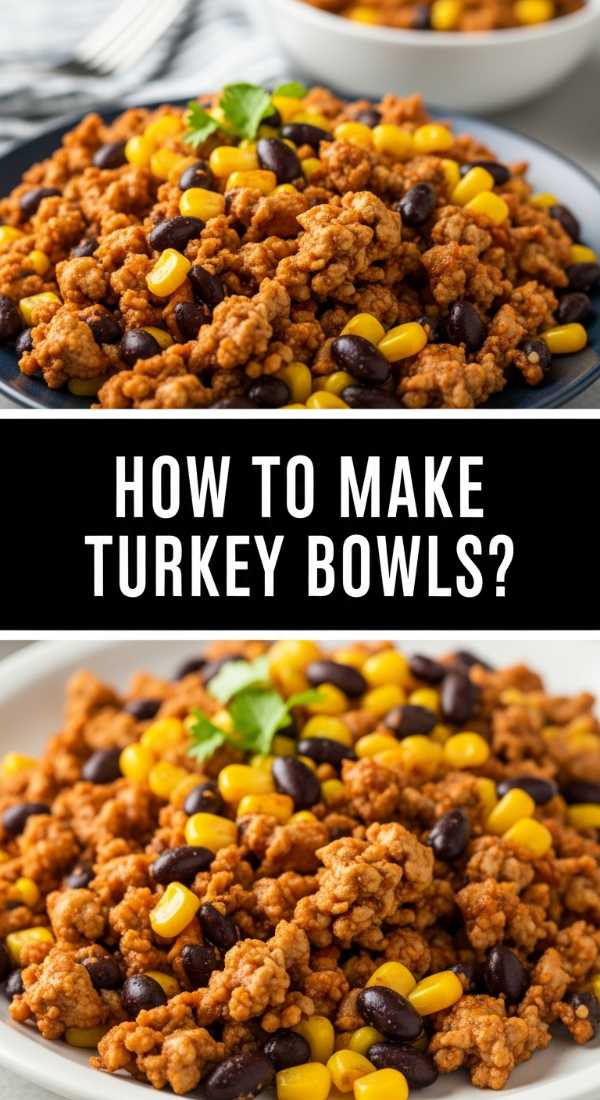
How to make turkey taco bowls

Why we love this
There is a festive, vibrant energy that taco-inspired dishes bring to a table, filled with the bold aromas of toasted cumin, chili, and lime. These turkey taco bowls offer a lean, protein-packed option that doesn’t skimp on flavor, providing a satisfying crumble that catches all the zest of your favorite toppings. The interplay of warm, spiced meat against cool avocado and crunchy radishes creates a sensory playground that makes every bite feel like a celebration of fresh, Mexican-inspired ingredients.
Ingredients
- 1 lb lean ground turkey
- 1 red onion, finely diced
- 2 tbsp taco seasoning (chili powder, cumin, garlic powder, onion powder)
- 1/2 cup tomato sauce or salsa
- Fresh cilantro and lime wedges for garnish
- 1 can black beans, rinsed and drained
- 1 cup corn kernels (fresh or frozen)
How to make it
- Heat a large skillet over medium-high heat with a tablespoon of oil; add the ground turkey and use a wooden spoon to break it into very small crumbles.
- Cook the turkey until it is no longer pink, then push the meat to the edges of the pan and add the diced onions to the center, sautéing until translucent and fragrant.
- Stir the meat and onions together, then sprinkle the taco seasoning over the mixture, stirring for 1 minute to “bloom” the spices and release their essential oils.
- Pour in the tomato sauce or salsa and the black beans; reduce the heat to medium-low and simmer for 5-7 minutes until the liquid has thickened and glazed the meat.
- In the last 2 minutes of cooking, fold in the corn kernels just to warm them through, maintaining their bright color and snap.
- Taste and adjust seasoning with a squeeze of lime and a pinch of salt to brighten the earthy spices.
- Serve in a large communal bowl on your board, topped with a forest of fresh cilantro and extra lime wedges for guests to squeeze over their individual portions.
How to prep roasted vegetables

Why we love this
Roasted vegetables are the unsung heroes of the simple food board, bringing a deep, concentrated sweetness and an earthy, charred aroma that only high-heat caramelization can provide. From the snap of a charred floret of broccoli to the creamy interior of a roasted carrot, these vegetables offer a variety of textures that keep the palate engaged. They add a rustic, artisanal aesthetic to the board, with their shriveled skins and golden edges signaling a meal that is both wholesome and expertly prepared.
Ingredients
- 1 lb mixed vegetables (broccoli, cauliflower, carrots, bell peppers)
- 3 tbsp olive oil
- 1 tsp dried thyme
- 1 tsp garlic powder
- 1/2 tsp sea salt
- 1/4 tsp crushed red pepper flakes (for a tiny hint of heat)
- Balsamic glaze for drizzling
How to make it
- Preheat your oven to a high heat of 425°F (220°C); a hot oven is the only way to achieve those crispy, browned edges without turning the vegetables into mush.
- Cut all your vegetables into uniform sizes to ensure they cook at the same rate; carrots should be sliced slightly thinner than broccoli florets as they take longer to soften.
- Toss the vegetables in a large bowl with the olive oil, thyme, garlic powder, salt, and red pepper flakes until every crevice is glistening.
- Spread the vegetables out on a large baking sheet in a single layer; if they are touching or overlapping, they will steam instead of roast. Use two sheets if necessary.
- Roast for 20-25 minutes, tossing them halfway through with a spatula to ensure even browning on all sides.
- Look for “char marks”—small spots of dark brown or black on the edges of the broccoli and cauliflower—which indicate the natural sugars have caramelized.
- Arrange them on the board while warm and finish with a light drizzle of balsamic glaze to add a touch of acidity and visual contrast.
How to cook quinoa salad prep
Why we love this
Quinoa salad is the ultimate textural chameleon, offering a light, nutty crunch that feels incredibly sophisticated. It’s a refreshing, herb-forward dish that smells like a summer garden, filled with the fragrance of fresh parsley, mint, and sharp lemon. Because it holds its structure so well, it’s the perfect board component to prep ahead of time, providing a colorful, jewel-toned heap of nutrition that balances out the heavier proteins and adds a clean, zesty finish to every forkful.
Ingredients
- 1 cup dry quinoa (tri-color looks best on a board)
- 2 cups vegetable broth
- 1 English cucumber, finely diced
- 1 cup cherry tomatoes, halved
- 1/2 cup crumbled feta cheese
- 1/4 cup fresh parsley, chopped
- Dressing: 3 tbsp olive oil, 2 tbsp lemon juice, 1 clove minced garlic
How to make it
- Rinse the dry quinoa thoroughly in a fine-mesh strainer under cold water for at least 60 seconds; this removes the saponin, a natural coating that can make quinoa taste bitter or soapy.
- In a medium saucepan, combine the quinoa and vegetable broth; bring to a boil, then cover and reduce the heat to low for 15 minutes.
- Once the water is absorbed, remove from heat and let it sit covered for 5 minutes; then, fluff it with a fork to see the little “tails” of the grain sprout, indicating it’s perfectly cooked.
- Spread the cooked quinoa out on a baking sheet to cool completely before mixing; this prevents the heat from wilting the fresh herbs and vegetables.
- In a large bowl, whisk together your dressing ingredients until emulsified.
- Fold the cooled quinoa, cucumber, tomatoes, parsley, and feta into the dressing, tossing gently to ensure even distribution without mashing the feta.
- Let the salad sit for at least 30 minutes before serving to allow the quinoa to absorb the dressing, making it even more flavorful when it hits the board.
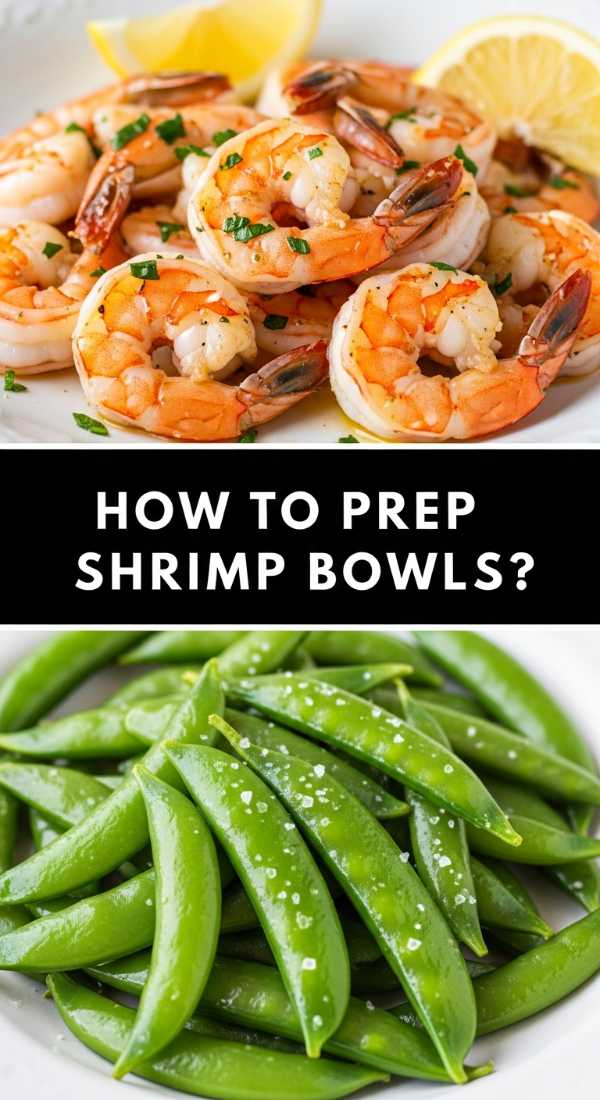
How to make shrimp stir fry
Why we love this
Shrimp stir fry adds a touch of fast-paced, wok-fired energy to your food board, offering a snappy, succulent texture that is impossible to resist. The aroma is intoxicating—a blend of toasted sesame oil, pungent ginger, and sharp garlic that cuts through the air. These pink, curled delights provide a light yet flavorful protein option that feels fancy and upscale, yet takes mere minutes to prepare, making them the perfect “last minute” addition to ensure your board is served piping hot and full of life.
Ingredients
- 1 lb large shrimp, peeled and deveined
- 2 tbsp soy sauce (or tamari for gluten-free)
- 1 tbsp sesame oil
- 1 tbsp freshly grated ginger
- 2 cloves garlic, minced
- 1 tbsp honey
- Green onions and sesame seeds for garnish
How to make it
- Ensure your shrimp are completely thawed and patted dry with paper towels; excess water will prevent them from getting that beautiful pink sear.
- In a small bowl, whisk together the soy sauce, ginger, garlic, honey, and a teaspoon of the sesame oil to create a thick, glossy stir-fry sauce.
- Heat a wok or large skillet over very high heat until it’s nearly smoking, then add the remaining sesame oil.
- Add the shrimp in a single layer; they cook incredibly fast, so stay focused! Let them sear for 90 seconds on one side until they turn opaque and pink.
- Flip the shrimp and immediately pour the sauce over them; the sauce will bubble and thicken into a glaze almost instantly.
- Toss the shrimp in the bubbling glaze for another 60 seconds until they are fully curled into a ‘C’ shape (don’t let them turn into an ‘O’ or they will be overcooked and rubbery).
- Transfer immediately to a serving dish and garnish with a snow-like dusting of sesame seeds and sliced green onions for that viral, restaurant-quality look.
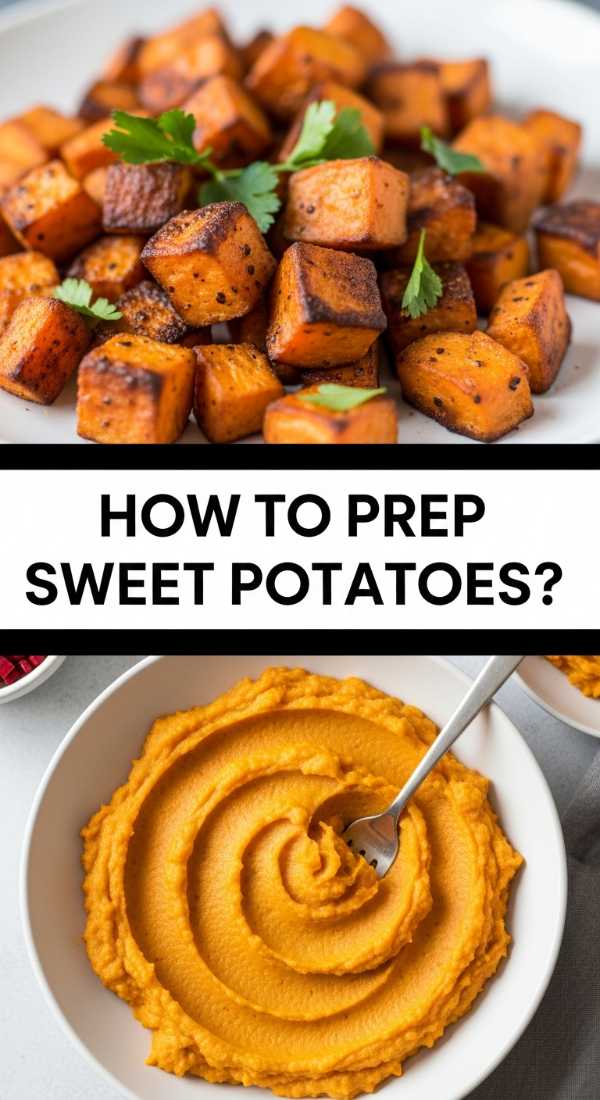
How to prep sweet potato mash
[IMAGE_10]
Why we love this
This sweet potato mash is like a warm hug in a bowl, offering a silky-smooth, velvety consistency that provides a comforting base for the more textured items on your board. Its natural sweetness is enhanced by warm spices, creating a fragrance that is reminiscent of autumn afternoons and cozy firesides. The vibrant orange hue adds a stunning pop of color to your spread, and its creamy richness makes it the perfect vehicle for soaking up sauces from the steak or the shrimp, tying the whole meal together in a cohesive, delicious way.
Ingredients
- 3 large sweet potatoes
- 2 tbsp grass-fed butter
- 1/4 cup full-fat coconut milk or heavy cream
- 1/2 tsp ground cinnamon
- A pinch of cayenne pepper (to balance the sweetness)
- Salt to taste
- Optional: Toasted pecans for crunch
How to make it
- Scrub the sweet potatoes and pierce them several times with a fork; bake them whole at 400°F (200°C) for 45-60 minutes until they are completely soft and collapsing. Baking them in their skins concentrates the sugars much better than boiling.
- Once cool enough to touch, peel the skins off—they should slip right away—and place the soft orange flesh into a large bowl.
- Add the butter and cinnamon while the potatoes are still hot, allowing the butter to melt into the fibers.
- Use an immersion blender or a hand mixer to whip the potatoes, slowly drizzling in the coconut milk or cream until you reach your desired level of silkiness.
- Add the salt and a tiny pinch of cayenne; the heat from the pepper won’t make it spicy, but it will make the sweetness of the potato taste more complex and savory.
- For a beautiful presentation, spread the mash in a shallow bowl and use the back of a spoon to create aesthetic “swirls” on the surface.
- Top with toasted pecans or a final sprinkle of cinnamon before nesting the bowl into the corner of your food board.
The Final Flourish: Bringing Your Board Together
Assembling the Viral Simple Food Board is less about following a strict recipe and more about embracing the art of the “beautiful mess.” Start by placing your larger bowls—the mash, the quinoa, and the taco turkey—in a triangular pattern to anchor the space. Fill in the gaps with your proteins, grouping the seared steak near the rice and the salmon near the roasted vegetables. Finally, tuck in the smaller elements like the egg bites and jars of oats, using fresh herbs and citrus wedges to bridge the gaps. The result is a stunning, interactive feast that invites your guests to linger, graze, and enjoy the simple pleasure of a meal made with love. Hosting doesn’t have to be a chore; with these prep-friendly components, you’re free to be the life of your own party.
Frequently Asked Questions
Everything you need to know about mastering the art of the food board.