

There is a specific kind of magic that happens when we stop waiting for the big milestones and start leaning into the quiet beauty of our everyday surroundings. It’s in the way the morning light hits a ceramic mug, or the satisfaction of smoothing out a linen tablecloth before a shared meal. Curating comfort isn’t about perfection; it’s about creating a sanctuary that breathes with you, reflecting the seasons and the softest parts of your soul.
Lately, I’ve been finding myself drawn to the concept of the ‘slow home’—a space where every corner tells a story and every DIY project is an act of self-care. Whether you’re plunging into a cool pool on a humid afternoon or setting up a flower bar for friends, these moments are the threads that weave together a life well-lived. Let’s explore how we can elevate our homes and our hearts through intentional, aesthetic living.
How to Create Enchanting Easter Decor for a Joyful Home Gathering

Why we love this
There is something profoundly hopeful about the arrival of Easter, a time when the earth begins to wake up and we welcome soft, pastel hues back into our living rooms. We love this approach because it moves away from plastic trinkets and toward organic, tactile beauty—think the scent of freshly cut eucalyptus, the speckled texture of real quail eggs, and the rustic charm of moss-covered centerpieces. It transforms your dining table into a woodland dreamscape where the air feels lighter and every guest feels instantly cherished by the thoughtful, earthy details.
Essential Elements:
- Natural grapevine or moss wreaths
- Speckled ceramic or real blown eggs in muted tones
- Fresh spring florals like tulips, ranunculus, and baby’s breath
- Linen napkins in sage, blush, or oatmeal
- Wooden chargers and vintage brass candlesticks
How to make it
- Begin by laying a neutral linen runner across your table to establish a soft, organic base that allows colors to pop without feeling overwhelming.
- Create a living centerpiece by placing several low-profile glass vases or vintage jars in a cluster, filling them with a mix of greenery and focal flowers at varying heights to mimic a wild garden.
- Nestle small bird nests made of excelsior or dried grass between the vases, placing three speckled eggs in each to symbolize new beginnings and add a whimsical touch.
- Incorporate height and warmth by adding slender taper candles in brass holders; choose beeswax or unscented ivory candles to ensure the floral scent remains the star of the show.
- Finish each place setting by folding a linen napkin into a simple ‘bunny ear’ knot, securing it with a piece of twine and a single sprig of dried lavender for a fragrant, artisanal touch.
How to Install a Refreshing Plunge Pool for Your Private Summer Sanctuary

Why we love this
A plunge pool is the ultimate architectural whisper of luxury, offering a cooling escape without the overwhelming maintenance of a full-sized basin. We are captivated by the way the water mirrors the sky, creating a serene focal point in a compact backyard that feels like a hidden Mediterranean villa. The sound of a gentle spillway and the feeling of smooth, submerged concrete against your skin on a 90-degree day provide a sensory reset that turns your own backyard into a high-end boutique resort.
Essential Elements:
- Concrete or pre-cast pool shell (usually 8×12 or 10×10)
- Variable speed pump and filtration system
- Saltwater chlorinator for soft, skin-friendly water
- Submerged seating ledges or ‘sun shelves’
- Natural stone coping (travertine or slate)
How to make it
- Start by consulting with a structural engineer to determine the best placement, ensuring you are clear of utility lines and that the soil can support the concentrated weight of the water.
- Excavate the site to the specified depth, typically 4 to 5 feet, and install a compacted gravel base followed by a rebar cage to provide the structural integrity required for a concrete pour.
- Rough-in the plumbing lines for the filter, pump, and optional heater, ensuring all pipes are pressure-tested before the shell is finalized to prevent future leaks beneath the deck.
- Apply the interior finish—whether it’s a smooth plaster, pebble sheen, or glass tile—working in sections to ensure a seamless, waterproof seal that feels soft underfoot.
- Install the coping stones along the edge using a high-grade mortar, then backfill around the pool and finish with a surrounding deck of wood or stone that slopes slightly away from the water for drainage.
How to Design a Stunning Flower Bar for the Most Memorable Garden Party

Why we love this
The flower bar is the ultimate interactive experience, inviting guests to play with color, texture, and scent while creating a living souvenir of your time together. We love how it breaks the ice, encouraging friends to mingle as they select the perfect velvet-soft petal or a fragrant sprig of rosemary to tuck into their bouquets. It’s a feast for the senses, filling the air with the sweet, heady aroma of jasmine and the visual delight of a rainbow of blossoms arranged in mismatched vintage buckets.
Essential Elements:
- A sturdy wooden table or potting bench
- Galvanized buckets or ceramic crocks of varying sizes
- Professional floral shears and green floral tape
- Brown kraft paper, lace ribbons, and twine for wrapping
- An array of ‘thrillers’ (roses), ‘fillers’ (waxflower), and ‘spillers’ (ivy)
How to make it
- Set up your station in a shaded area to keep the blooms crisp, using a long table draped in a washable fabric that complements your party’s color palette.
- Prepare the flowers by stripping any leaves that would sit below the water line and giving the stems a fresh 45-degree angle cut under lukewarm water to maximize hydration.
- Arrange the buckets in three tiers: tallest greenery in the back, medium focal flowers in the middle, and delicate accents or trailing vines in the front for easy accessibility.
- Provide a ‘Recipe Card’ at the end of the table with simple tips on how to balance a bouquet, suggesting a ratio of one large flower, three medium flowers, and plenty of airy greens.
- Include a station with pre-cut squares of kraft paper and a variety of ribbons, allowing guests to wrap their creations securely and add a personalized tag as a finishing touch.
How to Build a Charming Roadside Farm Stand for Selling Your Fresh Garden Harvest
Why we love this
There is a deep, soul-satisfying connection in sharing the bounty of your labor with the community, and a roadside stand is the perfect vessel for that generosity. We love the rustic, nostalgic aesthetic of weathered wood and chalkboard signs that announce the day’s ‘freshly picked’ treasures. It evokes a sense of slow living, where neighbors stop to admire the vibrant reds of heirloom tomatoes and the earthy smell of freshly dug potatoes, fostering a local food culture that is both beautiful and sustainable.
Essential Elements:
- Reclaimed wood pallets or cedar planks
- Corrugated metal roofing or a striped canvas awning
- Chalkboard paint and liquid chalk markers
- Woven baskets and wooden crates for display
- A secure, weather-proof honor system cash box
How to make it
- Design a basic A-frame or shed-style structure using pressure-treated 4×4 posts for the foundation to ensure it remains stable during summer thunderstorms and high winds.
- Construct tiered shelving inside the stand, angling the shelves slightly forward so that the produce is fully visible to passing cars and pedestrians.
- Apply a protective outdoor sealant or a coat of classic white milk paint, then sand the edges for a distressed, time-worn look that feels inviting and authentic.
- Create clear, high-contrast signage using chalkboard paint on the header, listing your offerings and prices in a clear, legible script that can be seen from the road.
- Place a heavy-duty, locked cash box in a discreet but accessible location, or display a QR code for digital payments to make the purchasing process seamless for your modern neighbors.
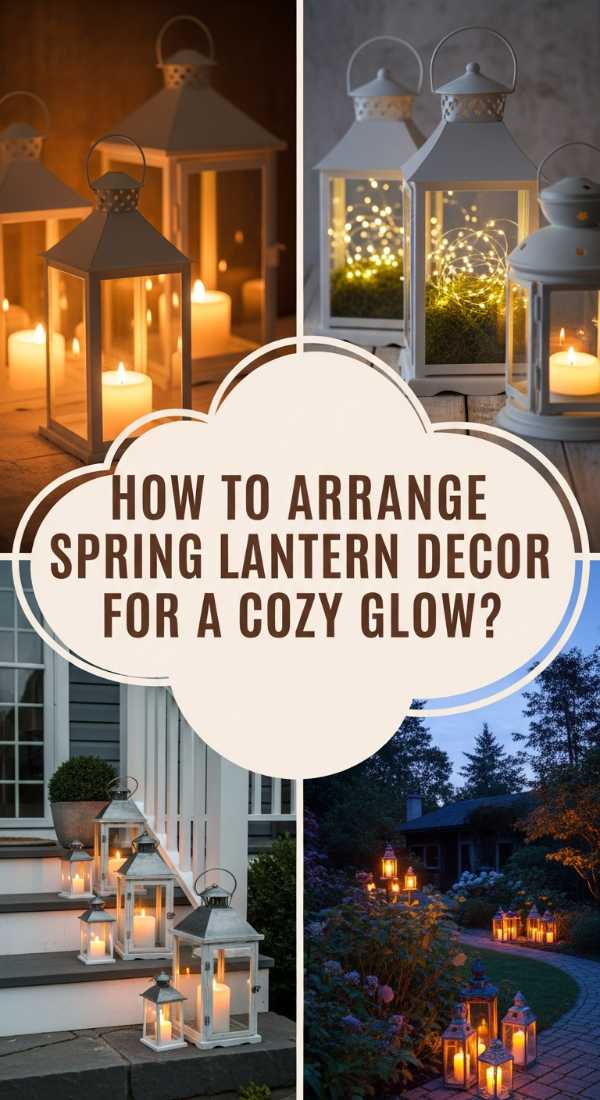
How to Style Spring Lantern Decor for a Soft Evening Glow on Your Porch
Why we love this
As the evenings grow longer, there is nothing more enchanting than the amber flicker of a lantern casting dancing shadows across your porch. We love this look because it bridges the gap between indoor coziness and outdoor freedom, creating an atmospheric ‘room’ without walls. The combination of glass, metal, and soft light provides a sophisticated warmth that makes even a simple Tuesday night feel like a special occasion, wrapping your home in a welcoming, golden embrace.
Essential Elements:
- A collection of lanterns in varying heights and finishes (matte black, copper, or wood)
- Flameless LED candles with timers and realistic flicker effects
- Natural fillers like smooth river stones or dried moss
- Outdoor-rated fairy lights
- Overhead hooks or sturdy floor space for layering
How to make it
- Clean the glass panes of your lanterns thoroughly with a vinegar-water solution to ensure the light emits a crisp, clear glow without any dusty diffusion.
- Group the lanterns in odd numbers—trios work best—placing the largest lantern at the back and staggering the smaller ones in front to create a sense of visual depth.
- Place a high-quality flameless candle inside each, opting for varying heights (4″, 6″, and 9″) to ensure the light levels are staggered and mimic a natural candle arrangement.
- Add a layer of organic texture to the base of the lantern by surrounding the candle with a thin bed of preserved moss or small, pale sea glass to hide the plastic candle bases.
- Set the automatic timers to trigger at dusk, so you are greeted by a warm, inviting glow the moment the sun begins to dip below the horizon each evening.
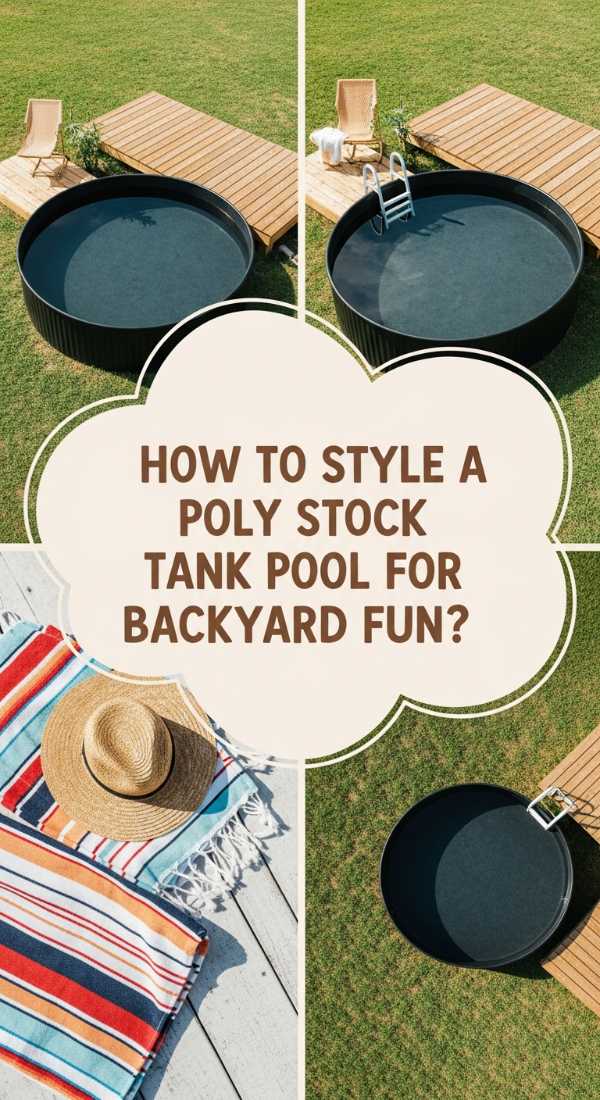
How to Prep a Poly Stock Tank Pool for Endless Days of Cool Backyard Fun
Why we love this
The poly stock tank pool is the ultimate ‘cool-girl’ DIY, blending industrial utility with a chic, minimalist aesthetic that fits into any backyard. We love the tactile, slightly textured feel of the heavy-duty plastic, which stays cooler to the touch than metal tanks in the direct sun. It’s a low-barrier-to-entry luxury that brings the nostalgia of childhood summer days into a modern adult context, perfect for soaking with a cocktail while the cicadas buzz in the trees.
Essential Elements:
- 8-foot or 10-foot poly (plastic) stock tank
- Above-ground pool pump and filter kit
- A 2-inch hole saw and waterproof silicone sealant
- A level surface of sand, crushed gravel, or a concrete pad
- Floating chlorine dispenser and pool thermometer
How to make it
- Level your chosen site perfectly; even a slight tilt will result in lopsided water levels and uneven pressure on the tank walls, potentially causing structural failure.
- Using a hole saw, carefully drill two holes in the side of the tank—one for the suction outlet and one for the return inlet—ensuring they match the diameter of your pump hoses.
- Install the threaded bulkhead fittings into the holes, applying a generous bead of marine-grade silicone sealant on both sides of the gasket to create a permanent, watertight bond.
- Connect the pump and filter system according to the manufacturer’s instructions, ensuring the pump is placed on a stable surface at least 5 feet away from the water for safety.
- Fill the tank with water, add the initial shock treatment and chlorine, and let the pump run for at least 4 hours to ensure the water is circulating and filtered before your first dip.
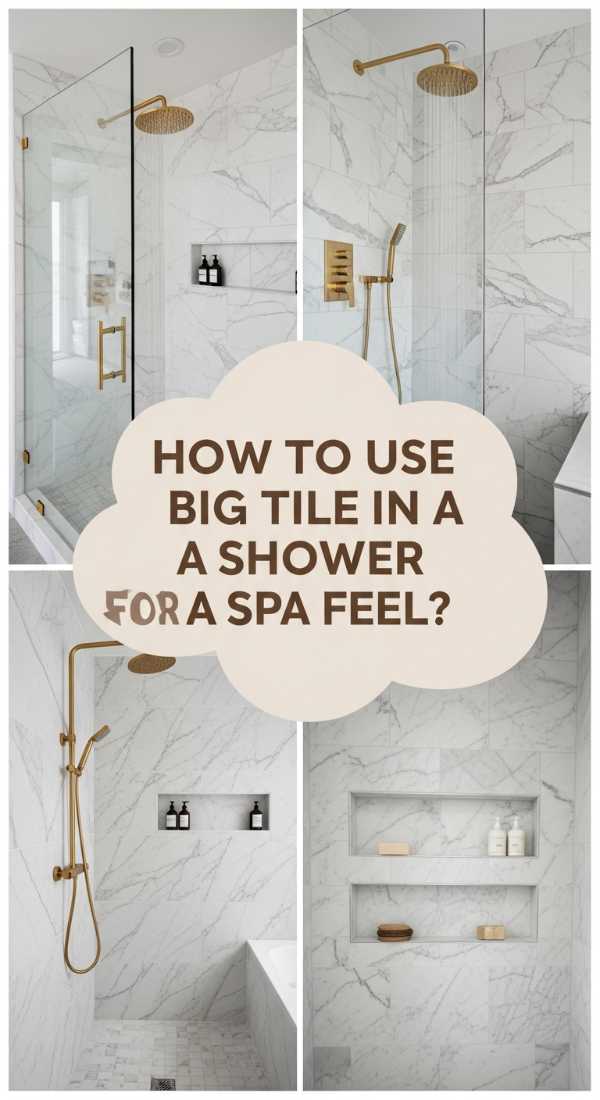
How to Use Big Tile in a Shower for a Seamless High End Spa Experience
Why we love this
Large-format tiles are a total game-changer for bathroom design, offering a sleek, expansive look that makes even a small shower feel like a palatial spa. We love the reduction of grout lines, which not only makes cleaning a breeze but also creates a continuous visual flow that mimics the appearance of solid stone slabs. The cold, smooth surface of porcelain or marble in a 24×48 inch format feels incredibly grounded and sophisticated under the spray of a rainfall showerhead.
Essential Elements:
- Large format tiles (at least 12×24 or larger)
- High-bond, polymer-modified thin-set mortar
- A tile leveling system (clips and wedges)
- Epoxy or high-quality sanded grout in a matching color
- Diamond blade wet saw for precision cuts
How to make it
- Ensure your shower walls are perfectly plumb and the substrate is coated with a liquid waterproofing membrane like RedGard to prevent moisture from reaching the studs.
- Back-butter each large tile with a thin layer of mortar in addition to troweling the wall; this ensures 100% coverage, which is critical for heavy tiles to prevent air pockets and cracking.
- Use a tile leveling system religiously; place the clips at the corners and midpoints of each tile to eliminate ‘lippage’ and ensure a perfectly flat, professional-grade surface.
- Allow the mortar to cure for at least 24 hours before removing the leveling clips and applying grout, choosing a color that matches the tile exactly for that seamless ‘slab’ look.
- Finish the corners and the base where the tile meets the tray with a high-quality silicone caulk that matches the grout to allow for natural expansion without cracking the seal.
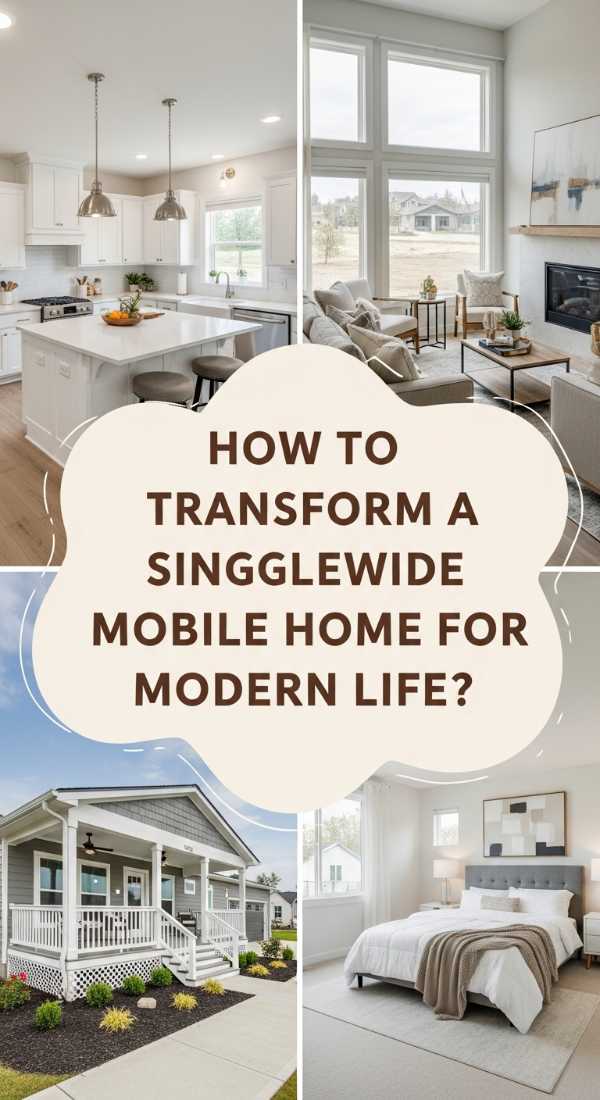
How to Renovate a Singlewide Mobile Home for a Chic and Spacious Modern Life

Why we love this
Renovating a singlewide is an exercise in creative freedom and the ultimate proof that style isn’t dictated by a foundation. We love the challenge of turning narrow corridors into airy, light-filled passages through the use of clever built-ins and a cohesive color palette. The transformation from a dated, dark interior to a bright, Scandi-inspired haven proves that with a bit of vision, any space can become a sanctuary that feels both incredibly modern and deeply personal.
Essential Elements:
- Lightweight LVP (Luxury Vinyl Plank) flooring
- High-hide white primer and eggshell finish paint
- New, oversized windows or upgraded lighting fixtures
- Lightweight, modern cabinetry or open shelving
- Removing non-structural interior walls for an open-concept flow
How to make it
- Start by assessing the chassis and leveling the home; mobile homes shift over time, and a level base is essential before you start installing new flooring or cabinetry.
- Prime the ‘VOG’ (Vinyl Over Gypsum) walls with a high-adhesion primer specifically designed for slick surfaces, which allows standard latex paint to bond without peeling.
- Replace the standard narrow baseboards and trim with wider, modern profiles to instantly elevate the architectural feel of the rooms and hide any gaps at the wall-floor junction.
- Opt for multi-functional, built-in furniture like window seats with storage or wall-mounted desks to maximize every square inch of the narrow footprint.
- Swap out the standard 7-foot interior doors for taller, higher-quality options or even sliding barn doors to save swing-space and create a feeling of height and luxury.
How to Curate an Irresistible Vendor Booth for Attracting Your Ideal Loyal Customers

Why we love this
A vendor booth is more than just a place to sell; it is a three-dimensional manifestation of your brand’s heart. We love the art of ‘visual merchandising’—the way a velvet runner or a hand-lettered sign can whisper your brand’s story to a passerby and draw them into your world. When done right, your booth becomes a sensory experience, where the smell of your handmade candles or the soft texture of your textiles creates an emotional bond that turns a one-time visitor into a lifelong fan.
Essential Elements:
- A consistent, on-brand color palette
- Tiered displays to create visual height and interest
- Warm, battery-operated accent lighting
- Clear, professional branding and signage
- A ‘touchable’ element or interactive product demo
How to make it
- Sketch your layout beforehand, ensuring there is a clear ‘path’ for customers to enter and move through your space without feeling cramped or overwhelmed.
- Utilize vertical space by using grids, tall shelving units, or hanging displays; this draws the eye up from across the market and makes your booth visible even in a crowd.
- Incorporate ‘lifestyle’ props—like a vase of flowers or an open book—next to your products to help customers visualize how the items will look and feel in their own homes.
- Ensure every single item has a clear, easy-to-read price tag; many customers are too shy to ask for prices and will simply walk away if the information isn’t readily available.
- Create a ‘checkout zone’ at the back or side of the booth that is stocked with high-quality packaging materials (tissue paper, stickers, branded bags) to make every purchase feel like a gift.
How to Capture the Timeless Casas Estilo Rancho Aesthetic for a Warm Rustic Retreat
[IMAGE_10]
Why we love this
Casas Estilo Rancho, or Ranch-style homes, celebrate the rugged beauty of the landscape and the warmth of heritage. We love this aesthetic for its use of raw, honest materials—the cool touch of terracotta tiles, the scent of aged leather, and the heavy, reassuring weight of exposed ceiling beams. It’s a style that feels grounded and permanent, offering a sanctuary that honors tradition while embracing the relaxed, indoor-outdoor lifestyle that makes a house truly feel like a home.
Essential Elements:
- Natural terracotta (Saltillo) floor tiles
- Exposed dark wood ceiling beams or vigas
- Plaster or stucco wall finishes in warm white or cream
- Wrought iron light fixtures and hardware
- A mix of vintage leather and woven textile accents
How to make it
- Install Saltillo tiles using a wide grout joint for that authentic, hand-laid look; ensure you seal them with a high-gloss or matte finish to protect the porous clay and enhance the deep orange tones.
- Apply a subtle texture to your walls using a light plaster wash or ‘skip-trowel’ technique to add depth and mimic the look of traditional adobe or stone construction.
- Incorporate dark, heavy wood elements through a reclaimed mantel or by adding faux wood beams to a vaulted ceiling to create that signature ranch architectural weight.
- Layer your furniture with a mix of ‘hard’ and ‘soft’—pair a structured leather sofa with oversized, hand-woven Mexican wool pillows and a chunky knit throw for a cozy contrast.
- Maximize the connection to the outdoors by using simple, sheer linen curtains that allow natural light to filter through while keeping the focus on the patio or garden views.
The Art of Intentional Living
Creating a home and a life that feels curated is not about spending the most money; it’s about the intention behind the choices we make. Whether you are laying a single tile or building a whole farm stand, you are putting your stamp on the world and creating a space that nurtures your spirit. I hope these ideas inspire you to look at your surroundings with fresh eyes and find the beauty in the small, everyday moments of creation.