
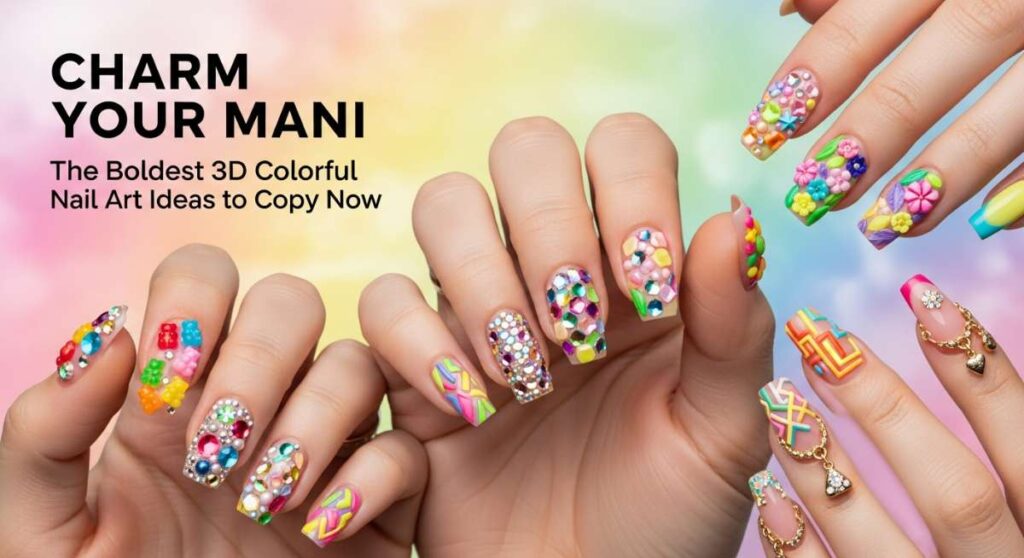
Charm Your Mani: The Boldest 3D Colorful Nail Art Ideas to Copy Now
Hello, my beautiful loves! I am so happy you’ve wandered into our little cozy corner of the internet today. Lately, I’ve been feeling like my hands needed a bit of a soul-awakening. You know that feeling when you look down at your keyboard or your morning matcha and just wish there was a bit more… life staring back at you? That’s exactly how this obsession with maximalist 3D nail art began for me.
In a world that often asks us to be quiet or blend in, there is something so deeply healing about wearing a rainbow on your fingertips. It’s like carrying a tiny, textured art gallery with you everywhere you go. Today, I’m sharing my favorite ways to embrace the ‘more is more’ philosophy with charms, textures, and every shade of the sun. Grab a cozy blanket, a warm cup of tea, and let’s dive into these whimsical designs together.
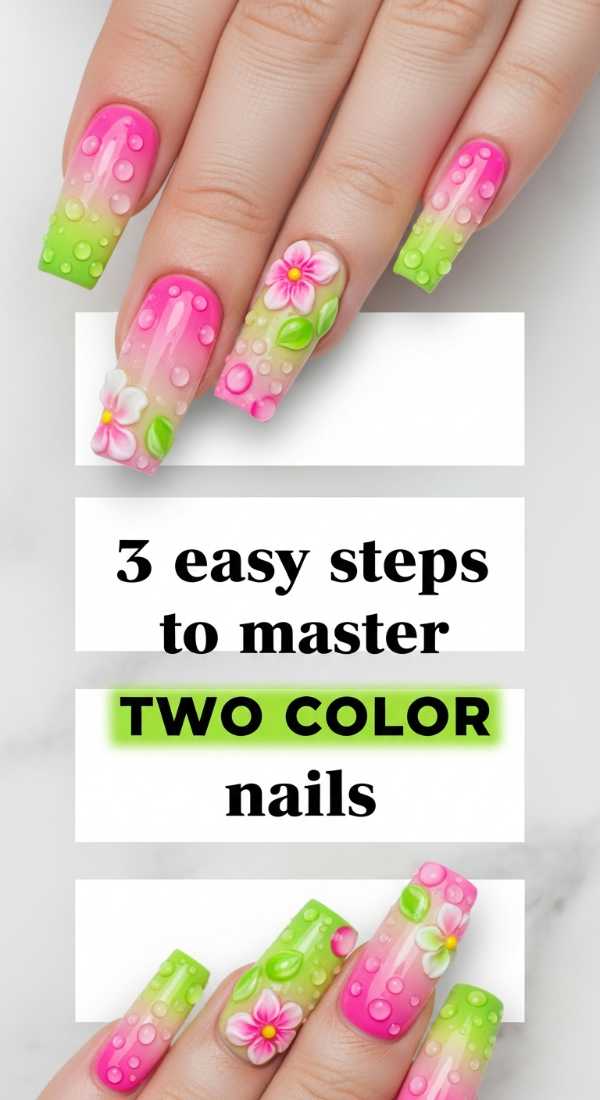
Mastering the Duet: 3 Easy Steps to Two Color Nails
Why to love this recipe:
Sometimes, darling, we just want a simple harmony. This technique is like a soft conversation between two of your favorite moods, blended into a seamless, tactile finish that feels modern yet approachable.
Essential Ingredients:
- Two contrasting gel polishes (e.g., Lavender and Sunshine Yellow)
- A sponge wedge
- Clear 3D builder gel
How to Prepare:
- Paint the base half of the nail with your first color and the top with the second.
- Lightly dab the center with a sponge to create a soft sunset gradient.
- Apply dots of 3D builder gel over the seam to create ‘raindrop’ textures.
Budget Range
- OPI Nail Lacquer ($11)
- Sally Hansen Miracle Gel ($10)
- Generic Makeup Sponges ($3)
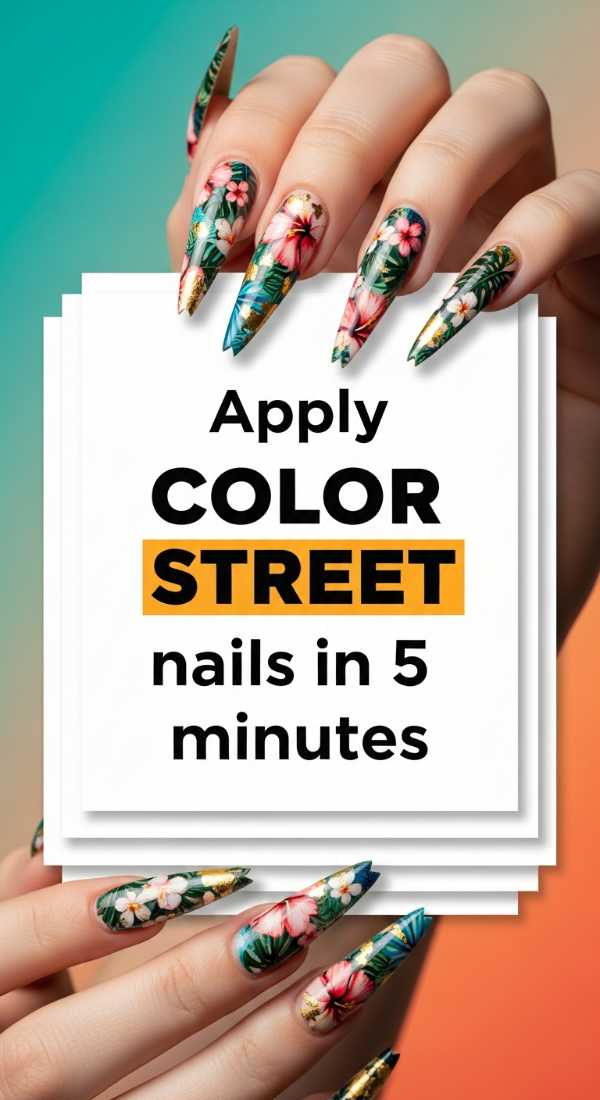
The 5-Minute Magic: Apply Color Street Nails
Why to love this recipe:
For my busy loves who are juggling a million beautiful things, this is your grace period. It’s the quickest way to get a salon-quality base that we can then embellish with our favorite 3D charms.
Essential Ingredients:
- Color Street nail strips
- Mini nail file
- Nail glue and tiny resin bow charms
How to Prepare:
- Clean your nails with a prep pad to ensure a smooth, loving bond.
- Peel and press the Color Street strip, smoothing out any tiny bubbles.
- Use a tiny drop of glue to place a 3D resin bow at the base of your ring finger.
Budget Range
- Color Street Sets ($13-$16)
- Resin Charms Bulk Pack ($8)
- Nail Glue ($5)
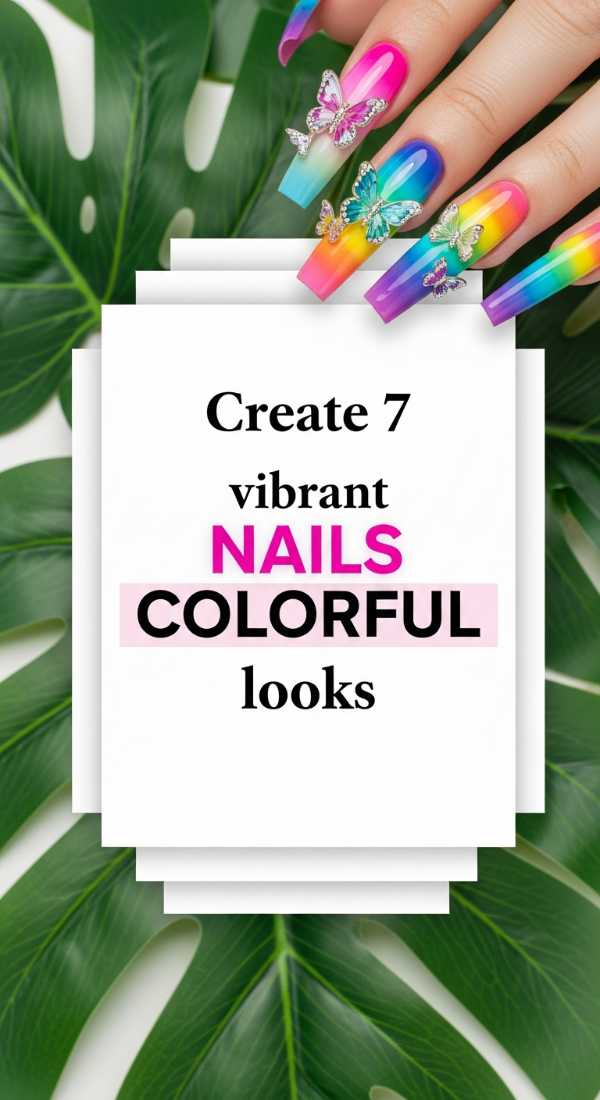
A Rainbow Riot: 7 Vibrant Nails Colorful Looks
Why to love this recipe:
This is for the days when you can’t pick just one emotion. It’s a celebration of variety, using different 3D elements on every single finger to create a joyous, maximalist masterpiece.
Essential Ingredients:
- 7 different neon polish shades
- Mixed bag of flatback pearls and rhinestones
- Matte top coat
How to Prepare:
- Apply a different vibrant base color to each nail.
- Once dry, apply a matte top coat to create a velvet-soft background.
- Cluster pearls and stones on the thumb and middle finger for a ‘jewelry’ effect.
Budget Range
- Modelones Gel Polish Set ($20)
- Mixed Rhinestone Wheel ($7)
- Essie Matte About You ($10)
The Four-Stage Rainbow: Design Multicolor Nails
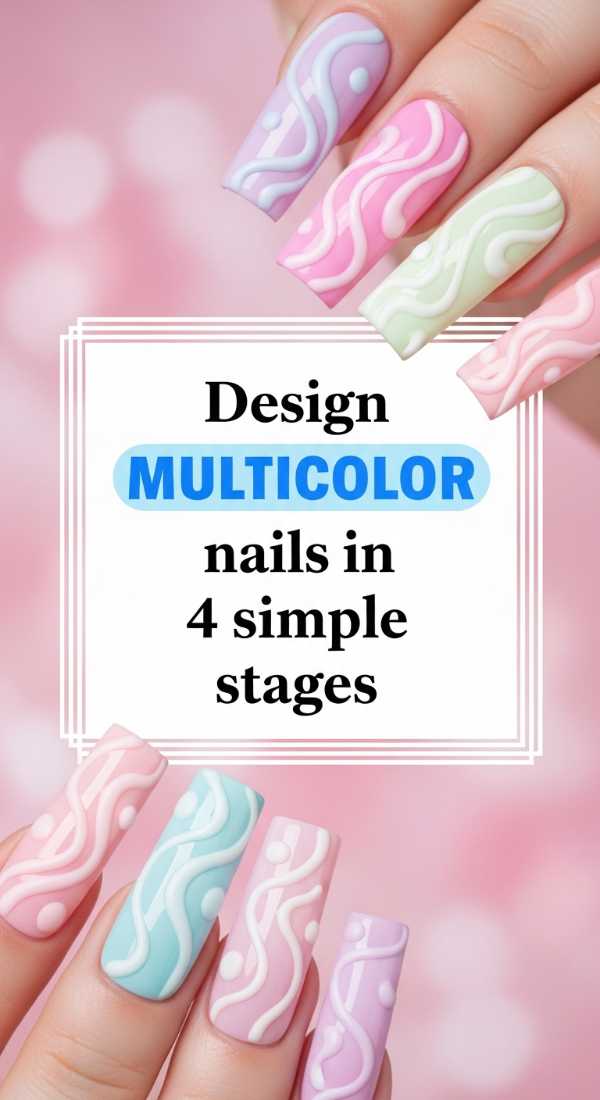
Why to love this recipe:
Structure meets soul here. By breaking the design into four stages, we ensure the 3D elements feel intentional rather than cluttered. It’s a peaceful way to build a complex look.
Essential Ingredients:
- Primary color palette (Red, Blue, Yellow)
- Fine liner brush
- Iridescent 3D ‘caviar’ beads
How to Prepare:
- Stage 1: Lay down your primary color blocks in geometric shapes.
- Stage 2: Outline the shapes with a fine liner brush in white or gold.
- Stage 3: Fill one geometric section with 3D caviar beads.
- Stage 4: Seal the flat sections with a high-gloss top coat.
Budget Range
- Beetles Liner Gel Set ($15)
- Caviar Microbeads ($6)
- Gelish Top Coat ($12)
The Inspiration Garden: 10 Fresh Colorful Nail Inspo Ideas

Why to love this recipe:
Think of this as a wildflower meadow for your hands. We use ten different inspirations—from butterflies to jelly beans—to create a curated 3D experience that feels fresh and exciting.
Essential Ingredients:
- Pastel gel polish set
- 3D butterfly decals
- Small dried pressed flowers
How to Prepare:
- Paint each nail a different soft pastel ‘sky’ color.
- Gently press a dried flower into a tacky top coat on your index finger.
- Add a 3D butterfly to the pinky for a touch of movement.
Budget Range
- Dried Flowers for Nails ($9)
- Butterflies 3D Stickers ($7)
- Zoya Pastel Polish ($12)
Sculpting Joy: 5 Stunning Colourful Acrylic Nails
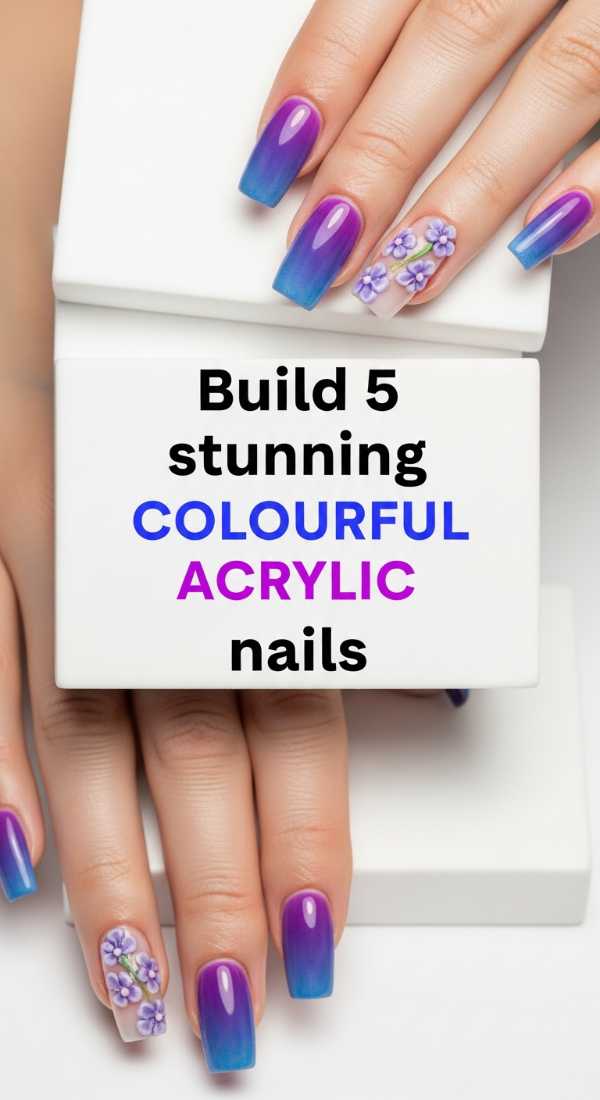
Why to love this recipe:
Acrylics give us the strength to carry heavier 3D art. This is a bold, architectural approach to beauty that makes a statement before you even say a word.
Essential Ingredients:
- Acrylic powder in ‘Vivid Pink’
- Large heart-shaped gummy charms
- Electric nail file
How to Prepare:
- Build a medium-length acrylic base with a slight curve.
- Buff the surface until it’s cloud-smooth.
- Attach a large 3D ‘gummy bear’ or ‘heart’ charm using a blob of clear acrylic for a permanent hold.
Budget Range
- Mia Secret Acrylic Powder ($12)
- Gummy Bear Nail Charms ($6)
- Professional Nail File ($15)
The Sharp & Sweet: 3 Colorful Stiletto Nails Techniques
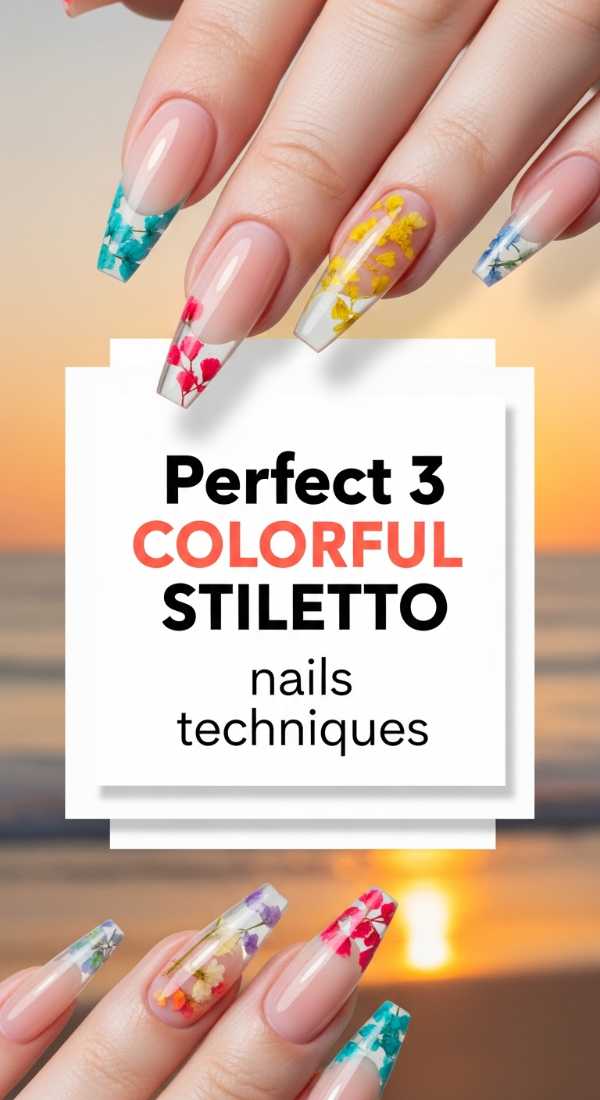
Why to love this recipe:
Stiletto nails are fierce, but when we add soft 3D textures, they become sweet and balanced. It’s the perfect metaphor for being a strong yet gentle woman.
Essential Ingredients:
- Stiletto nail tips
- Sheer jelly polishes
- Gold foil flakes
How to Prepare:
- Apply the stiletto tips and coat with a ‘jelly’ translucent color.
- Apply 3D gold foil in a vertical line to elongate the nail.
- Add a single 3D crystal at the very tip for a ‘sparkle drop’ effect.
Budget Range
- Una Gella Stiletto Tips ($10)
- Jelly Polish Set ($18)
- Gold Leaf Sheets ($5)
Textural Symphony: Layer 4 Textures for Multicolor Nails
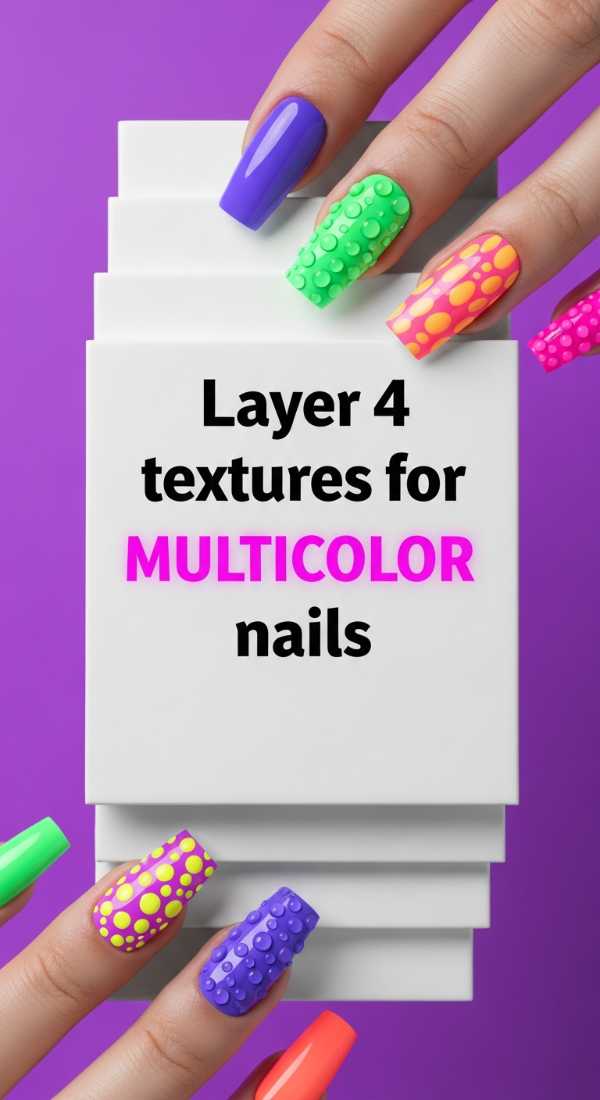
Why to love this recipe:
This is a sensory delight! By mixing matte, gloss, glitter, and 3D textures, your nails become a tactile landscape that you won’t be able to stop touching.
Essential Ingredients:
- Glitter polish
- Matte top coat
- 3D ‘sweater’ gel or thick embossing gel
How to Prepare:
- Paint one nail full glitter and the next a flat matte.
- On the matte nail, use embossing gel to draw 3D raised swirls.
- Layer a glossy top coat only over the 3D swirls to make them pop.
Budget Range
- Born Pretty Embossing Gel ($8)
- ILNP Holographic Polish ($10)
- Matte/Gloss Duo Pack ($12)
Runway Ready: 6 Gorgeous Colorful Stiletto Nails
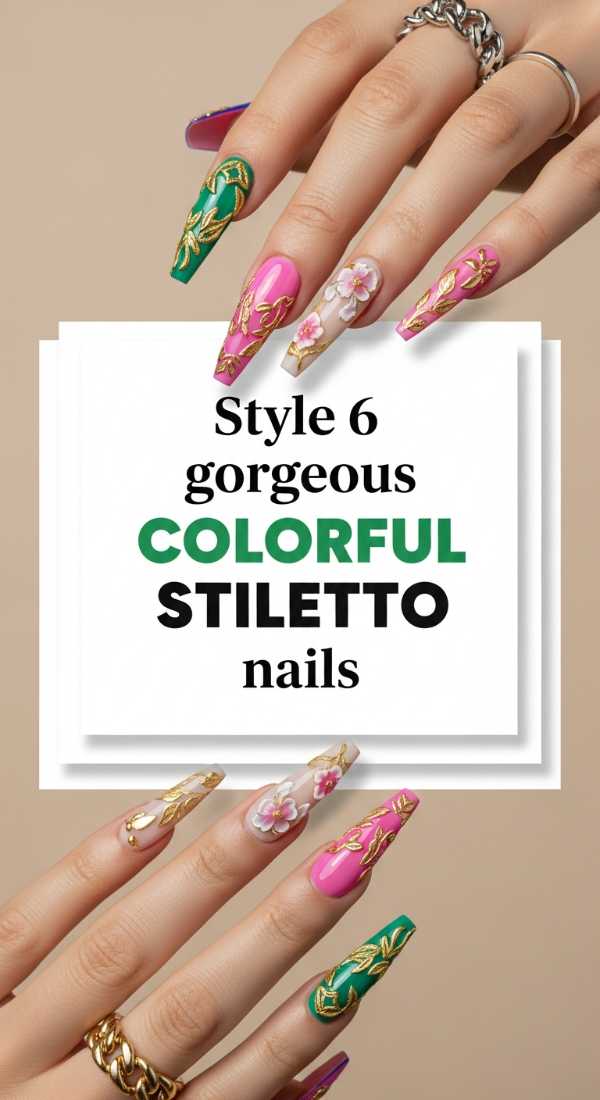
Why to love this recipe:
Inspired by the high-fashion runways, these six designs focus on sophisticated 3D height. It’s for the woman who isn’t afraid to let her hands take center stage.
Essential Ingredients:
- Deep jewel-toned polishes
- Metal chain nail accents
- Oversized ‘diamond’ gems
How to Prepare:
- Base the stiletto nails in deep emerald or royal purple.
- Drape a tiny 3D metal chain across the surface of the middle finger.
- Anchor the chain with a large, faceted 3D gem.
Budget Range
- Nail Art Chains ($7)
- Vixi Jewel Tones ($14)
- Large AB Crystals ($9)
The Full Spectrum: Mix 8 Shades for Nails Colorful Perfection
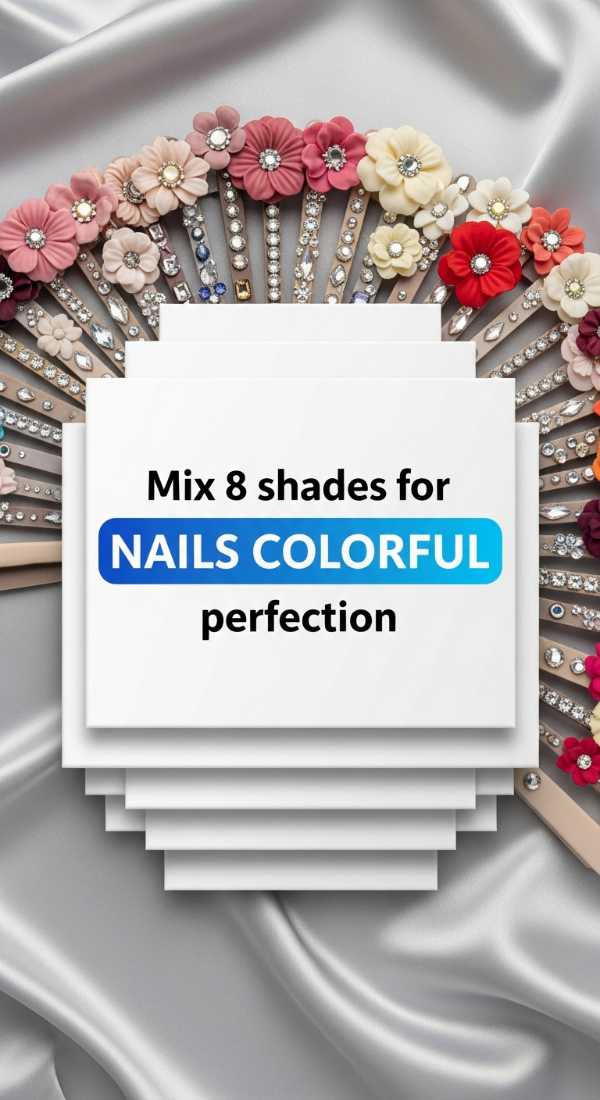
Why to love this recipe:
This is the ultimate ‘color therapy.’ By mixing eight distinct shades with 3D bubbles, we create a look that is pure, unadulterated happiness.
Essential Ingredients:
- 8 random vibrant colors from your collection
- Clear 3D gel bubbles
- White acrylic paint
How to Prepare:
- Paint a ‘blob’ of each of the 8 colors on the nail in a mosaic pattern.
- Add white paint ‘twinkles’ between the color gaps.
- Cover each color blob with a matching 3D clear gel dome for a ‘bubble’ effect.
Budget Range
- Your existing polish collection ($0!)
- Makartt Builder Gel ($13)
- Detailing Brushes ($6)
Embrace Your Inner Artist
Darlings, I hope these ideas spark a little flame of creativity in your heart. Remember, there are no rules in art—especially when it comes to your self-expression. If a design feels like ‘you,’ then it is perfect. Your hands do so much for the world; treat them to some 3D magic and let them shine as bright as your spirit. Until next time, stay colorful!