
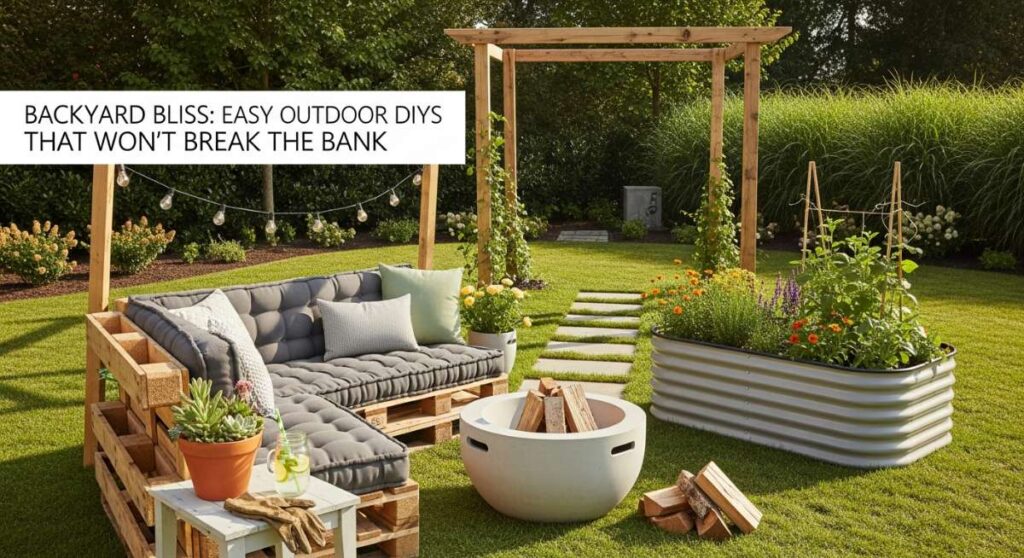
There’s something truly magical about that golden hour when the sun dips low, casting long, honey-colored shadows across the grass and turning your backyard into a private sanctuary. I’ve always believed that you don’t need a massive renovation budget to create an outdoor space that feels like a five-star retreat. It’s about the soul you pour into the details, the repurposed materials that tell a story, and the deep satisfaction of sitting back with a glass of iced tea, looking at your handiwork, and saying, ‘I made this.’
In this guide, we are diving deep into the world of pallet transformations. Whether you have a sprawling garden or a tiny urban balcony, these DIY projects are designed to bring warmth, texture, and a touch of rustic elegance to your home. We’ll explore everything from structural builds to the fine art of finishing, ensuring your backyard bliss is both beautiful and sustainable. Let’s grab our tools and turn those forgotten wooden crates into the centerpiece of your outdoor living experience.
How to Build Pallet Table DIY Projects for a Rustic Home Touch

Why we love this
Building your own pallet table is like giving a second life to a piece of history; there is an incredible tactile joy in feeling the rough, sun-bleached grain of the wood transform under your hands. The aroma of sawdust and old pine fills the air as you work, grounding you in the creative process while you build something sturdy and timeless. It’s not just a table; it’s a rugged, earth-toned statement piece that smells of the outdoors and brings a sense of grounded, organic warmth to any patio or sunroom. You’ll love the weight and presence it carries, offering a sturdy surface for heavy planters or stacks of vintage books.
Essential Elements:
- Two heat-treated (HT) wooden pallets
- Heavy-duty 3-inch carriage bolts
- Electric sander with 60 and 120 grit sandpaper
- Power drill and wood-boring bits
- Reclaimed timber for leg reinforcements
How to make it
- Begin by inspecting your pallets for the ‘HT’ stamp, which ensures they were heat-treated rather than chemically treated. Use a pry bar to remove any protruding nails, ensuring the surface is safe for handling.
- Position the two pallets stacked directly on top of each other. Align the edges perfectly, checking for symmetry. Use a 1/2-inch wood-boring bit to drill four holes through both layers at each corner of the internal support blocks.
- Insert your carriage bolts through the holes. When tightening the nuts, use a wrench to apply firm pressure until the bolt head sinks slightly into the wood—this ‘locking’ visual cue ensures the table won’t wobble during heavy use.
- Sand the entire structure starting with 60-grit paper to remove splinters. Transition to 120-grit when the wood feels fuzzy rather than sharp to the touch. This phase takes patience; spend at least 20 minutes per side for a professional feel.
- Flip the table and attach 4×4 timber blocks to the base corners using 4-inch deck screws. Drive the screws at a slight angle (toenailing) to ensure maximum structural integrity.
How to Design Pallet Table Ideas for an Aesthetic Living Space
Why we love this
Designing a pallet table specifically for aesthetics allows you to play with the contrast between raw, industrial textures and refined, modern decor. We love the way the weathered gray patina of the wood interacts with soft, cream-colored textiles or the glint of a brass tray. It’s a sensory experience that balances the ‘hard’ elements of construction with the ‘soft’ elements of interior design, creating a visual focal point that feels curated rather than cluttered. The visual depth of the slats creates interesting shadows, making your living space feel dynamic and layered with history and intent.
Essential Elements:
- One high-quality pallet
- Tempered glass tabletop (custom cut)
- Hairpin metal legs
- White-wash wood stain
- Soft-bristle staining brush
How to make it
- Select a pallet with narrow spacing between the top slats to provide better support for items. Clean the wood thoroughly with a mixture of mild soap and water, allowing it to dry in the sun for at least 24 hours until the wood feels bone-dry and light.
- Apply a white-wash stain using a ‘dry brush’ technique. Dip only the tips of your bristles into the stain and wipe the excess onto a rag. Lightly flick the brush over the wood grain to create a translucent, airy finish that highlights the wood’s texture without masking it.
- Measure the top surface and order a piece of 1/4-inch tempered glass with polished edges. This adds a level of sophistication and makes the surface easy to clean, reflecting light beautifully throughout the room.
- Flip the pallet over and mark four points for your hairpin legs, roughly 2 inches from each corner. Pre-drill pilot holes to prevent the wood from splitting, then secure the legs with 1-inch wood screws.
- Place clear silicone bumpers on the corners of the wood before laying the glass on top. This prevents the glass from sliding and provides a tiny air gap that prevents moisture from being trapped.
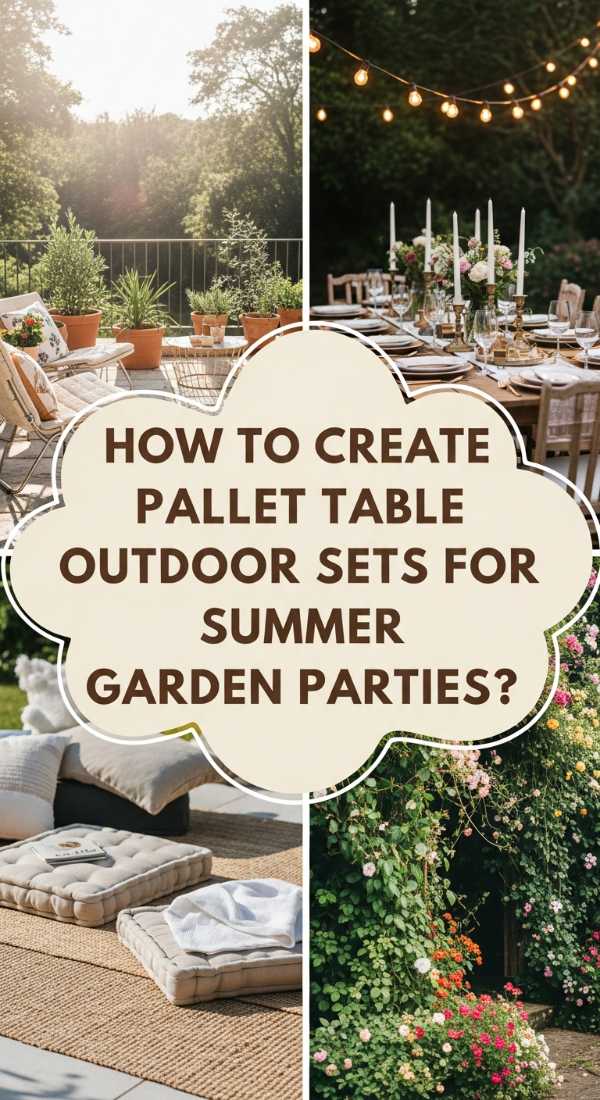
How to Create Pallet Table Outdoor Sets for Summer Garden Parties

Why we love this
There is nothing quite like the atmosphere of a garden party where the furniture feels as natural as the surrounding flora. These outdoor sets encourage a communal, relaxed vibe, perfect for sharing large platters of grilled vegetables and pitchers of herb-infused lemonade. The sturdy, low-profile design invites guests to kick off their shoes and lean in close for conversation as the evening air cools. The scent of cedar-infused wood stain mingles with the fragrance of blooming jasmine, creating a sensory backdrop that makes every summer gathering feel like an effortless, sun-drenched celebration of friendship and fresh air.
Essential Elements:
- Four standard pallets
- Weatherproof outdoor wood glue
- Exterior-grade deck screws
- Sun-resistant spar urethane
- Outdoor-rated caster wheels (locking)
How to make it
- For a long dining set, join two pallets end-to-end by securing a 2×4 support beam along the underside seam. Use plenty of weatherproof wood glue between the joining surfaces for a permanent bond.
- Reinforce the legs by stacking two smaller pallet sections underneath each end. Drill pilot holes and drive 3.5-inch screws through the top pallet into the base sections. Your cue for a secure fit is when the glue slightly beads out of the joint.
- Apply three coats of spar urethane. This is crucial for outdoor longevity. Wait 4 hours between coats; the surface should feel non-tacky and ‘cool’ to the touch before you apply the next layer. This creates a hard, plastic-like shield against UV rays.
- Install heavy-duty 4-inch caster wheels at the corners. This allows you to roll the table into the shade as the sun moves. Ensure at least two wheels have locking mechanisms to prevent the table from shifting during dinner.
- Finish by filling any large gaps between slats with thin wood strips glued in place, creating a more solid surface for wine glasses.
How to Style Wood Pallet Tables for Sustainable Modern Vibes
Why we love this
Styling for a sustainable modern vibe is all about the ‘less is more’ philosophy, highlighting the natural imperfections of the wood as a form of art. We love the juxtaposition of a rugged, upcycled pallet table against crisp, minimalist surroundings—it brings a ‘soul’ to modern architecture that can sometimes feel too clinical. The tactile contrast of the matte, sanded wood against a smooth ceramic vase or a sleek metallic lamp creates a sophisticated sensory palette. It’s a way to demonstrate that eco-consciousness and high-end style are not mutually exclusive, but rather, they enhance each other in a beautiful, conscious harmony.
Essential Elements:
- Single pallet base
- Matte black spray paint (for legs or accents)
- Natural beeswax finish
- Linen table runner
- Potted succulents in concrete planters
How to make it
- Clean the pallet and sand it to a very high 220-grit finish. The wood should feel as smooth as silk. This high-level sanding is what differentiates ‘trash’ from ‘modern furniture.’
- Instead of a traditional stain, rub a natural beeswax or hemp oil into the wood using a lint-free cloth. Work in circular motions. The visual cue for completion is a deep, rich saturation where the wood grain ‘pops’ and glows without looking shiny.
- Add a modern edge by painting the side supports or legs in a flat matte black. Use painter’s tape to create sharp, crisp lines between the natural wood and the black paint.
- Style the center with a single linen runner in a neutral tone like oatmeal or slate. The fabric should drape naturally over the edges, providing a soft texture against the hard wood.
- Top with a cluster of concrete-potted succulents. The gray of the concrete complements the natural tones of the wood, while the greenery adds a burst of living color.
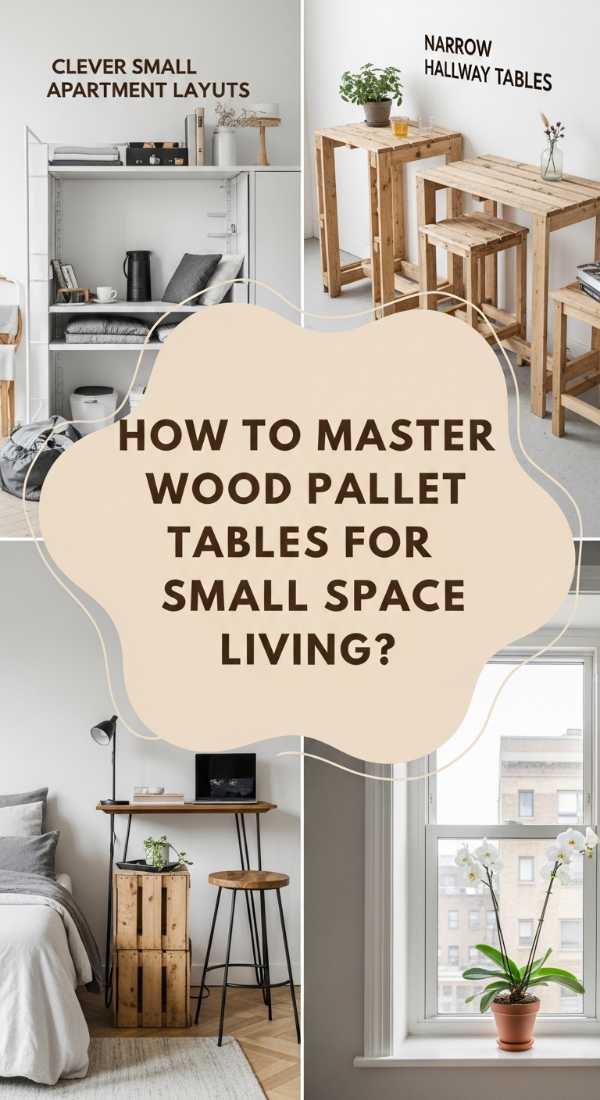
How to Master Wood Pallet Tables for Small Space Living
Why we love this
Mastering small space living requires furniture that is as versatile as it is beautiful, and a customized pallet table is the ultimate chameleon. We love how a slim-profile pallet table can act as a desk by day and a chic entryway console by night, saving precious floor space without sacrificing style. The compact nature of the pallet makes it feel intentional and snug, like a piece designed specifically for a cozy nook. The smell of the wood brings a bit of the ‘great outdoors’ inside, making even the smallest studio apartment feel more expansive, grounded, and connected to nature.
Essential Elements:
- Narrow ‘half’ pallet
- L-brackets for wall mounting
- Fold-down hinge hardware
- Multi-purpose wood sealant
- Integrated LED strip lighting
How to make it
- Cut a standard pallet in half lengthwise using a circular saw. This creates a slim profile that won’t obstruct walkways in small rooms. Sand the cut edges thoroughly to prevent snagging clothes.
- For a floating desk effect, mount heavy-duty L-brackets into the wall studs. Ensure the brackets are perfectly level; use a bubble level and wait for the bead to sit exactly in the center of the lines before marking your holes.
- If you need the table to fold away, use heavy-duty gate hinges to attach the pallet to a wall-mounted cleat. The visual cue for a perfect install is the pallet hanging perfectly vertical when closed.
- Mount a battery-powered LED strip underneath the top slat. This provides task lighting for work or ambient ‘mood’ lighting at night, making the table appear as though it is floating.
- Apply a clear, water-based polycrylic finish. It dries quickly (usually in 2 hours) and doesn’t have a strong odor, which is vital for small, poorly ventilated apartments.
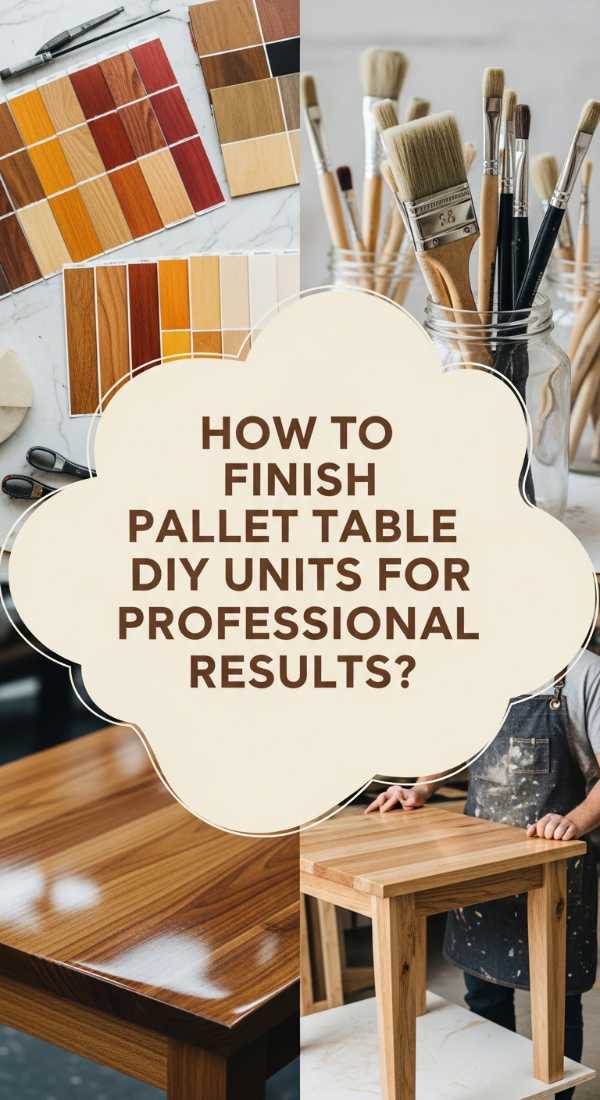
How to Finish Pallet Table DIY Units for Professional Results
Why we love this
The finishing stage is where the magic happens—it’s the moment the raw, splintery wood is transformed into a lustrous, touchable masterpiece. We love the rhythmic motion of the sanding and the way the wood grain drinks in the oil, revealing hidden patterns and colors you didn’t know were there. A professional finish makes your DIY project feel like a high-end heirloom, providing a smooth-to-the-touch surface that is as satisfying to rub your hand across as it is to look at. It’s the difference between a ‘craft project’ and a ‘piece of furniture,’ and that sense of accomplishment is truly unparalleled.
Essential Elements:
- Wood filler (stainable)
- Orbital sander with progressive grits (80, 150, 220)
- Tack cloth
- Pre-stain wood conditioner
- Oil-based wood stain and foam brushes
How to make it
- Fill all nail holes and deep gouges with a stainable wood filler. Overfill the holes slightly, as the filler will shrink as it dries. Wait until the filler is rock-hard and no longer cool to the touch (usually 1-2 hours).
- Sand the surface using an orbital sander. Move in the direction of the grain, never across it. Start with 80-grit, move to 150, and finish with 220. The wood is ready for the next grit when the previous scratches are invisible.
- Wipe the entire table down with a tack cloth. This is a sticky cheesecloth that picks up microscopic dust. This step is the ‘pro secret’ to a smooth, bump-free finish.
- Apply a pre-stain wood conditioner. This prevents the pallet wood (which is often very porous) from looking blotchy. Let it sit for 15 minutes, then wipe away the excess.
- Apply your stain with a foam brush in long, even strokes. Let it sit for 5-10 minutes depending on desired darkness. Wipe off the excess with a clean rag. Visual cue: The wood should look saturated but not ‘puddled.’
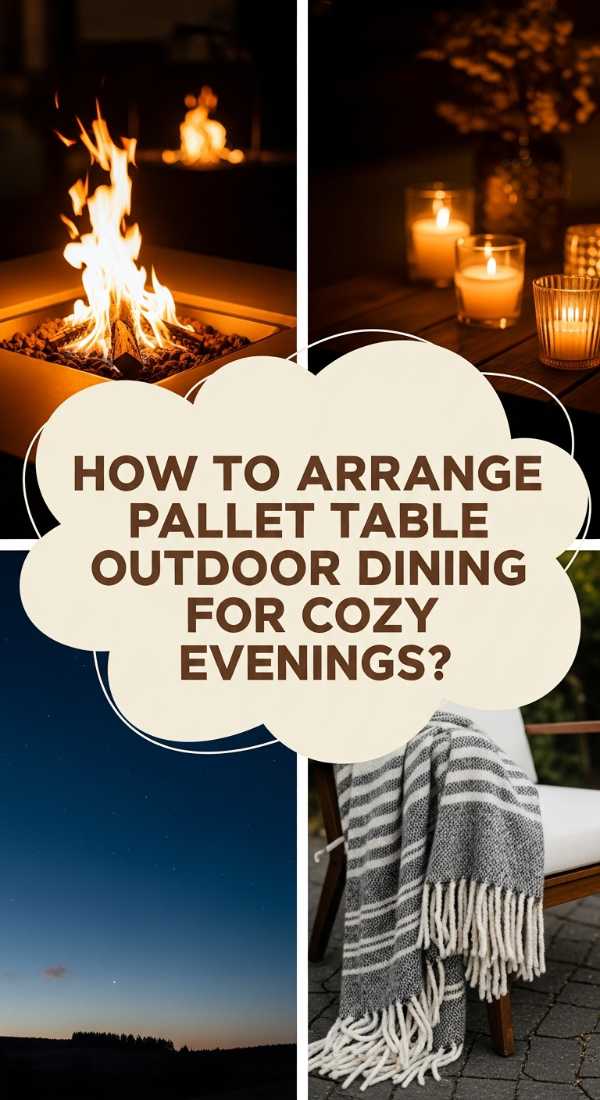
How to Arrange Pallet Table Outdoor Dining for Cozy Evenings

Why we love this
An outdoor dining arrangement centered around a pallet table creates an instant sense of ‘hygge’—that Danish concept of cozy contentment. We love the way the low height of a pallet coffee-style dining table encourages people to sit on floor cushions, creating a more intimate and grounded atmosphere. The flickering light of candles reflects off the wooden slats, and the soft textures of outdoor rugs and blankets make the whole setting feel like an extension of your living room. It’s about creating a ‘nest’ in your backyard where time slows down and the focus is entirely on the food and the company.
Essential Elements:
- Double-stacked pallet table
- Large outdoor floor cushions
- Weather-resistant area rug
- String lights or Edison bulbs
- Tabletop fire pit (ethanol-based)
How to make it
- Center your pallet table on a large outdoor rug. This ‘frames’ the dining area and provides a soft surface for guests who will be sitting on the ground.
- Surround the table with oversized floor cushions. Choose fabrics with high UV-resistance ratings. Place two cushions per side to ensure everyone has a comfortable, plush seat.
- Hang string lights in a ‘zigzag’ pattern above the table. Use a guide wire to prevent sagging. The lights should be low enough to cast a warm glow but high enough not to interfere with standing guests.
- Place a small, ethanol-based tabletop fire pit in the center of the table. This provides the sensory crackle of fire without the smoke. Ensure the fire pit is on a heat-resistant coaster to protect the wood.
- Set the table with heavy ceramic plates and linen napkins. The weight of the ceramics prevents them from blowing away in a light breeze and matches the sturdy vibe of the pallet.
How to Customize Pallet Tables for a Boho Chic Bedroom

Why we love this
In a bedroom, a customized pallet table adds a dreamy, bohemian touch that feels both effortless and artistic. We love how the light, airy wood can be softened with macrame runners and glowing salt lamps, creating a serene environment that’s perfect for winding down. The texture of the wood serves as a beautiful backdrop for dried lavender or eucalyptus, filling your sleeping space with calming, earthy scents. It’s a way to bring a bit of ‘wanderlust’ and creative freedom into your most personal room, making it feel like a boutique hotel retreat tailored specifically to your soul.
Essential Elements:
- Small, square pallet
- Pastel or chalk paint
- Decorative brass corners
- Macrame table runner
- Crystal or salt lamp
How to make it
- Paint the pallet with a matte chalk paint in a soft shade like sage green, dusty rose, or off-white. Chalk paint is ideal because it requires no priming and leaves a velvety, boho-style finish.
- Apply the paint in thin layers. If you want a ‘distressed’ look, use a piece of sandpaper to lightly rub the edges after the paint is dry, allowing the natural wood to peek through.
- Screw decorative brass or copper corners onto the four corners of the table. This adds a touch of ‘jewelry’ to the wood, elevating the look from rustic to chic.
- Layer a handmade macrame runner over the top. The intricate knots and fringe provide a beautiful contrast to the straight lines of the wooden slats.
- Place a Himalayan salt lamp on the corner. The warm, orange glow highlights the texture of the paint and wood, creating a soothing, low-light environment for the evening.
How to Repurpose Pallet Table Ideas for Functional Home Offices
Why we love this
Repurposing pallets for a home office brings a sense of organic productivity to your workday, breaking the monotony of standard laminate desks. We love the ‘living’ feel of the wood; it’s warm to the touch and provides a sturdy, reliable surface for your computer and coffee mug. The natural variations in the grain offer a visual break for tired eyes during long hours of work. It’s an empowering way to build your own workspace, fostering a creative environment where ideas can grow as naturally as the trees the wood came from.
Essential Elements:
- Two pallets (one for top, one for side storage)
- Industrial pipe legs or wooden trestles
- Cable management clips
- Clear acrylic desk mat
- Ergonomic chair
How to make it
- Construct a ‘L-shaped’ desk by joining two pallets at a 90-degree angle. Use heavy-duty miter plates on the underside to ensure the corner is perfectly square and doesn’t sag.
- Use industrial black iron pipes for legs. Clean the pipes with degreaser first, then spray with a clear coat to prevent rust. Screw the floor flanges directly into the pallet’s structural blocks.
- Incorporate ‘hidden’ storage by utilizing the natural gaps in the pallet sides. These are perfect for tucking away external hard drives or notebooks.
- Install cable management clips along the back edge of the pallet. Use a 1-inch spade bit to drill a ‘grommet hole’ through the top for your monitor and keyboard wires to pass through.
- Place a large, clear acrylic mat over the main work area. This gives you a perfectly flat surface for writing while still allowing the beauty of the pallet wood to be visible.
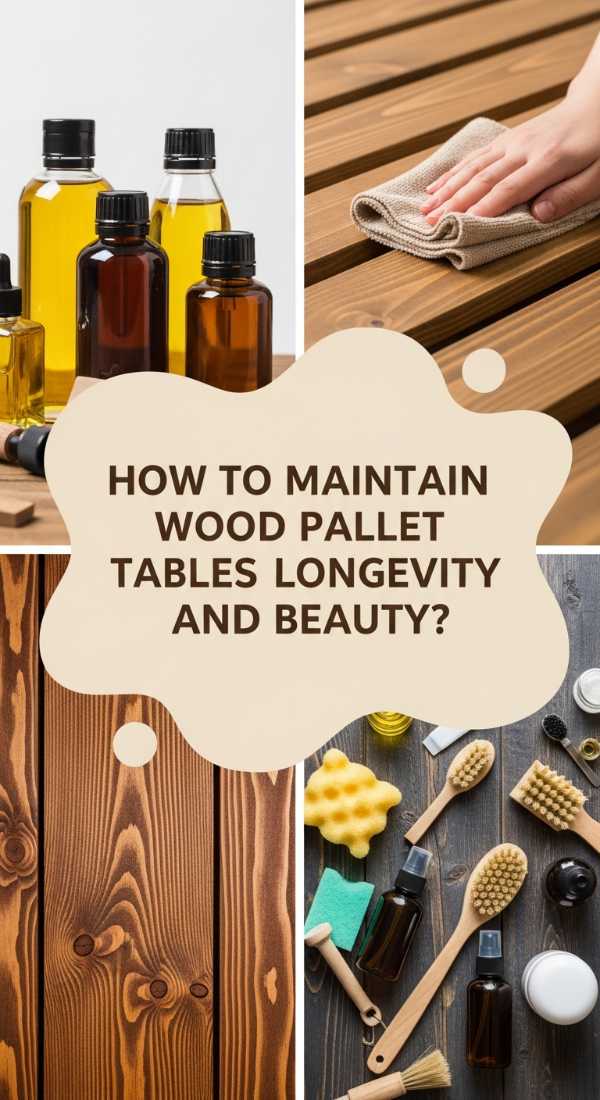
How to Maintain Wood Pallet Tables for Longevity and Beauty
[IMAGE_10]
Why we love this
Maintenance is the ultimate act of love for your DIY projects, a seasonal ritual that keeps the wood glowing and strong for years to come. We love the quiet, meditative process of cleaning and re-oiling the wood, watching it ‘wake up’ as the moisture is replenished. It’s deeply satisfying to see water bead up on the surface of a well-sealed table after a rainstorm, knowing that your care is protecting the wood from the elements. This longevity transforms a simple project into a lasting part of your home’s story, aging gracefully alongside your garden and your memories.
Essential Elements:
- Mild oxygen bleach cleaner
- Stiff-bristled scrub brush
- Fine-grit sandpaper (320 grit)
- Teak oil or Thompson’s WaterSeal
- Lint-free application rags
How to make it
- Every spring, give your table a deep clean. Mix oxygen bleach with water and scrub the wood to remove mold, mildew, and graying fibers. The visual cue is the wood returning to its original tan/yellow color.
- Once dry, lightly hand-sand the top surface with 320-grit paper. This ‘scuffs’ the old finish, allowing the new layer of sealant to bond perfectly.
- Inspect the joints. If any screws have loosened due to wood expansion/contraction, tighten them. If the wood has split, fill it with exterior wood filler and sand flush.
- Apply a fresh coat of teak oil or water sealant. Use a rag to ‘massage’ the oil into the fibers. The wood should look ‘wet’ but not have standing pools of liquid.
- Check the feet or wheels. If the table sits directly on the ground, ensure there is no rot. If needed, add plastic ‘feet’ to the bottom to create a small air gap that prevents moisture wicking.
Creating Your Own Backyard Oasis
Building a backyard sanctuary doesn’t require a designer’s budget, just a bit of imagination and the willingness to get your hands a little dirty. These pallet projects offer more than just furniture; they provide a reason to slow down, a place to gather, and a sense of pride that only comes from creating something with your own two hands. As you look out over your transformed space, remember that the best homes aren’t just bought—they are built, one DIY at a time.
Frequently Asked Questions
- Are pallets safe to use for indoor furniture?
- Yes, provided you look for the ‘HT’ (Heat Treated) stamp. Avoid pallets stamped with ‘MB’ (Methyl Bromide), as these contain harmful pesticides.
- How do I prevent my pallet table from wobbling?
- Always use a level during assembly and ensure your base is wide enough to support the top. If it wobbles, check that the bolts are tightened until the heads are flush with the wood.
- Can I leave my pallet table outside all winter?
- You can, but for maximum longevity, it is best to cover it or store it in a garage. At the very least, ensure it has a high-quality UV-resistant spar urethane coating.
- What is the best way to clean a pallet table?
- For everyday cleaning, a damp cloth with mild soap is fine. For deep cleaning, use a specialized wood cleaner and a soft brush to avoid stripping the finish.