

There is a profound magic that happens when we finally step across the threshold of our back doors and into the open air. It’s that exact moment when the hum of the refrigerator is replaced by the rustle of leaves, and the weight of the day seems to dissolve into the twilight. For me, the backyard has never been just a patch of grass; it is a canvas for memories, a place where the golden hour feels a little bit longer and the wine tastes a little bit crisper. Transforming your outdoor space into a private oasis isn’t about having a massive budget—it’s about intentionality and the joy of creating a sanctuary that mirrors your soul.
We often treat our interiors with such reverence, but there is an effortless, al fresco elegance waiting to be unlocked right outside your window. Whether you’re sipping a morning espresso surrounded by birdsong or hosting a moonlit dinner under a canopy of glowing lights, the right DIY touches can elevate a simple yard into a high-end retreat. Today, I’m sharing my favorite ways to blend modern aesthetics with organic warmth, proving that luxury is a feeling you can build with your own two hands. Let’s roll up our sleeves and turn your backyard into the escape you’ve always dreamed of.
How to Craft a Stunning Bird Sanctuary Using Budget Finds
Why we love this
There is something deeply meditative about watching a flurry of wings settle into a quiet corner of your garden, bringing with them a melody that no speaker system could ever replicate. This project creates a multi-sensory experience where the cool splash of water hits the air and the vibrant colors of native songbirds dance against the greenery. We love the way a budget-friendly sanctuary feels like a hidden woodland secret, offering a tactile connection to nature through the rough texture of terracotta and the sweet, earthy aroma of bird-friendly blooms. It transforms a static yard into a living, breathing ecosystem that provides endless moments of peaceful observation during your morning tea.
Essential Elements:
- Thrifted ceramic or terracotta bowls of varying sizes
- Weather-treated wooden stakes or heavy-duty garden pedestals
- All-weather silicone adhesive
- Assorted river stones and smooth sea glass
- Native wildflower seeds or potted pollinator plants (like Coneflower or Salvia)
- High-quality bird seed blend
How to make it
- Begin by sourcing three or four shallow ceramic bowls from a local thrift store; look for varying heights and muted, organic tones to create visual interest. Ensure they are lead-free and easy to clean.
- Clean the bowls thoroughly with a mixture of vinegar and water to remove any residue, then dry them completely to ensure the adhesive bonds correctly.
- Apply a generous bead of all-weather silicone adhesive to the top of your wooden stakes or pedestals, then center the bowls on top, pressing firmly to create a waterproof seal. Let these cure for a full 24 hours in a dry area.
- Drive the stakes into a shaded, quiet corner of your yard at staggered heights. This layering mimics the natural canopy of a forest and allows different species to find their comfort zone.
- Fill the bowls with clean water, placing river stones inside so they break the surface. This provides a safe landing spot for bees and butterflies to drink without the risk of drowning.
- Surround the base of your pedestals with your pollinator plants or seeds, creating a lush ground cover that provides natural shelter and snacks for your feathered visitors.
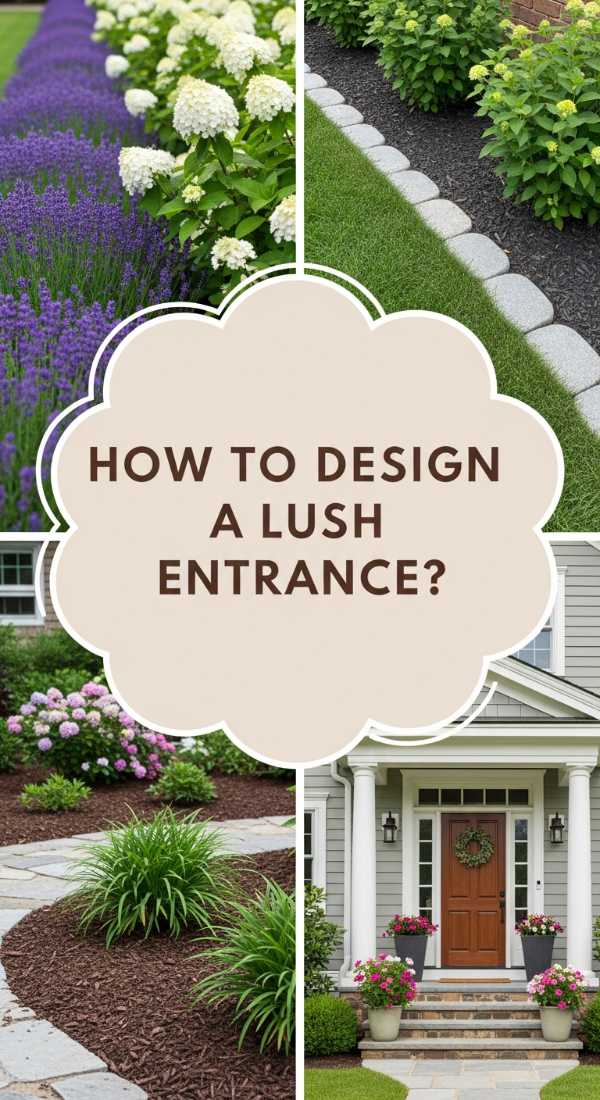
How to Design a Lush Entrance for Instant Curb Appeal

Why we love this
The entrance to your home is the prologue to your story, and a lush, green entryway sets a tone of warmth and sophisticated hospitality before you even turn the key. We are obsessed with the way a well-designed threshold uses different heights and textures—from the waxy sheen of magnolia leaves to the soft, feathery fronds of ferns—to create a cooling microclimate right at your door. The scent of damp earth and blooming jasmine greets you every evening, offering a sensory transition from the frantic outside world to the serenity of your private home. It’s an instant mood-lifter that makes every homecoming feel like a grand arrival at a boutique villa.
Essential Elements:
- A pair of oversized, architectural planters (stone or high-quality resin)
- Premium potting mix with perlite for drainage
- “Thriller” plants (e.g., Dracaena or Italian Cypress)
- “Filler” plants (e.g., Variegated Hostas or Geraniums)
- “Spiller” plants (e.g., English Ivy or Creeping Jenny)
- Slow-release organic fertilizer
How to make it
- Select two identical, large-scale planters that complement your home’s exterior color palette. For a modern look, choose matte black or concrete grey; for a cottage feel, go with weathered terracotta.
- Fill the bottom third of your pots with empty plastic water bottles or lightweight foam to ensure they aren’t too heavy to move and to provide extra drainage space for the roots.
- Add high-quality potting soil until the pot is two-thirds full, mixing in a handful of slow-release fertilizer to sustain your plants through the growing season.
- Plant your “Thriller” in the center. This should be your tallest, most dramatic plant that draws the eye upward. Ensure the root ball is level with the soil line.
- Arrange your “Fillers” around the central plant. These should be mid-height and bushy to create volume and hide the base of the taller plant.
- Place your “Spillers” along the edges of the pot. These trailing plants will grow downward over the sides, softening the hard edges of the container and adding a romantic, overgrown aesthetic.
- Water deeply until liquid runs out of the drainage holes, then top with a thin layer of decorative moss or pea gravel to retain moisture and provide a finished, professional look.
How to Build Modern Planters for a Chic Garden Look
Why we love this
Modern design is all about the harmony between clean lines and organic textures, and these DIY planters bring a sharp, architectural edge to any patio. We love the contrast of the warm, honey-toned cedar against the deep, saturated green of structural succulents or snake plants, creating a visual rhythm that feels both grounded and high-end. There is a satisfying tactile quality to the smooth-sanded wood and the sturdy weight of a custom-built piece that store-bought plastic versions simply can’t match. Every time you catch a glimpse of these on your deck, you’ll feel the pride of craftsmanship mixed with the calming presence of thriving greenery.
Essential Elements:
- Rot-resistant cedar or redwood boards (1×12 or 2×4 depending on size)
- Exterior-grade wood screws (Kreg screws are excellent for hidden joints)
- Waterproof wood glue
- Landscape fabric or heavy-duty plastic liner
- Power drill and miter saw
- Fine-grit sandpaper and outdoor wood sealer
How to make it
- Measure and cut your cedar boards into four equal side panels and one bottom panel. For a sleek, modern look, use a miter saw to cut 45-degree angles on the edges of the side panels so they fit together without showing the end grain.
- Apply waterproof wood glue to the mitered edges and clamp the side panels together to form a square or rectangle. Use a square tool to ensure your corners are perfectly 90 degrees.
- Secure the joints with exterior-grade screws. For the cleanest look, use a pocket-hole jig on the inside of the boards so no screw heads are visible on the exterior.
- Fit the bottom panel inside the frame, leaving a 1/4-inch gap around the edges or drilling several half-inch holes to ensure proper water drainage.
- Sand the entire exterior with 120-grit then 220-grit sandpaper until the wood feels like silk to the touch, then apply two coats of a UV-resistant clear sealer to preserve the cedar’s natural color.
- Line the interior with landscape fabric, stapling it to the sides. This prevents soil from washing out of the drainage holes while allowing the wood to breathe.
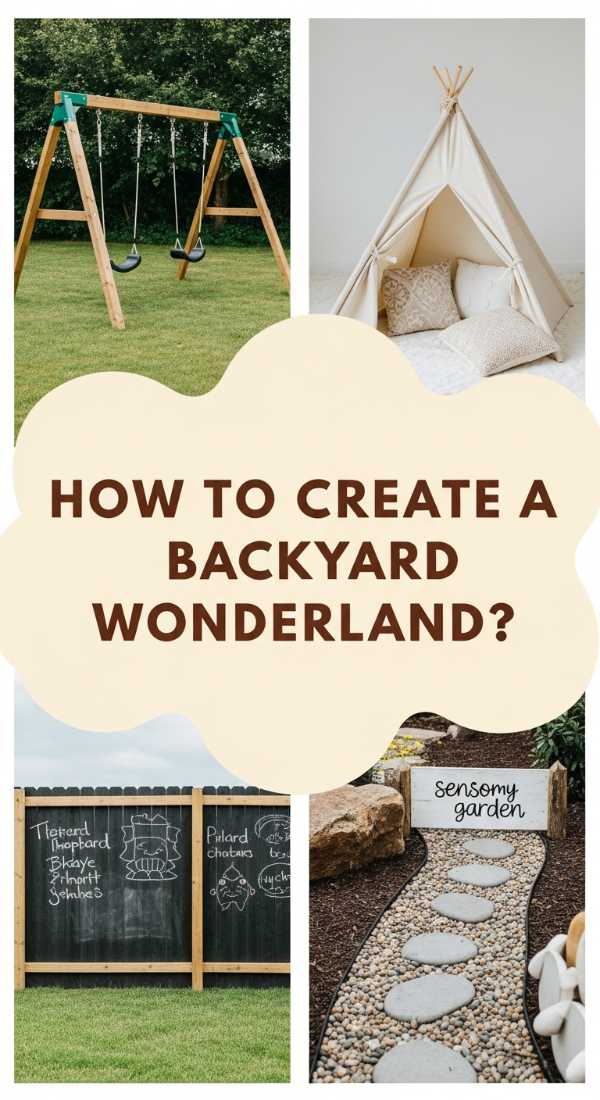
How to Create a Backyard Wonderland for Endless Outdoor Fun

Why we love this
A backyard wonderland is about recapturing that childhood sense of awe, where every corner holds a new adventure and the air feels thick with possibility. We love this approach because it turns a flat lawn into a multi-dimensional playground that appeals to both the young and the young at heart, using soft textures like outdoor rugs and the whimsical twinkle of fairy lights. It’s the feeling of soft grass under bare feet, the sound of laughter echoing against the fence, and the cozy glow of a fire pit that draws everyone together. This isn’t just a yard; it’s a stage for summer movie nights, marshmallow roasts, and the kind of unstructured play that nourishes the soul.
Essential Elements:
- Weather-resistant outdoor string lights (Edison style)
- Large-scale outdoor floor cushions and rugs
- A portable or built-in fire pit
- Canvas bell tent or a DIY wooden A-frame playhouse
- Assorted oversized garden games (Cornhole, Giant Jenga)
- Solar-powered pathway lanterns
How to make it
- Define specific “zones” within your yard to create a sense of discovery. Use an outdoor rug to anchor a lounge area and a separate gravel or stone circle for the fire pit.
- String Edison lights in a zigzag pattern across the main activity area. Use sturdy wooden posts or existing trees to keep the lights at least 8 feet off the ground for a canopy effect.
- Set up a focal point for play, such as a canvas bell tent styled with sheepskin rugs and battery-operated lanterns. This creates a “home base” for kids and a cozy reading nook for adults.
- Install a low-profile fire pit, ensuring it is at least 10 feet away from any structures. Surround it with comfortable Adirondack chairs or large floor cushions for an inviting, communal feel.
- Scatter oversized lawn games in a designated “active zone” to encourage movement. Store them in a weatherproof decorative trunk when not in use to keep the yard tidy.
- Edge your paths with solar lanterns that automatically turn on at dusk, guiding guests through your wonderland with a soft, magical glow.
How to Style a Play Kitchen with Natural Elements

Why we love this
The mud kitchen is the ultimate marriage of sensory play and aesthetic garden design, allowing children to “cook” with the very ingredients nature provides. We love the tactile delight of squishing cool mud, the aromatic punch of crushed mint leaves, and the visual beauty of wooden spoons against a backdrop of wildflowers. It’s a space that encourages slow, imaginative play while blending seamlessly into your landscaping with its rustic, organic materials. Watching a child carefully garnish a “mud pie” with cedar sprigs is a reminder of how the simplest elements—dirt, water, and wood—can be the most enchanting tools for creativity.
Essential Elements:
- Upcycled wooden potting bench or wooden pallets
- Stainless steel mixing bowls and old pots/pans
- Real kitchen utensils (whisks, wooden spoons, ladles)
- A functional outdoor tap or a large water dispenser
- Pots of hardy herbs like Rosemary, Mint, and Thyme
- Buckets of clean sand, smooth pebbles, and pinecones
How to make it
- Repurpose an old wooden potting bench by sanding down any rough edges and applying a non-toxic, water-based outdoor sealant to protect it from the elements.
- Cut a circular hole in the bench top using a jigsaw, then drop in a stainless steel bowl to act as a “sink.” Leave it unattached so it can be easily removed for cleaning.
- Install a series of small hooks along the backboard to hang whisks, spoons, and measuring cups, keeping the workspace organized and inviting.
- Place a large glass water dispenser with a spigot on one end of the bench. This allows children to control their water usage and adds a realistic “running water” element to their play.
- Plant a “chef’s garden” directly into the side of the kitchen or in small pots nearby. Choose robust herbs that smell amazing and can withstand frequent leaf-plucking by little hands.
- Fill small crates underneath the bench with “ingredients” like dried lavender, smooth river stones, and wood chips, providing a rotating buffet of textures for their culinary creations.
How to Curate a Spa Retreat for Personal Wellness

Why we love this
Creating a spa retreat in your backyard is an act of radical self-care, providing a private sanctuary where the air is scented with eucalyptus and the only sound is the gentle drip of water. We love the way this setup transforms a mundane Tuesday into a luxury getaway, focusing on the contrast between the heat of a soak and the coolness of the evening breeze. The texture of plush, rolled white towels, the smoothness of river rock underfoot, and the dim, warm light of candles create an environment that lowers the heart rate instantly. It’s a dedicated space for deep breathing and mental clarity, tucked away from the digital noise of the indoors.
Essential Elements:
- Cedar soaking tub or a high-quality inflatable spa
- Bamboo or teak flooring tiles for a wet zone
- Privacy screening (willow fencing or tall potted bamboo)
- Weatherproof shelving for towels and oils
- Outdoor-safe essential oil diffuser
- Soft, dimmable LED candles and a plush robe hook
How to make it
- Select a secluded corner of the yard with a level surface. Lay down interlocking teak or bamboo tiles to create a rot-resistant, slip-proof foundation that feels warm under bare feet.
- Install a privacy screen using cedar slats or tall, potted plants to create a sense of enclosure and intimacy, ensuring you feel completely hidden from neighbors.
- Position your soaking tub or spa in the center of the tiled area. If using an inflatable spa, consider building a simple wooden surround to give it a built-in, custom look.
- Place a small weather-resistant table or shelf within arm’s reach of the tub. Style it with rolled white cotton towels, a tray for a cold drink, and a selection of aromatherapy oils like lavender or eucalyptus.
- Set up a battery-operated essential oil diffuser and several flameless LED candles. The goal is to avoid harsh overhead lighting in favor of a low, amber glow that mimics a high-end spa.
- Add a sturdy wooden hook nearby for your robe and slippers, ensuring your transition from the warm water back to the house is as comfortable as possible.
How to Repurpose Old Wood for Sustainable Child Play
Why we love this
There is a rugged, timeless beauty in repurposed wood that tells a story of sustainability and imagination, turning old planks into a world of adventure. We love the silver-grey patina of weathered timber and the sturdy, dependable feel of a structure built to last through seasons of play. This project celebrates the “perfectly imperfect,” where the grain of the wood and the knots in the boards become part of the play experience. It’s about the smell of sawdust and sun-warmed cedar, providing a grounding, natural environment for kids to climb, balance, and explore without a single piece of bright, clashing plastic in sight.
Essential Elements:
- Reclaimed chemical-free pallets or cedar scrap wood
- Heavy-duty sanding equipment (orbital sander)
- Exterior wood screws and galvanized hardware
- Hemp or manila rope for natural texture
- Non-toxic outdoor stain or hemp oil finish
- Leveling shims and concrete pavers for footings
How to make it
- Inspect your reclaimed wood carefully, removing all old nails and staples. Only use heat-treated (HT) pallets; avoid any marked “MB” as they contain harmful methyl bromide.
- Sand every surface aggressively starting with a 60-grit sandpaper and working up to 120-grit. The goal is to remove all splinters while maintaining the rustic character of the wood.
- Design a simple balance beam or a low-profile climbing platform. Use 4×4 posts as the base, securing them to concrete pavers buried slightly underground to prevent the wood from touching wet soil.
- Assemble your structure using galvanized screws, pre-drilling every hole to prevent the weathered wood from splitting. Ensure all joints are rock-solid and can support the weight of an adult.
- Incorporate “natural” elements like a thick manila rope for a pull-up or a simple swing, securing it with heavy-duty eye bolts and checking for fraying.
- Finish the wood with a coat of natural hemp oil. This will deepen the color and provide a water-resistant barrier that is completely safe for children’s skin and the surrounding garden.
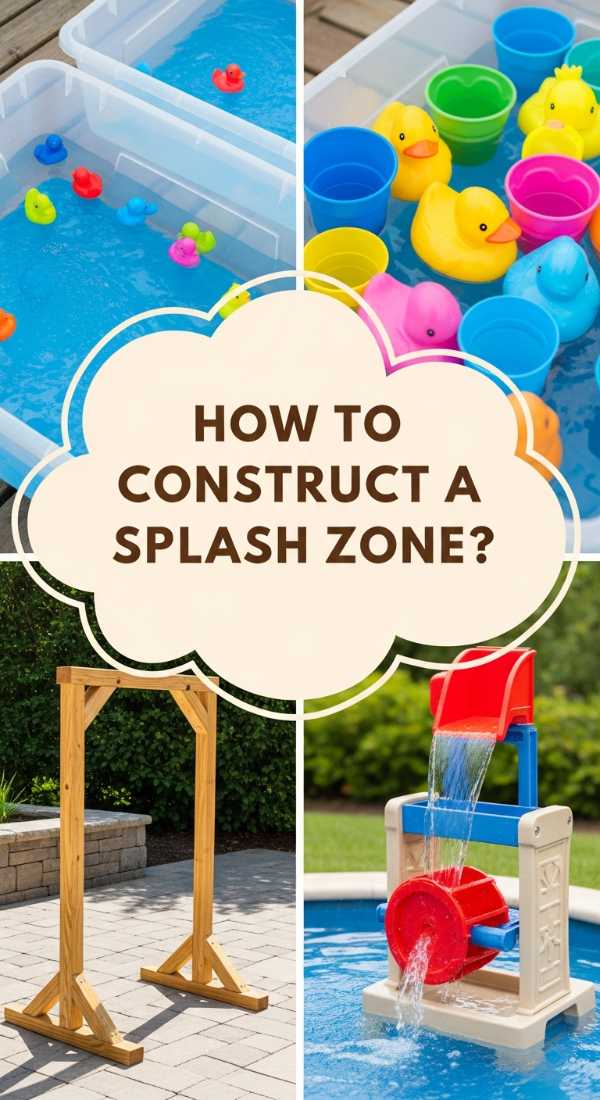
How to Construct a Sensory Splash Zone for Summer Cooling
Why we love this
When the summer heat becomes thick and heavy, a sensory splash zone offers a refreshing, sparkling escape that delights the senses. We love the interplay of light reflecting off moving water and the rhythmic, percussive sound of droplets hitting different surfaces, from metal buckets to smooth stones. It’s a tactile playground where the water feels silk-soft against the skin and the mist provides a cooling haze that lowers the ambient temperature of the whole patio. This isn’t just about getting wet; it’s about the joy of movement, the clarity of water, and the simple, visceral pleasure of cooling down on a sun-drenched afternoon.
Essential Elements:
- Galvanized steel stock tank or large plastic basins
- Submersible low-voltage water pump
- Flexible PVC tubing and assorted fountain heads
- Smooth river rocks and large architectural stones
- A misting kit for overhead cooling
- Aquatic plants (like Water Lilies or Horsetail)
How to make it
- Position a galvanized stock tank in a semi-shaded area of the patio to prevent the water from becoming too hot. Ensure the surface is perfectly level.
- Place a submersible pump at the bottom of the tank, concealing it beneath a layer of large, smooth river rocks. This creates a natural “babbling brook” sound as the water circulates.
- Run flexible tubing from the pump to the top of the tank, or attach a fountain head that creates a gentle bell-shape or a playful spray.
- Install a misting line along the underside of a nearby pergola or umbrella. Connect it to a standard garden hose to create a fine, cooling fog that drifts over the splash zone.
- Add a few potted aquatic plants in submerged baskets. These not only look beautiful with their vibrant green leaves but also help naturally filter the water.
- Keep the water crystal clear by adding a small amount of barley straw extract, which is a natural, non-toxic way to prevent algae growth without using harsh chemicals.
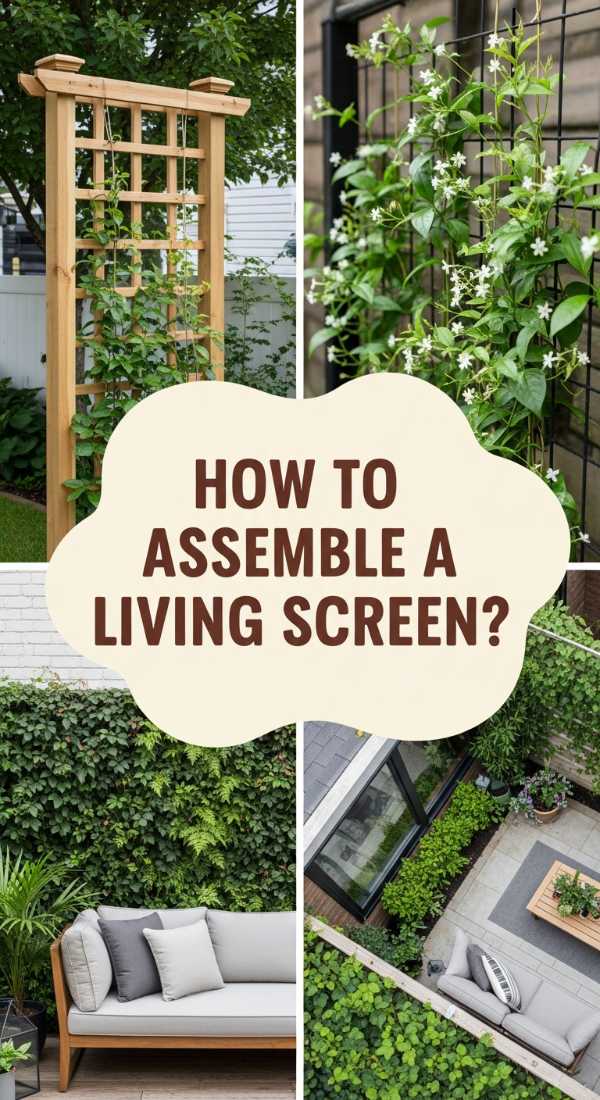
How to Assemble a Living Screen for Ultimate Backyard Seclusion

Why we love this
There is nothing quite like the feeling of being completely enclosed in a cocoon of greenery, shielded from the world by a wall of living, breathing leaves. A living screen is the ultimate luxury for a private oasis, providing a soft, rustling barrier that blocks the wind and muffles distant street noise. We love the intoxicating fragrance of star jasmine or the structural elegance of clumping bamboo, which adds a vertical dimension to the garden that feels both grand and intimate. It’s a visual feast of emerald tones that changes with the light, turning a basic fence line into a lush, verdant tapestry that makes your backyard feel like a hidden sanctuary.
Essential Elements:
- Large, rectangular trough planters with drainage
- Sturdy wooden or metal trellises (at least 6 feet high)
- Fast-growing climbing plants (Star Jasmine, Clematis, or Honeysuckle)
- High-quality climbing support (twine or garden wire)
- Moisture-retentive potting mix with compost
- Drip irrigation kit (optional but recommended)
How to make it
- Line up several long, rectangular planters along the area you wish to screen off. Ensure they are heavy enough to not blow over in high winds once the plants are fully grown.
- Secure a tall trellis to the back of each planter or mount them directly to an existing fence. Ensure the trellis is sturdy and has plenty of “grid” space for vines to grab onto.
- Fill the planters with a rich mix of potting soil and organic compost, leaving about two inches of space at the top for watering.
- Space your climbing plants approximately 12 inches apart. Gently untangle the nursery vines and weave them into the bottom of the trellis, securing them loosely with soft garden twine.
- As the plants grow, continue to “train” the vines by weaving them horizontally and vertically across the trellis to fill in any gaps and create a dense wall of foliage.
- Mulch the base of the plants with wood chips to keep the roots cool and moist. If possible, install a simple drip irrigation line to ensure consistent hydration, as container-grown screens dry out quickly.
How to Illuminate Garden Paths with Affordable Magic Glow
[IMAGE_10]
Why we love this
As the sun dips below the horizon, the right lighting transforms a familiar garden path into a mystical journey through a moonlit forest. We love the way soft, low-level illumination catches the texture of the gravel and casts long, romantic shadows across the lawn, creating a sense of depth and mystery. This “magic glow” isn’t about bright, blinding floodlights; it’s about the warm, amber flicker of lanterns and the subtle shimmer of solar-powered gems tucked into the foliage. It makes the garden accessible and enchanting long after dark, inviting you to take one last stroll under the stars before the day is done.
Essential Elements:
- Solar-powered LED path lights (warm white/amber tone)
- Glass lanterns or mason jars with fairy lights
- Black metal shepherd’s hooks
- Glow-in-the-dark garden pebbles or crushed glass
- Outdoor-rated extension cords (if using plug-in lights)
- Hammer and a piece of scrap wood (for driving stakes)
How to make it
- Plan your lighting path by walking your garden at dusk. Identify “danger zones” like steps or turns, and “beauty zones” like a favorite tree or flower bed that deserve a spotlight.
- Space your primary path lights about 4 to 6 feet apart. To avoid the “runway look,” stagger them on alternating sides of the path for a more organic, flowing feel.
- Use a piece of scrap wood over the top of your light stakes when hammering them into the ground. This prevents the plastic or metal from cracking under the force of the hammer.
- Hang glass lanterns from shepherd’s hooks at varying heights behind your low-level path lights. This adds a second layer of light that illuminates the surrounding plants and eye-level foliage.
- Scatter glow-in-the-dark pebbles or luminescent crushed glass along the edges of the path. These will absorb sunlight all day and provide a faint, ethereal shimmer that guides your feet without any electricity.
- Clean the solar panels on top of your lights once a month with a damp cloth. Dust and pollen can block the sensors, significantly reducing the brightness and duration of the glow.
Creating Your Forever Oasis
Transforming your backyard into a private retreat is a journey of small, soulful additions that culminate in a space that truly feels like home. It’s not about perfection; it’s about the way the light hits your new planters at 4 PM, the sound of the birds in their new sanctuary, and the peace of mind you find in your spa corner. I hope these projects inspire you to step outside and start building your own slice of paradise. Your oasis is waiting!
Frequently Asked Questions
Q: What are the best plants for low-maintenance privacy screens?
A: Clumping bamboo (like ‘Alphonse Karr’) is excellent because it doesn’t spread aggressively. For a flowering option, Star Jasmine is incredibly hardy, stays green year-round, and smells divine.
Q: How do I keep my DIY wood projects from rotting?
A: Always use rot-resistant wood like cedar, redwood, or pressure-treated timber. Additionally, ensure the wood is sealed with a high-quality UV-resistant exterior finish and try to keep it from making direct contact with wet soil by using pavers or plastic feet.
Q: Are solar lights bright enough for a main garden path?
A: Modern solar LEDs have come a long way! Look for lights with at least 10-15 lumens for pathway safety. For a truly “magical” glow, layer them with different heights of lanterns to create a fuller wash of light.