
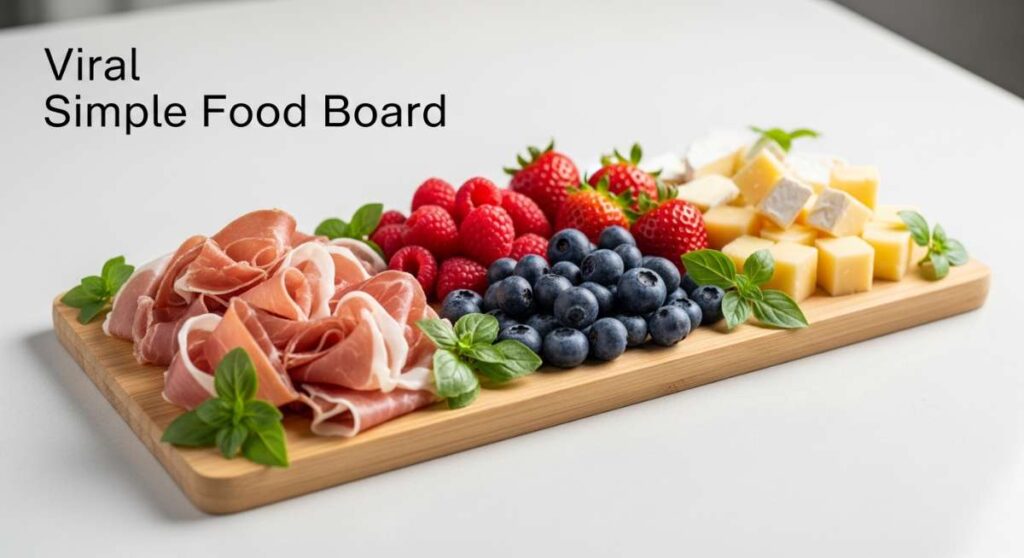
Impress Your Guests With This Viral 3-Ingredient Food Board
There is something truly magical about the way food brings us together, isn’t there? I remember the first time I hosted a dinner party; I was a nervous wreck, worrying about every tiny detail until I realized that my guests didn’t care about the fancy linens—they cared about the warmth of the conversation and the comfort of the meal. This viral food board concept was born out of that realization, designed to take the stress out of hosting while delivering a ‘wow’ factor that makes everyone feel special. It’s about creating a centerpiece that invites people to lean in, grab a fork, and stay a while.
The beauty of this 3-ingredient food board strategy is its versatility. Whether you’re throwing a last-minute gathering or planning a cozy Sunday dinner, these recipes focus on high-impact flavors with minimal fuss. We are diving into a collection of dishes that are not just easy to assemble, but are visually stunning and incredibly delicious. Each recipe is designed to be the star of its own board or part of a larger spread that will have your friends asking for the secret to your effortless kitchen magic.
Let’s get cooking and turn your next gathering into a viral sensation with these tried-and-true favorites that prioritize flavor and presentation above all else.
How to make honey garlic chicken

Why we love this
This dish is the ultimate crowd-pleaser because it hits that perfect sweet-and-savory note that everyone craves. The aroma of minced garlic sizzling in butter fills the kitchen with a cozy, inviting scent that immediately draws people toward the stove. As the honey caramelizes, it creates a sticky, golden glaze that clings to the tender chicken, providing a satisfyingly chewy exterior and a succulent, juicy middle. It’s the kind of meal that feels like a warm hug on a plate, making it a staple for any host looking to impress with minimal effort.
Ingredients
- Chicken thighs or breasts, cut into bite-sized pieces
- Raw local honey
- Freshly minced garlic cloves
- Soy sauce (for depth)
- Butter and olive oil
How to make it
- Begin by patting your chicken pieces completely dry with paper towels; this is crucial for achieving a golden-brown sear rather than steaming the meat. Season lightly with salt and pepper.
- Heat a large skillet over medium-high heat and add a tablespoon of olive oil and a knob of butter. Once the butter is foaming, add the chicken in a single layer, ensuring you don’t crowd the pan. Sear for 3-4 minutes until a deep golden crust forms.
- Flip the chicken and cook for another 3 minutes. While it finishes, whisk together 1/3 cup of honey, 3 tablespoons of soy sauce, and 4 cloves of minced garlic in a small bowl.
- Reduce the heat to medium and pour the sauce over the chicken. Let the liquid simmer and bubble vigorously. As the water evaporates, the sugars in the honey will begin to caramelize and thicken.
- Continue to toss the chicken in the glaze for 2-3 minutes until the sauce has reduced to a thick, syrupy consistency that coats the back of a spoon. Garnish with sesame seeds or green onions for a professional finish.
How to bake cinnamon roll bars
Why we love this
There is nothing quite like the scent of warm cinnamon and brown sugar wafting through the house on a lazy Saturday morning. These bars take everything you love about a classic cinnamon roll—the soft, pillowy dough and the decadent cream cheese frosting—and turn it into an easy-to-share finger food. The texture is a delightful contrast between the buttery, dense base and the gooey, spicy swirl of the filling. Every bite is a nostalgic trip back to childhood, making these the absolute star of any brunch-themed food board.
Ingredients
- Refrigerated cinnamon roll dough or homemade brioche dough
- Brown sugar and ground cinnamon
- Softened butter
- Cream cheese frosting (often included with dough)
- Pecans (optional for crunch)
How to make it
- Preheat your oven to 350°F (175°C) and line an 8×8 inch baking pan with parchment paper, leaving an overhang on the sides for easy removal later.
- If using pre-made dough, press the individual rolls together into the bottom of the pan to create one solid, even layer. If using homemade dough, roll it out to a 1/2 inch thickness before placing it in the pan.
- In a small bowl, mix together additional softened butter, 1/4 cup of brown sugar, and a tablespoon of cinnamon. Spread this mixture unevenly over the top of the dough to create pockets of concentrated flavor.
- Bake for 20-25 minutes. Look for the edges to turn a deep golden brown and the center to be set but still slightly soft to the touch. Avoid overbaking, as the bars will continue to firm up as they cool.
- While the bars are still slightly warm, spread a generous layer of cream cheese frosting over the top. The residual heat will melt the frosting slightly, allowing it to seep into the nooks and crannies. Let them cool completely before slicing into squares to ensure clean edges.
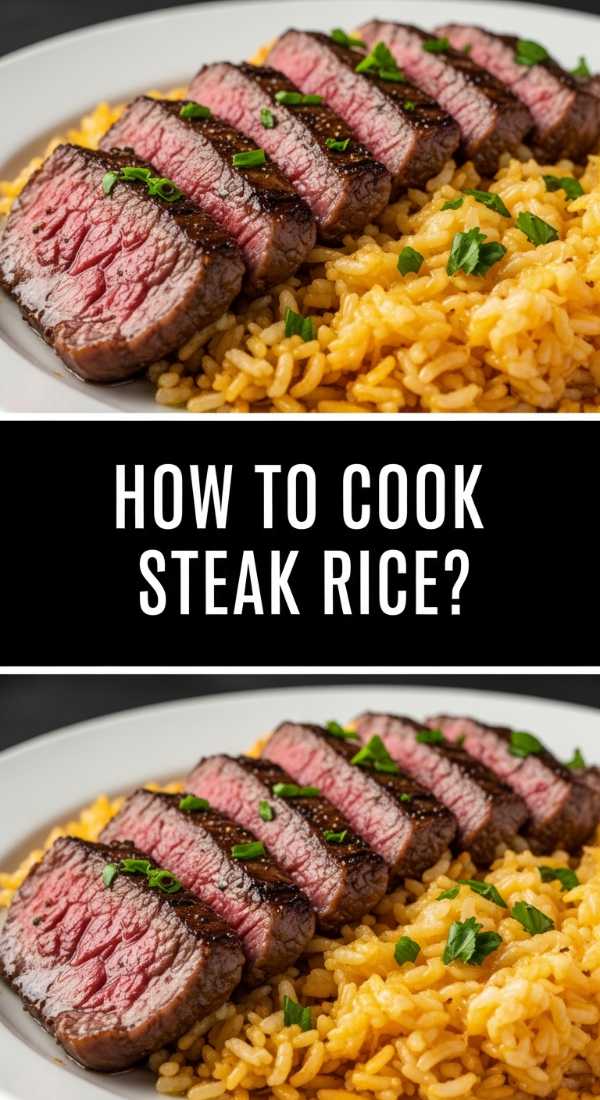
How to cook steak and rice

Why we love this
Steak and rice is the personification of ‘sophisticated comfort.’ The rich, umami flavors of a perfectly seared steak paired with the clean, fluffy texture of jasmine rice create a balanced meal that feels incredibly indulgent. We love the sensory experience of the hot steak juices mingling with the rice, turning every bite into a savory explosion. The visual appeal of thin, pink-centered slices of beef fanned out over a bed of snowy white rice is simply stunning, making it a high-end addition to any viral food board spread.
Ingredients
- Sirloin or Ribeye steak
- Jasmine or Basmati rice
- Beef broth (for cooking the rice)
- Garlic butter and fresh thyme
- Salt and cracked black pepper
How to make it
- Start by rinsing your rice under cold water until the water runs clear; this removes excess starch and ensures each grain stays separate and fluffy. Cook the rice using beef broth instead of water for an extra layer of savory flavor, following the package instructions for a 2:1 ratio.
- Remove your steak from the refrigerator at least 30 minutes before cooking to bring it to room temperature. This ensures even cooking throughout the meat. Season aggressively with salt and pepper on all sides.
- Heat a cast-iron skillet over high heat until it is wisps of smoke are visible. Add a high-smoke-point oil like avocado oil. Place the steak in the pan and sear without moving it for 3 minutes to develop a thick, dark crust.
- Flip the steak and add a large knob of butter, smashed garlic cloves, and thyme sprigs to the pan. Use a spoon to continuously baste the steak with the melting butter for another 2-3 minutes for medium-rare.
- Remove the steak and let it rest on a cutting board for at least 10 minutes. This allows the fibers to relax and the juices to redistribute. Slice against the grain and serve over the fluffed rice, drizzling any remaining pan juices over the top.
How to make honey garlic shrimp

Why we love this
Shrimp is the ultimate ‘fast food’ for the elegant host because it cooks in mere minutes while looking like a gourmet treat. These honey garlic shrimp offer a bright, snappy texture that contrasts beautifully with the thick, lustrous sauce. The pink hues of the seafood against the golden glaze create a vibrant pop of color on your food board. We love the way the garlic becomes slightly toasted and nutty in the pan, providing a sophisticated backdrop to the natural sweetness of the honey and the brine of the shrimp.
Ingredients
- Large shrimp, peeled and deveined
- Honey
- Fresh garlic, finely minced
- Lemon juice
- Red pepper flakes (for a hint of heat)
How to make it
- Ensure your shrimp are completely thawed and patted dry. Leaving moisture on the shrimp will cause them to steam rather than sear, ruining that signature ‘snap.’
- In a small jar, shake together 3 tablespoons of honey, 1 tablespoon of lemon juice, and 3 cloves of minced garlic. Set this aside for the final moments of cooking.
- Heat a stainless steel or non-stick skillet over medium-high heat with a splash of olive oil. Add the shrimp in a single layer. Cook for exactly 90 seconds on the first side until the edges turn pink and opaque.
- Flip the shrimp and immediately pour in the honey garlic mixture. The sauce will bubble and thicken almost instantly. Toss the shrimp constantly to ensure they are fully coated.
- Cook for only another 60 seconds. You are looking for the shrimp to form a ‘C’ shape; if they curl into an ‘O’, they are overcooked. Remove from heat immediately and serve with a sprinkle of fresh parsley and a squeeze of fresh lemon to cut through the sweetness.
How to roast crispy potatoes

Why we love this
Is there anything more universally adored than a perfectly crispy potato? The sound of that first crunch, followed by the fluffy, cloud-like interior, is pure culinary bliss. These potatoes are the ultimate supporting act for any food board, providing a salty, earthy element that balances out richer meats and sauces. We love the rustic, golden look of hand-crushed potatoes, which makes the board feel accessible and homey while still demonstrating a mastery of texture and heat.
Ingredients
- Yukon Gold or Russet potatoes
- Extra virgin olive oil
- Sea salt and rosemary
- Garlic powder
- Baking soda (the secret ingredient)
How to make it
- Peel and cube your potatoes into 1-inch chunks. Place them in a pot of cold water with a generous pinch of salt and a half-teaspoon of baking soda. The baking soda breaks down the potato’s pectin, creating a starchy slurry on the surface that turns into a massive crunch later.
- Boil until the potatoes are just tender but not falling apart (about 10 minutes). Drain and let them sit in the colander for 2 minutes to allow steam to escape.
- Give the colander a vigorous shake. You want the edges of the potatoes to look fuzzy and mashed; this increased surface area is what creates the ‘crunch.’
- Toss the potatoes in a bowl with olive oil, salt, garlic powder, and chopped rosemary. Spread them out on a preheated heavy-duty baking sheet, ensuring they aren’t touching.
- Roast at 425°F (220°C) for 45-50 minutes, turning them every 15 minutes. They are done when they are deep mahogany brown and sound hollow when tapped with a fork.
How to make creamy pasta

Why we love this
Creamy pasta is the definition of soul food, offering a luxurious, velvety mouthfeel that coats the palate in richness. There is a specific comfort in the way a well-emulsified sauce clings to every strand of noodle, shimmering under the kitchen lights. We love the simplicity of using high-quality cheese and pasta water to create a decadent sauce without the need for heavy creams. It’s an elegant, understated dish that brings a sense of Italian bistro flair to your viral food board.
Ingredients
- High-quality dried pasta (like Fettuccine or Rigatoni)
- Freshly grated Parmesan or Pecorino Romano
- Butter
- Black pepper
- Reserved pasta water
How to make it
- Boil a large pot of water but use less water than usual. A lower water-to-pasta ratio results in starchier water, which is the ‘liquid gold’ needed for a creamy sauce. Salt the water until it tastes like the sea.
- Cook the pasta until it is two minutes shy of ‘al dente.’ It should still have a firm bite in the center because it will finish cooking in the sauce.
- Before draining, reserve two cups of the starchy pasta water. In a large skillet over low heat, melt three tablespoons of butter and toast a teaspoon of cracked black pepper until fragrant.
- Add the undercooked pasta to the skillet along with one cup of the reserved water. Slowly sprinkle in the finely grated cheese while tossing constantly with tongs. The motion is key—you are emulsifying the fats and starches into a smooth sauce.
- If the sauce looks too thick or dry, add more pasta water a tablespoon at a time. Continue tossing over low heat until the sauce is glossy and coats the noodles perfectly. Serve immediately while hot.
How to make savory meatballs

Why we love this
Meatballs are the perfect ‘grab-and-go’ element for a food board, offering a punchy, savory bite that is easy for guests to eat with a toothpick. We love the complexity of flavors—the herbal notes of parsley, the sharpness of onion, and the richness of the meat—all contained in one tidy package. A great meatball should be incredibly moist on the inside with a deeply browned, slightly crusty exterior. They evoke a sense of tradition and hearth, making your guests feel right at home the moment they take a bite.
Ingredients
- Ground beef and pork mix (80/20 ratio)
- Breadcrumbs soaked in milk (panade)
- Egg (as a binder)
- Fresh parsley and grated onion
- Worcestershire sauce
How to make it
- The secret to a tender meatball is a ‘panade.’ Soak 1/2 cup of breadcrumbs in 1/4 cup of milk for 5 minutes until it forms a paste. This prevents the meat proteins from bonding too tightly and becoming tough.
- In a large bowl, combine the meat, panade, one beaten egg, finely grated onion, chopped parsley, and a splash of Worcestershire sauce. Use your hands to mix gently; overworking the meat will result in a rubbery texture.
- Roll the mixture into golf-ball-sized spheres. For the best results, chill the meatballs in the refrigerator for 30 minutes before cooking to help them hold their shape.
- Heat a skillet with a thin layer of oil over medium-high heat. Sear the meatballs in batches, browning them on all sides. This ‘Maillard reaction’ is where all the deep, savory flavor lives.
- Once browned, reduce the heat to low, add a splash of beef broth or marinara sauce to the pan, cover, and simmer for 8-10 minutes until the internal temperature reaches 165°F. This ensures they are cooked through while remaining juicy.
How to sear fresh salmon

Why we love this
Salmon is a showstopper on any food board because of its beautiful coral color and sophisticated profile. When seared correctly, the skin becomes as crispy as a potato chip, while the flesh remains buttery and tender, flaking apart with the slightest pressure from a fork. We love the clean, fresh taste of high-quality salmon, especially when paired with a bright citrus garnish. It adds a lighter, healthier element to the board that feels upscale and thoughtfully prepared for guests who prefer seafood over red meat.
Ingredients
- Fresh salmon fillets (skin-on is best)
- Grapeseed or canola oil
- Kosher salt
- Lemon wedges
- Dill for garnish
How to make it
- Take the salmon out of the fridge 15 minutes before cooking. Use a sharp knife to gently scrape the skin side to remove any excess moisture, then pat the entire fillet dry with paper towels. Moisture is the enemy of a crispy sear.
- Season the skin side generously with salt. Heat a stainless steel pan over medium-high heat and add enough oil to thinly coat the bottom. Wait until the oil is shimmering and just starting to smoke.
- Place the salmon fillets in the pan, skin-side down. Press down firmly with a spatula for the first 30 seconds to ensure the skin makes full contact with the pan and doesn’t curl up.
- Cook the salmon skin-side down for about 80% of the total cooking time (usually 5-6 minutes). You will see the cooked color creeping up the side of the fillet. Do not try to move it until the skin naturally releases from the pan.
- Flip the fillet and sear the top for only 1-2 minutes to finish. The center should be a translucent medium-pink. Remove from the pan and let it rest for a minute before serving skin-side up to maintain the crunch.
How to make beef tacos

Why we love this
Tacos bring an element of fun and interactivity to a food board that is hard to beat. We love the vibrant colors of the toppings—the bright green cilantro, the deep red salsa, and the creamy white cheese—which turn the board into a festive work of art. The smell of toasted cumin and chili powder in the seasoned beef is intoxicating, promising a meal that is bold, zesty, and deeply satisfying. It’s a customizable experience that allows every guest to build their perfect bite, making it the ultimate social food.
Ingredients
- Lean ground beef
- Taco seasoning (cumin, chili powder, garlic powder)
- Small corn or flour tortillas
- Toppings: Shredded lettuce, lime, radish, and cilantro
- Tomato paste and water
How to make it
- Place a large skillet over medium-high heat and add the ground beef. Break it up into small crumbles with a wooden spoon. Cook until the beef is fully browned and no pink remains.
- Drain the excess fat from the pan. This is an important step to ensure your tacos aren’t greasy and the seasoning clings to the meat properly.
- Add your spices and a tablespoon of tomato paste. The tomato paste adds a rich ‘umami’ base and helps the sauce thicken. Pour in 1/2 cup of water or beef broth.
- Simmer the mixture for 5-7 minutes, stirring occasionally, until the liquid has evaporated and the beef is coated in a thick, flavorful sauce. The meat should be moist but not ‘soupy.’
- While the meat simmers, char your tortillas directly over a gas flame or in a dry pan for 30 seconds per side. This adds a smoky flavor and makes them more pliable. Assemble the tacos and place them in a row on your board for a stunning visual effect.
How to cook vegetable stirfry
[IMAGE_10]
Why we love this
A great stirfry is a celebration of texture and freshness. We love the way high heat transforms raw vegetables into crisp-tender morsels that retain their bright, jewel-toned colors. The ginger and garlic provide a zesty, aromatic base that feels light and energizing. Including a stirfry on your food board adds a much-needed crunch and a variety of nutrients, making the entire spread feel more balanced. It’s a fast, high-energy way to cook that brings a professional ‘chef’ feel to your home kitchen.
Ingredients
- Assorted vegetables (broccoli, bell peppers, snap peas, carrots)
- Fresh ginger and garlic, minced
- Soy sauce and toasted sesame oil
- Cornstarch (for the sauce slurry)
- Vegetable oil
How to make it
- Preparation is everything in stir-frying. Chop all your vegetables into uniform, bite-sized pieces before you even turn on the stove. Group them by cooking time: hearty veggies like carrots and broccoli together, and delicate ones like peppers and peas in another pile.
- Whisk together 1/4 cup soy sauce, a teaspoon of toasted sesame oil, and a teaspoon of cornstarch in a small bowl to create your signature stir-fry sauce.
- Get your wok or widest skillet screaming hot. Add a tablespoon of vegetable oil. Toss in the hearty vegetables first and stir constantly for 2-3 minutes. You want them to get slightly charred but stay firm.
- Add the more delicate vegetables along with the minced ginger and garlic. Stir-fry for another 2 minutes. Adding the aromatics later prevents them from burning and becoming bitter in the high heat.
- Give your sauce slurry a quick whisk (cornstarch settles) and pour it over the veggies. Toss everything rapidly. The sauce will thicken into a clear, glossy glaze in about 30 seconds. Remove from heat immediately and serve topped with toasted sesame seeds.
Conclusion
Creating a viral-worthy food board isn’t about spending hours in the kitchen; it’s about choosing recipes that speak to the senses and arranging them with love. Whether you opt for the sticky sweetness of honey garlic shrimp or the comforting crunch of roasted potatoes, the key is the shared experience. These dishes are designed to be enjoyed together, sparking conversation and making memories. So, grab your largest platter, pick a few of these favorites, and get ready to be the host everyone talks about!
Frequently Asked Questions
Hosting can be tricky, so here are a few tips to make sure your food board is a success every single time.