
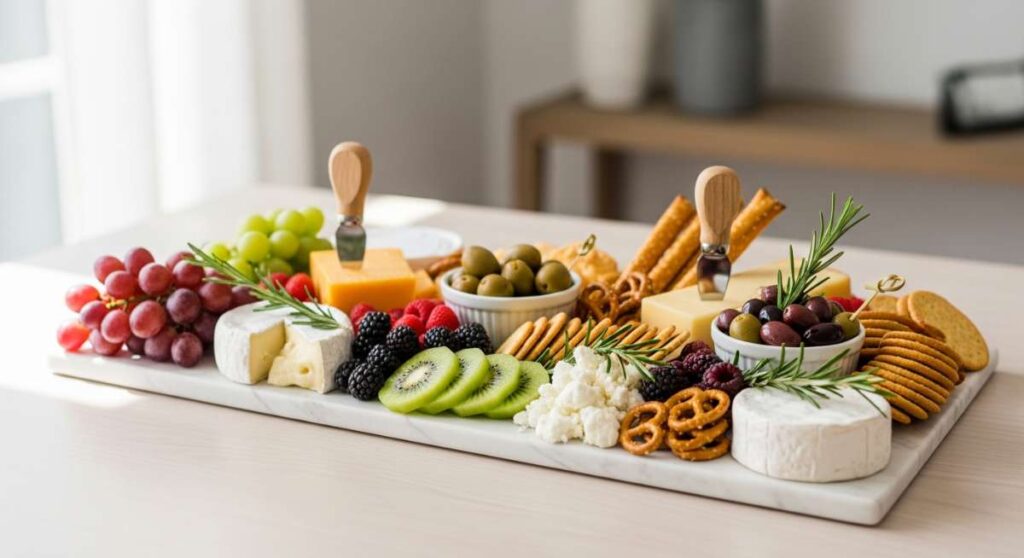
Lazy but Aesthetic: The Easiest Food Board for Your Next Party
There is something inherently magical about the golden hour, that soft glow that settles over a backyard gathering where the laughter is loud and the drinks are cold. We all want to be that host—the one who looks effortlessly chic while presenting a spread that looks like it was plucked straight from a high-end editorial. But let’s be honest: between the chaos of daily life and the desire to actually enjoy our own parties, spending hours over a hot stove is the last thing anyone wants to do. This ‘Lazy but Aesthetic’ food board is your secret weapon for creating a stunning, viral-worthy spread without the burnout.
The beauty of this approach lies in the mix of textures, colors, and temperatures. It’s about taking simple, soul-warming classics and presenting them with a bit of flair. Whether you are hosting a casual Sunday brunch or a mid-summer twilight dinner, these components come together to form a cohesive, inviting landscape of flavor. From the spicy kick of a classic dip to the delicate foraging of edible greens, we are covering every base to ensure your guests are impressed and your stress levels are non-existent. Let’s dive into the elements that will make your next board the talk of the neighborhood.
HOW TO MAKE ROTEL DIP?

Why we love this
There’s an undeniable nostalgia that comes with a bowl of warm Rotel dip, its velvety cheese pulling away from a salty corn chip in a perfect, gooey string. As the heat of the diced green chilies begins to bloom on your palate, it is balanced beautifully by the rich, savory depth of browned sausage and the silkiness of melted cheese. It’s the ultimate communal food, inviting everyone to lean in, share stories, and indulge in a snack that feels like home. The aroma alone—savory, spicy, and slightly smoky—is enough to draw a crowd to the kitchen before you’ve even set the board down.
Ingredients
- 1 lb Velveeta cheese, cubed
- 1 can (10 oz) Ro-Tel Diced Tomatoes and Green Chilies, undrained
- 1 lb ground breakfast sausage or chorizo
- 1/2 teaspoon garlic powder
- Fresh cilantro for garnish
How to make it
- Begin by browning your sausage in a heavy-bottomed skillet over medium-high heat. Use a wooden spoon to break the meat into small, uniform crumbles, ensuring it cooks through until no pink remains and the edges are slightly crispy and caramelized.
- Drain the excess grease from the skillet by tilting the pan and using a spoon to discard the fat, or transfer the meat to a paper-towel-lined plate. This ensures your dip remains creamy rather than oily.
- In a slow cooker or a large heavy pot over low heat, combine the cubed Velveeta and the undrained can of Ro-Tel. Adding the juice from the can is essential as it provides the acidity and liquid needed for the perfect consistency.
- Stir constantly with a heat-resistant spatula as the cheese melts. You are looking for a completely smooth, glossy texture with no lumps remaining. Keep the heat low to prevent the cheese from scorching or becoming grainy.
- Once melted, fold in the cooked sausage and garlic powder. Stir gently until fully incorporated. If the dip is too thick, add a splash of whole milk. Serve immediately in a warmed bowl with sturdy tortilla chips.
HOW TO MAKE HUMMINGBIRD FOOD?

Why we love this
While not for the guests to eat, setting out a hummingbird feeder near your party board adds a layer of living art to your aesthetic. Watching these iridescent, tiny creatures dart and hover with incredible precision creates a serene, natural atmosphere that no store-bought decoration can replicate. The simple act of providing nourishment for your local ecosystem brings a sense of peace and wonder to your outdoor space. It’s a conversation starter that invites your guests to slow down, look closer at the garden, and appreciate the fleeting beauty of a summer afternoon.
Ingredients
- 1 cup granulated white sugar
- 4 cups filtered water
How to make it
- Measure out your water and pour it into a clean saucepan. It is best to use filtered water to ensure there are no heavy minerals or chemicals that might be harmful to the delicate birds.
- Bring the water to a full, rolling boil over high heat. This step is crucial for two reasons: it ensures the sugar dissolves completely and it kills any bacteria or mold spores that might be present in the water.
- Remove the pan from the heat and immediately whisk in the granulated white sugar. Continue stirring until the liquid is perfectly clear and every grain of sugar has vanished. Never use honey or artificial sweeteners, as these can be fatal to hummingbirds.
- Allow the mixture to cool completely to room temperature. This is a vital safety step; filling a feeder with hot liquid can warp the plastic or injure the birds.
- Pour the cooled nectar into a clean, red-colored feeder. There is no need for red dye in the liquid itself, as the color of the feeder is enough to attract them. Store any leftover nectar in a sealed jar in the refrigerator for up to one week.
HOW TO COOK SUMMER PASTA?
Why we love this
Summer pasta is the epitome of light, breezy dining, capturing the essence of the season in every forkful. Imagine long strands of pasta coated in a shimmering veil of high-quality olive oil, infused with the bright, citrusy zing of fresh lemon and the earthy fragrance of basil plucked straight from the pot. It doesn’t weigh you down like heavy cream sauces, making it the perfect centerpiece for an outdoor board spread. The texture is a delightful contrast between the tender al dente pasta and the slight crunch of seasonal vegetables, creating a dish that feels sophisticated yet incredibly simple to prepare.
Ingredients
- 12 oz spaghetti or linguine
- 1/4 cup extra-virgin olive oil
- 3 cloves garlic, thinly sliced
- 1 medium zucchini, julienned
- Zest and juice of 1 large lemon
- 1/2 cup grated Parmesan cheese
- Fresh basil leaves, torn
How to make it
- Bring a large pot of heavily salted water to a boil. Adding enough salt—so it tastes like the sea—is your only chance to season the pasta itself. Cook the pasta according to package directions, but aim for ‘al dente,’ which means it should still have a firm bite in the center.
- Before draining, carefully scoop out about one cup of the starchy pasta water. This ‘liquid gold’ is the secret to creating a silky sauce that clings to the noodles.
- In a large skillet over medium-low heat, add the olive oil and the thinly sliced garlic. Sauté gently for about 2 minutes until the garlic is fragrant and just beginning to turn a pale golden color; do not let it brown or it will become bitter.
- Add the julienned zucchini to the skillet and toss for 3 minutes until just softened. Increase the heat to medium and add the cooked pasta directly into the pan along with the lemon juice and half of the reserved pasta water.
- Toss vigorously with tongs, adding more pasta water as needed, until a light, emulsified sauce forms. Remove from heat, fold in the lemon zest, Parmesan, and torn basil. Serve at room temperature for the ultimate lazy-day vibe.
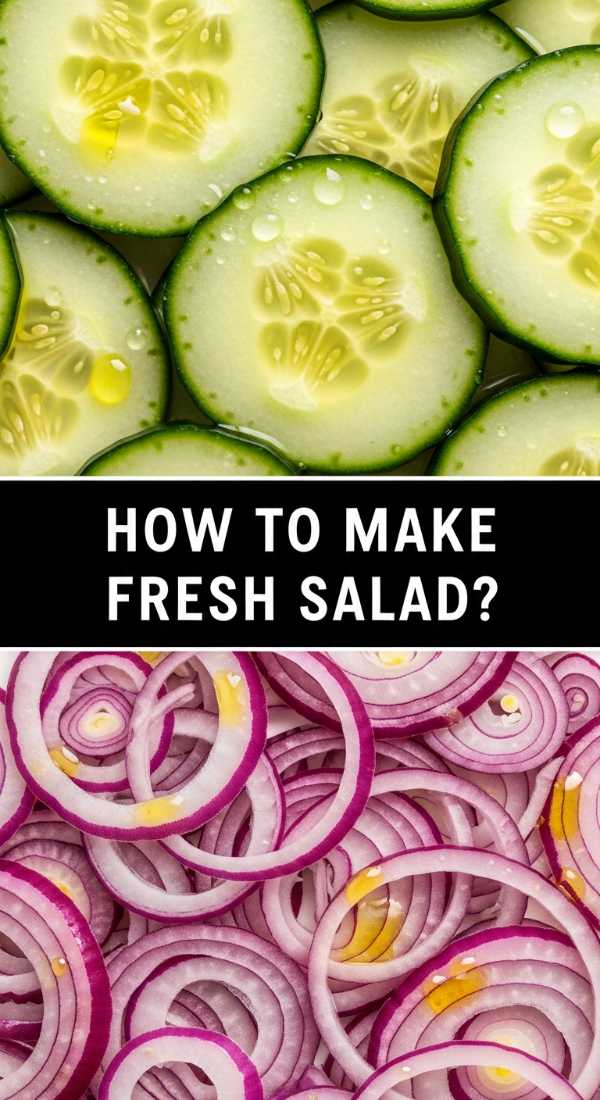
HOW TO MAKE FRESH SALAD?

Why we love this
A truly fresh salad is a symphony of textures and colors that provides a much-needed cooling element to any food board. There is something deeply satisfying about the snap of crisp butter lettuce paired with the juicy burst of heirloom tomatoes and the creamy finish of a well-balanced vinaigrette. It cleanses the palate between richer bites and brings a vibrant, garden-grown aesthetic to your presentation. The aroma of freshly cracked black pepper and chopped herbs wafting from the bowl signals to your guests that the meal is as healthy as it is delicious, embodying the very best of farm-to-table living.
Ingredients
- 1 head of butter lettuce or bibb lettuce
- 1 pint heirloom cherry tomatoes, halved
- 1 English cucumber, thinly sliced
- 1/4 red onion, shaved into rings
- For the dressing: 3 tbsp olive oil, 1 tbsp apple cider vinegar, 1 tsp Dijon mustard, salt and pepper
How to make it
- Begin by washing your greens in cold water and drying them thoroughly. A salad spinner is best for this, as water clinging to the leaves will prevent the dressing from adhering, resulting in a soggy salad. Tear the leaves into bite-sized pieces by hand to avoid bruising the edges with a knife.
- Prepare your vegetables with precision. Slice the English cucumber into paper-thin rounds and halve the cherry tomatoes. For the red onion, use a mandoline or a very sharp knife to create translucent rings; soaking them in ice water for 10 minutes before serving can take away the harsh ‘bite.’
- In a small glass jar, combine the olive oil, apple cider vinegar, Dijon mustard, salt, and pepper. Shake vigorously until the mixture is thick and emulsified. The mustard acts as a binder to keep the oil and vinegar from separating.
- Place the lettuce in a large wooden bowl and drizzle only half of the dressing over the leaves. Use your hands or large spoons to toss gently, ensuring every leaf is lightly coated.
- Arrange the tomatoes, cucumbers, and onions on top of the greens. Drizzle the remaining dressing just before serving to maintain the crispness of the vegetables. Finish with a final crack of black pepper.
HOW TO GRILL PERFECT KABOBS?

Why we love this
Kabobs are the quintessential party food because they are naturally portioned and visually stunning with their alternating bands of charred meat and vibrant vegetables. There is a primal joy in the scent of smoke rising from a grill and the sizzle of fat hitting hot coals. The slight char on the edges of a bell pepper or a piece of red onion adds a smoky sweetness that can’t be replicated in an oven. They offer a variety of flavors on a single stick, making them an easy ‘grab-and-go’ option for guests who want to mingle while they eat, fitting perfectly into the aesthetic of a curated food board.
Ingredients
- 1 lb sirloin steak or chicken breast, cut into 1-inch cubes
- 1 red bell pepper and 1 green bell pepper, cut into chunks
- 1 red onion, cut into wedges
- 8 oz whole mushrooms
- Balsamic glaze or teriyaki sauce for brushing
- Wooden or metal skewers
How to make it
- If using wooden skewers, soak them in water for at least 30 minutes before grilling to prevent them from catching fire. Preheat your grill to medium-high heat (about 400°F). Ensure the grates are clean and lightly oiled.
- Thread the meat and vegetables onto the skewers, alternating colors and textures. Do not pack the items too tightly together; leaving a tiny bit of space between each piece allows the heat to circulate and ensures even cooking on all sides.
- Season the assembled skewers generously with salt, pepper, and a little garlic powder. Do not apply sugary sauces yet, as they will burn before the meat is cooked through.
- Place the kabobs on the grill. For steak, cook for 3-4 minutes per side for medium-rare. For chicken, ensure it reaches an internal temperature of 165°F. Use tongs to turn them carefully, looking for distinct grill marks and a slight char on the vegetables.
- During the last 2 minutes of grilling, brush your chosen glaze over the kabobs. This allows the sugars to caramelize slightly without burning. Remove from the grill and let them rest for 5 minutes before placing them on your board to allow the juices to redistribute.
HOW TO BAKE SUMMER DESSERTS?

Why we love this
Summer desserts should feel like a celebration of the harvest, focusing on the natural sweetness of sun-ripened berries and stone fruits. A rustic fruit galette or a simple berry crumble brings a warm, buttery aroma to the house that feels incredibly inviting. The contrast between a flaky, golden-brown crust and the bubbling, jammy center of softened fruit is a sensory delight. It’s the kind of dessert that doesn’t need to be perfect; its ‘homestyle’ appearance is exactly what makes it aesthetic. Served warm with a dollop of cold cream, it is the perfect sweet ending to a lazy afternoon feast.
Ingredients
- 2 cups fresh blueberries or sliced peaches
- 1/4 cup granulated sugar
- 1 tbsp cornstarch
- 1 refrigerated pie crust (for the ‘lazy’ aesthetic)
- 1 egg (for egg wash)
- Turbinado sugar for dusting
How to make it
- Preheat your oven to 375°F (190°C) and line a baking sheet with parchment paper. This ensures the dessert won’t stick and makes cleanup effortless.
- In a medium bowl, toss your fruit with the granulated sugar and cornstarch. The cornstarch is essential as it thickens the fruit juices as they bake, preventing a ‘soggy bottom’ on your crust.
- Unroll the refrigerated pie crust onto the parchment paper. Pile the fruit mixture into the center of the crust, leaving about a 2-inch border all the way around the edge.
- Fold the edges of the crust up over the fruit, pleating the dough as you go. The center should still be open, revealing the fruit. This ‘rustic’ look is very on-trend and much easier than a traditional double-crust pie.
- Beat the egg with a teaspoon of water and brush the crust lightly. Sprinkle with turbinado sugar for a professional, crunchy finish. Bake for 25-30 minutes until the crust is deeply golden and the fruit filling is bubbling. Let it cool slightly before sliding it onto your board.
HOW TO MAKE SUMMER SOUP?

Why we love this
Summer soup, particularly a chilled gazpacho or a light corn chowder, is an unexpected but sophisticated addition to a party board. It offers a refreshing, hydrating burst of flavor that is both elegant and soothing. The bright, acidic notes of tomatoes and peppers in a cold soup act as a vibrant wake-up call for the taste buds, cutting through the richness of cheeses or meats. Served in small glass votives or shooters, it adds a vertical element to your board’s layout, making the entire presentation feel more curated and high-end while remaining incredibly easy to prepare in advance.
Ingredients
- 4 large ripe tomatoes, cored and chopped
- 1 cucumber, peeled and chopped
- 1 red bell pepper, seeded and chopped
- 1/2 red onion
- 2 tbsp sherry vinegar or red wine vinegar
- 1/3 cup extra-virgin olive oil
- Salt and cumin to taste
How to make it
- Place all the chopped vegetables (tomatoes, cucumber, pepper, and onion) into a high-powered blender. If you want a smoother result, you can peel the tomatoes first by blanching them, but for a ‘lazy’ version, the skin adds fiber and texture.
- Add the vinegar, salt, and a pinch of cumin to the blender. The cumin provides an earthy undertone that balances the acidity of the tomatoes.
- Pulse the blender until the soup reaches your desired consistency. Some prefer a chunky, salsa-like texture, while the classic aesthetic is a silky-smooth liquid.
- With the blender running on low, slowly drizzle in the olive oil. This emulsifies the soup, giving it a creamy mouthfeel and a beautiful orange-pink hue.
- Taste and adjust the seasoning. The flavors will develop and mellow as the soup chills, so be generous with the salt. Refrigerate for at least 2 hours before the party. Serve in small chilled glasses with a tiny sprig of cilantro or a drop of olive oil on top.
HOW TO MIX SUMMER DRINKS?

Why we love this
A signature summer drink is the crowning jewel of any food board, providing the literal ‘cheers’ to your gathering. Whether it’s a sparkling botanical mocktail or a fruit-infused sangria, the sight of ice cubes clinking against glass and condensation forming on a pitcher is the ultimate sign of a good time. Infusing drinks with fresh herbs like mint or rosemary adds an aromatic layer that hits you before you even take a sip. It’s about more than just hydration; it’s about creating a ritual of refreshment that looks stunning in photos and tastes like pure sunshine.
Ingredients
- 1 bottle of chilled Rosé or sparkling water
- 1 cup sliced strawberries
- 1/2 lemon, sliced into rounds
- Fresh mint sprigs
- 1/4 cup honey or simple syrup
- Ice cubes (extra points if they have frozen fruit inside)
How to make it
- In a large glass pitcher, add the sliced strawberries and lemon rounds. Use a long spoon to gently muddle the fruit against the bottom of the pitcher. This releases the essential oils from the lemon peel and the juice from the berries without pulverizing them.
- Add the honey or simple syrup. If using honey, you may want to dissolve it in a tablespoon of warm water first so it doesn’t clump when it hits the cold liquid.
- Slap the mint sprigs between your palms before dropping them into the pitcher. This ‘spanking’ technique bruises the leaves just enough to release their fragrant oils without making the drink look messy with torn bits.
- Fill the pitcher with ice. For a viral aesthetic, use large clear ice spheres or cubes that you’ve frozen with a single blueberry or pansy inside.
- Pour the chilled Rosé or sparkling water over the ice and fruit. Stir gently with a long bar spoon to combine the flavors. Serve in wine glasses or highballs, ensuring each guest gets a bit of fruit garnish in their glass.
HOW TO COOK WITH DANDELIONS?

Why we love this
Cooking with dandelions is the ultimate nod to the ‘cottagecore’ aesthetic, bringing a whimsical, foraged feel to your table. These bright yellow blossoms and slightly bitter greens are often overlooked, but when prepared correctly, they offer a sophisticated, nutty flavor that rivals expensive radicchio. There is a beautiful irony in taking a common ‘weed’ and transforming it into a gourmet element of your food board. It shows a level of creativity and connection to the earth that guests find fascinating, and the vibrant yellow petals scattered over a dish add a pop of color that is undeniably cheerful.
Ingredients
- 2 cups fresh dandelion greens (harvested from an untreated area)
- 2 tbsp butter
- 1 clove garlic, minced
- A squeeze of fresh lemon
- Red pepper flakes
- Optional: Dandelion petals for garnish
How to make it
- Harvest your dandelions from a location you know is free from pesticides and pets. Select the younger, smaller leaves, as these are much more tender and less bitter than the large, mature ones.
- Wash the greens thoroughly in a bowl of cold water, changing the water several times until no grit or soil remains at the bottom. Pat them dry with a clean kitchen towel.
- Heat a skillet over medium heat and melt the butter until it begins to foam. Add the minced garlic and a pinch of red pepper flakes, sautéing for 30 seconds until the garlic is golden and fragrant.
- Add the dandelion greens to the skillet. They will wilt quickly, much like spinach. Toss them constantly with tongs for about 2-3 minutes. You want them to be bright green and just softened, not mushy.
- Remove from the heat immediately and finish with a squeeze of fresh lemon juice and a sprinkle of sea salt. The acidity of the lemon perfectly balances the natural bitterness of the greens. Arrange them in a small heap on your board and scatter fresh yellow petals over the top for a stunning visual.
HOW TO START MEAL PREP?
[IMAGE_10]
Why we love this
Starting a meal prep routine is the ‘lazy’ person’s secret to a high-vibe lifestyle, as it ensures you always have the components for a beautiful board ready at a moment’s notice. There is a deep sense of calm that comes from opening a refrigerator filled with neatly organized glass containers of pre-washed greens, sliced veggies, and marinated proteins. It removes the ‘what’s for dinner’ anxiety and replaces it with the joy of assembly. When you meal prep, you aren’t just cooking; you are gifting your future self the time to relax, indulge in hobbies, and host friends without the frantic last-minute grocery run.
Ingredients
- 3 different proteins (e.g., chicken, hard-boiled eggs, chickpeas)
- 5 varieties of vegetables (e.g., peppers, broccoli, carrots)
- 2 grains (e.g., quinoa, brown rice)
- A set of airtight glass containers
- Your favorite pre-made dressings or sauces
How to make it
- Dedicate a ‘Power Hour’ on Sunday afternoon for your prep. Start by preheating your oven and getting your grains simmering on the stove. Efficiency is key; use the time items are cooking to wash and chop your raw vegetables.
- Roast two or three items at once on the same baking sheet. For example, you can roast chicken breasts on one side and broccoli florets on the other, as long as you monitor their different cooking times. Season them simply with olive oil, salt, and pepper so they remain versatile.
- Once grains are cooked, fluff them with a fork and let them cool completely before sealing them in containers. Storing them while hot will create steam and lead to a mushy texture.
- Prep your ‘board basics’: wash your lettuce, slice your cucumbers, and portion out nuts or dried fruits. Having these small ‘fillers’ ready makes assembling a party board a 5-minute task rather than a 45-minute chore.
- Label your containers with the date and contents. Organize them in the fridge by ‘expiration date,’ with the items that need to be eaten first at eye level. Now, when guests arrive unexpectedly, you can simply pull out your prepped items and arrange them beautifully.
Conclusion
Hosting doesn’t have to be a performance of perfection; it should be a celebration of presence. By focusing on simple ingredients, smart preparation, and a few ‘lazy’ hacks, you can create a food board that is both aesthetic and deeply satisfying. Remember that the best parties are the ones where the host is relaxed enough to enjoy the conversation. So, grab a board, pick a few of these viral elements, and let the good times roll.