
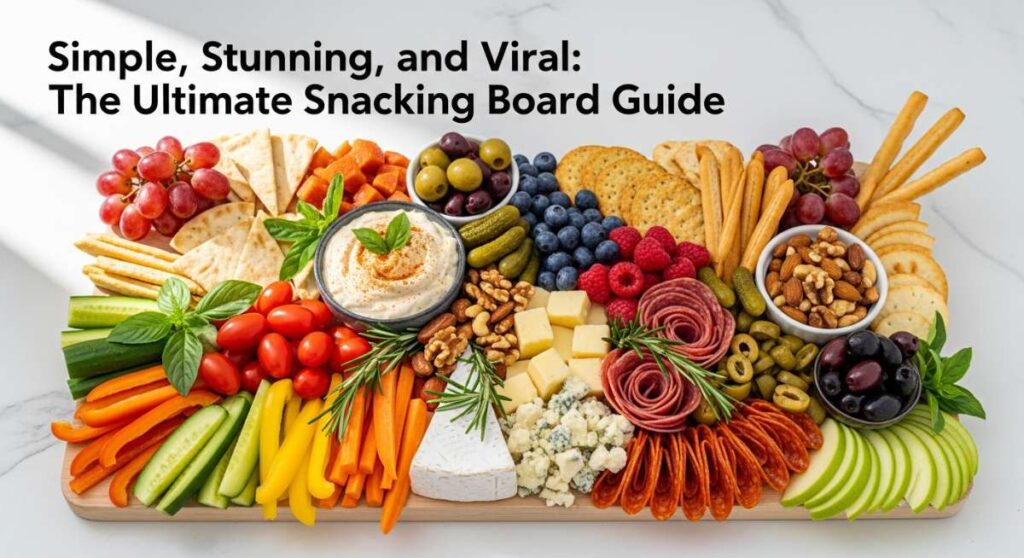
There is something undeniably magical about the golden hour of a summer afternoon, when the sun dips low and the air is filled with the scent of blooming jasmine and charcoal grills. In my home, this is the time when the kitchen becomes the heart of everything, a place where we gather not just to eat, but to reconnect. I’ve always believed that the best memories are made over shared plates, where the food is as beautiful as it is delicious, and the atmosphere is effortlessly relaxed.
Lately, I’ve been obsessed with the ‘viral snacking board’ trend—that perfect blend of aesthetics and accessibility that turns a simple meal into an event. Whether you are hosting a backyard bash or just trying to survive a Tuesday with some flair, creating a stunning spread is about celebrating the season’s freshest ingredients. It’s about that pop of a cherry tomato, the sizzle of a kabob, and the clinking of ice in a glass of something sparkling.
This guide is my love letter to summer entertaining. I’ve rounded up ten of my absolute favorite, high-vibe recipes that are designed to be served together or enjoyed individually. From the nostalgic comfort of a cheesy dip to the refined simplicity of a garden-fresh salad, these dishes are the secret to a lifestyle that feels both curated and completely authentic. Let’s dive into the flavors that are currently taking the internet—and my dinner table—by storm.
How to make the best rotel dip recipe?

Why we love this
This dip is the ultimate crowd-pleaser that evokes a sense of pure, unadulterated nostalgia with every gooey bite. Its texture is incredibly silky and molten, coating every crevice of a salty tortilla chip with a blend of savory beef and tangy, spiced tomatoes. As the heat hits the cheese, the aroma of browned meat and green chilies fills the room, instantly signaling to your guests that the party has officially started. It’s the kind of comfort food that disappears in minutes because it perfectly balances richness with a subtle, spicy kick that keeps you coming back for just one more scoop.
Ingredients
- 1 lb lean ground beef or breakfast sausage
- 1 block (16 oz) Velveeta cheese, cubed
- 2 cans (10 oz) Rotel Original Diced Tomatoes and Green Chilies
- 1/2 cup whole milk (for consistency)
- 1 tsp taco seasoning
- Fresh cilantro and sliced jalapeños for garnish
How to make it
- Begin by browning your ground beef or sausage in a large skillet over medium-high heat. Use a wooden spoon to break the meat into small, uniform crumbles to ensure an even texture throughout the dip. Cook until no pink remains and the meat is slightly crispy at the edges.
- Drain the excess grease thoroughly from the skillet; this is a critical step to prevent the dip from becoming oily or separating later on.
- Reduce the heat to low and add the cubed Velveeta cheese to the skillet. Cubing the cheese into 1-inch pieces ensures it melts quickly and evenly without scorching.
- Pour in both cans of Rotel tomatoes. Do not drain the cans, as the liquid provides essential acidity and spice that thins the cheese to the perfect dipping consistency.
- Stir continuously with a heat-resistant spatula. As the cheese begins to melt, slowly pour in the milk to achieve a velvet-like smoothness.
- Continue to cook on low heat for 5-7 minutes, stirring frequently until the mixture is completely homogenous and bubbling gently.
- Transfer the dip to a pre-warmed slow cooker set to the ‘warm’ function to maintain that perfect molten texture throughout your event. Garnish with fresh cilantro and jalapeños right before serving.
How to make a fresh cucumber tomato onion salad?
Why we love this
This salad is the definition of summer in a bowl, offering a vibrant explosion of colors and a crisp, refreshing crunch that cuts through any heavy main course. The fragrance of freshly sliced cucumbers and vine-ripened tomatoes is elevated by a zesty vinaigrette that pools at the bottom, begging to be soaked up with a piece of crusty bread. It feels incredibly light on the palate, with the sharp bite of red onion providing a sophisticated contrast to the sweetness of the tomatoes. Every forkful feels like a burst of hydration and garden-fresh goodness, making it an essential side for any outdoor gathering.
Ingredients
- 3 large English cucumbers, sliced into rounds or half-moons
- 1 pint cherry tomatoes, halved
- 1 small red onion, thinly sliced into slivers
- 1/4 cup extra virgin olive oil
- 2 tbsp red wine vinegar
- 1 tsp dried oregano
- Salt and cracked black pepper to taste
- Fresh parsley, chopped
How to make it
- Start by prepping your vegetables with precision. Slice the English cucumbers into 1/4-inch thick rounds; using English cucumbers is preferred because their skin is thin and seeds are minimal, providing a better crunch.
- Halve the cherry tomatoes. If you are using larger heirloom tomatoes, cut them into bite-sized wedges to keep the proportions consistent with the cucumbers.
- Thinly shave the red onion. To mellow out the sharp ‘bite’ of the raw onion, you can soak the slices in a bowl of ice water for 5 minutes, then pat them dry before adding them to the salad.
- In a small glass jar or bowl, whisk together the olive oil, red wine vinegar, dried oregano, salt, and pepper until the dressing is emulsified and slightly thickened.
- Place all the vegetables into a large glass mixing bowl. Pour the dressing over the top and toss gently with large spoons to ensure every slice is coated without bruising the tomatoes.
- Cover the bowl and refrigerate for at least 30 minutes. This chilling period is vital as it allows the salt to draw out a bit of the vegetable juices, which mingle with the vinegar to create a flavorful brine.
- Give it one final toss before serving and top with a generous handful of chopped fresh parsley for a bright finish.
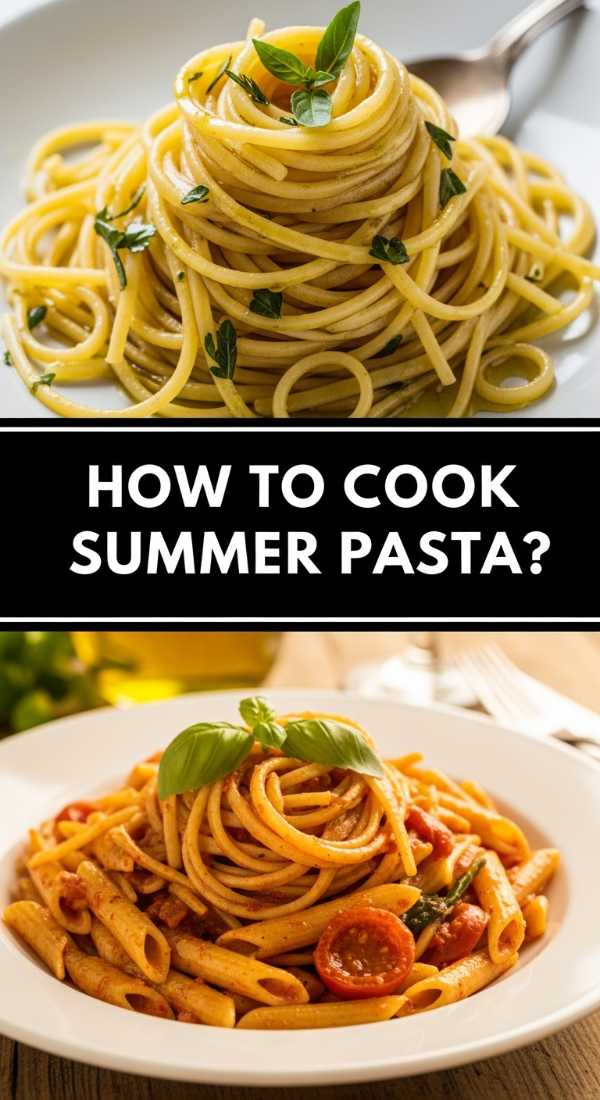
How to cook a perfect summer pasta?

Why we love this
A perfect summer pasta should feel effortless and airy, focusing on high-quality olive oil and aromatics rather than heavy, weighing sauces. The aroma of toasted garlic and bright lemon zest creates an olfactory experience that is both elegant and inviting, drawing everyone to the kitchen. We love the way thin strands of pasta twirl around bursts of blistered tomatoes and silky parmesan, creating a texture that is light yet deeply satisfying. It’s a dish that tastes like a sunset dinner on the Mediterranean coast, emphasizing simplicity and the pure joy of fresh, seasonal ingredients.
Ingredients
- 1 lb spaghetti or linguine
- 1/4 cup high-quality extra virgin olive oil
- 4 cloves garlic, thinly sliced
- 1 tsp red pepper flakes
- 1 pint grape tomatoes
- Zest and juice of 1 lemon
- 1/2 cup fresh basil leaves, torn
- 1/2 cup freshly grated Parmesan cheese
How to make it
- Bring a large pot of heavily salted water to a rolling boil. The water should taste like the sea; this is your only chance to season the pasta itself. Cook the pasta until it is ‘al dente’—usually 1-2 minutes less than the package directions—as it will finish cooking in the sauce.
- While the pasta cooks, heat the olive oil in a large skillet over medium-low heat. Add the sliced garlic and red pepper flakes. Sauté slowly for 2-3 minutes until the garlic is golden and fragrant, being careful not to let it burn, which would make it bitter.
- Increase the heat to medium and add the grape tomatoes to the skillet. Cook them for 5 minutes, stirring occasionally, until they begin to soften and burst their juices into the oil.
- Before draining the pasta, reserve exactly 1 cup of the starchy pasta water. This liquid gold is the secret to a glossy sauce.
- Drain the pasta and add it directly into the skillet with the tomatoes and garlic.
- Add the lemon juice, lemon zest, and half of the reserved pasta water. Toss vigorously over medium heat. The starch in the water will emulsify with the olive oil to create a thin, silky sauce that clings to the noodles. Add more pasta water if the dish looks dry.
- Remove from heat and fold in the fresh basil and Parmesan cheese. The residual heat will melt the cheese just enough to create a creamy finish. Serve immediately with an extra drizzle of olive oil.
How to grill the best summer kabobs?

Why we love this
There is an elemental joy in cooking over an open flame, and summer kabobs offer the perfect combination of charred, smoky flavor and vibrant, caramelized vegetables. The visual appeal of alternating colors—deep red peppers, bright green zucchini, and perfectly seared protein—makes them a focal point of any snacking board. We love the contrast between the tender, juicy interior of the meat and the crisp, blackened edges from the grill. Each skewer is a self-contained explosion of texture and taste, making them incredibly fun to eat and even more fun to share during a casual backyard hangout.
Ingredients
- 1.5 lbs top sirloin steak or chicken breast, cut into 1.5-inch cubes
- 2 bell peppers (any color), cut into chunks
- 1 large red onion, cut into wedges
- 1 zucchini, sliced into thick rounds
- 1/4 cup soy sauce
- 2 tbsp honey
- 1 tbsp minced ginger
- 2 cloves garlic, minced
- Bamboo or metal skewers
How to make it
- If using bamboo skewers, soak them in water for at least 30 minutes prior to grilling to prevent them from catching fire on the grates.
- In a large bowl or gallon-sized freezer bag, combine the soy sauce, honey, ginger, and garlic. Add the cubed meat and toss to coat. Marinate in the refrigerator for at least 1 hour, or up to 4 hours for maximum flavor infusion.
- Preheat your grill to medium-high heat (about 400°F). Ensure the grates are clean and lightly oiled to prevent sticking.
- Assemble the kabobs by alternating meat and vegetables on the skewers. Do not crowd the items too tightly; leaving a tiny bit of space between pieces allows the heat to circulate and cook everything evenly.
- Place the skewers on the grill. Close the lid and cook for 4-5 minutes on the first side. You are looking for distinct grill marks and a natural release from the grates.
- Flip the skewers and cook for another 4-5 minutes. For steak, an internal temperature of 135°F is perfect for medium-rare; for chicken, ensure it reaches 165°F.
- Remove from the grill and let the meat rest for 5 minutes before serving. This allows the juices to redistribute, ensuring every bite is succulent and tender.
How to make homemade hummingbird food?
Why we love this
Making your own hummingbird food is a small but deeply rewarding act of mindfulness that connects you directly to the nature in your own backyard. There is a quiet, rhythmic peace in the simple process of dissolving sugar into water, knowing you are providing essential energy for these tiny, iridescent creatures. We love the clarity of homemade nectar, which avoids the harmful dyes found in store-bought versions, keeping the birds healthy and vibrant. Watching a hummingbird hover at a feeder you’ve personally prepared is a serene lifestyle moment that makes any porch feel like a sanctuary.
Ingredients
- 1 cup granulated white sugar
- 4 cups filtered water
How to make it
- The ratio for hummingbird nectar is strictly 1 part sugar to 4 parts water, which closely mimics the sucrose content of natural flower nectar. Use only plain white granulated sugar; never use honey, brown sugar, or artificial sweeteners, as these can be fatal to birds.
- In a medium saucepan, combine the sugar and water. Place the pan over medium-high heat and stir gently.
- Bring the mixture to a low boil. Boiling the water is important because it helps the sugar dissolve completely and neutralizes any impurities or bacteria in the water that could cause the nectar to spoil quickly.
- Once the liquid is clear and the sugar is fully dissolved, remove the pan from the heat immediately. Do not boil for an extended period, as this will change the water-to-sugar ratio through evaporation.
- Allow the nectar to cool completely to room temperature. This is crucial; hot nectar can warp plastic feeders or harm the birds.
- Fill your clean hummingbird feeder with the cooled nectar. Store any extra in a clean glass jar in the refrigerator for up to one week.
- Clean your feeder every 3-5 days (more often in extreme heat) with hot water and a brush to prevent mold growth, ensuring a safe environment for your feathered visitors.
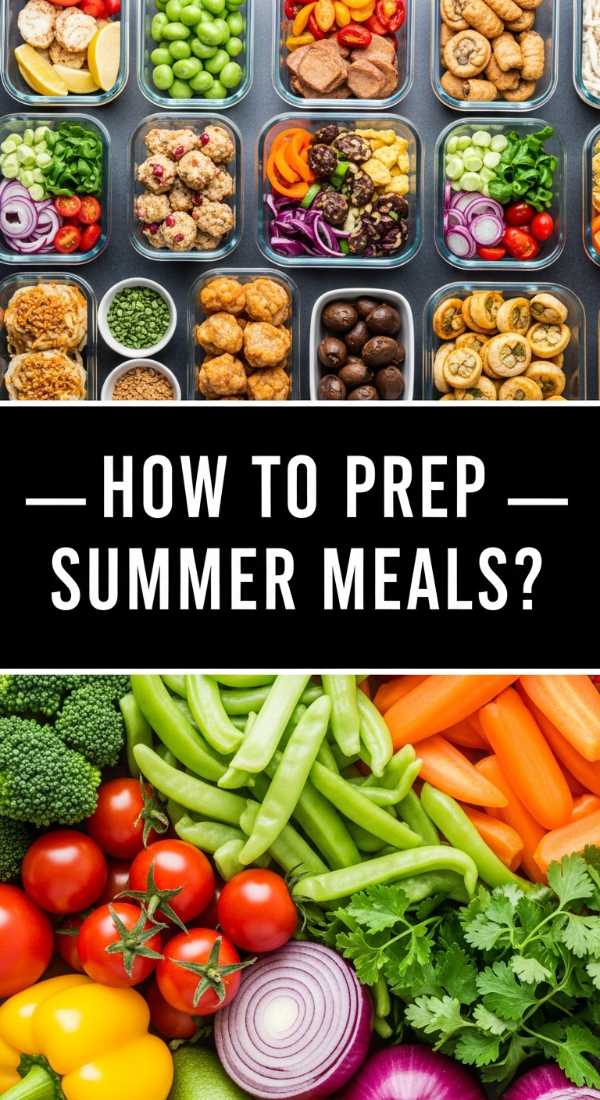
How to prep healthy summer meals?

Why we love this
Healthy summer meal prepping is all about reclaiming your time so you can spend more hours in the sun and less time standing over a hot stove. We love the feeling of a refrigerator stocked with colorful, nutrient-dense bowls that are ready to grab at a moment’s notice. The combination of chilled grains, crunchy raw vegetables, and zesty dressings creates a meal that feels energizing rather than heavy. It’s a lifestyle hack that promotes wellness without sacrificing flavor, allowing you to maintain a glow from the inside out while enjoying the best of the season’s produce.
Ingredients
- 2 cups cooked quinoa or farro
- 1 can chickpeas, drained and rinsed
- 2 cups shredded kale or spinach
- 1 cup shredded carrots
- 1/2 cup crumbled feta cheese
- Lemon-Tahini Dressing: 3 tbsp tahini, juice of 1 lemon, 1 tsp maple syrup, 1 clove minced garlic
How to make it
- Batch-cook your base grain (quinoa or farro) at the start of the week. Rinse the grains under cold water first to remove bitterness, then simmer in vegetable broth instead of water to infuse them with extra savory flavor. Fluff with a fork and let cool completely before storage.
- Prepare your dressing by whisking the tahini, lemon juice, maple syrup, and garlic in a small bowl. Add a tablespoon of warm water at a time until the consistency is smooth and pourable. Pre-making the dressing allows the flavors to meld.
- Chop and prep your hardy vegetables. Kale and carrots are excellent for meal prep because they don’t wilt quickly. Massage the kale with a tiny bit of olive oil and salt to soften its fibers.
- Use clear glass meal prep containers to keep the ingredients fresh and visible. Layer the ingredients: start with the chickpeas and grains at the bottom, followed by the carrots and kale, and top with the feta cheese.
- Store the dressing in separate small containers or silicone cups inside the main container to keep the greens crisp until you’re ready to eat.
- When ready to serve, pour the dressing over the bowl, toss well, and enjoy a perfectly fresh, balanced meal that requires zero day-of effort.
How to bake easy summer desserts?

Why we love this
Summer desserts should be an effortless celebration of fruit at its peak ripeness, featuring textures that are buttery, flaky, and meltingly soft. We love the way a simple galette or crumble allows the natural sugars of peaches or berries to bubble over and caramelize, creating a rustic beauty that no fancy pastry can match. The aroma of warm fruit and vanilla wafting through the house is the ultimate signal of a cozy evening. These desserts are meant to be served warm with a melting scoop of vanilla bean ice cream, creating a delightful contrast of temperatures that feels like a hug in a bowl.
Ingredients
- 4 cups fresh fruit (peaches, blueberries, or strawberries)
- 1/2 cup granulated sugar
- 1 tbsp lemon juice
- 1 tbsp cornstarch
- 1 store-bought refrigerated pie crust (for a galette) or a mix of oats, butter, and brown sugar (for a crumble)
How to make it
- Preheat your oven to 375°F. If you are making a galette, line a large baking sheet with parchment paper to prevent sticking and ensure easy cleanup.
- In a large mixing bowl, toss your prepared fruit with the sugar, lemon juice, and cornstarch. The cornstarch is essential as it thickens the fruit juices into a glossy syrup during baking, preventing a soggy crust. Let the fruit macerate for 10 minutes.
- Unroll the store-bought pie crust onto the parchment paper. Pile the fruit mixture into the center, leaving a 2-inch border of dough all the way around.
- Gently fold the edges of the dough over the fruit, pleating it as you go. It doesn’t have to be perfect; the rustic, ‘unfinished’ look is part of the charm.
- Brush the edges of the crust with a little bit of milk or a beaten egg and sprinkle with coarse sparkling sugar for a professional, crunchy finish.
- Bake for 30-35 minutes until the crust is a deep golden brown and the fruit filling is bubbling thick bubbles in the center.
- Cool for at least 15 minutes before slicing. This allows the filling to set so you get a perfect slice every time. Serve with a dollop of whipped cream or ice cream.
How to make the best picnic sides?

Why we love this
Picnic sides are the unsung heroes of outdoor dining, providing the portable, flavor-packed foundation for a meal on a blanket. We love a good Mexican Street Corn Salad (Esquites) because it packs all the charred, creamy, and tangy flavors of elote into a bowl that is easy to transport and eat. The combination of sweet corn, smoky chili powder, and salty cotija cheese creates a complex flavor profile that stays delicious even at room temperature. It’s a festive, colorful dish that turns a standard picnic into a gourmet experience, making every bite feel like a celebration of summer corn season.
Ingredients
- 4 cups charred corn kernels (frozen, canned, or fresh from the cob)
- 1/4 cup mayonnaise
- 1/4 cup sour cream or Greek yogurt
- 1/2 cup crumbled cotija cheese
- 1/4 cup chopped fresh cilantro
- 1/2 tsp chili powder
- 1 lime, juiced
How to make it
- If using fresh corn, grill the cobs until lightly charred, then cut the kernels off. If using frozen or canned corn, sear them in a cast-iron skillet over high heat with a tiny bit of oil until they develop dark, caramelized spots. This char provides a smoky depth that defines the dish.
- In a large mixing bowl, whisk together the mayonnaise, sour cream, lime juice, and chili powder until smooth and creamy.
- Add the charred corn to the dressing while the corn is still slightly warm; this helps the flavors absorb more effectively into the kernels.
- Gently fold in the crumbled cotija cheese and the chopped cilantro. Cotija is a dry, salty cheese that won’t melt, providing a great textural contrast.
- Taste and adjust the seasoning. You might want an extra squeeze of lime for acidity or a pinch of salt, though the cotija is often salty enough.
- For a picnic, pack the salad into a chilled insulated container. To keep it looking fresh, save a little extra cilantro and a sprinkle of chili powder to add right before serving at the park or beach.
How to make fun summer drinks?

Why we love this
A fun summer drink is more than just hydration; it’s an accessory to the perfect afternoon, complete with clinking ice cubes and vibrant garnishes. We love a sparkling raspberry lemonade because it offers a sophisticated fizz and a beautiful ombre pink hue that looks stunning in photos. The tartness of the lemon combined with the sweetness of muddled berries creates a refreshing profile that cleanses the palate and cools the body. Serving a signature drink in a large glass pitcher filled with sliced fruit makes any gathering feel more curated and special, encouraging guests to linger and enjoy the vibe.
Ingredients
- 1 cup fresh raspberries
- 1/2 cup simple syrup (equal parts sugar and water dissolved)
- 1 cup fresh lemon juice
- 3 cups sparkling water or club soda
- Ice cubes
- Lemon slices and mint sprigs for garnish
How to make it
- Start by making a raspberry base. Place the fresh raspberries in a fine-mesh strainer over a bowl and use the back of a spoon to press them through. This creates a smooth puree without the seeds.
- In a large pitcher, combine the raspberry puree, fresh lemon juice, and simple syrup. Stir vigorously until the mixture is a consistent, deep red color.
- When you are ready to serve, add the sparkling water. Do not add it too early, or you will lose the refreshing carbonation. Pour it slowly down the side of the pitcher to preserve the bubbles.
- Fill highball glasses with plenty of ice—the colder the better for a summer drink.
- Pour the lemonade over the ice. For a ‘viral’ look, you can layer the drink by pouring the sparkling water over a spoon into the raspberry base to create a gradient effect.
- Garnish each glass with a fresh lemon wheel and a sprig of mint. Slap the mint between your palms before adding it to release the aromatic oils, which enhances the drinking experience with every sip.
How to prep easy camping meals?
[IMAGE_10]
Why we love this
Camping meals should be all about high-reward flavor with minimal cleanup, allowing you to focus on the crackle of the fire and the stars above. Foil pack fajitas are a personal favorite because they steam the ingredients to perfection in their own juices, resulting in incredibly tender meat and peppers. We love the ritual of nestled silver packets in the embers of a campfire, the anticipation building as the aroma of cumin and lime begins to waft through the woods. It’s the ultimate way to enjoy a hot, gourmet-style meal in the middle of the wilderness without the need for multiple pots or pans.
Ingredients
- 1 lb flank steak or chicken strips
- 2 bell peppers, sliced into strips
- 1 large onion, sliced
- 2 tbsp olive oil
- 1 packet fajita seasoning (or a mix of cumin, chili powder, and garlic powder)
- Heavy-duty aluminum foil
- Tortillas and lime wedges for serving
How to make it
- Prep your ingredients at home before you leave. Slice the meat, peppers, and onions and toss them in a gallon-sized bag with the olive oil and fajita seasoning. This ensures the meat marinates on the way to the campsite and saves you from bringing a cutting board and knives into the woods.
- Tear off four large sheets of heavy-duty aluminum foil (about 12 inches each). Standard foil is too thin and may tear or burn through on the coals.
- Divide the meat and vegetable mixture evenly among the four sheets, placing the pile in the center of the foil.
- Fold the sides of the foil in, then fold the top and bottom to create a completely sealed, airtight packet. Leave a little ‘headroom’ inside the packet for steam to circulate.
- Prepare your campfire. You don’t want to cook over high flames; instead, wait for the fire to burn down until you have a bed of glowing, hot white coals.
- Place the packets directly onto the coals using long-handled tongs. Cook for 15-20 minutes, flipping the packets halfway through the cooking time.
- Carefully remove a packet and peek inside to check for doneness. The meat should be seared and the vegetables soft. Let them rest for 2 minutes before opening fully (watch out for the hot steam!), and serve directly from the foil into warm tortillas with a squeeze of lime.
Conclusion
Building a viral snacking board is about more than just putting food on a tray; it’s about creating a tapestry of flavors that invites people to slow down and savor the moment. Whether you’re layering a spicy Rotel dip or tossing a light summer pasta, the goal is to celebrate the ease and beauty of the season. I hope these recipes inspire you to host your own summer gathering, filled with laughter, sunlight, and truly incredible food. Happy snacking!