
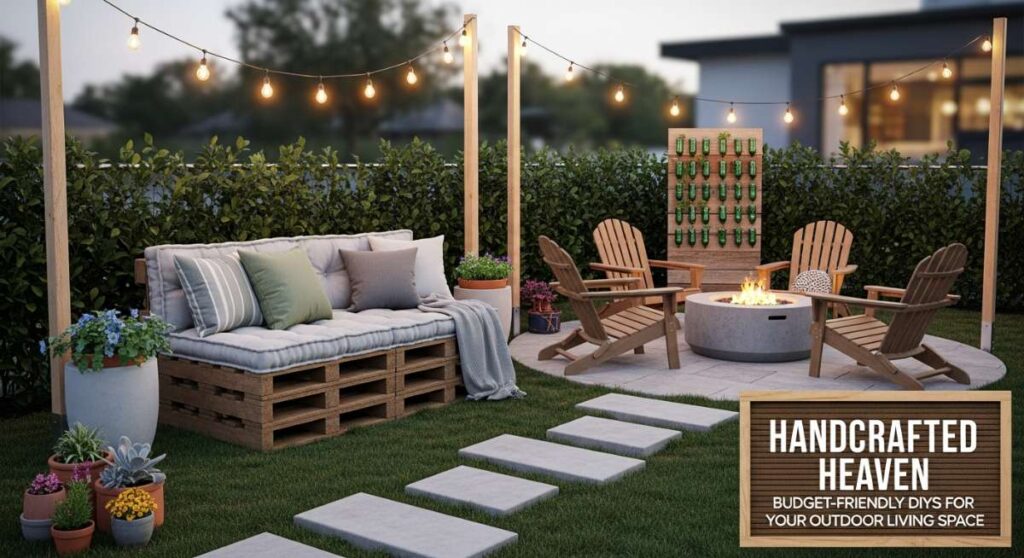
Imagine stepping out your back door into a world that feels like a boutique resort, yet smells like cedar and fresh earth—a space where every corner tells a story of your own making. There’s something profoundly soul-soothing about transforming a plain patch of grass into a sanctuary, not with a massive credit card bill, but with the magic of your own two hands and a vision for beauty. We often think of our homes as the four walls that surround us, but the true magic happens in that liminal space where the indoors meets the wild.
For years, I looked at my backyard and saw only chores and untamed weeds. But then, I realized that with a few budget-friendly DIYs, I could create an outdoor living space that rivals any five-star getaway. It’s about more than just aesthetics; it’s about creating a backdrop for those slow Sunday mornings with a cup of coffee and those golden-hour dinners where the laughter never seems to end. Let’s dive into how you can reclaim your garden and turn it into a handcrafted heaven.
How to Build a Serene Sanctuary for Beautiful Songbirds

Why we love this
The gentle trill of a goldfinch and the rhythmic tapping of a woodpecker create a natural symphony that instantly lowers your cortisol levels and brings a sense of harmony to your morning routine. There’s a quiet, meditative joy in watching these winged visitors flit through a custom cedar house, their vibrant feathers catching the morning light as they find refuge in the haven you’ve built just for them. It connects your home to the local ecosystem, making your garden feel like a living, breathing part of the natural world where life is celebrated in every chirp.
Essential Elements:
- Untreated Cedar or Pine planks (cedar is naturally rot-resistant)
- Exterior-grade wood glue
- Galvanized finishing nails
- 1.5-inch spade bit (for the entry hole)
- Hanging hardware or a sturdy mounting pole
- Non-toxic, water-based sealant
How to make it
- Measure and cut your cedar planks into six pieces: a base, four walls, and a roof. Ensure the roof has a slight overhang to protect the entrance from rain.
- Using the 1.5-inch spade bit, carefully drill an entry hole in the front panel, positioned about two-thirds of the way up to keep nestlings safe from predators.
- Apply a thin bead of exterior wood glue to the edges of the side walls and press them onto the back panel, securing them with galvanized finishing nails for a weatherproof bond.
- Attach the front panel and the base, ensuring there are small gaps at the bottom corners for drainage and ventilation.
- Secure the roof pieces at a 45-degree angle to create a peak, then sand down any rough edges to prevent injury to the birds.
- Apply a light coat of non-toxic sealant to the exterior only, then mount the house in a quiet, shaded area at least six feet off the ground.
How to Landscape a Breathtaking Entrance for Instant Joy

Why we love this
First impressions start the moment your foot hits the path, and a lush, flower-lined entrance acts as a warm embrace for you and your guests before you even reach the door. Imagine the scent of French lavender and creeping thyme wafting up as you walk, the vibrant colors of perennial blooms guiding you toward your sanctuary with a promise of peace. This transition zone is crucial for shifting your mindset from the frantic pace of the outside world to the calm serenity of your own private domain, creating a visual and olfactory bridge to happiness.
Essential Elements:
- Natural stone pavers or reclaimed bricks
- Weed-blocking landscape fabric
- Pea gravel or organic cedar mulch
- A mix of perennial plants (Lavender, Hostas, and Salvia)
- Solar-powered accent lanterns
How to make it
- Clear the existing grass and debris from your entrance area, digging down about three inches to create a level foundation for your new path.
- Lay down a high-quality landscape fabric to prevent weeds from poking through, securing the edges with U-shaped landscape staples.
- Position your stone pavers or bricks in a winding, organic pattern to encourage a slower, more mindful walking pace.
- Fill the gaps between the stones with pea gravel, tamping it down firmly so it feels stable underfoot.
- Dig planting holes along the borders and tuck in your perennials, ensuring you space them according to their full-grown width to avoid overcrowding.
- Spread a thick layer of mulch around the plants to retain moisture and finish the look with solar lanterns placed at rhythmic intervals for a magical nighttime glow.
How to Construct Elegant Wood Containers for Flourishing Greenery

Why we love this
Deep, dark wood grain contrasting against the neon pop of a Boston fern or the trailing silver of dichondra creates an architectural statement that breathes life into any patio corner. These sturdy vessels bring a sense of permanence and elegance to your outdoor space, making even the simplest potted plant look like a curated piece of living art. The tactile nature of the wood and the earthy aroma of damp soil within them provide a grounding sensory experience that elevates the humble act of gardening into a sophisticated design choice.
Essential Elements:
- 2×4 Pressure-treated timber or reclaimed decking boards
- Corrosion-resistant deck screws
- Power drill and pilot bits
- Perforated plastic liner
- Coarse drainage gravel
- High-quality potting mix
How to make it
- Cut your timber into equal lengths for the sides and slightly shorter pieces for the base to create a modern, square silhouette.
- Pre-drill pilot holes at the corners of your boards to prevent the wood from splitting when you drive in the heavy-duty deck screws.
- Assemble the four sides into a box frame, checking with a carpenter’s square to ensure every corner is a perfect 90-degree angle.
- Screw the base boards into the bottom of the frame, leaving 1/4-inch gaps between them to allow for natural water drainage.
- Line the interior with perforated plastic to protect the wood from constant moisture, then add a 2-inch layer of coarse gravel at the bottom.
- Fill the container with a nutrient-rich potting mix and plant your greenery, ensuring you water deeply the first time to help the soil settle.
How to Imagine a Magical Backyard World for Active Play

Why we love this
Seeing children lost in a world of pure imagination, where a simple corner of the yard becomes a fairy kingdom or a pirate ship, is the greatest reward for any DIY parent. It’s about creating those core memories in the dappled sunlight, where the air is thick with the scent of pine needles and the sound of pure, unbridled laughter. This handcrafted play zone encourages movement and creativity, providing a tactile alternative to screens that feels both adventurous and safe within the boundaries of your own backyard.
Essential Elements:
- Natural tree stumps or smooth river boulders
- Weatherproof outdoor fabric for a DIY teepee
- Colorful bunting and fairy lights
- A sandbox frame made of smooth-sanded cedar
- Non-toxic play sand
How to make it
- Select a level, shaded corner of your yard and clear away any sharp rocks or prickly weeds to create a safe “soft zone.”
- Arrange tree stumps of varying heights in a circle to create a “council ring” for storytelling and imaginative meetings.
- Construct a simple tripod frame using three long wooden poles, lashing them at the top with heavy twine to form the skeleton of a teepee.
- Drape your outdoor fabric over the poles, securing it with clips or heavy-duty staples, and decorate the entrance with vibrant bunting.
- Build a low-profile sandbox nearby by screwing four cedar boards together and filling the center with clean, filtered play sand.
- String battery-operated fairy lights through the trees or around the teepee to extend the magic into the twilight hours.
How to Source Adorable Mini Utensils for Culinary Adventures
![]()
Why we love this
There is a whimsical, storybook charm to seeing tiny copper pots and carved wooden spoons hanging in an outdoor play kitchen, ready for a “mud pie” feast. These miniature tools invite little hands to explore various textures and scents, turning the backyard into a laboratory of sensory discovery and culinary wonder. The sight of these small-scale treasures, worn by use and kissed by the sun, adds a layer of vintage warmth to your garden that feels both nostalgic and incredibly sweet.
Essential Elements:
- Thrifted vintage mini pots and pans
- Whittled wooden spoons or bamboo spatulas
- Stainless steel S-hooks
- A wooden rail or pegboard
- Outdoor-rated chalkboard paint
How to make it
- Scour local thrift stores and garage sales for small-scale kitchenware, looking for durable materials like stainless steel, copper, or thick wood.
- Thoroughly scrub your finds with a mixture of vinegar and baking soda to remove any grime and ensure they are safe for sensory play.
- Install a horizontal wooden rail against a fence or the side of a playhouse at the average waist height of your children.
- Space out stainless steel S-hooks along the rail, ensuring they are securely fastened so they don’t fall off during enthusiastic play.
- Organize the utensils by type—spoons in one section, pots in another—to teach basic organizational skills through play.
- Paint a small section of the nearby wall with chalkboard paint so the “little chefs” can write out their daily specials or mud-pie recipes.
How to Transform a Simple Deck for Luxurious Soaking

Why we love this
Imagine the steam rising into the cool evening air as you sink into a warm, cedar-wrapped tub on your own private deck, the stars twinkling above like scattered diamonds. It’s the ultimate indulgence—a spa-like retreat that turns a mundane wooden platform into a destination for deep relaxation and restorative quiet. The combination of warm water and the natural aesthetic of wood creates a sensory experience that melts away the day’s stress, offering a luxury experience without the luxury price tag.
Essential Elements:
- Galvanized steel stock tank (6-foot diameter recommended)
- Cedar tongue-and-groove planks for cladding
- Submersible water heater and filter pump
- Heavy-duty exterior adhesive
- Weatherproof wood sealant
How to make it
- Ensure your deck is structurally reinforced to handle the significant weight of a filled water tank; consult a professional if you are unsure about the load capacity.
- Place the galvanized stock tank in its permanent position and install the filter pump and heater through the pre-drilled side ports using watertight seals.
- Cut your cedar planks to the height of the tank and apply exterior adhesive to the back of each board, pressing them firmly against the metal exterior.
- Secure the cladding with a decorative metal band or small finishing nails at the top and bottom to create a seamless, high-end look.
- Apply three coats of a high-quality, UV-resistant wood sealant to the cedar to protect it from splashes and sun damage.
- Fill the tank with water, balance the pH levels, and allow the heater to reach your desired temperature before your first sunset soak.
How to Reclaim Vintage Wood for a Charming Playtime Hub

Why we love this
Reclaimed wood carries a soul and a history that new lumber simply cannot match, offering a rustic warmth that feels both grounded and adventurous. Building a play hub from salvaged boards creates a texture-rich environment where every knot and grain tells a story of resilience and creative repurposing. It’s an eco-friendly way to add character to your yard, providing a sturdy, timeless structure that looks as though it has always been part of the landscape, inviting children to build their own histories within its walls.
Essential Elements:
- Old pallets or salvaged barn wood
- A heavy-duty crowbar (for disassembly)
- Electric orbital sander with various grits
- Non-toxic, eco-friendly wood stain
- Long-reach wood screws
How to make it
- Carefully disassemble your pallets or vintage wood using a crowbar, removing every single rusty nail to ensure the material is completely safe.
- Spend extra time with the orbital sander, starting with 60-grit and moving up to 120-grit, until the wood is buttery smooth to the touch.
- Design a simple A-frame or box structure, using the sturdiest beams for the vertical supports and thinner boards for the walls and floor.
- Pre-drill all holes and assemble the structure using long-reach wood screws, ensuring the entire hub is rock-solid and wobble-free.
- Apply a coat of non-toxic, tinted wood stain to enhance the natural character of the grain while providing a barrier against the elements.
- Furnish the interior with soft outdoor cushions and a small crate for books to turn the hub into a cozy reading nook or secret clubhouse.
How to Design a Cooling Water Feature for Endless Summer Giggles

Why we love this
The rhythmic splash of water against stone is nature’s white noise, a refreshing sensory delight that cools the surrounding air and invites the spirit to play. Whether it’s a bubbling rock or a gentle stream, the sound of water adds a layer of tranquility that transforms a hot summer afternoon into a misty, magical escape. It’s a focal point that draws people in, providing a tactile way to cool off and a visual centerpiece that makes your garden feel like a lush, hidden oasis.
Essential Elements:
- Small submersible water pump
- Watertight plastic basin or liner
- A collection of smooth river rocks and flat slate
- Decorative ceramic urn or a large focal stone
- Flexible PVC tubing
How to make it
- Dig a hole slightly larger than your plastic basin in a spot near an outdoor electrical outlet, ensuring the basin sits level with the ground.
- Place the submersible pump at the bottom of the basin and connect the flexible PVC tubing, running it up through the center of your decorative urn or stone.
- Fill the basin with water and test the pump to ensure the water flow is gentle and doesn’t splash too far outside the perimeter.
- Stack your river rocks and slate around the basin to hide the edges, creating a naturalistic look that blends seamlessly with the earth.
- Adjust the flow rate on your pump to achieve the perfect “babbling brook” sound—not too loud, but enough to mask street noise.
- Surround the feature with moisture-loving plants like ferns or moss to complete the look and help naturally filter any occasional overflow.
How to Grow a Natural Wall for Private Outdoor Living

Why we love this
A living wall of emerald ivy or fragrant jasmine creates a soft, breathing boundary that shields you from the world while inviting nature deep into your living space. This vertical garden offers a tapestry of textures and intoxicating scents, turning a boring fence into a lush backdrop that feels like a hidden forest alcove. It provides a sense of seclusion and intimacy that hardscaping simply can’t achieve, cooling your patio through natural transpiration and providing a home for beneficial pollinators.
Essential Elements:
- Sturdy wall-mounted trellis or cattle panel
- Climbing plants (Star Jasmine, Clematis, or Climbing Hydrangea)
- Organic compost and slow-release fertilizer
- Drip irrigation kit
- Galvanized wall anchors
How to make it
- Mount your trellis or cattle panel to your wall or fence using galvanized anchors, leaving a 2-inch gap behind it to allow for airflow and plant movement.
- Enrich your soil with a generous amount of organic compost to provide the high-energy nutrients climbing plants need to grow vertically.
- Space your climbing plants approximately 18 inches apart at the base of the trellis, teasing the roots out gently before planting them at the same depth they were in their pots.
- Carefully weave the initial tendrils of the plants into the trellis mesh, securing them loosely with soft garden twine to guide their upward growth.
- Install a simple drip irrigation line along the base of the wall to ensure the plants receive consistent moisture without wasting water.
- Prune the plants twice a year to encourage bushier growth at the base, ensuring your natural wall remains thick and private from top to bottom.
How to Install Glowing Accent Points for an Enchanting Walkway
[IMAGE_10]
Why we love this
As dusk falls, the soft, amber glow of lights along a winding path guides you home like a trail of fallen stars, casting long, romantic shadows across the grass. This illumination doesn’t just light the way for safety; it creates an enchanting atmosphere that makes your garden feel alive and welcoming long after the sun has set. There is something deeply comforting about a well-lit path, inviting you to take one last stroll through your handcrafted heaven before the night settles in.
Essential Elements:
- Low-voltage LED path lights
- Outdoor-rated transformer
- 14-gauge direct-burial landscape wire
- Small hand shovel or trenching tool
- Wire connectors (waterproof)
How to make it
- Map out your lighting plan by placing the fixtures on the ground where you want them, spacing them about 6 to 8 feet apart for a soft, layered effect.
- Use a small shovel to dig a shallow trench—about 3 inches deep—along the edge of your path to house the landscape wire.
- Lay the wire in the trench and connect the transformer at one end, ensuring it is plugged into a GFCI-protected outdoor outlet.
- Attach each LED fixture to the main wire using waterproof connectors, twisting them firmly until the piercing prongs make a solid connection with the copper.
- Turn on the system to check each light, then bury the wire and tamp down the soil, hiding the cables completely beneath the mulch or turf.
- Program the transformer’s timer to turn on at dusk and off at dawn, ensuring your enchanting walkway is always ready to greet you.
Creating Your Own Slice of Paradise
Building a handcrafted heaven isn’t about perfection; it’s about the process of creation and the joy of seeing your vision come to life. Whether you start with a simple birdhouse or go all-in on a cedar-wrapped soaking tub, each project adds a layer of soul to your outdoor space. Take it one weekend at a time, breathe in the fresh air, and enjoy the beautiful sanctuary you’ve built with your own two hands.