

There is something undeniably magical about the way a simple wooden board can transform a meal into an experience. Lately, my social media feed has been flooded with these stunning, minimalist spreads that prioritize flavor over fuss. We have all been there—spending hours in the kitchen only to be too exhausted to actually enjoy the company. This 3-ingredient food board trend is the antithesis of that stress, focusing on high-quality components that sing when brought together in one beautiful, communal display.
I remember the first time I set one of these out for my friends on a humid Tuesday evening. Within minutes, the atmosphere shifted from a casual hangout to a sensory celebration. The laughter grew louder, the wine flowed easier, and the food disappeared faster than I could have imagined. It reminded me that the heart of hospitality isn’t found in complex techniques or expensive gadgets, but in the warmth of sharing something delicious and tactile. This is why everyone is obsessed—it’s approachable, gorgeous, and deeply satisfying.
How to make strawberry pie

Why we love this
There is nothing quite like the scent of sun-warmed strawberries macerating in their own juices to signal the height of summer. This pie offers a perfect textural contrast between the buttery, shatteringly flaky crust and the soft, jammy heart of the fruit that bursts with every bite. The vibrant crimson glaze catches the light like a jewel, while the aroma of baked sugar and fresh berries fills the kitchen with a sense of pure, unadulterated nostalgia. It is a dessert that feels like a warm hug on a plate, especially when topped with a dollop of cold cream.
Ingredients
- 1 pre-baked 9-inch pie crust
- 6 cups fresh strawberries (hulled and sliced)
- 1 cup granulated sugar mixed with 3 tablespoons cornstarch
How to make it
- Begin by preparing your pie shell; if using store-bought, bake it until it reaches a deep golden brown to ensure it can hold the weight of the fruit without becoming soggy.
- In a medium saucepan, crush about 1 cup of the strawberries using a potato masher to release their natural juices and create a flavorful base.
- Whisk the sugar and cornstarch mixture into the crushed berries over medium heat, stirring constantly to prevent clumping until the mixture reaches a thick, translucent boil.
- Remove the glaze from the heat and let it cool slightly before gently folding in the remaining 5 cups of whole or sliced strawberries, ensuring every berry is glistening and coated.
- Pour the mixture into the prepared crust, smoothing the top with a spatula, and refrigerate for at least 3-4 hours until the filling is firmly set and chilled through.
How to make rotel dip

Why we love this
This dip is the ultimate comfort food, a velvety and molten sea of cheese spiked with the zesty heat of green chilies and savory tomatoes. The way it clings to a salty tortilla chip is pure culinary alchemy, offering a rich mouthfeel that is instantly addictive and perfect for any gathering. You can smell the savory spice the moment it hits the table, promising a bold flavor profile that balances creaminess with a subtle, lingering kick. It’s the kind of dish that brings people together, huddled around the bowl in a shared moment of indulgence.
Ingredients
- 16 oz Velveeta cheese (cubed)
- 1 can (10 oz) Ro*Tel Diced Tomatoes and Green Chilies
- 1 lb ground sausage or beef (browned and drained)
How to make it
- Start by browning your choice of meat in a heavy skillet over medium-high heat, breaking it into fine crumbles until it is fully cooked and no pink remains.
- Drain the excess fat thoroughly from the meat to ensure the dip stays smooth and doesn’t become oily or separate during the melting process.
- In a slow cooker or a heavy-bottomed pot, combine the cubed cheese, the undrained can of Ro*Tel, and the cooked meat.
- Set the heat to low and stir frequently; the goal is a slow melt to maintain a silky texture without scorching the bottom of the cheese.
- Once the mixture is completely homogenous and bubbling gently, serve immediately or keep on the ‘warm’ setting, stirring occasionally to prevent a skin from forming.
How to cook dirty spaghetti

Why we love this
Dirty spaghetti is a soulful, umami-forward twist on traditional pasta that swaps bright marinara for a deep, earthy, and savory sauce profile. The pasta strands become coated in a rich glaze of rendered fats and aromatic spices, creating a complex flavor that feels incredibly decadent despite its humble ingredients. Every forkful offers a satisfying bite of al dente pasta mixed with the grainy, seasoned texture of the meat, releasing a smoky aroma that fills the room. It’s a bold, rustic dish that proves that a few well-chosen pantry staples can create a gourmet-level experience.
Ingredients
- 1 lb spaghetti noodles
- 1 lb ground pork or beef
- 2 tablespoons Cajun seasoning
How to make it
- Bring a large pot of heavily salted water to a rolling boil and cook the spaghetti until just under al dente; it should still have a firm bite in the center.
- While the pasta cooks, brown the ground meat in a large skillet over medium-high heat, allowing the edges to get slightly crispy for maximum flavor development.
- Do not drain all the fat; instead, sprinkle the Cajun seasoning directly over the meat and toast it for 60 seconds to wake up the dried spices and oils.
- Reserve one cup of the starchy pasta water before draining the noodles, then toss the spaghetti directly into the skillet with the seasoned meat.
- Add the pasta water a splash at a time while tossing vigorously over medium heat, which creates a light emulsion that helps the “dirty” sauce cling perfectly to every strand.
How to marinate grilled chicken

Why we love this
A well-marinated grilled chicken is a masterclass in balance, offering a smoky charred exterior that gives way to an incredibly tender and juicy interior. The marinade works its way into the fibers of the meat, infusing it with bright acidity and herbaceous notes that dance across the palate with every bite. When the chicken hits the hot grates, the sugars in the marinade caramelize, creating those beautiful grill marks and a savory-sweet aroma that is the hallmark of a summer cookout. It’s a versatile staple that feels both light and deeply satisfying, making it the star of any outdoor board.
Ingredients
- 2 lbs chicken thighs or breasts
- 1/2 cup olive oil
- 1/4 cup lemon juice or balsamic vinegar
How to make it
- If using chicken breasts, pound them to an even thickness using a meat mallet so they cook uniformly and absorb the marinade more effectively.
- In a large bowl or a gallon-sized resealable bag, whisk together the oil and acid (lemon or vinegar) to create a simple but powerful emulsified base.
- Submerge the chicken in the liquid, ensuring every surface is coated, and refrigerate for at least 30 minutes, though 4 to 6 hours is ideal for deeper flavor penetration.
- Preheat your grill to medium-high heat (about 400°F) and oil the grates lightly to prevent sticking before placing the marinated meat down.
- Grill for 6-8 minutes per side, resisting the urge to move the chicken too early so that a proper crust forms, and always let the meat rest for 5 minutes before slicing.
How to make summer pasta
Why we love this
Summer pasta is the embodiment of freshness, celebrating the vibrant colors and sharp flavors of the season’s best produce in a light, olive-oil-based sauce. The cherry tomatoes blister and pop, releasing their sweet nectar to mingle with the aromatic garlic and the peppery bite of fresh basil leaves. It feels effortless and breezy, with a fragrance that is reminiscent of a Mediterranean garden bathed in the late afternoon sun. Every bite is a refreshing contrast of warm pasta and cool, crisp ingredients, making it the perfect centerpiece for a hot day’s meal.
Ingredients
- 1 lb short pasta (like fusilli or penne)
- 2 cups cherry tomatoes
- 1/2 cup high-quality extra virgin olive oil
How to make it
- Cook your pasta in a large pot of salted water until it is perfectly al dente, making sure to save a bit of that liquid gold (pasta water) for later.
- In a wide pan, heat the olive oil over medium heat and add the whole cherry tomatoes, cooking them until their skins begin to wrinkle and burst.
- Use the back of a wooden spoon to gently press some of the tomatoes, allowing their juices to emulsify with the olive oil into a light, golden sauce.
- Toss the cooked pasta into the pan with the tomatoes, adding a splash of pasta water and increasing the heat for 1 minute to marry the flavors.
- Finish the dish off the heat with a generous handful of torn basil and a crack of black pepper, serving it either warm or at room temperature.
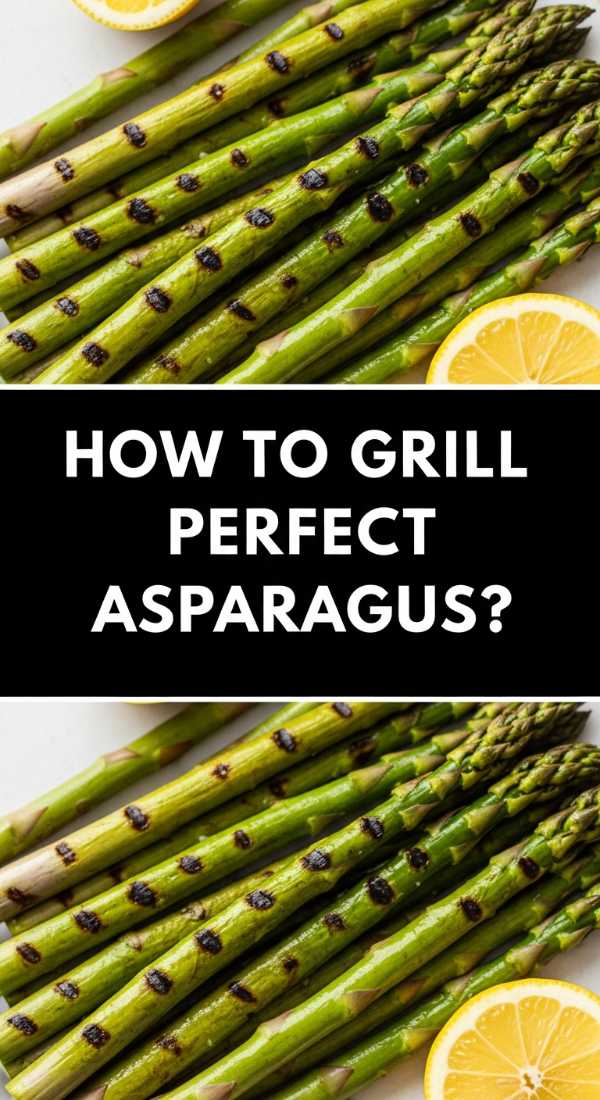
How to grill perfect asparagus

Why we love this
There is a specific, delightful snap to perfectly grilled asparagus that you just can’t get from steaming or roasting in the oven. The high heat of the grill intensifies the natural sweetness of the spears while adding a sophisticated smoky char to the delicate tips. It’s a side dish that looks elegant on a board, with its vibrant green stalks glistening with oil and coarse salt, smelling of charred earth and fresh lemon. It’s the ultimate way to enjoy this spring vegetable, offering a clean, crisp flavor that cuts through richer grilled meats beautifully.
Ingredients
- 1 bunch fresh asparagus
- 2 tablespoons olive oil
- 1 teaspoon sea salt
How to make it
- Wash the asparagus and trim the woody, fibrous bottom ends by snapping them where they naturally break or cutting off the bottom two inches.
- Toss the spears in a bowl with olive oil and sea salt until they are evenly coated, which helps the heat distribute and prevents the tips from burning too quickly.
- Preheat your grill to a consistent medium-high heat and place the spears perpendicular to the grill grates so they don’t fall through the gaps.
- Grill for about 3 to 5 minutes, turning them occasionally with tongs to ensure they get even char marks on all sides while remaining tender-crisp.
- Remove from the heat once they turn a bright, vivid green with dark charred spots, and finish with a squeeze of fresh lemon juice while still hot.
How to brew sun tea

Why we love this
Sun tea is a slow-motion ritual that captures the very essence of a lazy summer afternoon in a glass jar. The gentle heat of the sun slowly extracts the tea’s flavor, resulting in a brew that is remarkably smooth, naturally sweet, and devoid of the bitterness often found in boiled tea. Watching the clear water gradually transform into a deep, amber glow on your porch is a visual treat that builds anticipation for that first cold sip. It’s a nostalgic beverage that tastes like sunshine and memories, especially when served over a mountain of ice with a sprig of mint.
Ingredients
- 1 gallon cold filtered water
- 8 to 10 black tea bags
- Fresh lemon slices (optional)
How to make it
- Fill a clean, one-gallon glass jar with cold water, ensuring the jar has been thoroughly sterilized to prevent any bacterial growth during the brewing process.
- Add the tea bags, hanging the strings over the outside of the jar for easy removal later, and cap the jar loosely to allow for slight expansion.
- Place the jar in a spot that receives direct, intense sunlight for at least 3 to 5 hours; the more direct the light, the stronger the brew will be.
- Once the liquid has reached a rich, dark amber color, bring the jar inside and remove the tea bags immediately—do not squeeze them, as this can add bitterness.
- Stir in any desired sweeteners while the tea is still slightly warm from the sun, then refrigerate immediately and serve over plenty of ice.
How to make pea salad
Why we love this
This salad is a delightful explosion of textures, featuring the sweet, firm pop of green peas against the creamy richness of a chilled dressing. It’s a vintage-inspired dish that brings a bright, garden-fresh energy to any food board, looking stunning with its varying shades of green and pink. The aroma is clean and cooling, while the addition of smoky bacon or sharp cheese provides a savory backbone that makes it surprisingly hearty. It’s the kind of side dish that people often forget they love until they take that first refreshing, crunchy, and creamy bite.
Ingredients
- 4 cups frozen peas (thawed)
- 1/2 cup mayonnaise or Greek yogurt
- 1/2 cup diced red onion or bacon bits
How to make it
- Thaw your peas by placing them in a colander and running cool water over them until the frost disappears; pat them very dry to prevent a watery salad.
- In a large mixing bowl, whisk together the mayonnaise (or yogurt for a tangier version) with a pinch of salt and pepper until smooth and aerated.
- Gently fold the peas and your chosen mix-ins—like the sharp red onion or the crunchy bacon—into the dressing using a rubber spatula to avoid crushing the peas.
- Cover the bowl and refrigerate for at least one hour; this chilling time is crucial as it allows the flavors to meld and the dressing to thicken.
- Give the salad a quick toss right before serving on your board to redistribute the dressing and ensure every pea is perfectly coated.
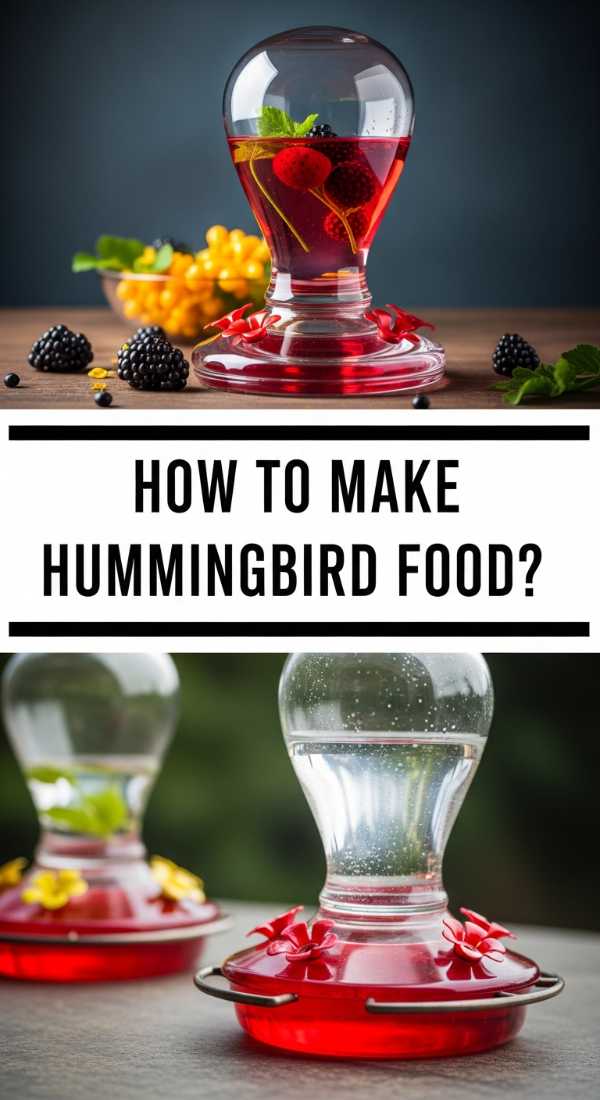
How to make hummingbird food
Why we love this
While not for the human guests, making hummingbird food is a beautiful way to bring vibrant life and movement to your outdoor dining area. The simple clarity of the homemade nectar ensures these tiny, iridescent creatures stay healthy and energized as they flit around your garden. There is a quiet joy in watching them hover near the feeder, their wings a blur of motion, drawn by the promise of the sweet fuel you’ve prepared. It turns your backyard into a living sanctuary, adding an extra layer of enchantment to your summer evenings on the patio.
Ingredients
- 1 cup granulated white sugar
- 4 cups water
- (No red dye needed!)
How to make it
- Mix the sugar and water in a small saucepan, using only white granulated sugar as other types can be harmful to the birds’ digestive systems.
- Heat the mixture over medium-high heat, stirring constantly until the sugar is completely dissolved and the liquid is perfectly clear.
- Bring the solution to a brief boil for about 1-2 minutes; this helps to slow down the growth of mold and bacteria once it’s outside in the heat.
- Allow the nectar to cool completely to room temperature before filling your feeders; hot liquid can warp plastic feeders or harm the birds.
- Store any extra nectar in the refrigerator for up to two weeks, and be sure to clean your feeders every few days to keep your feathered friends safe.
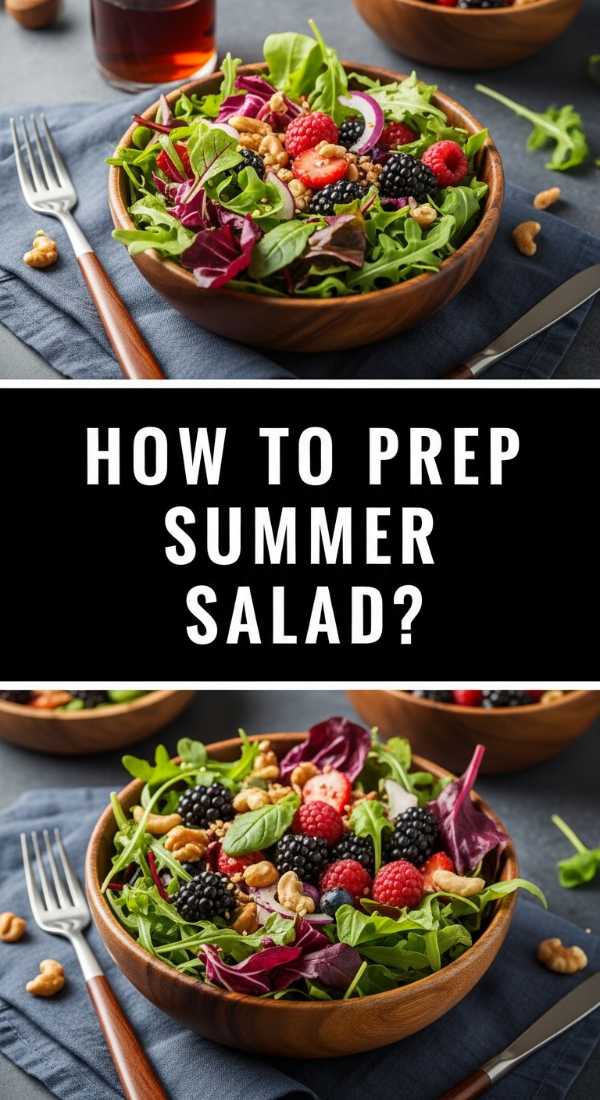
How to prep summer salad
[IMAGE_10]
Why we love this
A perfectly prepped summer salad is a canvas of seasonal abundance, offering a crisp foundation of greens topped with the best the farmer’s market has to offer. The mix of textures—from succulent berries to crunchy nuts and creamy goat cheese—creates a sophisticated palate that feels indulgent yet light. The scent of fresh-cut herbs and a zingy vinaigrette is incredibly appetizing, making it an essential component for balancing out the heavier items on a food board. It’s a celebration of raw, vibrant ingredients that look as beautiful as they taste, providing a burst of vitality in every forkful.
Ingredients
- 5 oz mixed baby greens or arugula
- 1 cup seasonal fruit (peaches, berries, or melon)
- 1/4 cup nuts or seeds (pecans, walnuts, or pepitas)
How to make it
- Start with very cold, dry greens; use a salad spinner to remove every trace of moisture so the dressing can actually stick to the leaves rather than sliding off.
- Slice your seasonal fruit into bite-sized pieces, ensuring they are ripe but still firm enough to hold their shape when tossed.
- Toast your nuts or seeds in a dry pan over medium heat for 2-3 minutes until they become fragrant and slightly golden to enhance their crunch and flavor.
- Layer the ingredients rather than mixing them aggressively; place the greens down first, then scatter the fruit and nuts over the top for a beautiful presentation.
- Wait until the very last second to drizzle with a light vinaigrette or serve the dressing on the side to ensure the greens stay crisp and voluminous on your board.
The Joy of Simple Gathering
Ultimately, these recipes prove that you don’t need a pantry full of rare ingredients to create something truly memorable. Whether it’s the slow brew of sun tea or the perfect snap of grilled asparagus, the beauty lies in the quality of the ingredients and the intention behind the prep. So, grab a board, pick a few of these favorites, and invite someone over. Life is too short for complicated recipes when simple ones taste this good.