

From Pantry to Pinterest: The Viral Simple Food Board Tutorial
There is something inherently magical about a spread that looks as good as it tastes. We’ve all seen those viral Pinterest boards—the ones filled with vibrant colors, steaming plates of comfort, and the kind of rustic charm that makes you want to reach through the screen. But let’s be honest: real life isn’t always a curated photoshoot. As a busy home cook, I used to think these aesthetics were reserved for professional stylists, until I realized that the best boards aren’t about perfection; they’re about the story a simple, homemade meal tells.
Today, I’m pulling back the curtain on my ‘Viral Simple Food Board.’ This collection isn’t just about feeding your family; it’s about creating a moment. From the sweet, sun-ripened scent of a fresh strawberry pie to the savory, smoky char of grilled asparagus, these recipes are designed to be approachable yet show-stopping. Whether you are hosting a backyard get-together or just want to elevate a Tuesday night dinner, these ten essentials will transform your kitchen into a Pinterest-worthy sanctuary of flavor and warmth.
How to bake a fresh strawberry pie

Why we love this
There is nothing quite like the aroma of a strawberry pie cooling on a windowsill, filling the kitchen with the scent of caramelized sugar and sun-warmed fruit. The texture is a symphony of contrasts: a buttery, flaky crust that shatters at the touch of a fork, giving way to a ruby-red filling that is thick, glossy, and bursting with natural sweetness. Each bite feels like a celebration of summer, offering a bright acidity that balances the richness of the pastry. It is the kind of dessert that invites long conversations and second helpings, evoking a deep sense of nostalgia and home-cooked comfort.
Ingredients
- 2 pints fresh strawberries, hulled and sliced
- 1 cup granulated sugar
- 3 tablespoons cornstarch
- 1/4 teaspoon salt
- 1 tablespoon lemon juice
- Double pie crust (homemade or store-bought)
- 1 egg (for egg wash)
- 1 tablespoon turbinado sugar (for topping)
How to make it
- Preheat your oven to 400°F (200°C) and place a baking sheet on the bottom rack to catch any drips.
- In a large mixing bowl, gently toss the sliced strawberries with granulated sugar, cornstarch, salt, and lemon juice. Let the mixture sit for about 15 minutes to allow the juices to macerate and the cornstarch to begin dissolving.
- Roll out your bottom pie crust and fit it into a 9-inch pie plate. Trim the edges, leaving a 1-inch overhang.
- Pour the strawberry mixture into the prepared bottom crust, piling the fruit slightly higher in the center for a classic domed look.
- Roll out the second crust and place it over the strawberries. You can do a full top with slits for steam or a beautiful lattice weave. Fold the top crust under the bottom crust overhang and crimp the edges tightly with your fingers or a fork to seal.
- Whisk the egg with a splash of water and brush it generously over the top crust. Sprinkle with turbinado sugar for a professional, crunchy finish.
- Bake for 45-50 minutes. Look for the crust to be a deep golden brown and the filling to be bubbling thick through the vents. If the edges brown too quickly, tent them with foil.
- Crucial Step: Let the pie cool completely on a wire rack for at least 3-4 hours. This allows the fruit pectin and cornstarch to set, ensuring you get clean slices rather than a soupy mess.
How to make creamy rotel dip

Why we love this
Rotel dip is the ultimate social glue—the kind of appetizer that disappears within minutes of being placed on the table. Its velvety, molten texture is incredibly satisfying, coating every curve of a salty tortilla chip with a blend of rich cheese and zesty peppers. The aroma is bold and savory, with the subtle heat of green chilies cutting through the creamy decadence of the base. It’s warm, gooey, and unapologetically comforting, making it the perfect centerpiece for a game day spread or a casual night in with friends where double-dipping is almost expected.
Ingredients
- 1 lb Velveeta cheese, cut into cubes
- 1 can (10 oz) Ro*Tel Original Diced Tomatoes and Green Chilies (undrained)
- 1 lb ground sausage or lean ground beef
- 1/2 teaspoon garlic powder
- 1/4 cup chopped fresh cilantro (optional garnish)
- Tortilla chips for serving
How to make it
- Place a large skillet over medium-high heat. Add the ground sausage or beef, breaking it apart with a spatula into small crumbles.
- Cook the meat until it is thoroughly browned and no pink remains. This should take about 7-10 minutes. Drain the excess grease carefully into a heat-safe container.
- Lower the heat to medium-low. Add the cubed Velveeta cheese to the skillet (or transfer everything to a slow cooker if you want to keep it warm for hours).
- Pour the can of Ro*Tel directly over the cheese. Do not drain the liquid; the juices from the tomatoes are essential for reaching the perfect dipping consistency.
- Stir continuously as the cheese begins to melt. Use a folding motion to incorporate the meat and tomatoes evenly. If the dip is too thick, add a tablespoon of milk at a time until it reaches your desired silkiness.
- Once the cheese is completely smooth and bubbling slightly, sprinkle with garlic powder for an extra layer of savory depth.
- Serve immediately in a warm bowl, garnished with fresh cilantro to add a pop of color and brightness.
How to cook savory dirty spaghetti

Why we love this
Savory dirty spaghetti is a soulful twist on traditional pasta that brings deep, earthy flavors to the forefront of the palate. Unlike a bright marinara, this dish is rich with the ‘fond’—those caramelized brown bits from the meat—giving it a ‘dirty’ appearance that signals intense seasoning and slow-simmered goodness. The texture is hearty, with perfectly al dente strands of pasta slicked in a savory, meat-heavy sauce that smells of toasted garlic, onions, and black pepper. It’s a rustic, filling meal that feels like a warm hug on a plate, perfect for those evenings when you crave something substantial and complex.
Ingredients
- 1 lb spaghetti noodles
- 1 lb ground beef or pork
- 1 medium yellow onion, finely diced
- 1 green bell pepper, diced
- 3 cloves garlic, minced
- 1/4 cup beef broth
- 2 tablespoons Worcestershire sauce
- 1 teaspoon smoked paprika
- Salt and cracked black pepper to taste
- Fresh parsley for garnish
How to make it
- Bring a large pot of salted water to a rolling boil. Cook the spaghetti according to the package directions, but aim for ‘al dente’ (firm to the bite), as it will cook further in the sauce. Reserve 1/2 cup of pasta water before draining.
- In a wide skillet or Dutch oven, brown the ground meat over medium-high heat. Allow the meat to sear undisturbed for 2-3 minutes at a time to develop a deep brown crust—this is where the ‘dirty’ flavor comes from.
- Add the diced onion and bell pepper to the meat. Sauté for about 5-6 minutes until the vegetables are soft and translucent, picking up the browned bits from the bottom of the pan.
- Stir in the minced garlic, smoked paprika, and plenty of cracked black pepper. Cook for only 60 seconds to avoid burning the garlic.
- Deglaze the pan with the beef broth and Worcestershire sauce. Scrape the bottom of the pan vigorously with a wooden spoon to incorporate all the flavor.
- Add the cooked spaghetti directly into the skillet. Toss the noodles with tongs to coat them thoroughly in the meat and juices.
- If the pasta seems dry, splash in the reserved pasta water a little at a time. The starches in the water will help the savory sauce cling to the noodles.
- Season with salt to taste and garnish with fresh parsley before serving in deep bowls.
How to marinate chicken for the grill
Why we love this
The secret to unforgettable grilled chicken lies in the marinade, a process that transforms simple protein into a tender, juice-filled masterpiece. As the chicken soaks, the acids break down the fibers, while the oils and herbs infuse deep into the meat, creating a profile that is both zesty and savory. On the grill, these sugars in the marinade caramelize, creating those iconic charred grill marks that offer a smoky crunch before yielding to a moist, flavorful interior. The aroma of herbs hitting the hot coals is enough to bring the whole neighborhood to your backyard, promising a meal that is light yet deeply satisfying.
Ingredients
- 2 lbs chicken breasts or thighs
- 1/2 cup extra virgin olive oil
- 1/4 cup balsamic vinegar or lemon juice
- 3 tablespoons soy sauce
- 2 tablespoons honey or maple syrup
- 3 cloves garlic, smashed
- 1 teaspoon dried oregano and 1 teaspoon dried thyme
- 1/2 teaspoon crushed red pepper flakes
How to make it
- Prepare the chicken by patting it dry with paper towels. If using breasts, pound them to an even thickness (about 3/4 inch) using a meat mallet; this ensures the entire piece cooks at the same rate without drying out the edges.
- In a medium bowl or a gallon-sized Ziploc bag, whisk together the olive oil, acid (vinegar or lemon), soy sauce, honey, herbs, and garlic. The oil carries the flavor, while the acid tenderizes.
- Submerge the chicken in the marinade. Seal the bag while pressing out as much air as possible to ensure maximum contact between the liquid and the meat.
- Refrigerate for at least 30 minutes, though 4 to 6 hours is ideal. Do not exceed 24 hours, or the acid will start to change the texture of the meat, making it mushy.
- Remove the chicken from the fridge 20 minutes before grilling to take the chill off, which helps it cook more evenly.
- Preheat your grill to medium-high (about 400°F). Lightly oil the grates to prevent sticking.
- Place the chicken on the grill and cook for 6-7 minutes per side. Resist the urge to flip it too early; wait until the meat releases easily from the grates.
- Use an instant-read thermometer to check for a final internal temperature of 165°F (74°C). Let the meat rest for 5 minutes under foil before slicing to lock in the juices.
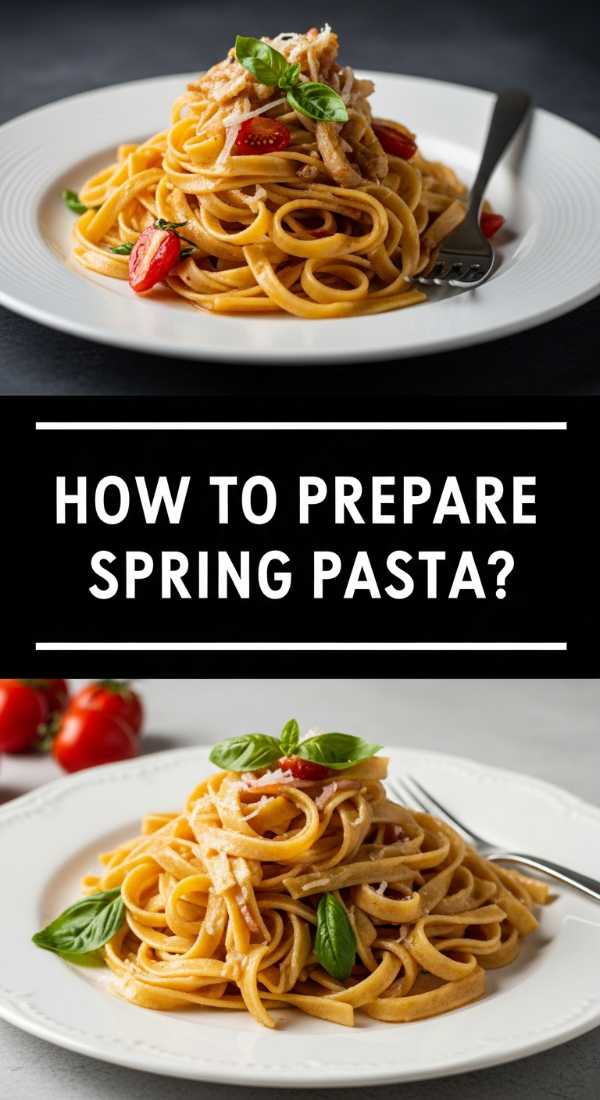
How to prepare a healthy spring pasta

Why we love this
Spring pasta is like a garden on a plate, celebrating the arrival of fresh, green life after a long winter. The dish is characterized by its lightness; instead of heavy creams, it relies on a delicate emulsion of pasta water, high-quality olive oil, and bright lemon zest. The texture is a playful mix of tender noodles, the slight snap of blanched asparagus, and the pop of sweet peas. It smells like a fresh breeze—herbaceous, citrusy, and clean. This is the meal you make when you want to feel energized and nourished, capturing the essence of the season in every vibrant, sun-drenched forkful.
Ingredients
- 12 oz linguine or fettuccine
- 1 bunch thin asparagus, cut into 2-inch pieces
- 1 cup fresh or frozen peas
- 2 tablespoons olive oil
- 2 cloves garlic, thinly sliced
- Zest and juice of 1 large lemon
- 1/2 cup grated Parmesan cheese
- Handful of fresh mint or basil leaves, torn
How to make it
- Bring a large pot of salted water to a boil. Cook the pasta until it is about 2 minutes away from being done (check the box for timing).
- In the last 2 minutes of the pasta’s cooking time, drop the asparagus pieces and peas directly into the boiling pasta water. This blanches the vegetables perfectly without needing an extra pot.
- Before draining, scoop out 1 cup of the starchy pasta water and set it aside. Drain the pasta and vegetables together.
- In the same pot (now empty), heat the olive oil over medium heat. Add the sliced garlic and sauté for 1-2 minutes until it is fragrant and just begins to turn golden at the edges.
- Return the pasta and vegetables to the pot. Pour in the lemon juice and half of the reserved pasta water.
- Add the Parmesan cheese and toss vigorously with tongs. The cheese and pasta water will create a light, silky sauce that coats everything. If it looks dry, add more pasta water.
- Remove from heat. Fold in the lemon zest and fresh herbs (mint or basil). The residual heat will wilt the herbs just enough to release their oils without turning them brown.
- Serve with an extra sprinkle of Parmesan and a crack of black pepper.
How to mix a virgin pina colada

Why we love this
The virgin pina colada is the ultimate ‘vacation in a glass,’ offering a tropical escape without the need for a passport. Its texture is incredibly decadent—thick, frothy, and ice-cold, like a sophisticated fruit smoothie. The flavor profile is a heavenly marriage of creamy coconut milk and the sharp, tangy sweetness of pineapple. It carries a tropical aroma that immediately transports you to a poolside lounge chair. Garnished with a bright cherry and a wedge of fruit, it’s a beautiful, celebratory drink that makes any afternoon feel like a special occasion, providing a refreshing chill that lingers on the tongue.
Ingredients
- 1 cup frozen pineapple chunks
- 1/2 cup pineapple juice
- 1/2 cup canned cream of coconut (e.g., Coco Lopez)
- 1 cup crushed ice
- 1 tablespoon fresh lime juice
- Maraschino cherries and pineapple wedges for garnish
How to make it
- Place the frozen pineapple chunks in the bottom of a high-powered blender. Using frozen fruit instead of just ice ensures a thicker, more flavorful drink that won’t get watered down.
- Add the pineapple juice and the cream of coconut. Note: Cream of coconut is much thicker and sweeter than coconut milk; ensure you are using the sweetened version found in the mixer aisle.
- Squeeze in the fresh lime juice. This is the ‘pro tip’ that cuts through the intense sweetness and adds a necessary layer of brightness.
- Add the crushed ice to the blender.
- Pulse the blender a few times to break up the large chunks, then blend on high speed for 30-45 seconds until the mixture is completely smooth and looks like soft-serve ice cream.
- Pour the mixture into a tall hurricane glass or a chilled mason jar.
- Garnish immediately with a pineapple wedge on the rim and a maraschino cherry dropped on top. Serve with a straw for the ultimate poolside vibe.
How to grill fresh asparagus

Why we love this
Grilled asparagus is a revelation for anyone who grew up with the mushy, boiled version of this vegetable. When kissed by the flame, the spear-like stalks develop a gorgeous charred exterior that adds a smoky, nutty depth to their natural sweetness. The texture remains firm and crisp-tender, offering a satisfying ‘snap’ with every bite. Topped with a sprinkle of coarse sea salt and a squeeze of lemon, the aroma is earthy and bright. It’s an elegant yet simple side dish that feels elevated enough for a dinner party but is easy enough for a weeknight barbecue, highlighting the beauty of seasonal produce with minimal effort.
Ingredients
- 1 bunch fresh asparagus (medium thickness is best for grilling)
- 2 tablespoons extra virgin olive oil
- 1/2 teaspoon garlic powder
- 1/2 teaspoon kosher salt
- 1/4 teaspoon black pepper
- Lemon wedges for serving
- Optional: Grated Parmesan or balsamic glaze
How to make it
- Wash the asparagus and pat it thoroughly dry. Any moisture on the surface will cause the vegetable to steam rather than sear.
- Trim the woody ends. A great trick is to hold a spear at both ends and snap it; it will naturally break where the tough part ends. Use that spear as a guide to trim the rest of the bunch with a knife.
- Place the spears on a large baking sheet. Drizzle with olive oil and sprinkle with garlic powder, salt, and pepper. Toss with your hands to ensure every inch of the stalk is lightly coated.
- Preheat your grill to medium-high heat. If your grill grates are wide, consider using a grill basket or placing the spears perpendicular to the grates so they don’t fall through.
- Place the asparagus on the hot grill. Cook for 3-5 minutes, rolling them occasionally with tongs to ensure even charring.
- Look for the tips to become slightly crispy and the stalks to develop dark brown grill marks. They should be easily pierced with a fork but still have a bit of resistance.
- Remove from the grill and immediately squeeze fresh lemon juice over the top. The acidity brightens the smoky flavor instantly.
How to use sourdough discard easily

Why we love this
Using sourdough discard is a beautiful lesson in kitchen mindfulness and zero-waste living. The ‘discard’—the portion of the starter you usually throw away—is actually a treasure trove of tangy, complex flavor. When added to simple batters, it creates a unique texture that is slightly more tender and elastic than traditional flour mixes, with a signature fermented zip that tickles the back of the throat. Whether you’re making crackers or pancakes, the aroma is yeasty and comforting, like a professional bakery. It feels deeply rewarding to turn a byproduct into a star ingredient, connecting you to the ancient rhythm of bread-making in a modern, easy way.
Ingredients
- 1 cup sourdough discard (unfed, straight from the fridge)
- 1 cup all-purpose flour
- 1/2 teaspoon fine sea salt
- 4 tablespoons unsalted butter, softened
- 2 tablespoons dried herbs (like rosemary or ‘everything bagel’ seasoning)
- Olive oil for brushing
How to make it
- In a medium mixing bowl, combine the sourdough discard, all-purpose flour, salt, softened butter, and your choice of dried herbs.
- Mix by hand until a cohesive dough forms. It should be slightly tacky but not sticky. Wrap the dough in plastic and let it rest in the fridge for at least 30 minutes; this hydrates the flour and makes it much easier to roll out thinly.
- Preheat your oven to 350°F (175°C). Prepare two large sheets of parchment paper.
- Divide the dough in half. Place one half on a sheet of parchment and flatten it slightly. Place the second sheet of parchment on top and roll the dough out until it is paper-thin (about 1/16th of an inch). Thinness is the key to a crunchy cracker.
- Remove the top layer of parchment. Brush the surface of the dough lightly with olive oil and sprinkle with a bit more salt or seasoning.
- Use a pizza cutter to score the dough into squares or rectangles. Do not worry about separating them; they will snap apart after baking.
- Bake for 15-20 minutes, or until the edges are golden brown and the centers feel firm.
- Let them cool completely on the pan. They will crisp up significantly as they cool. Store in an airtight container for up to a week.
How to make sweet dandelion jelly

Why we love this
Dandelion jelly is like capturing sunshine in a jar. Often called ‘poor man’s honey,’ this golden preserve has a delicate, floral flavor with notes of honey and lemon that surprise everyone who tastes it. The texture is smooth and translucent, shimmering when held up to the light. The process of foraging for the bright yellow blossoms brings a sense of wonder and connection to the earth, making the final product feel like a true labor of love. Smeared on a warm biscuit, it offers a gentle, sweet aroma that evokes memories of spring meadows and the simple joys of a handcrafted pantry.
Ingredients
- 2 cups dandelion petals (yellow parts only, no green stems/sepals)
- 4 cups boiling water
- 1/4 cup lemon juice
- 1 box (1.75 oz) powdered pectin
- 4 cups granulated sugar
How to make it
- The most important step is harvesting: pick fresh dandelions from an area free of pesticides. Pull the yellow petals away from the green base. Ensure NO green enters the mix, as it will make the jelly bitter.
- Place the 2 cups of petals in a heat-proof jar and pour the 4 cups of boiling water over them. Let this ‘tea’ steep for at least 2 hours, or overnight in the fridge for a deeper flavor.
- Strain the mixture through a fine-mesh sieve or cheesecloth, squeezing the petals to extract all the golden liquid. You should have about 3 to 3.5 cups of dandelion tea.
- In a large pot, combine the dandelion tea, lemon juice, and the powdered pectin. Bring the mixture to a full rolling boil (a boil that cannot be stirred down) over high heat.
- Once boiling, pour in all the sugar at once. Stir constantly until the sugar dissolves.
- Bring the mixture back to a full rolling boil and let it boil hard for exactly one minute. This timing is crucial for the pectin to set correctly.
- Remove from heat and skim off any foam that has formed on the surface with a spoon.
- Ladle the hot jelly into sterilized jars, leaving 1/4 inch of headspace. Process in a water bath canner for 10 minutes or simply let them cool on the counter to set (if consuming within a few weeks).
How to serve a cold pea salad
[IMAGE_10]
Why we love this
Cold pea salad is the unsung hero of the picnic table, offering a refreshing and crunchy counterpoint to heavier grilled meats. The texture is a delightful mix of pop-in-your-mouth peas, crisp red onion, and the salty, smoky crunch of real bacon bits. All of this is enveloped in a creamy, tangy dressing that smells faintly of apple cider vinegar and sharp cheddar cheese. It’s a dish that manages to be both light and hearty, with a vibrant green color that brightens any plate. Best served chilled, it provides a cooling sensation that is incredibly welcome during the heat of a summer afternoon.
Ingredients
- 1 bag (16 oz) frozen peas, thawed and drained
- 1/2 cup sharp cheddar cheese, cubed or shredded
- 1/2 cup cooked bacon, crumbled
- 1/4 cup red onion, finely diced
- 1/2 cup mayonnaise
- 1 tablespoon apple cider vinegar
- 1 teaspoon sugar
- Salt and pepper to taste
How to make it
- Begin by ensuring your frozen peas are completely thawed. Place them in a colander and run cool water over them, then pat them dry with a clean kitchen towel. Excess water will make the dressing runny.
- In a small mixing bowl, whisk together the mayonnaise, apple cider vinegar, and sugar until smooth. This creates a dressing that is slightly sweet and pleasantly tangy.
- In a large bowl, combine the peas, cheddar cheese cubes, crumbled bacon, and diced red onion. I recommend using cubed cheese rather than shredded for a better textural contrast.
- Pour the dressing over the pea mixture. Use a large rubber spatula to gently fold the ingredients together until every pea is evenly coated in the creamy dressing.
- Season generously with salt and freshly cracked black pepper. Taste as you go, as the saltiness of the bacon and cheese will vary.
- The most critical step: cover the bowl and refrigerate for at least 2 to 4 hours before serving. This ‘resting period’ allows the flavors to meld and the peas to absorb the dressing, resulting in a much more cohesive dish.
- Give the salad a quick toss right before serving to redistribute the dressing.
Wrapping Up Your Pinterest-Perfect Journey
Creating a viral-worthy food board isn’t about being a professional chef; it’s about embracing the textures, colors, and stories behind the food we love. From the rustic charm of sourdough discard crackers to the vibrant, sunny glow of dandelion jelly, each of these recipes adds a unique chapter to your culinary story. When you bring these dishes together, you aren’t just serving a meal—you’re creating an experience that is as beautiful as it is delicious. So, grab your apron, clear off your counter, and start building your own Pinterest-perfect board today. Don’t forget to snap a photo before the first bite!