
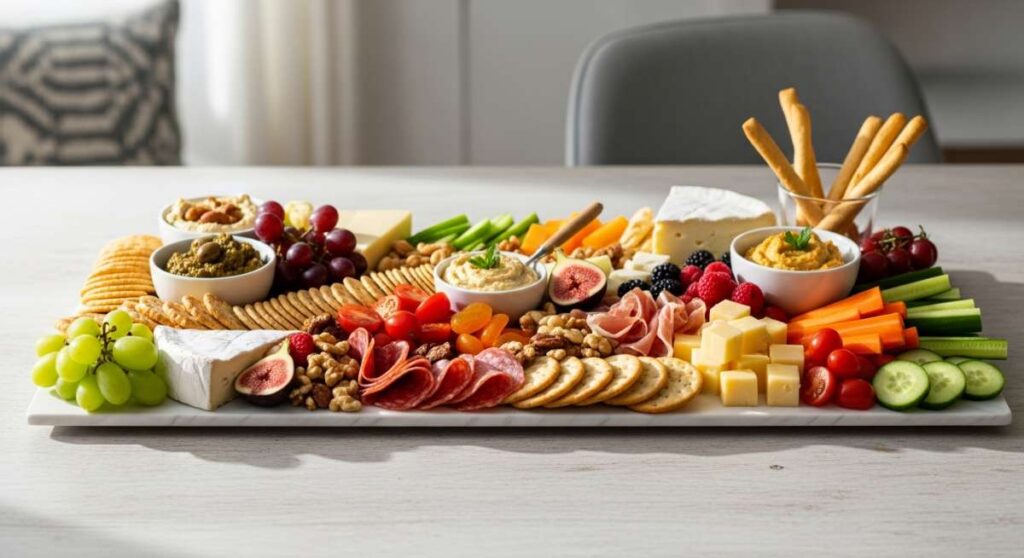
Effortless & Viral: The Ultimate Simple Food Board Guide
There is something undeniably magical about a table filled with colors, textures, and the inviting aroma of home-cooked goodness spread out on a wooden board. It transforms a simple meal into an event, a moment of connection where friends and family can graze, laugh, and linger. Whenever I bring out a large platter, the energy in the room shifts; it feels less like a formal dinner and more like a shared experience that invites everyone to dig in and enjoy the little things.
In today’s fast-paced world, we often crave that sense of effortless beauty. We want food that looks like it belongs on a viral social media feed but feels like a warm hug from a loved one. This guide is your roadmap to creating those moments. From the sizzle of the grill to the sweet, jammy centers of seasonal fruits, these recipes are designed to be served ‘board-style’ to maximize both visual appeal and flavor. Let’s dive into these ten viral-worthy creations that will make your next gathering unforgettable.
How to build a nourishing spring dinner board in minutes?

Why we love this
This approach to spring dining is all about freshness and the vibrant renewal of the season. Imagine the crisp snap of blanched sugar snap peas paired with the velvety richness of a lemon-herb tahini drizzle. The colors are a kaleidoscope of greens and soft yellows, smelling faintly of fresh mint and earth. It is a light yet deeply satisfying way to end a day, leaving you feeling energized rather than weighed down, perfect for those golden hour sunsets on the patio.
Ingredients
- 2 cups quinoa or farro
- 1 bunch asparagus, trimmed
- 1 cup snap peas
- 2 heirloom carrots, shaved
- 1 avocado, sliced
- 1/4 cup pumpkin seeds
- Lemon-tahini dressing
- Fresh mint and parsley
How to make it
- Begin by cooking your grains (quinoa or farro) in salted water or vegetable broth. Bring to a boil, then reduce to a simmer and cover for 12-15 minutes. Once the water is absorbed, fluff with a fork and let it cool slightly to maintain a light texture.
- Blanch the asparagus and snap peas by dropping them into boiling water for exactly 60 seconds until they turn bright green, then immediately plunge them into an ice bath to stop the cooking and preserve that essential crunch.
- Arrange the fluffy grains in the center of your board as a base. Layer the blanched greens, shaved carrots, and avocado slices in concentric circles or artistic clusters.
- Toast the pumpkin seeds in a dry pan over medium heat for 3-4 minutes until they pop and smell nutty. Sprinkle them over the board for a necessary saltiness and crunch.
- Drizzle the lemon-tahini dressing generously over the vegetables and garnish with hand-torn mint and parsley leaves for a burst of aromatic freshness.
How to elevate your classic Rotel dip to viral status?
Why we love this
There is a reason this dip is a staple, but when served on a board with an array of colorful dippers, it becomes a true centerpiece. The aroma of melted cheese infused with spicy green chilies and savory sausage is enough to draw a crowd from across the house. Each bite is a creamy, indulgent journey, with the warmth of the dip contrasting against the cold, crisp bite of fresh peppers or the salty snap of a blue corn tortilla chip.
Ingredients
- 1 block (16 oz) high-quality melting cheese
- 1 can Rotel (diced tomatoes and green chilies)
- 1 lb ground breakfast sausage or chorizo
- 1/2 cup heavy cream (for silkiness)
- Fresh cilantro and jalapeños for garnish
- Dippers: Tortilla chips, mini bell peppers, celery sticks
How to make it
- In a large skillet over medium-high heat, brown the sausage or chorizo. Use a wooden spoon to break it into very small crumbles, cooking until no pink remains and the edges are slightly crispy and caramelized.
- Drain the excess fat from the skillet but leave the flavorful browned bits. Reduce the heat to low and add the cubed melting cheese and the entire can of Rotel (do not drain the juices!).
- Slowly stir in the heavy cream as the cheese melts. The goal is a velvety, pourable consistency. If it looks too thick, add a splash more cream. Keep the heat low to prevent the cheese from scorching or becoming oily.
- Once fully melted and integrated, pour the dip into a pre-heated ceramic bowl to keep it warm. Place the bowl in the center of a large wooden board.
- Surround the dip with high-contrast dippers: golden tortilla chips, vibrant red and orange bell pepper slices, and cool green celery. Garnish the dip with freshly chopped cilantro and thin jalapeño rounds for a professional finish.
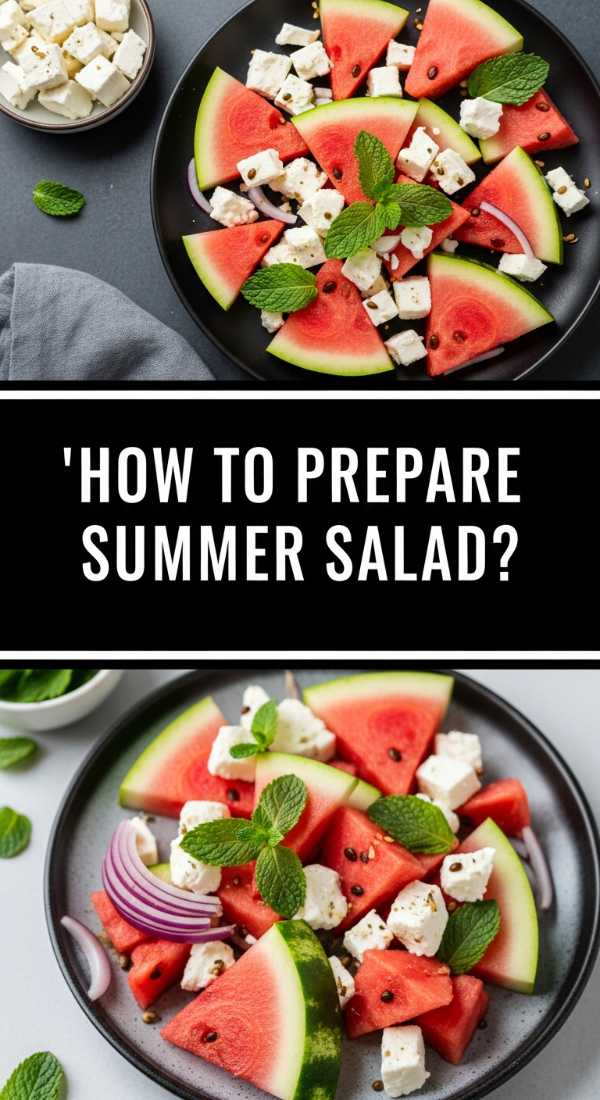
How to craft a refreshing summer salad board that stays crisp?
Why we love this
A summer salad board is a visual masterpiece that celebrates the peak of the harvest. We love the way the juice from a perfectly ripe peach mingles with the salty tang of crumbled feta and the peppery bite of arugula. The texture is a delightful mix of soft fruit, crunchy nuts, and tender greens, all tied together with a balsamic glaze. It smells like a sun-drenched garden and feels like the ultimate luxury on a hot July afternoon.
Ingredients
- 4 cups baby arugula or spinach
- 3 ripe peaches, sliced
- 1 cup fresh blueberries
- 1/2 cup crumbled feta or goat cheese
- 1/2 cup candied pecans
- Prosciutto ribbons (optional)
- Balsamic glaze and extra virgin olive oil
How to make it
- Start with a base of chilled greens. Use a mix of arugula for spice and spinach for softness. Spread them across the board, leaving small gaps to tuck in other ingredients.
- Slice the peaches into even wedges. For an extra flavor dimension, sear the peach slices on a hot grill pan for 60 seconds per side to caramelize the natural sugars before placing them on the board.
- Scatter the blueberries and cheese crumbles evenly. The feta adds a necessary saltiness that balances the sweetness of the fruit.
- Roll thin slices of prosciutto into rose-like shapes and nestle them among the greens for a touch of savory elegance.
- Just before serving, drizzle with high-quality olive oil and a thick balsamic glaze. Sprinkle the candied pecans on top last to ensure they stay perfectly crunchy and don’t absorb the moisture from the fruit.
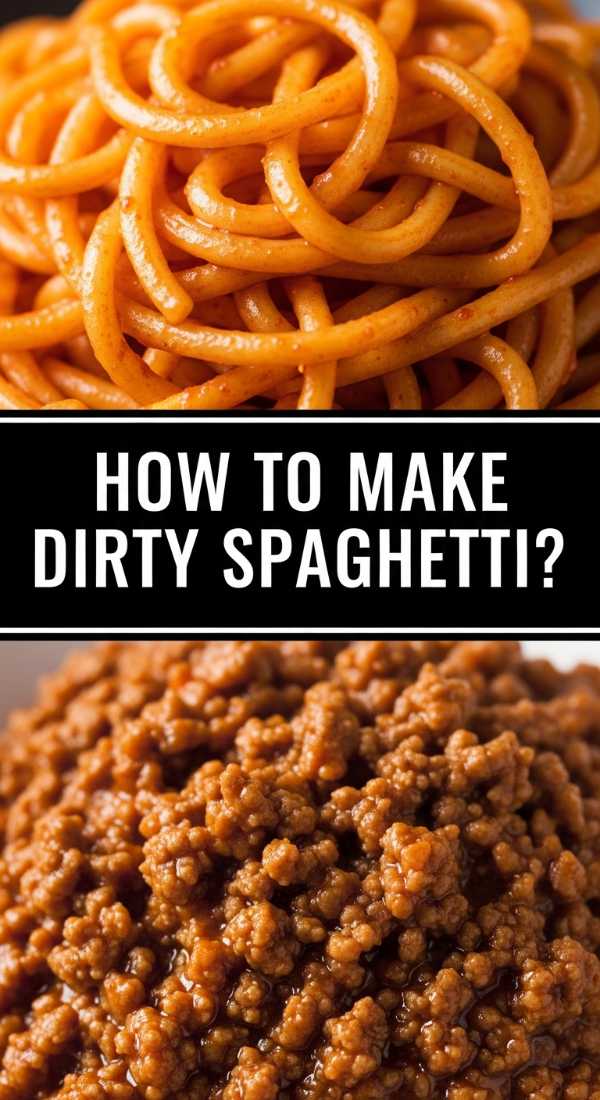
How to master the ultimate savory dirty spaghetti board?
Why we love this
Dirty spaghetti is the ultimate comfort food, transformed into a viral sensation by its rich, deep flavors and rustic presentation. The aroma of garlic, onions, and savory ground meat sautéed to perfection fills the air, promising a meal that is both hearty and sophisticated. The texture is all about the ‘al dente’ pasta clinging to a thick, flavorful sauce, topped with a snow-like dusting of parmesan that melts into the crevices of the noodles.
Ingredients
- 1 lb spaghetti
- 1 lb ground beef or pork
- 1 onion, finely diced
- 3 cloves garlic, minced
- 2 tbsp tomato paste
- 1 tsp smoked paprika
- Fresh parsley and parmesan cheese
- Crusty bread slices for the side
How to make it
- Boil a large pot of heavily salted water—it should taste like the sea. Cook the spaghetti until it is just shy of al dente (about 2 minutes less than the package directions), as it will finish cooking in the sauce.
- In a wide pan, brown the meat over medium-high heat until deeply browned. Add the diced onions and cook until translucent and sweet. Stir in the minced garlic and tomato paste, cooking for 2 minutes until the paste turns a dark brick red.
- Add a splash of pasta water and the smoked paprika to the pan to create a rich, emulsified sauce. The starch in the water is the secret to a sauce that sticks to the noodles perfectly.
- Toss the pasta directly into the sauce pan. Use tongs to coat every strand, adding more pasta water if necessary until the spaghetti looks glossy and ‘dirty’ with flavor.
- Spread the spaghetti across a long board. Top with a generous amount of freshly grated parmesan and chopped parsley. Surround with toasted, garlicky bread slices to soak up any leftover sauce.
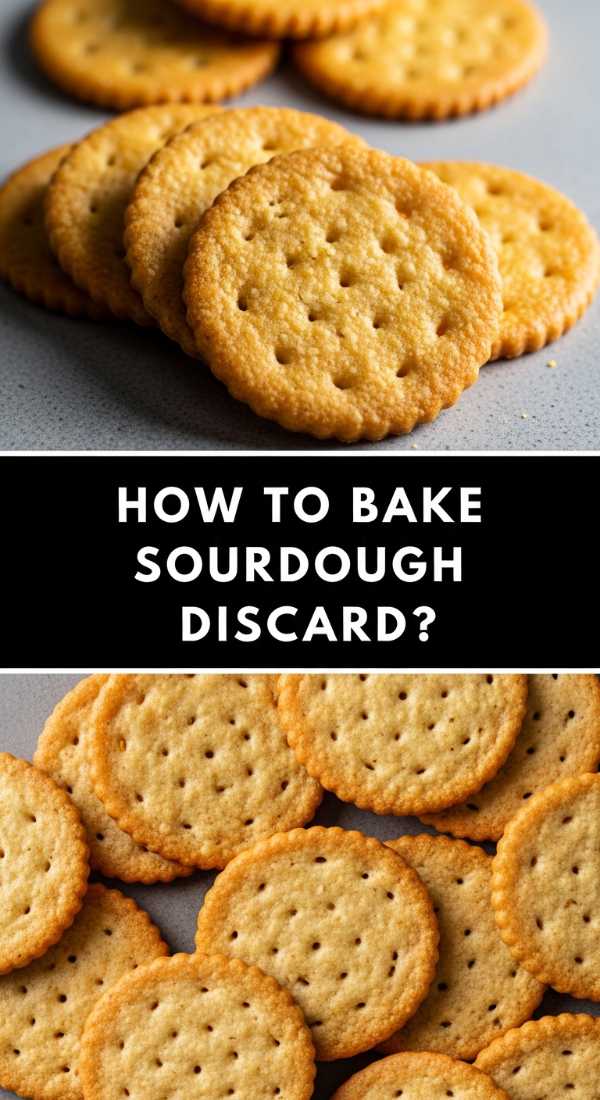
How to achieve the perfect crusty sourdough for your artisan board?

Why we love this
There is nothing quite like the primal satisfaction of breaking into a loaf of sourdough that you’ve nurtured yourself. The crackle of the crust as it yields to a soft, tangy, and airy interior is a sensory experience like no other. It smells of yeast and toasted grain, evoking a sense of timeless craftsmanship. Served on a board with salted butter and honeycomb, it becomes the sophisticated soul of any gathering.
Ingredients
- 100g active sourdough starter
- 350g warm water
- 500g bread flour
- 10g fine sea salt
- Flour for dusting
- Salted butter and honey for serving
How to make it
- Whisk your active starter and warm water in a large bowl until the starter is dissolved. Add the flour and salt, mixing by hand until a shaggy dough forms. Cover and let rest for 30 minutes (autolyse).
- Perform a series of four ‘stretch and folds’ every 30 minutes. Reach under the dough, pull it up, and fold it over itself. This builds the gluten structure without heavy kneading, resulting in those beautiful air pockets.
- Let the dough bulk ferment in a warm spot until it has grown by about 50% and looks bubbly. Shape the dough into a tight round ball (boule) by tension-pulling it across a clean counter.
- Place the dough in a floured proofing basket and refrigerate overnight. This cold proofing develops the signature tangy flavor.
- Preheat a Dutch oven in a 450°F (230°C) oven. Score the top of the loaf with a sharp blade, place it in the pot, and bake covered for 20 minutes. Remove the lid and bake for another 20-25 minutes until the crust is a deep mahogany brown. Let it cool completely before slicing and placing on your board.
How to create a pastel-perfect spring dessert board?
Why we love this
This board is a celebration of sweetness and light, featuring a delicate balance of tart citrus and creamy textures. We love the whimsical look of pale pink macarons nestled next to bright yellow lemon bars and dusted shortbread. It feels like a tea party in a blooming garden, with the scent of vanilla and lemon zest wafting through the air. Each bite is a miniature explosion of joy, perfect for sharing over coffee and conversation.
Ingredients
- Mini lemon bars
- Strawberry macarons
- Shortbread cookies
- Fresh raspberries and blackberries
- White chocolate dipped pretzels
- Honey-yogurt dip
- Edible pansies for garnish
How to make it
- Start by placing the larger items, like the lemon bars and shortbread cookies, in opposite corners of the board to create balance. Ensure the lemon bars are cut into small, uniform squares for easy grabbing.
- Nestle the macarons in small rows or clusters. Their smooth shells and ruffled ‘feet’ add a touch of professional patisserie flair to the board.
- Fill a small bowl with the honey-yogurt dip (simply Greek yogurt mixed with a tablespoon of honey) and place it in the center. This provides a refreshing, creamy element to balance the sugary treats.
- Fill all the remaining gaps with fresh berries and white chocolate pretzels. The berries add a natural acidity that cuts through the sweetness, while the pretzels add a much-needed salty crunch.
- For the viral finishing touch, scatter a few food-grade edible pansies across the board. The pops of purple and yellow make the entire presentation look like a work of art.
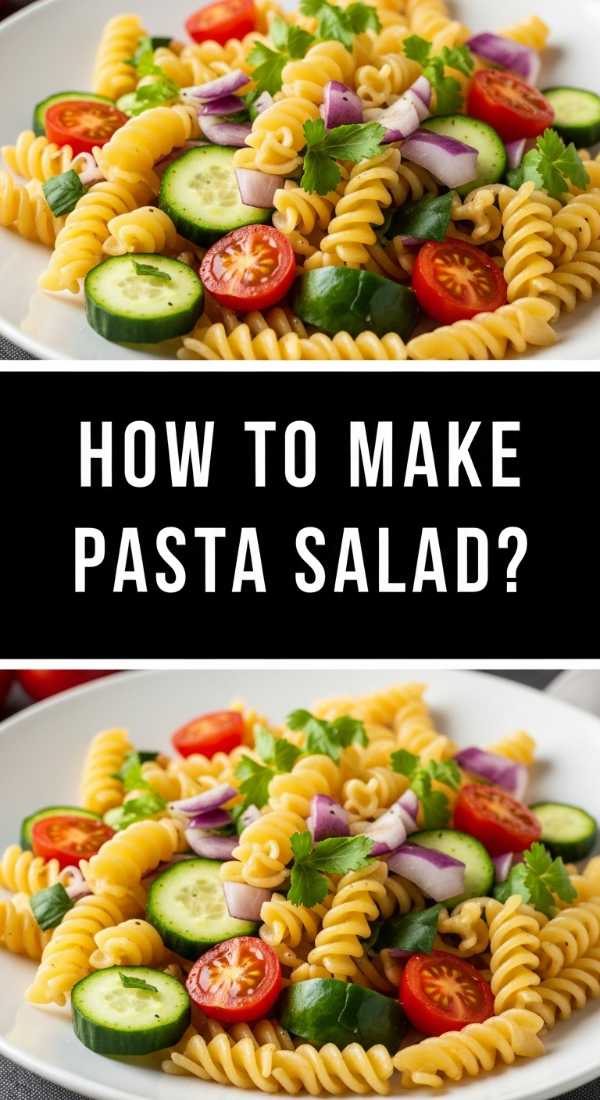
How to assemble a zesty summer pasta salad flight?

Why we love this
Why choose one pasta salad when you can have a flight? This board concept is genius because it offers a variety of flavors—from herbaceous pesto to zesty Italian vinaigrette. The texture varies with every scoop, featuring chewy rotini, crunchy cucumbers, and creamy mozzarella pearls. It smells like fresh basil and sun-dried tomatoes, making it the ultimate refreshing side dish for a backyard barbecue where everyone wants a little taste of everything.
Ingredients
- 3 types of short pasta (e.g., fusilli, farfalle, orzo)
- Pesto sauce
- Italian dressing
- Greek vinaigrette
- Mix-ins: Cherry tomatoes, olives, cucumbers, feta, mini mozzarella
- Fresh basil leaves
How to make it
- Cook the three different pasta shapes separately in salted water until al dente. Drain and immediately toss each with a little olive oil to prevent sticking while they cool.
- In three separate bowls, mix each pasta with its designated dressing and specific mix-ins. For example, toss the fusilli with pesto and mozzarella, the farfalle with Italian dressing and tomatoes, and the orzo with Greek vinaigrette and cucumbers.
- Place three medium-sized bowls onto your board. Fill each with one of the pasta salads. This ‘flight’ style allows guests to see the distinct colors and ingredients of each variety.
- Garnish the edges of the bowls with fresh herbs that match the flavors inside—basil for the pesto, oregano for the Greek.
- Fill the spaces on the board between the bowls with extra olives, marinated artichokes, or toasted pine nuts to create a cohesive, bountiful look that invites sampling.
How to grill the juiciest, most flavorful chicken for your platter?
Why we love this
Perfectly grilled chicken is the backbone of a great food board. We love the contrast between the smoky, charred exterior and the incredibly tender, succulent meat inside. The aroma of garlic and charred lemon is intoxicating, signaling a meal that is healthy yet indulgent. When sliced thin and laid out on a board with roasted vegetables, it looks stunning and ensures everyone gets their fill of high-quality protein.
Ingredients
- 2 lbs chicken thighs (boneless, skin-in for flavor)
- 1/4 cup olive oil
- 3 cloves garlic, smashed
- 1 lemon, zested and halved
- 1 tbsp dried oregano
- Salt and cracked black pepper
- Fresh rosemary sprigs
How to make it
- Marinate the chicken thighs for at least 2 hours (or overnight) in a mixture of olive oil, smashed garlic, lemon zest, oregano, salt, and pepper. This ensures the flavor penetrates deep into the meat and helps retain moisture.
- Prehead your grill to medium-high heat (about 400°F). Clean the grates thoroughly and lightly oil them to prevent the skin from sticking and tearing.
- Place the chicken skin-side down first. This renders the fat and creates that coveted crispy texture. Grill for 6-8 minutes without moving them to get clear, professional grill marks.
- Flip the chicken and grill for another 6-10 minutes. Use an instant-read thermometer to check for doneness; you are looking for 165°F (74°C). In the last 2 minutes, place the lemon halves cut-side down on the grill to caramelize.
- Let the chicken rest for a full 10 minutes before slicing. This allows the juices to redistribute so the meat stays moist. Arrange the slices on the board, squeeze the charred lemon over the top, and garnish with rosemary.
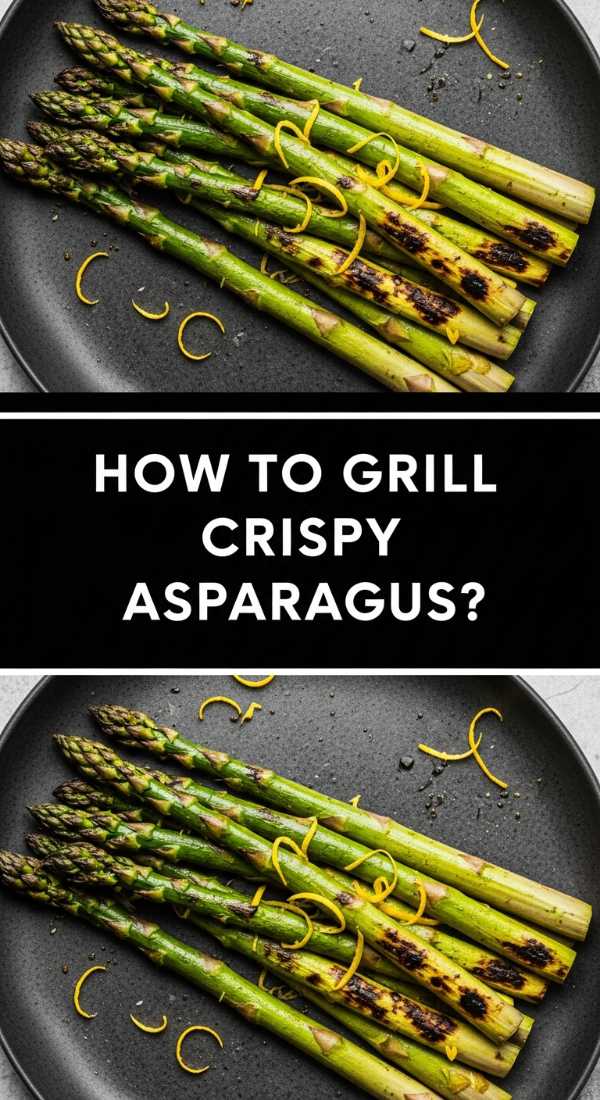
How to get that perfect smoky snap on grilled asparagus?

Why we love this
Grilled asparagus is the unsung hero of the spring and summer board. When done right, it has a sophisticated smokiness and a tender-crisp texture that makes it disappear faster than the main course. We love the bright, earthy flavor highlighted by a sprinkle of sea salt and a grating of lemon zest. It provides a beautiful structural element to your board, with its long, elegant spears acting as dividers between other components.
Ingredients
- 1 large bunch of thick asparagus
- 2 tbsp avocado oil (high smoke point)
- 1 tsp sea salt
- 1/2 tsp red pepper flakes
- Lemon wedges
- Parmesan shavings
How to make it
- Prep the asparagus by snapping off the woody ends. A pro tip: hold a spear at both ends and bend it; it will naturally break at the point where the stalk becomes tender.
- Toss the spears in a bowl with avocado oil, salt, and red pepper flakes. Avocado oil is better than olive oil for high-heat grilling as it won’t smoke or turn bitter.
- Ensure your grill is very hot. Lay the asparagus spears perpendicular to the grill grates so they don’t fall through. Grill for only 3-5 minutes, rolling them occasionally with tongs.
- Look for the visual cues: the tips should be slightly charred and crispy, while the stalks should be bright green and just starting to soften but still have a firm ‘snap’ when bitten.
- Transfer immediately to your board. While still hot, grate fresh parmesan over the top so it slightly melts, and serve with plenty of fresh lemon wedges for a bright finish.
How to bake a rustic strawberry pie that steals the show?
[IMAGE_10]
Why we love this
A rustic strawberry pie, or galette, is the perfect board dessert because it’s meant to look imperfect and ‘homemade.’ We love the way the deep red strawberry juices bubble over the golden, buttery crust, creating a jammy, caramelized edge. The smell of baking butter and berries is the essence of summer. It’s a warm, comforting treat that feels both humble and incredibly special when served with a dollop of cold whipped cream.
Ingredients
- 1 disc of chilled pie dough
- 3 cups fresh strawberries, hulled and halved
- 1/4 cup sugar (plus extra for sprinkling)
- 1 tbsp cornstarch
- 1 tsp vanilla extract
- 1 egg (for egg wash)
- Coarse sanding sugar
How to make it
- Preheat your oven to 400°F (200°C). In a medium bowl, gently toss the strawberries with the sugar, cornstarch, and vanilla. The cornstarch is vital—it thickens the juices so your crust doesn’t get soggy.
- Roll out your chilled pie dough on a piece of parchment paper into a rough 12-inch circle. It doesn’t need to be a perfect circle; the jagged edges add to the rustic charm.
- Mound the strawberry mixture in the center of the dough, leaving a 2-inch border all the way around. Carefully fold the edges of the dough over the berries, pleating it as you go. The center will remain open.
- Brush the crust with a beaten egg (the egg wash) and sprinkle generously with coarse sanding sugar. This gives the crust a professional, sparkly finish and a satisfying crunch.
- Bake for 25-30 minutes until the crust is a deep golden brown and the fruit is bubbling and thick. Let it cool for at least 20 minutes before sliding it onto the center of your dessert board.
Conclusion: The Art of the Simple Board
Creating a viral-worthy food board isn’t about perfection; it’s about the celebration of ingredients and the people you share them with. Whether it’s the rustic fold of a strawberry pie or the vibrant layers of a spring salad, these boards invite interaction and joy. The best part of this ‘simple board’ lifestyle is that it takes the pressure off the host. You aren’t stuck in the kitchen; you’re part of the conversation, grazing alongside your guests. So, grab your largest wooden platter, pick a few of these recipes, and start building your own edible masterpiece tonight. Happy hosting!