
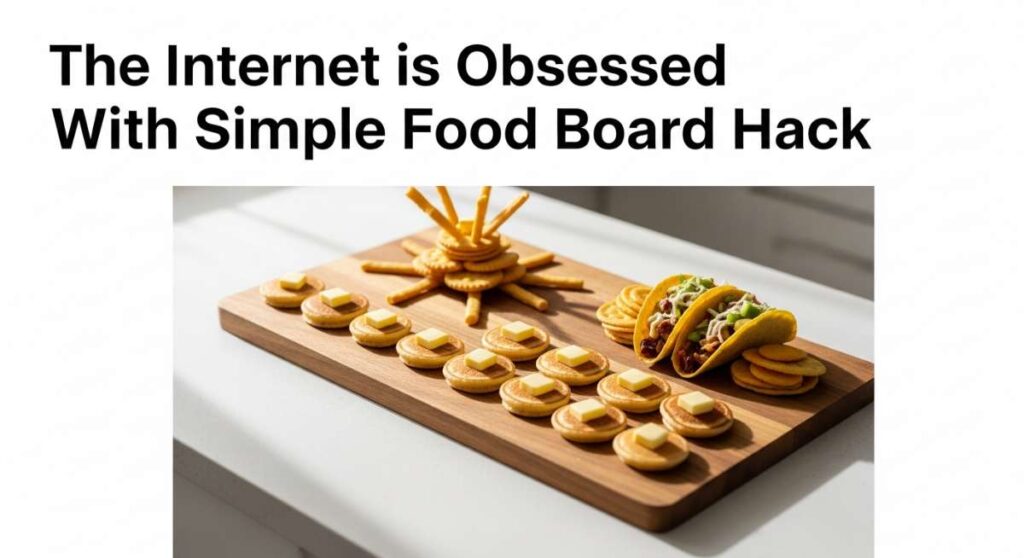
The Internet is Obsessed With This Simple Food Board Hack
Have you ever had one of those mornings where the light hits your kitchen counter just right, but your breakfast feels… well, a little uninspired? I used to find myself standing over the sink, gulping down a lukewarm coffee, wishing for a moment of peace and beauty before the chaos of the day began. We all crave that ‘Pinterest-perfect’ lifestyle, but who actually has the time for a five-course gourmet spread at 7:00 AM?
That is exactly why the internet has completely fallen in love with the ‘Smoothie Component Board.’ It is a game-changer that turns the humble morning beverage into a vibrant, interactive experience. Instead of just blending and dashing, we are reclaiming our mornings by laying out the textures, the colors, and the raw energy of fresh produce. It’s not just about a drink; it’s about the ritual of nourishing yourself in a way that feels like a warm hug for your soul.
Today, I’m breaking down the ultimate guide to mastering this viral hack. From the velvet-smooth textures of a perfect green blend to the art of layering colors like a sunset in a glass, these ten techniques will transform your kitchen into the wellness sanctuary you deserve. Grab your favorite wooden board and let’s get blending!
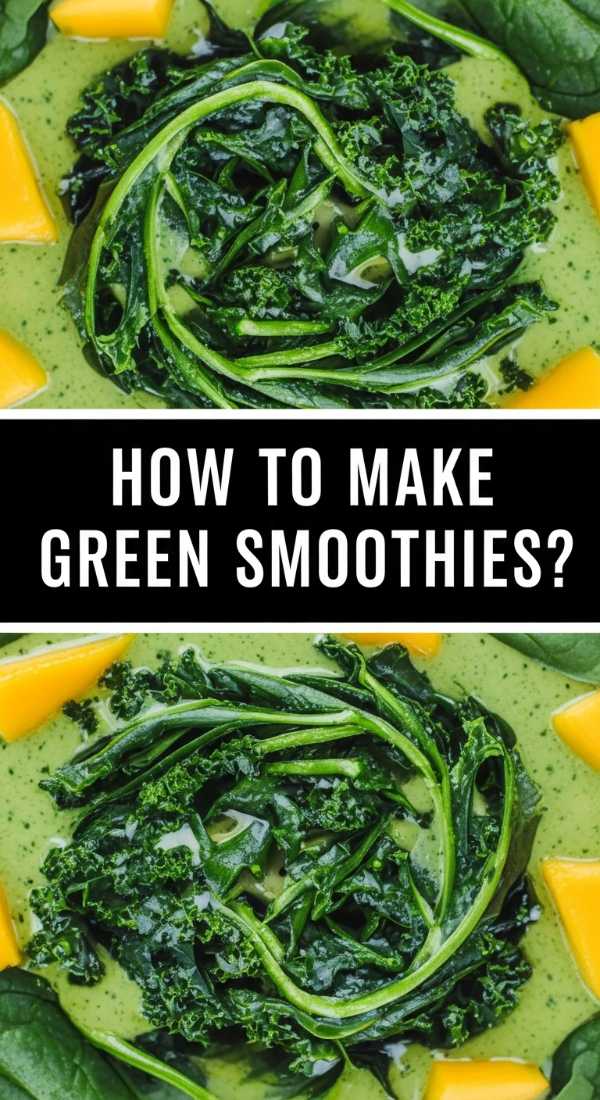
How to make green smoothies?
Why we love this
There is something undeniably revitalizing about the deep, emerald hue of a perfectly crafted green smoothie. When done right, it doesn’t taste like ‘drinking grass’; instead, it offers a crisp, refreshing sweetness that wakes up your palate and your cells simultaneously. The aroma is clean and garden-fresh, while the texture is silkier than a milkshake, leaving you feeling light yet deeply satisfied. It is the ultimate liquid sunshine that makes you feel like you’ve conquered the day before it even starts.
Ingredients
- 2 cups tightly packed baby spinach or kale (stems removed)
- 1 cup unsweetened almond milk or coconut water
- 1 frozen banana, sliced
- 1/2 green apple, chopped
- 1 tablespoon chia seeds
- A squeeze of fresh lemon juice
How to make it
- Start by placing your leafy greens and your liquid base into the blender first. This is the ‘green liquid’ phase; blending these two alone for 30-45 seconds ensures there are no leafy bits left behind. Look for a consistent, dark green liquid with no visible floating specks.
- Add your frozen banana and apple. The frozen fruit acts as the ice, providing a thick, creamy mouthfeel without watering down the flavor.
- Switch your blender to the highest setting for 60 seconds. You are looking for a vortex to form in the center of the jar.
- Add the chia seeds and lemon juice at the very end, pulsing just 5-10 times to incorporate. The lemon juice brightens the chlorophyll and prevents oxidation, keeping the color vibrant for longer.
- Pour into a chilled glass and serve immediately. The ideal consistency should coat the back of a spoon but still be easy to sip through a straw.
How to blend fruit smoothies?

Why we love this
A classic fruit smoothie is like a tropical vacation captured in a glass. The fragrance of sun-ripened mangoes and pineapples fills the air, transporting you to a white-sand beach with every sip. We love the way the natural sugars provide a gentle energy lift, and the creamy, frost-like consistency feels like an indulgent treat. It is the perfect balance of tartness and honey-like sweetness that satisfies every craving while keeping things completely wholesome and natural.
Ingredients
- 1 cup frozen mango chunks
- 1/2 cup fresh pineapple
- 1/2 cup orange juice (freshly squeezed preferred)
- 1/2 cup Greek yogurt
- A drizzle of honey or agave nectar
How to make it
- Layer your ingredients starting with the Greek yogurt at the bottom. This provides a ‘slick’ surface for the blades to catch, preventing the blender from stalling.
- Add the orange juice and then the fresh pineapple. The fresh fruit releases juice quickly, helping the frozen items break down more efficiently.
- Top with the frozen mango. The weight of the frozen fruit helps push everything down toward the blades.
- Start on a low speed to crush the large frozen chunks. Once you hear the motor hum consistently without catching, ramp up to high speed.
- Blend for 45 seconds until the mixture looks like soft-serve ice cream. If it’s too thick, add one tablespoon of juice at a time until it reaches a pourable, yet thick, consistency.
How to mix protein shakes?

Why we love this
Protein shakes are the unsung heroes of muscle recovery and sustained fullness, but the secret is all in the emulsification. When mixed correctly, they lose that chalky reputation and become a rich, velvety elixir that tastes more like a melted chocolate bar than a supplement. We love how the earthy notes of almond butter harmonize with the sweetness of the protein powder, creating a decadent, nutty aroma that makes post-workout refueling something to actually look forward to.
Ingredients
- 1 scoop high-quality vanilla or chocolate protein powder
- 1 1/2 cups cold water or oat milk
- 1 tablespoon almond butter
- 1/2 teaspoon cinnamon
- A pinch of sea salt
How to make it
- To avoid the dreaded ‘powder clump’ at the bottom, pour your liquid into the blender or shaker bottle *before* adding the powder.
- Add the protein powder and the cinnamon. The cinnamon not only adds warmth but acts as a natural stabilizer for the flavor.
- Add the almond butter last. Because it is heavy and sticky, it needs to be suspended in the liquid to prevent it from sticking to the sides of the jar.
- If using a blender, blend on medium speed for 20 seconds. This aerates the shake, making it fluffy and light.
- Check for a ‘frothy’ top. A layer of fine bubbles indicates that the protein and fats from the nut butter have fully emulsified. Serve in a glass over two large ice cubes to keep it crisp.
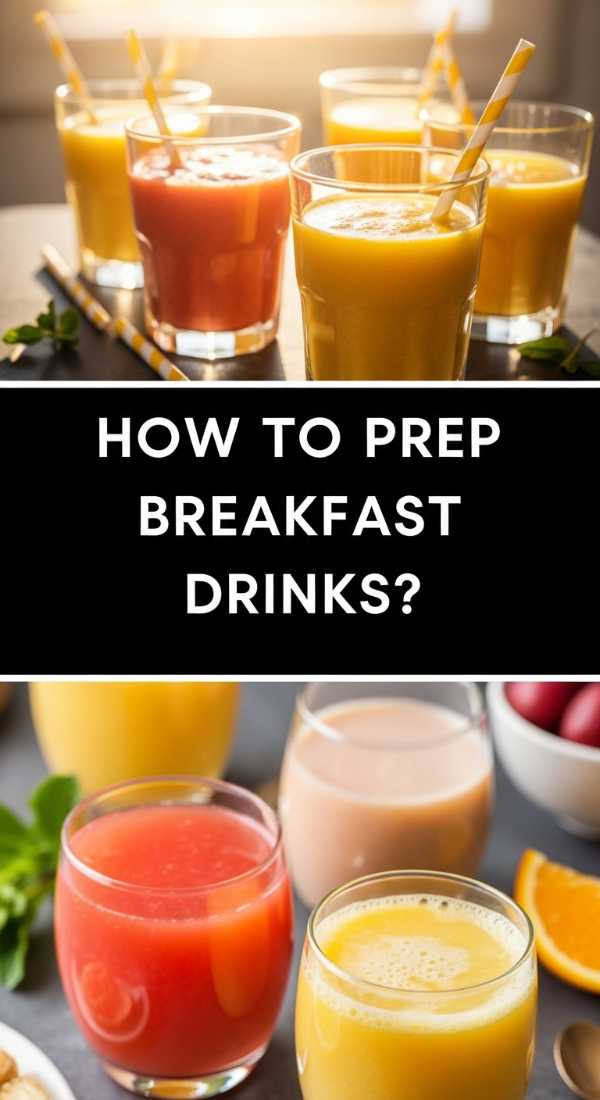
How to prep breakfast drinks?
Why we love this
There is an incredible sense of calm that comes from knowing your morning is already handled. Prepping your breakfast drinks removes the ‘decision fatigue’ from your sunrise routine, allowing you to focus on the quiet moments of the morning. We love the convenience of ‘grab-and-go’ combined with the peace of mind that comes from using whole, real ingredients. It turns a rushed morning into a seamless, high-vibe start where you feel organized, prepared, and totally in control of your health.
Ingredients
- Pre-portioned fruit bags (strawberries, peaches, banana)
- Individual silicone freezer molds for liquid bases
- Hemp hearts or flax seeds in small jars
- Reusable glass bottles with airtight lids
How to make it
- Dedicate 15 minutes on Sunday to ‘kitting’ your drinks. Place your fruit combinations into reusable silicone bags, squeezing out as much air as possible to prevent freezer burn.
- Freeze your liquid bases—like coconut milk or herbal tea—into ice cube trays. This prevents the liquid from leaking in your prep bags and ensures your drink is icy cold when blended.
- When ready to enjoy, dump one bag of fruit and 3-4 liquid cubes into your blender.
- Add your dry boosters (seeds or powders) fresh at the moment of blending to keep them from clumping in the freezer.
- Blend on high for 60 seconds. The pre-portioned nature means the ratio is always perfect, resulting in a consistent texture every single time without the need for measuring.
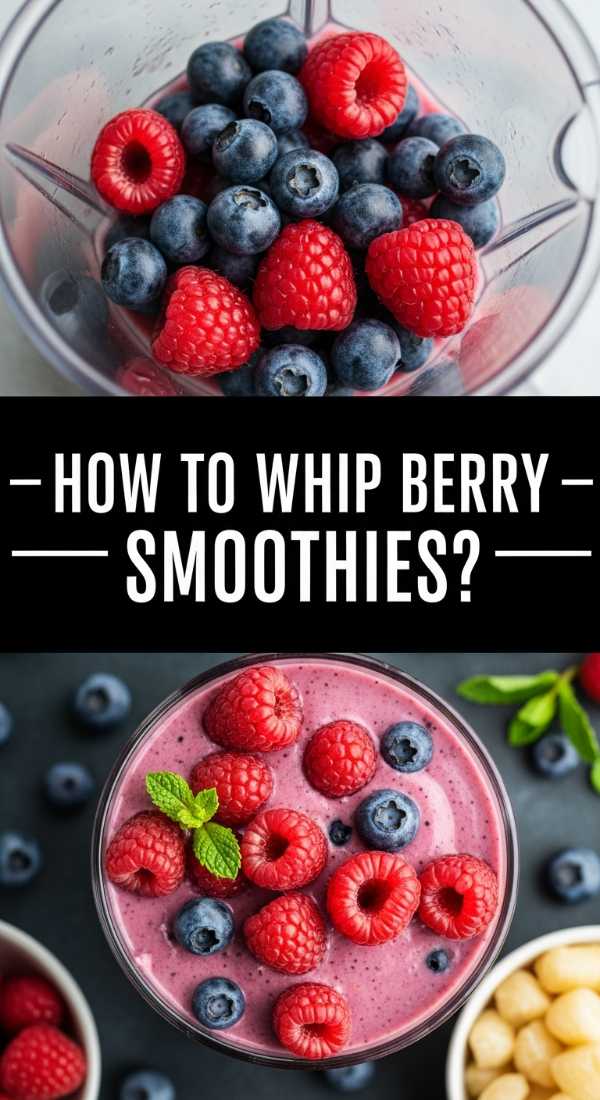
How to whip berry smoothies?
Why we love this
Berry smoothies are a celebration of antioxidants and vibrant, jewel-toned beauty. The scent of crushed raspberries and blueberries is intoxicatingly sweet and slightly floral, evoking memories of summer afternoons. We love the tiny, satisfying pop of berry seeds and the way the deep purple and pink hues make the drink feel like a luxurious potion. It is a tart, zesty, and incredibly refreshing way to brighten your mood and give your skin that coveted natural glow from the inside out.
Ingredients
- 1 cup mixed frozen berries (raspberries, blueberries, blackberries)
- 1/2 cup pomegranate juice
- 1/2 cup plain kefir or yogurt
- A few fresh mint leaves
- 1 teaspoon honey
How to make it
- Place the frozen berries into the blender first. Because berries vary in size, they need the most contact with the blades.
- Pour in the pomegranate juice and kefir. The kefir adds a probiotic punch and a tangy creaminess that balances the tart berries.
- Add the mint leaves. This is the secret hack—the mint oils are released during blending, adding a cooling finish to the drink.
- Pulse 5 times to break down the frozen mass, then blend on high for 50 seconds.
- Look for a deep, uniform color. If you see streaks of white yogurt, blend for another 10 seconds. The result should be thick enough to hold a straw upright but smooth enough to drink without effort.
How to create healthy drinks?
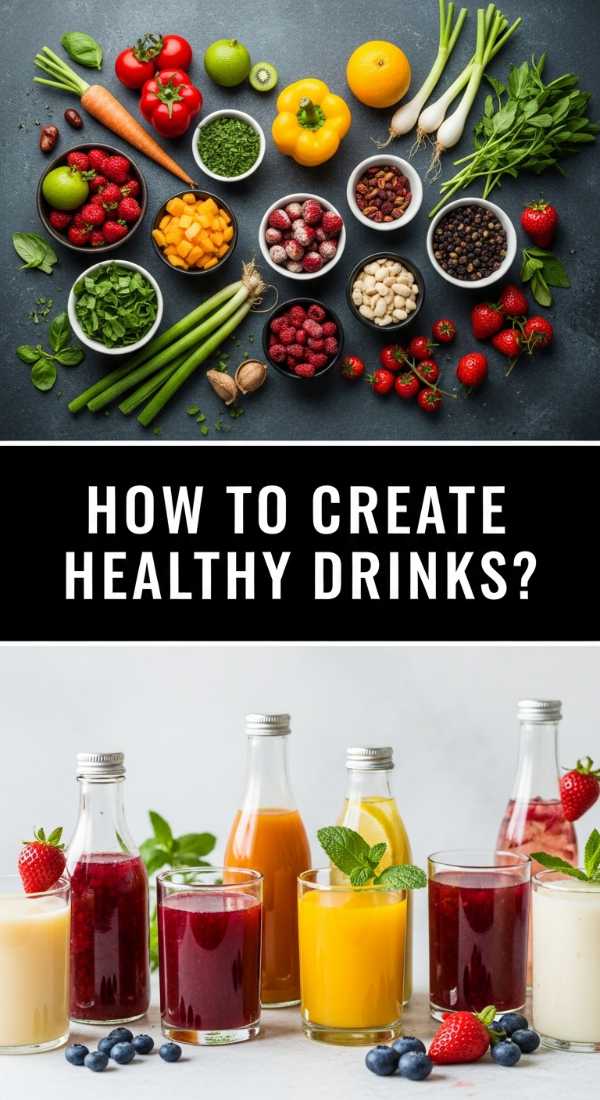
Why we love this
Creating truly healthy drinks is an art form that balances functional nutrition with delicious flavor. We love the way ‘superfood’ additions like turmeric or ginger add a spicy, warming kick that tingles on the tongue and boosts the immune system. These drinks feel purposeful; they are more than just hydration—they are a form of self-care. The earthy, complex flavors make each sip feel grounded and intentional, proving that ‘healthy’ can be the most exciting flavor profile in your repertoire.
Ingredients
- 1 cup coconut water
- 1 teaspoon fresh grated ginger
- 1/2 teaspoon turmeric powder
- A pinch of black pepper (to activate the turmeric)
- 1 teaspoon raw honey
- Juice of half a lime
How to make it
- In a small glass, whisk the turmeric, black pepper, and honey into a thick paste. This ensures the spices don’t float on top of the liquid.
- Add the grated ginger to your blender along with the coconut water and lime juice.
- Add the spice paste to the blender.
- Blend on high for 30 seconds. The high speed is necessary to fully pulverize the fresh ginger fibers so the drink remains smooth and not ‘stringy.’
- Strain the mixture through a fine-mesh sieve if you prefer a clear tonic, or pour as-is into a glass. The visual cue of success is a bright, golden-orange liquid that looks clear and vibrant.
How to layer fruit smoothies?

Why we love this
Layering smoothies is where culinary skill meets fine art. There is something so satisfying about seeing distinct bands of color—from sun-kissed orange to deep magenta—stacked perfectly in a tall glass. We love how the flavors change as you move your straw, offering a multi-sensory journey from creamy banana to tart raspberry. It turns a simple breakfast into a conversation piece that is almost too beautiful to drink, making you feel like a professional barista in your own home.
Ingredients
- Bottom layer: 1/2 frozen banana + 1/4 cup mango + splash of milk
- Middle layer: 1/2 cup frozen strawberries + splash of milk
- Top layer: 1/2 cup frozen blueberries + splash of milk
How to make it
- The key to layering is ‘density.’ Your bottom layer must be the thickest. Blend the banana and mango with the absolute minimum amount of liquid. It should be the consistency of thick Greek yogurt.
- Carefully spoon the first layer into the bottom of a glass, smoothing the top with the back of a spoon. Place the glass in the freezer for 3 minutes to set.
- Rinse the blender and make the second layer (strawberry). Again, keep it very thick.
- To prevent the layers from mixing, do not pour the second layer directly onto the first. Instead, place a large spoon over the first layer and pour the second layer gently over the back of the spoon.
- Repeat for the final blueberry layer. The result will be three sharp, distinct tiers of color. Serve with a long spoon to enjoy each layer individually.
How to chill protein shakes?
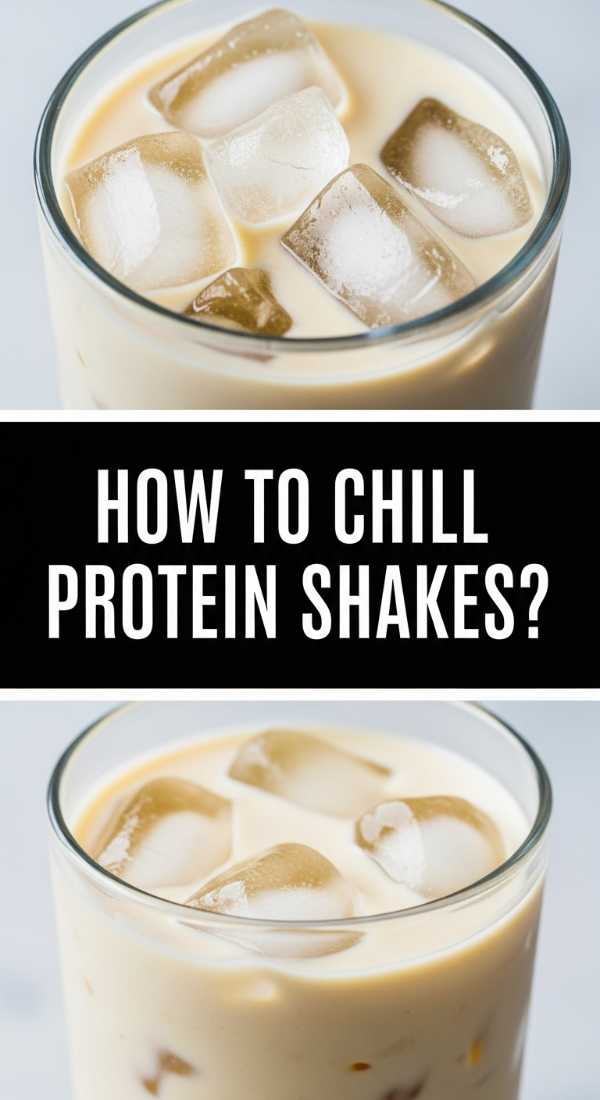
Why we love this
There is a massive difference between a room-temperature shake and one that is crisp, frosty, and bone-chillingly cold. We love the way the cold temperature tightens the texture of the shake, making it feel more like a decadent frappe and less like a supplement. That first icy sip after a grueling workout is pure bliss—it lowers your internal temperature and provides an immediate sense of relief and reward. It turns a functional drink into a truly refreshing experience.
Ingredients
- Your prepared protein shake mixture
- A stainless steel shaker bottle
- Double-walled glass
- Frozen grapes or specialized ‘whiskey stones’
How to make it
- Place your empty glass or shaker bottle in the freezer for at least 20 minutes before use. A ‘frosted’ glass is the first step to maintaining a chill.
- When blending your shake, replace half of your liquid with ice cubes made from the same milk or coffee you are using in the shake. This prevents ‘watering down’ as the ice melts.
- Blend until you no longer hear the ‘clink’ of ice hitting the blades; the shake should look frosty and slightly thickened.
- If using a shaker bottle, add 2-3 stainless steel ‘whiskey stones’ or frozen grapes. These will keep the liquid at 32 degrees Fahrenheit without diluting the flavor profile.
- Keep the shake in a double-walled insulated tumbler if you are taking it to go. This will maintain the icy texture for up to 4 hours, ensuring the last sip is as cold as the first.
How to style smoothie bowls?

Why we love this
Smoothie bowls are the ultimate canvas for creativity, allowing you to play with textures that a straw simply can’t handle. We love the contrast between the frozen, velvet-smooth base and the crunch of toasted granola, the snap of fresh hemp seeds, and the juicy burst of sliced fruit. It’s a meal you eat with a spoon, forcing you to slow down and savor each bite. The aesthetic appeal of a perfectly styled bowl, with toppings arranged in neat, geometric rows, is a form of edible meditation.
Ingredients
- Extra-thick smoothie base (using 50% less liquid than usual)
- Sliced kiwi, strawberries, and bananas
- Granola or toasted coconut flakes
- Drizzle of almond butter
- Chia seeds and edible flowers (optional)
How to make it
- Blend your base until it is so thick you have to use a tamper to push the fruit into the blades. It should pass the ‘spoon test’—a spoon should be able to stand upright in the center of the blender.
- Pour the base into a wide, shallow bowl. Use a spatula to level the surface, creating a smooth, flat ‘canvas.’
- Place your largest toppings first, like granola or fruit slices, in a diagonal line across the center. This creates a focal point for the eye.
- Fill in the smaller spaces with ‘texture’ toppings like chia seeds or coconut flakes. Grouping them in small clusters looks more professional than scattering them randomly.
- Finish with a ‘swizzle.’ Dip a toothpick into almond butter and drag it through the surface of the smoothie base to create delicate swirls. Serve immediately before the base begins to soften.
How to juice fresh fruits?
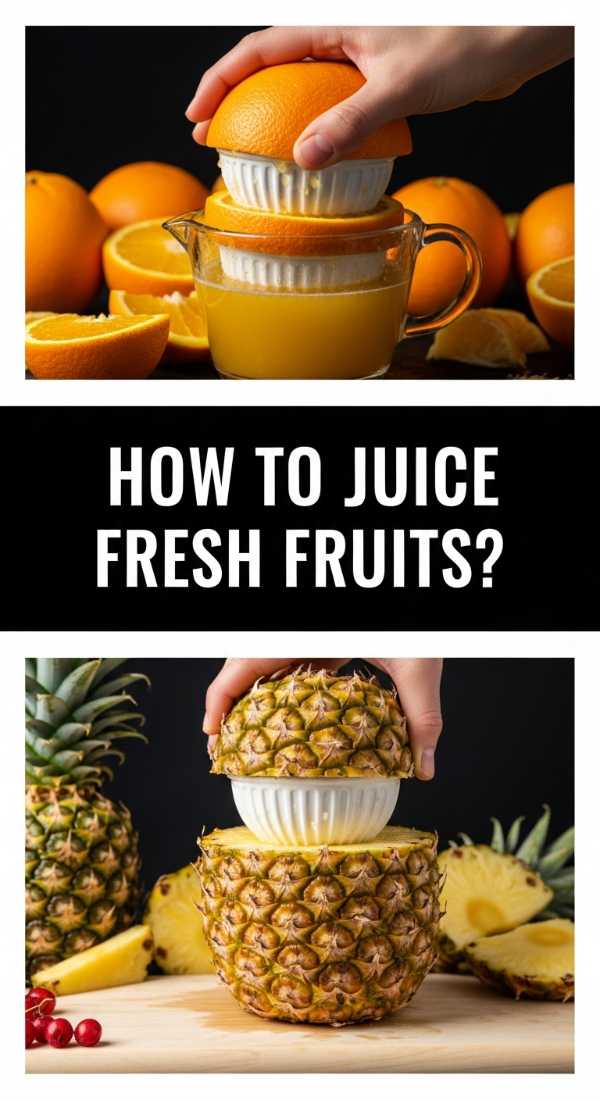
Why we love this
Freshly pressed juice is the purest expression of fruit, stripped of fiber to deliver an immediate, vibrant burst of vitamins. We love the clarity of the liquid—it looks like liquid stained glass in the morning light. The aroma of cold-pressed oranges or crisp apples is incredibly potent and uplifting. It’s a light, clean way to hydrate that feels sophisticated and revitalizing, offering a sharp, bright flavor profile that wakes up your senses far better than a cup of coffee ever could.
Ingredients
- 4 large carrots
- 2 green apples
- 1 inch fresh ginger root
- 1/2 lemon (peeled)
How to make it
- Wash all produce thoroughly and cut them into sizes that fit your juicer’s chute. Keep the skins on the apples and carrots for maximum nutrient extraction, but peel the lemon to avoid the bitter oils in the pith.
- Turn your juicer on and start with the most ‘fibrous’ item first—the ginger. This ensures the ginger juice is washed through by the more watery fruits later.
- Follow with the apples and then the carrots. The carrots provide the bulk of the liquid and the vibrant orange color.
- Watch the pulp output. If the pulp feels wet, your juicer isn’t being efficient; feed the pulp back through the machine one more time to extract every last drop of ‘liquid gold.’
- Stir the juice with a glass rod to incorporate the layers. Fresh juice separates quickly because it contains no emulsifiers. Drink within 15 minutes of juicing to prevent the loss of enzymes due to light and air exposure.
Conclusion: Your New Morning Ritual
Mastering the art of the ‘Food Board’ through these smoothie and drink techniques is about more than just nutrition—it’s about the joy of creation. When you take the time to layer your colors, chill your glasses, and choose high-quality ingredients, you are sending a message to yourself that your well-being is a priority. I hope these tips inspire you to turn your kitchen into a colorful laboratory of flavor. Don’t forget to share your beautiful creations on social media; after all, the world could always use a little more color and health in its feed!