
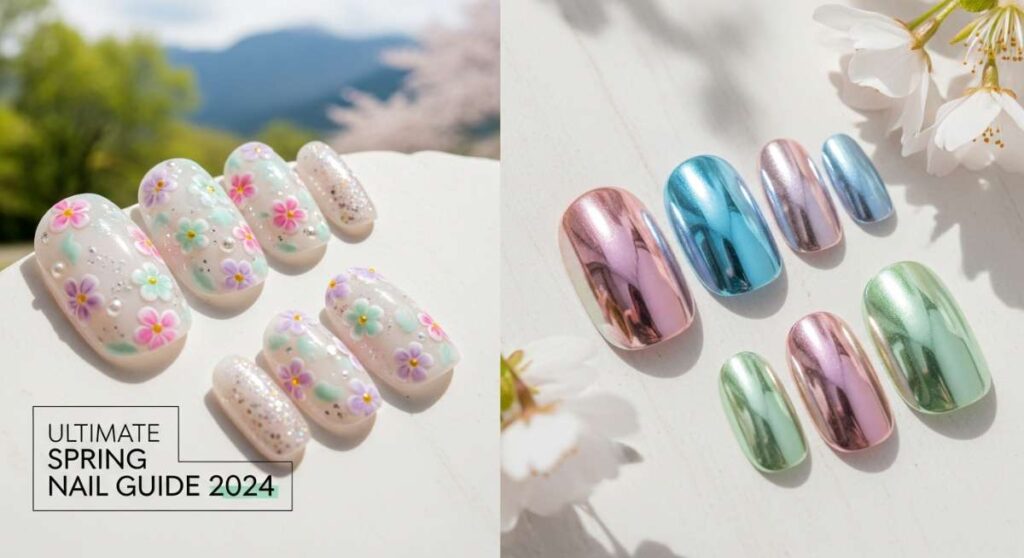
The 2024 Spring Nail Edit: From Floral Accents to Chrome Pastels
Hello, my loves! Can you feel it? That soft, golden light filtering through the window, the first brave tulips peeking through the soil, and that undeniable urge to shed the heavy coats and dark manicures of winter. Spring is finally whispering to us, and there is something so deeply restorative about aligning our beauty rituals with the blooming world outside.
For me, a fresh manicure is like a cloud-soft embrace for the soul. It’s that tiny sparkle you see while typing, or the pop of color that makes your morning coffee feel a little more like a celebration. This season, we are leaning into everything light, airy, and effortlessly chic. We’re talking about the ‘Ultimate Spring Nail Guide 2024,’ curated just for you, my sweet friends.
4 simple steps for perfect April nails
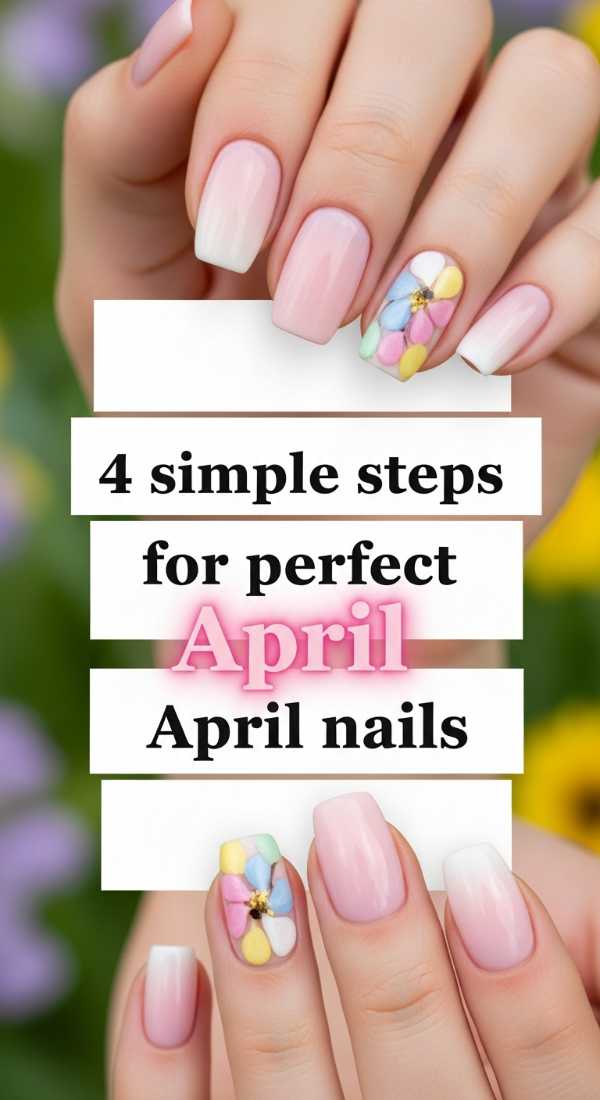
Why to love this Design:
April is all about that fresh start vibe. This design focuses on a clean, ‘clean girl’ aesthetic with a hint of rainy-day dew. It’s the perfect foundation for those who want their nails to look naturally healthy and polished without being over-the-top.
Essential Elements:
- Sheer peach base coat
- High-shine glass top coat
- Cuticle oil (Rose scented)
- Fine-grit glass nail file
How to Prepare:
- Gently shape your nails into a soft oval to mimic natural growth.
- Buff the surface lightly to ensure a smooth, ridge-free canvas.
- Apply one thin layer of sheer peach to neutralize any discoloration.
- Seal with a glass-finish top coat for that ‘wet look’ shine.
Budget Range
- Essie Mademoiselle ($10)
- Olive & June Cuticle Serum ($15)
- Holler and Glow Glass File ($5)
Apply spring chrome nails in 3 easy minutes
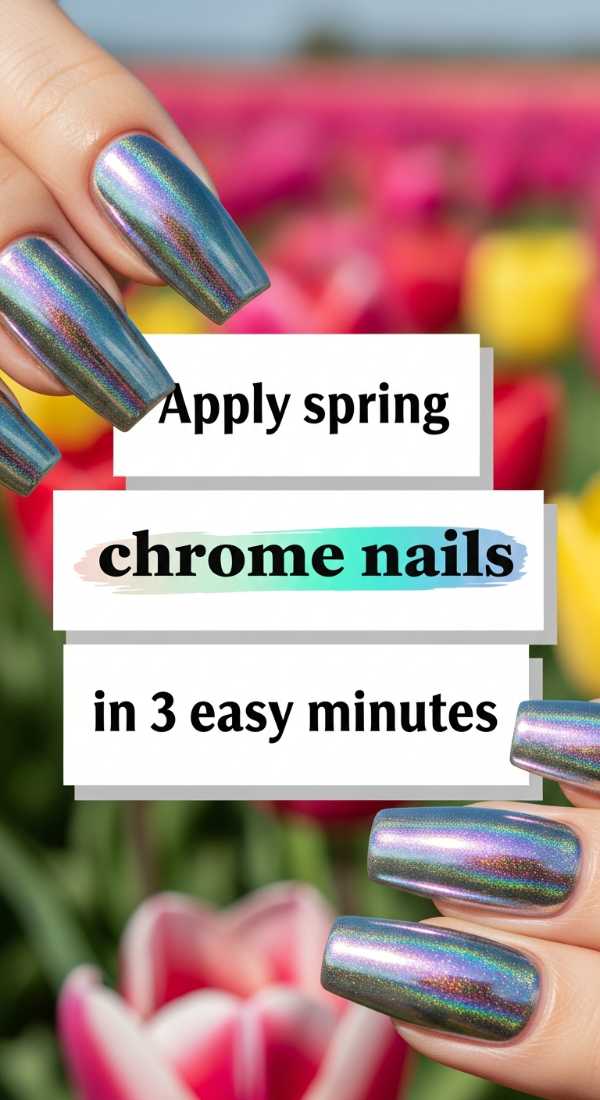
Why to love this Design:
Chrome isn’t just for the holidays anymore, loves! This spring, we are doing ‘Glazed Donut’s’ younger, colorful sister. It’s fast, it’s magical, and it catches the sunlight in the most ethereal way during your outdoor brunches.
Essential Elements:
- Pearl or Iridescent chrome powder
- No-wipe gel top coat
- Silicone applicator tool
How to Prepare:
- Apply your favorite pastel base color and cure (or let dry until tacky).
- Use the silicone tool to rub the chrome powder firmly across the nail surface.
- Sweep away excess dust and seal immediately with a top coat.
Budget Range
- Born Pretty Pearl Powder ($7)
- Beetles No Wipe Top Coat ($8)
- Zoya Naked Manicure Base ($12)
Create cute spring nails fruit art in 5 steps
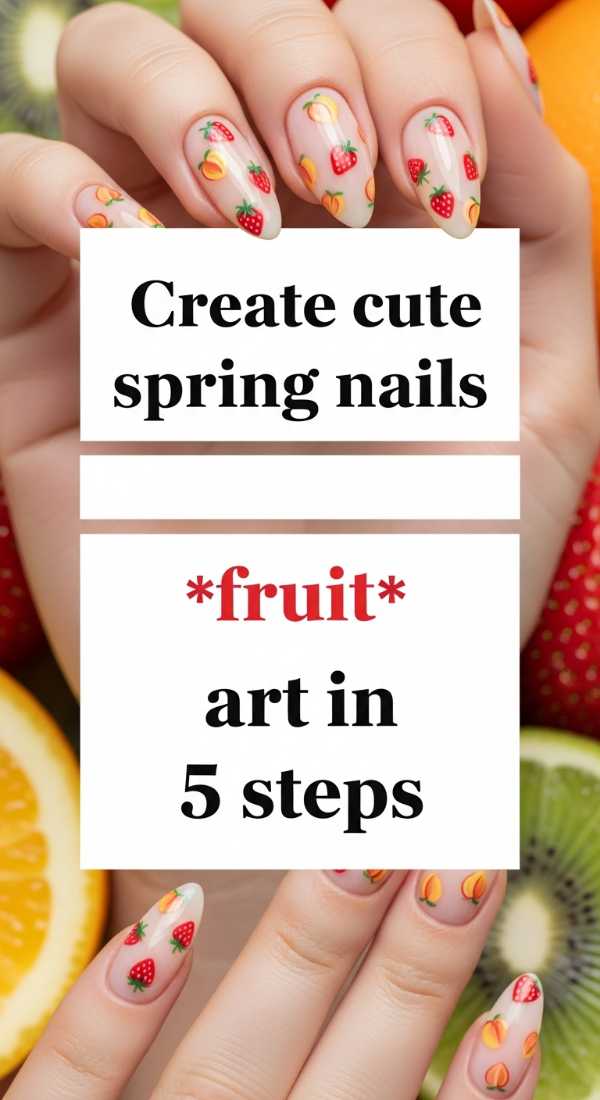
Why to love this Design:
Is there anything more adorable than tiny strawberries or cherries on your fingertips? This design brings a playful, picnic-ready energy to your look. It’s whimsical, feminine, and guaranteed to start conversations.
Essential Elements:
- Dotting tool
- Bright red and leaf green polish
- Creamy white base
How to Prepare:
- Paint two coats of creamy white as your backdrop.
- Use the large end of a dotting tool to place two red dots side-by-side for fruit.
- Use a toothpick or fine brush to draw a tiny green ‘V’ for the stem.
- Add microscopic white dots for ‘seeds’ or highlights.
- Finish with a plump top coat to protect the art.
Budget Range
- Sally Hansen Insta-Dri in ‘Red-io Active’ ($6)
- Nail Art Dotting Tool Set ($5)
- OPI Alpine Snow ($11)
Master yellow blueberry nails with 6 quick tricks
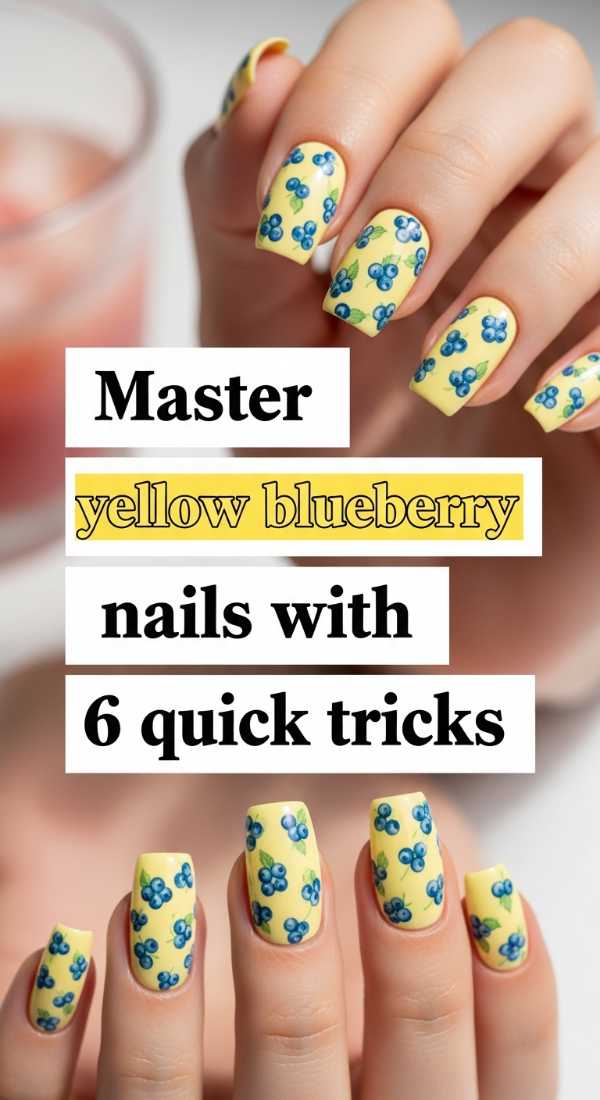
Why to love this Design:
The ‘Blueberry Milk’ trend gets a sunny update! Mixing soft buttery yellows with tiny blue accents creates a striking contrast that feels like a spring meadow. It’s unexpected and so incredibly fresh.
Essential Elements:
- Pastel lemon polish
- Deep cornflower blue polish
- Detailing liner brush
How to Prepare:
- Apply two coats of the lemon yellow and let dry completely.
- Place a small drop of blue on a piece of foil.
- Dip your liner brush and create three tiny dots in a cluster.
- Keep the placement asymmetrical for a modern feel.
- Use a matte top coat for a ‘velvet’ fruit effect.
- Moisturize your hands with a lemon-scented balm to match.
Budget Range
- Lights Lacquer ‘Paper Snow’ ($13)
- Orly ‘Lemonade’ ($15)
- Butter London Matte Finisher ($18)
Get vibrant teal spring nails in 4 tutorial stages
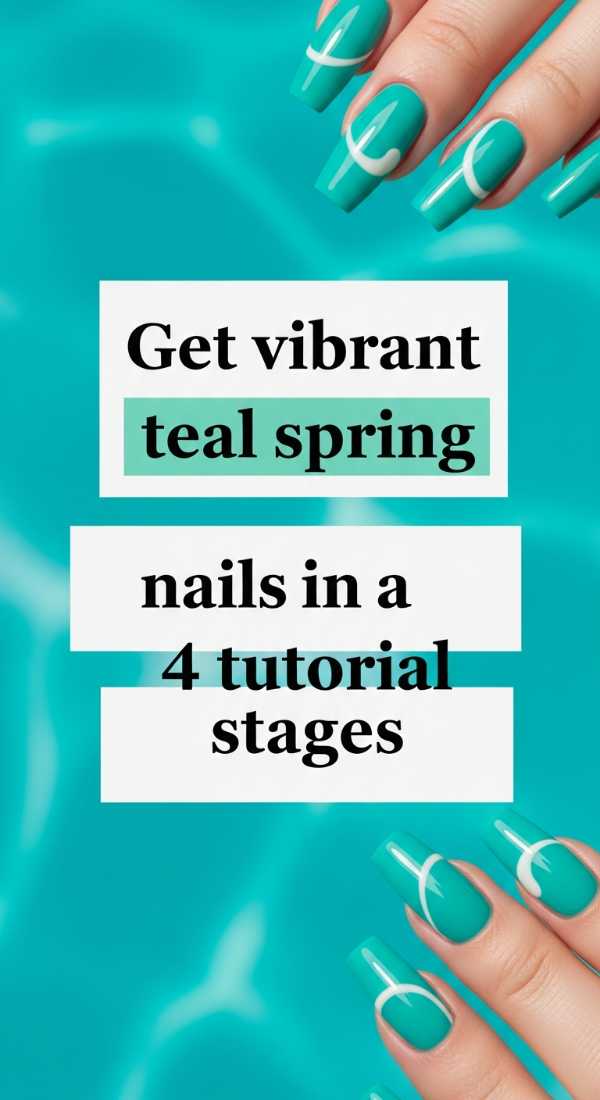
Why to love this Design:
Teal is the bridge between the cool winter and the warm summer. It’s sophisticated, grounding, and looks stunning on every skin tone. This is for my loves who want a bit of depth while still feeling seasonal.
Essential Elements:
- Creamy teal or turquoise polish
- Gold foil flakes
- Tweezers
How to Prepare:
- Apply a base coat to prevent staining (teal is pigment-heavy!).
- Apply two even coats of your vibrant teal.
- While slightly tacky, use tweezers to place tiny gold foil flakes near the cuticle.
- Seal with a thick top coat to smooth out the foil edges.
Budget Range
- Essie ‘In the Cab-ana’ ($10)
- Gold Leaf Flakes for Nails ($6)
- Seche Vite Dry Fast Top Coat ($9)
Achieve natural spring nails in 3 daily habits
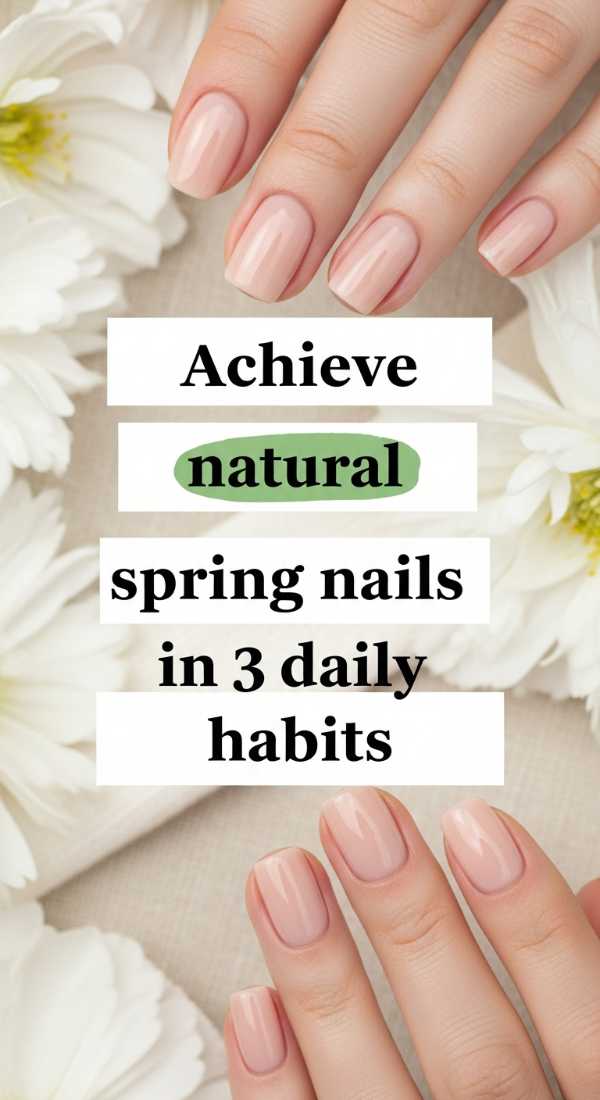
Why to love this Design:
Sometimes the most beautiful design is just health itself. This ‘naked’ nail look celebrates your natural strength. It’s about that quiet luxury and the softness of a well-cared-for hand.
Essential Elements:
- Strengthening base treatment
- High-quality hand cream
- Nail bed massager
How to Prepare:
- Massage vitamin E oil into your cuticles every single night before bed.
- Apply a strengthening treatment once a week, removing the old layer first.
- Stay hydrated—your nails reflect your inner glow!
Budget Range
- CeraVe Therapeutic Hand Cream ($12)
- Burt’s Bees Lemon Butter Cuticle Cream ($6)
- ISDIN Si-Nails Strengthener ($30)
Upgrade your spring chrome nails with 2 secret layers
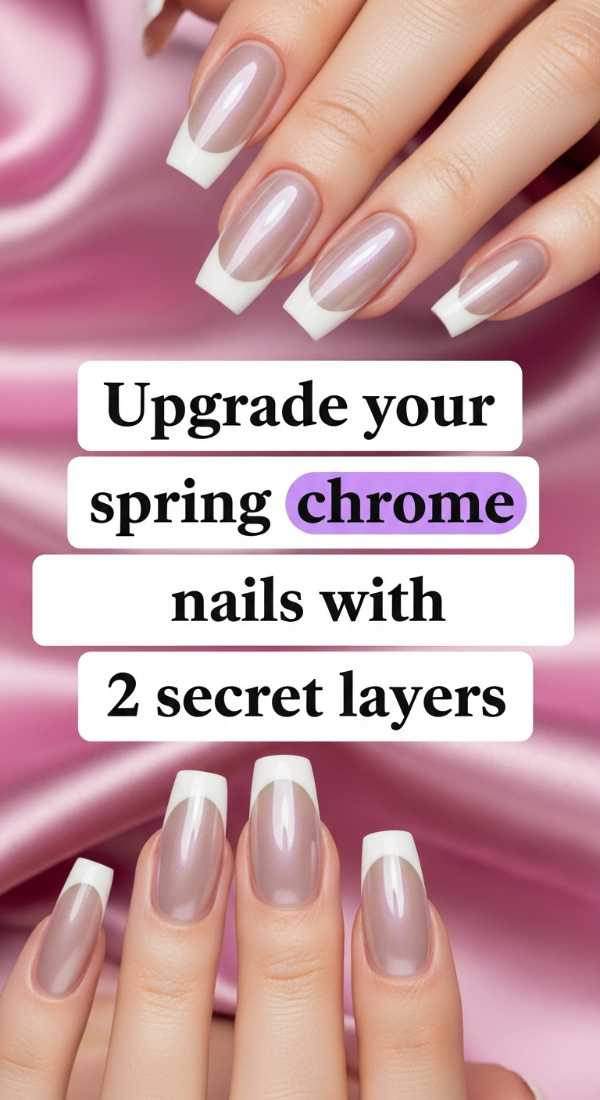
Why to love this Design:
Want that ‘pro-salon’ multidimensional look at home? The secret is layering. By adding a sheer tint over chrome, you create a jelly-opal effect that looks like it cost hundreds of dollars.
Essential Elements:
- Silver chrome base
- Sheer ‘jelly’ pink or lilac polish
How to Prepare:
- Apply and buff your chrome powder as usual.
- Apply one thin layer of sheer ‘jelly’ polish directly over the chrome before the final top coat.
Budget Range
- Cirque Colors Jelly Polish ($14)
- Ardell Nail Addict Chrome Kit ($12)
Design teal spring nails using 5 minimalist patterns
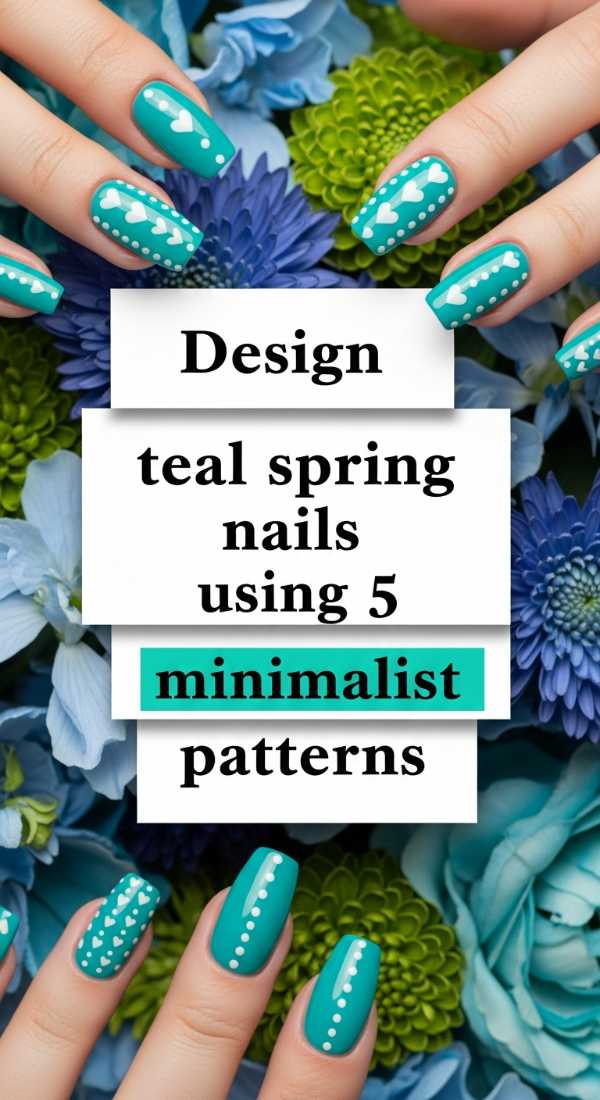
Why to love this Design:
If full color feels too heavy, minimalist teal patterns are your best friend. It’s negative space art that feels airy and editorial—perfect for my modern muses.
Essential Elements:
- Striper tape
- Teal polish
- Clear base
How to Prepare:
- Apply a clear base coat.
- Place striper tape diagonally across the nail.
- Paint teal on only one side of the tape.
- Remove tape immediately while wet for a crisp line.
- Add a single dot of teal at the base of the ’empty’ side.
Budget Range
- Nail Art Striper Tape ($4)
- Revlon Enamel in ‘Ultra Violet’ ($8)
- OPI ‘Tealing Festive’ ($11)
Style your April nails for 7 different occasions
Why to love this Design:
April is busy! From Easter brunch to spring weddings and rainy coffee dates, you need a look that transitions. This multi-tonal pastel palette ensures you match every bouquet and every outfit.
Essential Elements:
- A set of 5 coordinating pastel polishes
How to Prepare:
- Assign one color to each finger (Skittle mani style).
- Keep the finish consistent (all matte or all glossy).
- Match your thumb color to your favorite spring handbag.
Budget Range
- Olive & June Pastel Set ($40)
- Barry M Gelly Hi Shine Set ($25)
Prep your natural spring nails in 8 easy minutes
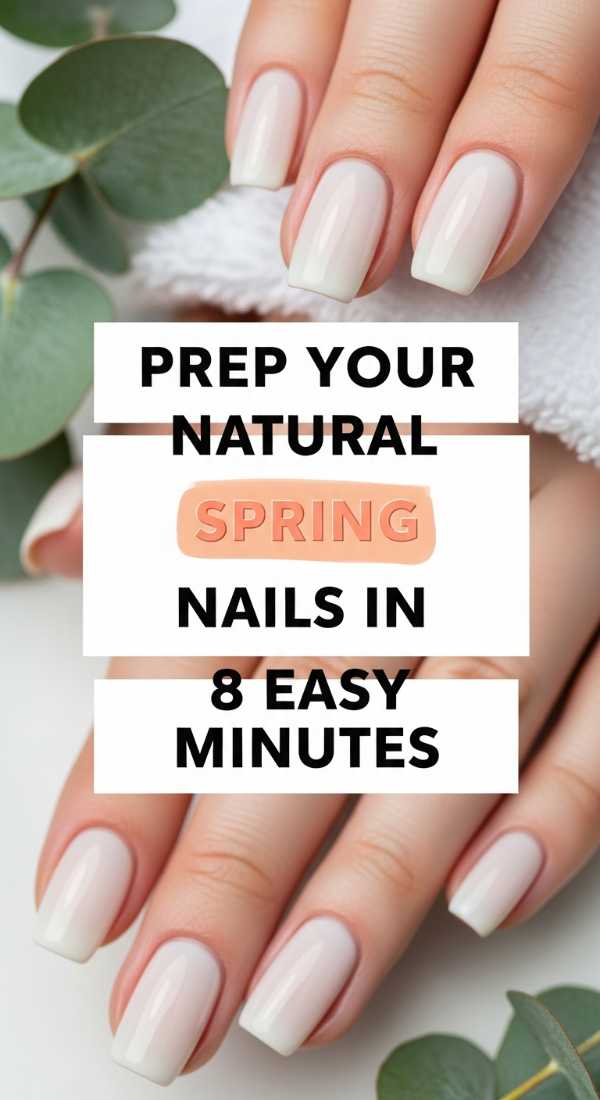
Why to love this Design:
We are all busy bees, aren’t we? This 8-minute routine is the ‘self-care snack’ you need. It’s the ritual of preparation that makes the final color look so much more expensive.
Essential Elements:
- Cuticle remover gel
- Orange wood stick
- Buffer block
How to Prepare:
- Apply remover gel for 30 seconds.
- Gently push back cuticles with the wood stick.
- Quickly buff away any dead skin cells.
- Rinse, dry, and swipe with alcohol to prep for polish.
Budget Range
- Blue Cross Cuticle Remover ($7)
- Flowery Orange Wood Sticks ($4)
- Deborah Lippmann ‘The Stripper’ ($19)
Embrace the Bloom
As the season unfolds, let your fingertips reflect the beauty of the world waking up. Whether you choose a bold teal or a soft, natural glow, remember that these moments of self-care are for you, my loves. You deserve to feel polished, pampered, and ready to step into the sun. Happy painting!