
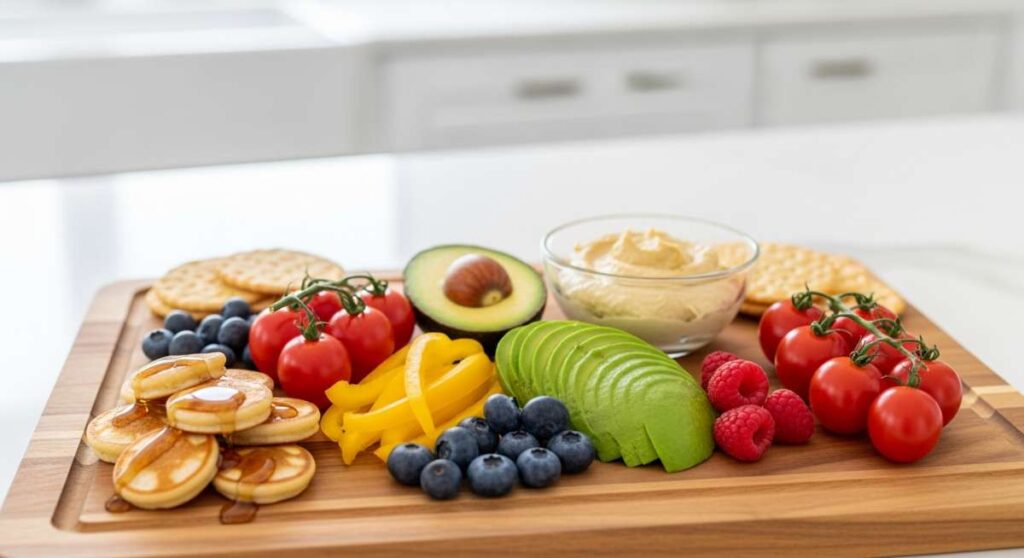
How to Create a Viral Food Board in Under 10 Minutes
We’ve all been there—the doorbell rings, or the late-night cravings hit, and suddenly you need a spread that looks like it belongs on a professional food stylist’s feed, but you only have a few minutes to spare. There is something truly magical about a beautifully curated snack board; it’s more than just food, it’s an invitation to slow down, graze, and enjoy the textures and flavors that make life sweet (and salty). I’ve spent countless afternoons perfecting the art of the ‘Viral Simple Food Board,’ and I’ve realized that the secret isn’t hours of prep—it’s about choosing vibrant, high-impact snacks that come together with ease.
In this guide, I’m sharing my favorite quick-hit recipes that turn a plain wooden plank into a masterpiece. Whether you’re hosting your best friends for wine night or just want to treat yourself to a gourmet solo lunch, these bites are designed to impress without the stress. We are talking about the crunch of perfectly roasted chickpeas, the velvety smoothness of homemade hummus, and the sweet, chewy indulgence of stuffed dates. Let’s dive into how you can assemble the ultimate board that will have everyone reaching for their cameras before they reach for a snack.
How to make protein balls?

Why we love this
These little gems are the ultimate powerhouse snack, offering a dense, fudge-like texture that feels like a decadent truffle but fuels you like a meal. As you bite into one, you’re met with the deep, nutty aroma of roasted almond butter combined with the subtle sweetness of pure maple syrup and a hint of vanilla. The tiny bursts of dark chocolate chips provide a satisfying snap against the soft, chewy base, making them an addictive addition to any board that needs a hit of clean energy and satisfying sweetness.
Ingredients
- 1 cup rolled oats
- 2/3 cup creamy nut butter (peanut or almond)
- 1/2 cup ground flaxseed
- 1/2 cup semi-sweet chocolate chips
- 1/3 cup honey or maple syrup
- 1 teaspoon vanilla extract
How to make it
- Begin by placing your rolled oats, ground flaxseed, and chocolate chips into a large mixing bowl, stirring them together until the dry components are evenly distributed.
- In a separate small microwave-safe bowl, slightly warm your nut butter and honey for about 15 seconds; this makes the mixture more fluid and easier to incorporate into the oats without over-working the dough.
- Pour the liquid mixture and the vanilla extract over the dry ingredients. Using a sturdy silicone spatula, fold the mixture together using a pressing motion until everything is thoroughly moistened and the dough holds together when squeezed.
- Place the bowl in the refrigerator for at least 30 minutes. This is a critical step because it allows the oats to hydrate and the fats to firm up, ensuring the balls don’t fall apart when rolled.
- Once chilled, use a small cookie scoop or a tablespoon to portion out the dough. Roll each portion between your palms using firm, even pressure to create smooth, round spheres about 1 inch in diameter. Store them in an airtight container in the fridge until you are ready to plate your board.
How to bake kale chips?
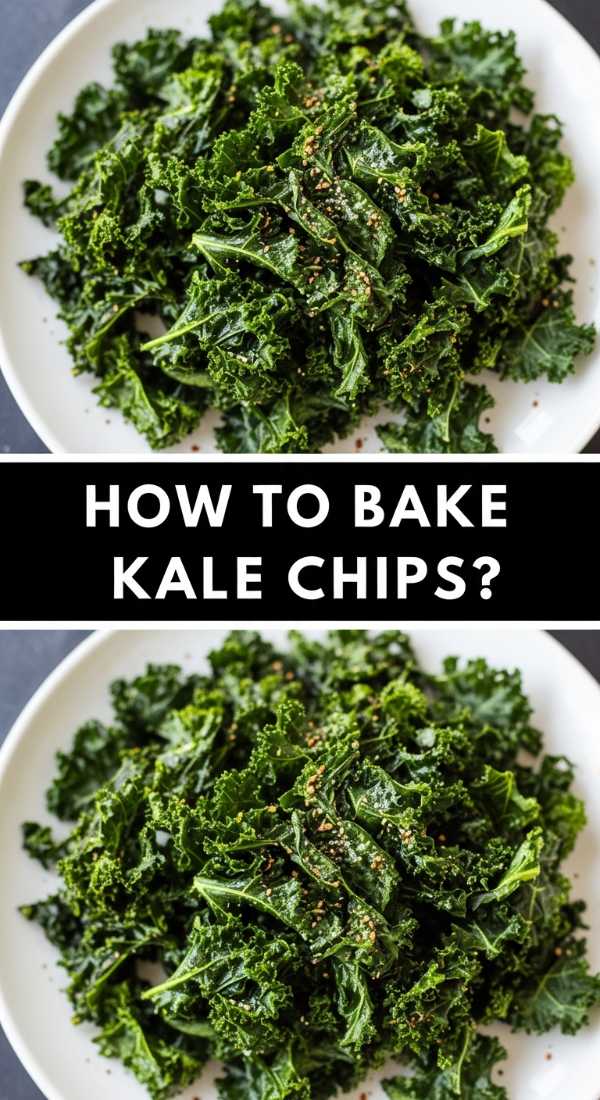
Why we love this
Kale chips are the ethereal, crispy wonder of the vegetable world, offering a light-as-air crunch that dissolves on the tongue with a salty, earthy finish. When baked correctly, they lose all their bitterness, transforming into delicate, translucent green shards that carry seasonings perfectly. The aroma of toasted greens filling your kitchen is incredibly comforting, and the satisfying ‘shatter’ of a perfectly dried leaf is a sensory experience that makes healthy snacking feel like a genuine indulgence.
Ingredients
- 1 large bunch of curly kale
- 1 tablespoon extra-virgin olive oil
- 1/2 teaspoon sea salt
- Optional: 1 tablespoon nutritional yeast for a ‘cheesy’ flavor
How to make it
- Preheat your oven to 300°F (150°C). A lower temperature is vital here; if the oven is too hot, the delicate kale leaves will burn and turn bitter before they actually dehydrate into chips.
- Wash the kale thoroughly and, most importantly, dry it completely. Use a salad spinner and then pat the leaves with a kitchen towel. Any remaining moisture will steam the kale instead of crisping it, resulting in soggy leaves.
- Remove the tough inner ribs by tearing the leaves into bite-sized pieces. Place the dry leaves in a large bowl and drizzle with olive oil.
- Massage the oil into the kale with your hands for at least 2 minutes. You want every nook and cranny of the curly leaves to be lightly coated in oil, which helps the heat distribute evenly. Sprinkle with salt and nutritional yeast if using.
- Spread the leaves in a single layer on a parchment-lined baking sheet, ensuring they do not overlap. Bake for 10 to 15 minutes, rotating the pan halfway through. They are done when they are rigid to the touch but still green; remove them immediately and let them cool on the pan for 5 minutes to reach peak crispness.
How to roast crispy chickpeas?

Why we love this
Roasted chickpeas are the ultimate ‘craveable’ snack, offering a rustic, nutty flavor profile and a crunch that rivals any store-bought corn nut. As they roast, the skins become incredibly brittle while the insides stay slightly airy, creating a multidimensional texture that is simply addictive. Tossed in smoked paprika and sea salt, they release a warm, savory aroma that anchors the more delicate items on your food board, providing a protein-packed punch that keeps everyone coming back for just one more handful.
Ingredients
- 1 can (15 oz) chickpeas (garbanzo beans)
- 1 tablespoon olive oil
- 1/2 teaspoon sea salt
- 1/2 teaspoon smoked paprika
- 1/4 teaspoon garlic powder
How to make it
- Drain the chickpeas into a colander and rinse them thoroughly under cold water to remove the canning liquid.
- Spread the chickpeas onto a clean kitchen towel and roll them around vigorously. You must get them as dry as possible. If any loose skins come off during this process, discard them; removing the skins actually helps the chickpeas get crispier.
- Preheat your oven to 400°F (200°C). Place the dried chickpeas on a bare baking sheet (no parchment paper helps with browning) and roast them for 15 minutes WITHOUT oil. This initial ‘dry roast’ evaporates any lingering internal moisture.
- Remove the pan from the oven, drizzle the olive oil over the chickpeas, and shake the pan to coat. Sprinkle with salt, paprika, and garlic powder, then toss again.
- Return to the oven for another 15-20 minutes. Listen for a ‘rattling’ sound when you shake the pan—that’s the sound of doneness. Let them cool completely in the turned-off oven with the door slightly ajar for maximum crunch.
How to make apple nachos?
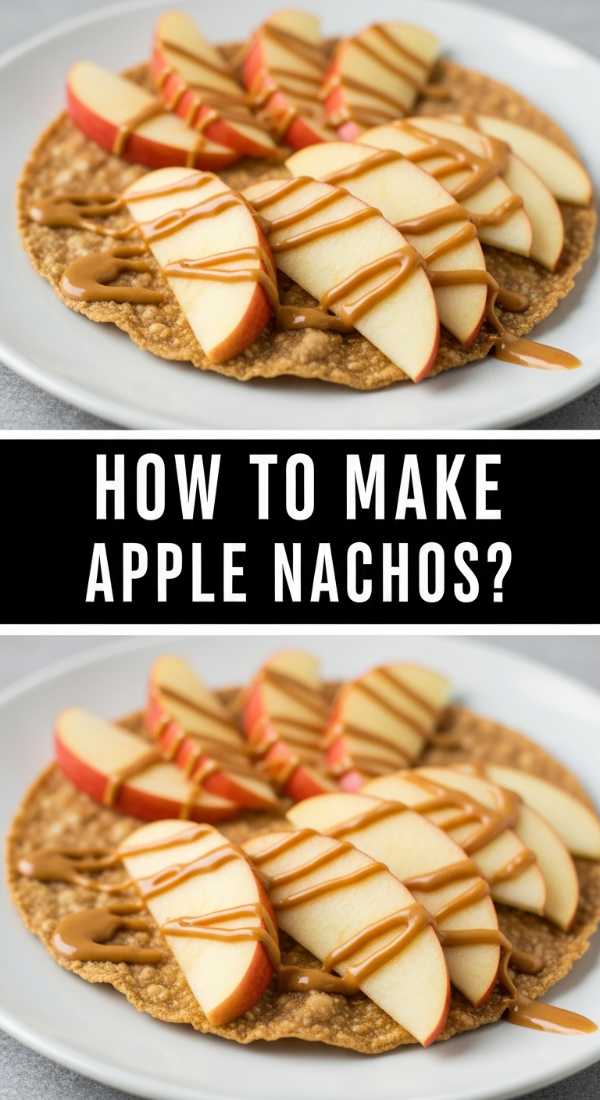
Why we love this
Apple nachos are a whimsical, vibrant celebration of contrasting temperatures and textures. Imagine the cold, sharp snap of a juicy Honeycrisp apple slice acting as a vessel for a warm, velvet-smooth drizzle of almond butter and the gooey sweetness of honey. Topped with crunchy nuts and tiny bursts of chocolate, it’s a dish that feels celebratory and fresh. The bright acidity of the fruit cuts through the richness of the toppings, making every bite a perfectly balanced explosion of flavor that looks stunningly messy in the best way possible.
Ingredients
- 2 large apples (Granny Smith or Honeycrisp)
- 1/4 cup nut butter
- 2 tablespoons honey or caramel sauce
- 1/4 cup chopped walnuts or pecans
- 1 tablespoon mini chocolate chips
- 1/2 lemon (for juice)
How to make it
- Wash your apples and core them. Slice them into even wedges, about 1/4 inch thick. To prevent browning while you prep the rest of the board, toss the slices in a bowl with cold water and the juice of half a lemon, then pat them dry right before plating.
- Arrange the apple slices on your board or a flat platter in a circular or shingled pattern, slightly overlapping each other to create a sturdy base for the toppings.
- If your nut butter is thick, warm it in the microwave for 20 seconds until it reaches a pourable consistency. Using a spoon, drizzle the nut butter in a zig-zag motion across the entire bed of apples.
- Follow with a drizzle of honey or warmed caramel. The key is high, steady movements to get those thin, ‘pro-style’ lines.
- Immediately sprinkle the chopped nuts and chocolate chips over the top so they stick to the drizzled sauces. Serve immediately to ensure the apples stay crisp and the drizzles stay melty.
How to cook crispy edamame?
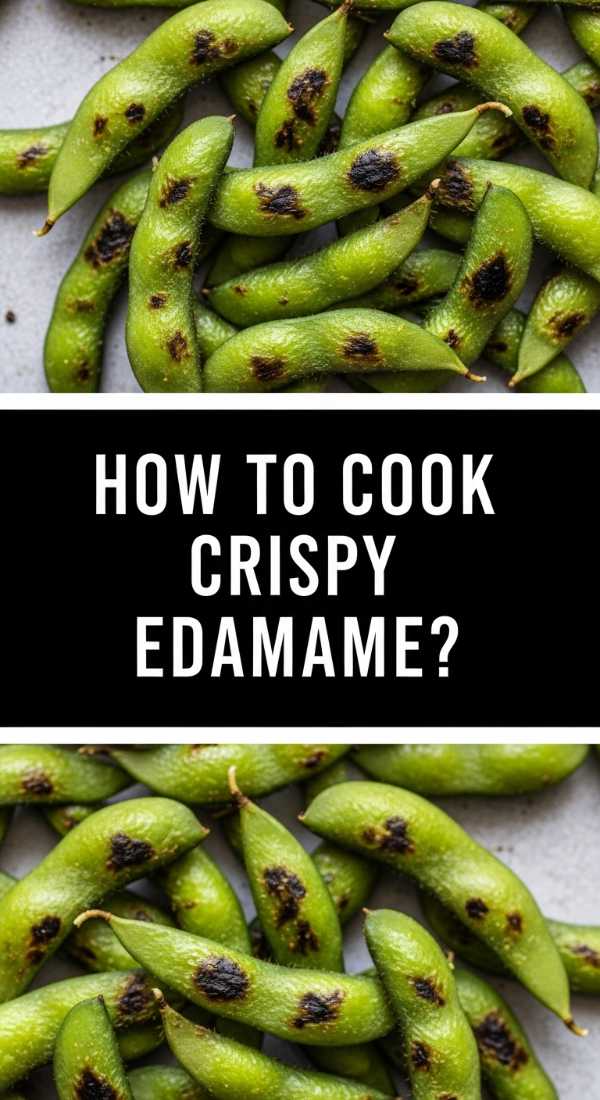
Why we love this
Crispy edamame is the sophisticated, high-protein snack you didn’t know you were missing. When roasted, these bright green beans develop a toasted, almost buttery exterior that contrasts beautifully with their firm, meaty interior. They carry sea salt and black pepper exceptionally well, and their vibrant color adds a pop of ‘freshness’ to your board. They provide a satisfying, rhythmic snacking experience that feels light but is incredibly satiating, making them the perfect bridge between fresh vegetables and heavier nuts.
Ingredients
- 12 oz frozen shelled edamame, thawed
- 1 tablespoon olive oil
- 1/4 cup grated Parmesan cheese (optional)
- 1/2 teaspoon sea salt
- 1/4 teaspoon black pepper
How to make it
- Preheat your oven to 400°F (200°C). Thaw your edamame by running them under warm water, then spread them out on a paper towel and pat them until they are completely dry. Moisture is the enemy of a crisp bean!
- In a medium bowl, toss the dry edamame with olive oil, salt, and pepper. If you want an extra crunch, add the grated Parmesan cheese at this stage; it will melt and then crisp up into little ‘frico’ bits on the beans.
- Spread the edamame in a single layer on a parchment-lined baking sheet. Ensure they aren’t crowded, as air circulation is key for the skin to crisp.
- Bake for 15-20 minutes. At the 10-minute mark, use a spatula to flip and stir the beans so they brown evenly on all sides.
- Remove from the oven when they begin to look golden brown and slightly wrinkled. Let them cool for 5 minutes; as the oil settles, the exterior will continue to harden into a perfect crunch.
How to make yogurt bark?
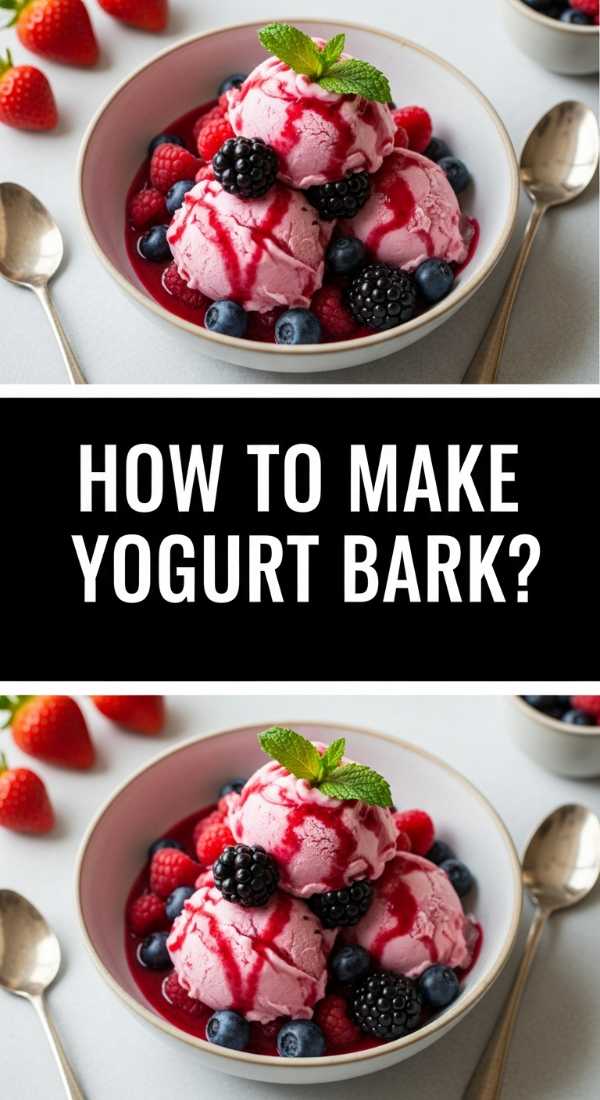
Why we love this
Yogurt bark is a refreshing, icy treat that looks like a slab of marble art on your food board. The creamy, tangy base of Greek yogurt provides a lush canvas for the jewel-toned pops of fresh berries and the earthy crunch of granola. It’s incredibly cold and crisp, melting slowly on the tongue to release a floral sweetness. It brings a necessary coolness to a board that might have warm or spicy elements, acting as a palate cleanser that feels much more sophisticated than a simple bowl of yogurt.
Ingredients
- 2 cups full-fat Greek yogurt
- 2 tablespoons honey or agave
- 1/2 teaspoon vanilla extract
- 1/2 cup fresh raspberries or blueberries
- 1/4 cup granola
- 1 tablespoon hemp seeds or chia seeds
How to make it
- In a mixing bowl, whisk together the Greek yogurt, honey, and vanilla extract until the mixture is silky smooth and the sweetener is fully integrated.
- Line a rimmed baking sheet with parchment paper. Pour the yogurt mixture onto the center of the sheet and use an offset spatula or the back of a large spoon to spread it into an even layer, about 1/4 to 1/2 inch thick.
- Scatter your berries across the top. If using large strawberries, slice them thinly so they freeze evenly. Press the berries gently into the yogurt so they are partially submerged.
- Sprinkle the granola and seeds over the top for texture. This adds a visual ‘crunch’ factor that makes the bark look professional.
- Place the tray flat in the freezer for at least 3-4 hours, or until completely solid. Once frozen, remove and break into irregular, rustic shards using your hands or a sharp knife. Keep in the freezer until the very moment you serve the board.
How to prepare stuffed dates?

Why we love this
Stuffed dates are nature’s candy, elevated to a gourmet appetizer. The date itself is deep, chewy, and reminiscent of caramel, while the creamy filling—whether it’s goat cheese or nut butter—provides a savory or velvety counterpoint. When you top them with a single sea salt flake or a sliver of almond, you create a bite that hits every single taste bud: sweet, salty, creamy, and crunchy. They are small but mighty, adding a dark, rich aesthetic to your board that feels incredibly luxurious.
Ingredients
- 10-12 Medjool dates
- 4 tablespoons goat cheese or creamy almond butter
- 12 whole almonds or walnut halves
- A pinch of flaky sea salt
- Optional: A drizzle of honey or balsamic glaze
How to make it
- Using a small paring knife, make a longitudinal slit down the center of each Medjool date. Do not cut all the way through; you want to create a ‘pocket.’
- Pop out the pit and discard it. Open the date slightly with your fingers to widen the cavity.
- Using a small spoon or a piping bag, fill each date with about a teaspoon of goat cheese or nut butter. If using goat cheese, let it come to room temperature first so it’s easy to work with.
- Press an almond or walnut half into the center of the filling. This provides a structural crunch that balances the softness of the date.
- Arrange them on your board and finish with a sprinkle of flaky sea salt. The salt is non-negotiable—it cuts the intense sweetness of the date and makes the flavors sing.
How to make zucchini fries?

Why we love this
Zucchini fries offer all the comfort of a classic fry but with a light, garden-fresh twist. The exterior is a golden-brown crust of seasoned breadcrumbs and parmesan that shatters upon entry, revealing a tender, succulent interior that practically melts. They have a subtle, sweet squash flavor that pairs beautifully with a tangy dipping sauce. Serving these on a board adds a warm, savory element that feels substantial and home-cooked, yet they remain light enough for guilt-free grazing.
Ingredients
- 2 medium zucchinis
- 1/2 cup Panko breadcrumbs
- 1/4 cup grated Parmesan cheese
- 1 teaspoon Italian seasoning
- 1 egg, beaten
- Salt and pepper to taste
How to make it
- Preheat your oven to 425°F (220°C). Cut the ends off the zucchinis, then slice them into sticks about 3 inches long and 1/2 inch thick (resembling standard fries).
- Set up a dredging station: one shallow bowl with the beaten egg, and another bowl with a mixture of Panko, Parmesan, Italian seasoning, salt, and pepper.
- Dip each zucchini stick into the egg wash, ensuring it’s fully coated, then roll it in the breadcrumb mixture. Press the crumbs onto the zucchini firmly so they stick.
- Place the fries on a wire rack set over a baking sheet. Using a wire rack allows the hot air to circulate under the fries, ensuring they get crispy on the bottom without needing to be flipped.
- Bake for 15-20 minutes until the coating is deeply golden and crispy. Serve warm with a side of marinara or Greek yogurt dip.
How to bake potato bites?
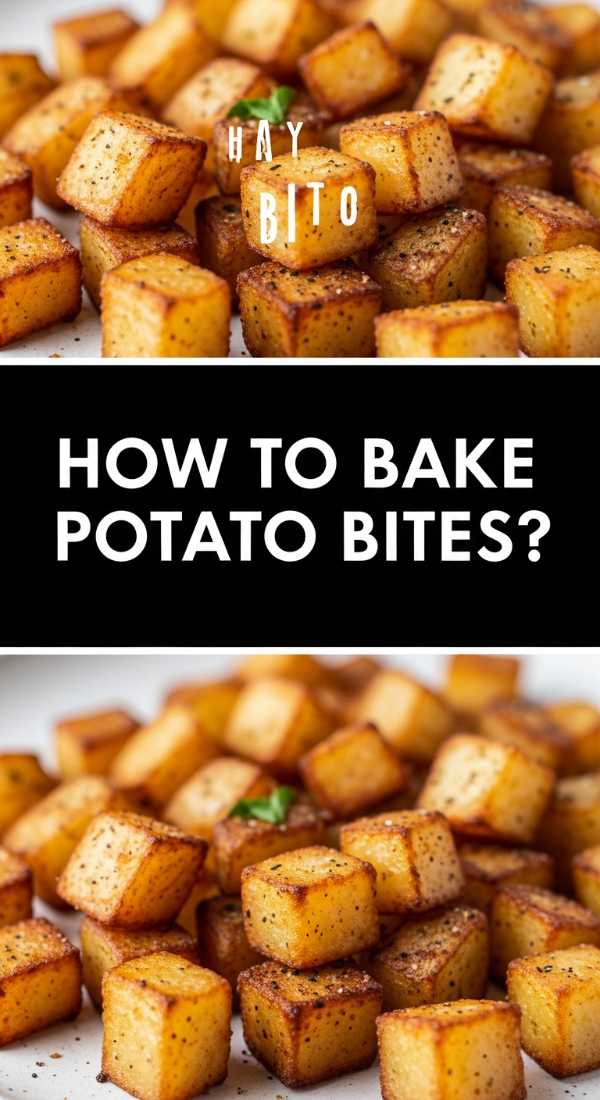
Why we love this
There is nothing quite as universally loved as a perfectly roasted potato, and these ‘bites’ are the platonic ideal. Small enough to be popped into your mouth, they feature a glass-like, crispy skin that yields to a fluffy, buttery center. Infused with rosemary and garlic, they emit a heavenly, savory scent that grounds the entire board. They are the ultimate comfort food, providing a hearty, starchy base that balances out the lighter fruits and vegetables on the spread.
Ingredients
- 1 lb baby potatoes (Yukon Gold or Red)
- 2 tablespoons olive oil
- 1 teaspoon dried rosemary
- 1/2 teaspoon garlic powder
- 1/2 teaspoon sea salt
How to make it
- Preheat your oven to 400°F (200°C). Wash the potatoes and pat them very dry. Cut them into small, uniform cubes—about 1/2 inch square. Uniformity is the secret to ensuring they all finish cooking at the exact same time.
- In a large bowl, toss the potato cubes with olive oil, rosemary, garlic powder, and salt. Make sure every cube is glistening with oil; this is what creates the ‘fried’ texture in the oven.
- Spread the potatoes on a baking sheet. Avoid crowding; if the potatoes are touching, they will steam rather than crisp.
- Bake for 25-30 minutes. Every 10 minutes, use a metal spatula to toss them around. You are looking for a deep golden-brown color and a visible ‘puff’ in the skin.
- For an extra professional touch, sprinkle with fresh parsley and a tiny bit more salt the moment they come out of the oven.
How to make creamy hummus?
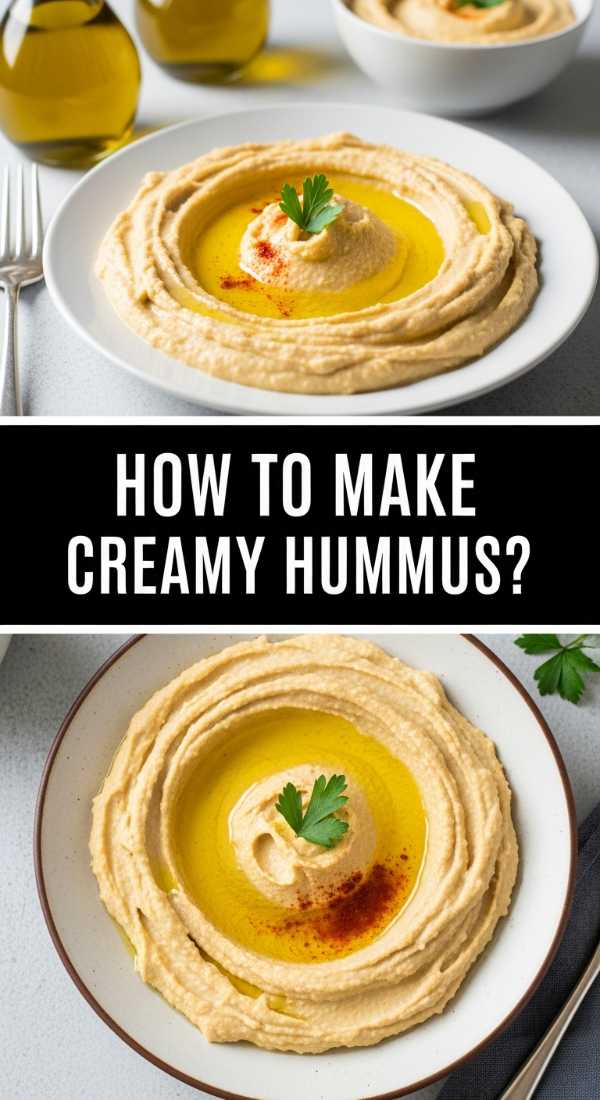
Why we love this
Homemade hummus is a revelation—worlds away from the grainy, store-bought versions. It is incredibly velvety, with a rich, tahini-forward flavor that is brightened by a sharp zing of fresh lemon. It acts as the ‘glue’ of the food board, the central hub where crackers, zucchini fries, and crispy chickpeas all meet. The texture is so smooth it’s almost like savory frosting, and the pool of olive oil on top makes it look like a piece of art in the center of your display.
Ingredients
- 1 can (15 oz) chickpeas, drained and rinsed
- 1/3 cup high-quality tahini
- 2 tablespoons fresh lemon juice
- 1 small clove garlic, minced
- 2 tablespoons ice water
- 1/2 teaspoon sea salt
- Olive oil and paprika for garnish
How to make it
- Pro Tip: For the smoothest hummus ever, place your rinsed chickpeas in a pot of water with a pinch of baking soda and boil them for 10 minutes. This softens the skins so much they virtually disappear when blended.
- Drain the boiled chickpeas and add them to a food processor along with the tahini, lemon juice, garlic, and salt. Process for 2-3 minutes. Yes, that long! You want to break down every single fiber.
- While the processor is running, slowly drizzle in the ice water. The ice water reacts with the fats in the tahini to create a light, aerated, and incredibly creamy texture.
- Taste and adjust the seasoning. If it’s too thick, add one more tablespoon of ice water.
- Spread the hummus into a shallow bowl, using the back of a spoon to create ‘swirls.’ Fill those swirls with a generous glug of extra-virgin olive oil and a dusting of paprika or sumac before placing the bowl onto your board.
Wrapping Up Your Viral Board
Creating a food board isn’t just about the cooking; it’s about the assembly. Start by placing your larger bowls (like the hummus and yogurt bark) on the board first, then build around them with your larger items like zucchini fries and potato bites. Fill the small gaps with your chickpeas, protein balls, and stuffed dates. The goal is to have no wood showing—a lush, overflowing board is what makes it go viral! I can’t wait to see your creations, so grab your favorite platter and start snacking!