

How to Build a Viral Aesthetic Food Board on a Budget
We’ve all seen those stunning, overflowing food boards on our social feeds—the ones that look like a Renaissance painting made of cheese, crackers, and colorful dips. For a long time, I thought hosting a gathering like that required a professional stylist and a massive grocery budget, but I’ve learned the secret: it’s all about the ‘Viral Simple Food Board’ philosophy. By focusing on a few star dishes that are high-impact but low-cost, you can create a centerpiece that brings people together without breaking the bank.
The magic happens when you mix textures and colors, pulling from seasonal produce and pantry staples to create a feast for the eyes as much as the palate. It’s about that warm feeling when a friend reaches for a warm tortilla chip or the sound of laughter over a shared plate of pasta. Today, I’m sharing my favorite budget-friendly recipes that will make your next food board look like a million bucks while keeping your stress levels low and your guests very, very happy.
How to Make the Ultimate Creamy Rotel Dip?
Why we love this
There is something incredibly nostalgic and comforting about the aroma of savory sausage and melted cheese mingling with the bright, zesty tang of diced tomatoes and green chilies. This dip is the ultimate crowd-pleaser, offering a velvety, gooey texture that clings perfectly to a salty chip, delivering a satisfying crunch followed by a slow, spicy heat. It’s the kind of dish that disappears in minutes because it feels like home, evoking memories of game days and cozy backyard hangouts where the food is simple but the flavors are bold and undeniably addictive.
Ingredients
- 1 lb Velveeta cheese, cubed
- 1 can (10 oz) Ro-Tel Diced Tomatoes and Green Chilies
- 1 lb ground breakfast sausage or chorizo
- 1/4 cup chopped cilantro for garnish
- Tortilla chips for serving
How to make it
- Begin by browning your ground sausage in a large skillet over medium-high heat. Use a wooden spoon to break the meat into small, uniform crumbles, ensuring it cooks through until no pink remains and the edges are slightly crispy for added texture.
- Once fully cooked, drain the excess fat from the skillet to keep the dip from becoming oily. Return the meat to the pan and turn the heat down to low.
- Add the cubed Velveeta cheese and the entire can of Ro-Tel (do not drain the liquid from the can, as the juices provide essential flavor and help thin the cheese to the perfect consistency).
- Stir constantly with a heat-resistant spatula, allowing the cheese to melt slowly. Avoid high heat, which can cause the cheese to separate or scorch on the bottom of the pan.
- Once the mixture is silky smooth and fully incorporated, transfer it to a warmed serving bowl or a small slow cooker set to ‘warm’ to maintain that perfect pourable texture. Top with fresh cilantro for a pop of color before placing it in the center of your board.
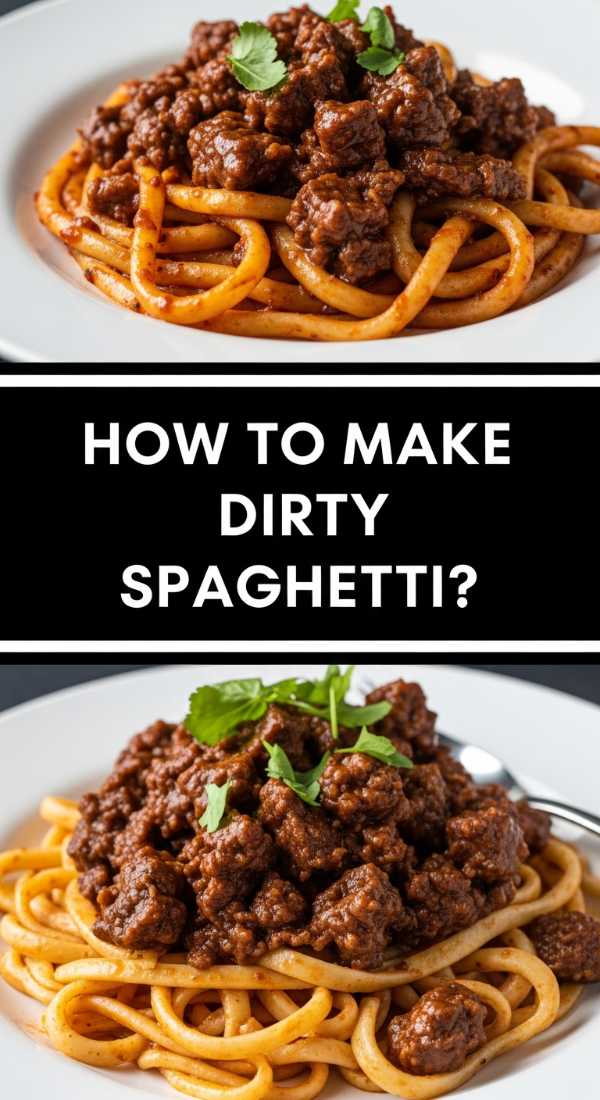
How to Whip Up Viral One-Pot Dirty Spaghetti?

Why we love this
Dirty spaghetti is the soulful, deeply flavored cousin of your standard marinara, boasting a rich, umami depth that comes from perfectly seared meats and aromatic vegetables. The scent of sautéed bell peppers and onions caramelizing in the pan creates an irresistible base layer of flavor that permeates every strand of pasta. It’s a hearty, rustic dish that feels luxurious and complex, yet it relies on humble ingredients to create a silky, savory sauce that coats the noodles in a beautiful, dark hue, promising a bite that is both peppery and sweet.
Ingredients
- 1 lb spaghetti noodles
- 1 lb ground beef or ground pork
- 1 green bell pepper, finely diced
- 1 medium yellow onion, finely diced
- 2 cloves garlic, minced
- 2 cups beef broth
- 1 cup tomato sauce
- 1 tbsp Worcestershire sauce
- Cajun seasoning to taste
How to make it
- In a large pot or Dutch oven, brown the ground meat over medium heat until fully rendered. If you are using a leaner meat, add a tablespoon of olive oil to help the browning process.
- Add the diced onions and bell peppers to the pot, sautéing them in the rendered fat until they are soft and the onions have turned translucent, about 5-7 minutes. Add the garlic and cook for just another 60 seconds until fragrant.
- Stir in the Cajun seasoning and Worcestershire sauce, scraping the bottom of the pot to release any ‘fond’—those flavorful brown bits stuck to the bottom.
- Pour in the beef broth and tomato sauce, then break your spaghetti noodles in half and submerge them into the liquid. Breaking the noodles helps them cook evenly in the one-pot format.
- Bring the liquid to a gentle boil, then reduce the heat to low and cover. Let it simmer for 10-12 minutes, stirring occasionally to prevent the starch from sticking. Once the pasta is al dente and the liquid has transformed into a thick, glossy sauce, remove from heat and serve warm.
How to Bake the Perfect No-Bake Strawberry Pie?
Why we love this
This pie is a celebration of summer, featuring bright red, glistening strawberries nestled in a sweet, translucent glaze that sparkles under the light. Each bite offers a refreshing burst of cool, juicy fruit against a buttery, crumbly graham cracker crust that provides a satisfying snap and a hint of honeyed sweetness. The fragrance of fresh berries is intoxicating, and the vibrant color makes it a stunning visual anchor for any food board, providing a light, airy finish to a meal that feels like a breeze on a warm afternoon.
Ingredients
- 1 pre-made graham cracker crust
- 1 quart fresh strawberries, hulled and sliced
- 1 cup sugar
- 3 tbsp cornstarch
- 1 cup water
- 3 oz box strawberry flavored gelatin
- Whipped cream for topping
How to make it
- Clean and hull your strawberries, slicing the larger ones in half while keeping the smaller ones whole for a varied, organic look. Arrange the berries tightly inside the graham cracker crust.
- In a small saucepan, whisk together the sugar, cornstarch, and water until smooth. Place over medium heat and bring to a boil, stirring constantly.
- Continue to cook the mixture for about 2-3 minutes until it thickens and becomes clear. Remove from the heat immediately.
- Stir in the strawberry gelatin powder until it is completely dissolved and the mixture is a deep, vibrant red. Let the glaze cool for about 10 minutes so it doesn’t wilt the fresh berries.
- Slowly pour the glaze over the strawberries, ensuring every crevice is filled and every berry is coated. Refrigerate the pie for at least 3-4 hours until the gelatin is firm. Top with swirls of whipped cream just before serving to maintain the structure.
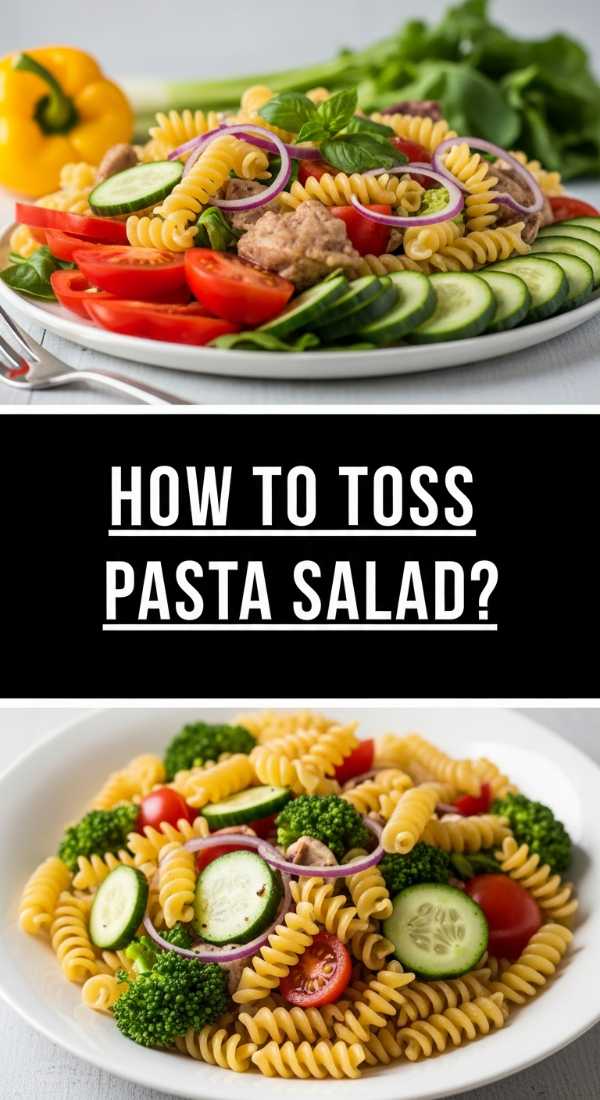
How to Master the Zesty Summer Pasta Salad?
Why we love this
Summer pasta salad is the ultimate versatile side dish, bringing a bright, acidic pop to your board that balances out richer, savory items. We love the medley of textures—the springy chew of rotini, the crisp snap of cucumbers, and the creamy crumble of salty feta cheese all tossed in a zingy vinaigrette. The aroma is dominated by fresh herbs and lemon, making it smell as refreshing as a garden after a light rain, and the kaleidoscope of colors from cherry tomatoes and olives makes it an instant visual win.
Ingredients
- 1 lb rotini or fusilli pasta
- 1/2 cup Italian vinaigrette
- 1 cup cherry tomatoes, halved
- 1 cucumber, diced
- 1/2 cup black olives, sliced
- 1/2 cup crumbled feta cheese
- Fresh parsley, chopped
How to make it
- Boil a large pot of heavily salted water. Cook the pasta according to the package directions, but aim for ‘al dente’—usually 1 minute less than the box suggests—to ensure the pasta doesn’t get mushy after absorbing the dressing.
- Drain the pasta and immediately rinse it under cold running water. This stops the cooking process and removes excess starch, which prevents the noodles from sticking together.
- In a large mixing bowl, toss the cooled pasta with half of the Italian vinaigrette. This allows the pasta to absorb the flavor while it’s still slightly porous.
- Fold in the cherry tomatoes, cucumber, olives, and feta cheese. Be gentle so you don’t break the delicate vegetables or turn the cheese into a paste.
- Add the remaining dressing and a generous handful of fresh parsley. Cover and chill in the refrigerator for at least an hour before serving to let the flavors meld together into a cohesive, zesty bite.
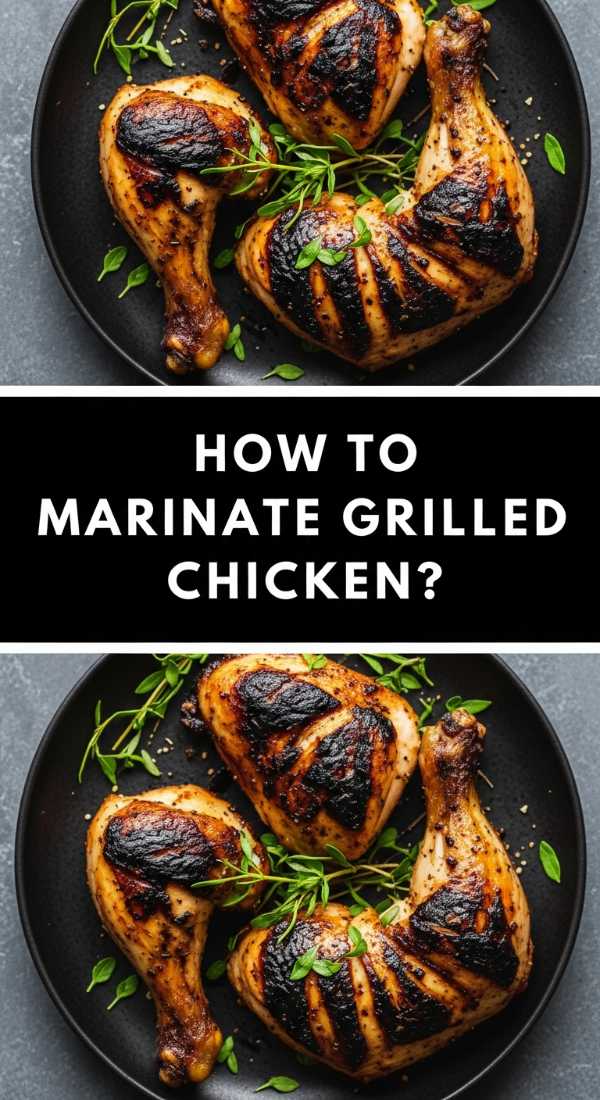
How to Get the Juiciest Grilled Chicken Ever?
Why we love this
Perfectly grilled chicken is a masterclass in sensory contrast: a smoky, charred exterior that crackles slightly under the fork, giving way to an incredibly tender and succulent interior. The scent of caramelized proteins and woodsmoke is the quintessential smell of outdoor hosting, instantly signaling a hearty and wholesome meal. When seasoned with bright citrus and earthy herbs, the chicken becomes a versatile protein that feels light enough for a summer afternoon but satisfying enough to be the star of your aesthetic food board.
Ingredients
- 2 lbs chicken thighs or breasts, pounded to even thickness
- 1/4 cup olive oil
- 2 lemons, juiced and zested
- 3 cloves garlic, smashed
- 1 tsp dried oregano
- Salt and cracked black pepper
How to make it
- Start by prepping your chicken. If using breasts, pound them to a uniform half-inch thickness using a meat mallet; this ensures that the entire piece cooks at the same rate, preventing the edges from drying out before the center is done.
- Whisk together the olive oil, lemon juice, zest, garlic, oregano, salt, and pepper in a zip-top bag. Add the chicken and marinate for at least 30 minutes, or up to 4 hours in the fridge for maximum flavor penetration.
- Preheat your grill to medium-high heat (about 400°F). Lightly oil the grates using a folded paper towel dipped in vegetable oil to create a non-stick surface.
- Place the chicken on the grill and leave it undisturbed for 5-6 minutes. Resist the urge to flip too early; you want the meat to develop deep, golden grill marks and release naturally from the grates.
- Flip the chicken and cook for another 5-7 minutes, or until the internal temperature reaches 165°F. Remove from the grill and—this is the most important step—let the meat rest for 5-10 minutes under a piece of foil before slicing to allow the juices to redistribute.
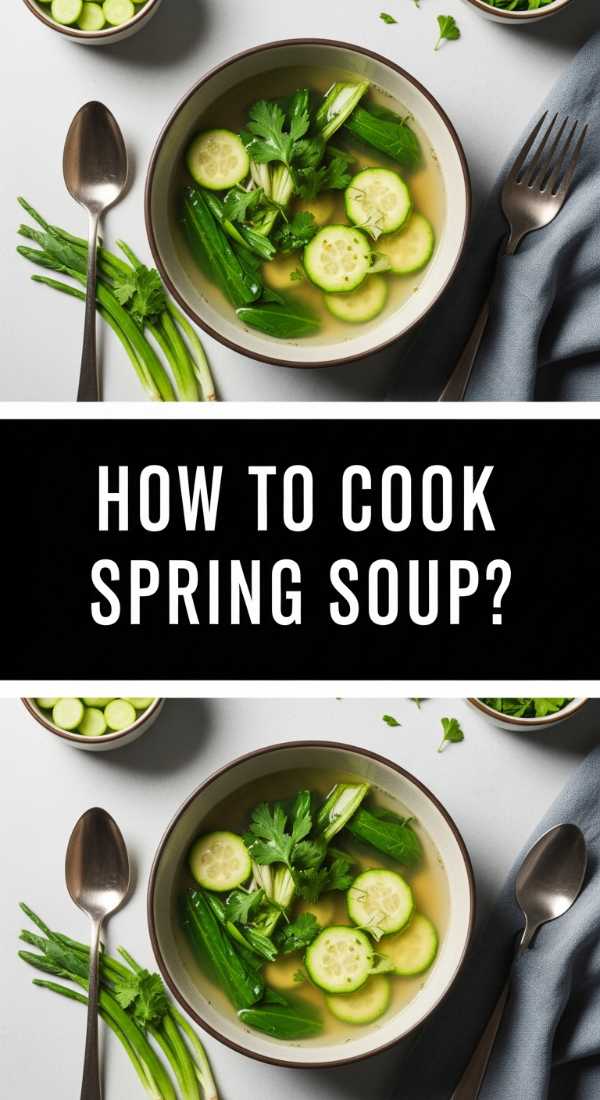
How to Simmer a Light and Green Spring Soup?
Why we love this
Spring soup is like a garden in a bowl, offering a delicate, herbaceous aroma that feels restorative and light. We love the vibrant, bright green hue that comes from fresh peas and tender leeks, providing a visual freshness that contrasts beautifully with heavier board items. The texture is smooth and silky, often finished with a dollop of cool cream or a squeeze of lemon that cuts through the earthiness, making every spoonful feel like a celebration of the new season’s first harvest.
Ingredients
- 2 tbsp butter
- 2 large leeks, white parts only, cleaned and sliced
- 1 quart vegetable broth
- 4 cups fresh or frozen sweet peas
- 1/4 cup fresh mint leaves
- Salt and pepper to taste
- Greek yogurt for garnish
How to make it
- Melt the butter in a large heavy-bottomed pot over medium heat. Add the sliced leeks and a pinch of salt, cooking slowly until they are soft and buttery, about 8-10 minutes. Do not let them brown; you want to maintain their pale, sweet flavor.
- Pour in the vegetable broth and bring the mixture to a simmer. Once simmering, add the peas. If using fresh peas, cook for 5 minutes; if using frozen, cook for only 2-3 minutes to preserve their bright green color and sweet snap.
- Remove the pot from the heat and stir in the fresh mint leaves. The residual heat will wilt the mint just enough to release its oils without turning it bitter.
- Using an immersion blender, blend the soup directly in the pot until it is completely smooth and aerated. If you prefer an ultra-fine texture, you can pass the liquid through a fine-mesh sieve.
- Season generously with salt and pepper. Serve the soup warm or chilled in small shooters on your food board, topped with a tiny swirl of Greek yogurt and a single mint leaf for a professional, ‘viral’ finish.
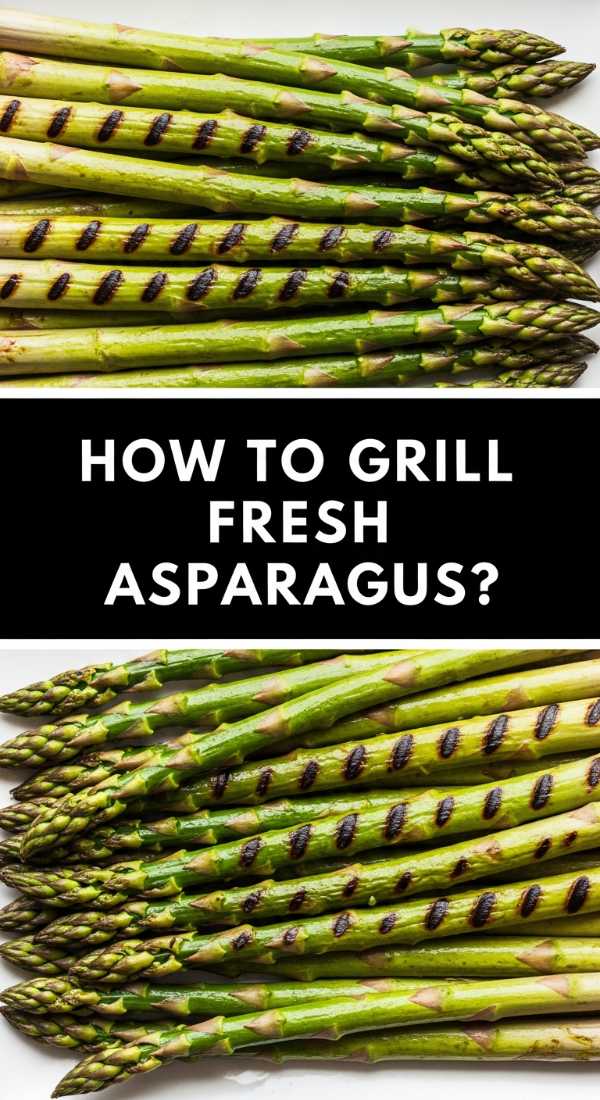
How to Char Asparagus for that Perfect Snap?

Why we love this
Grilled asparagus is the ultimate sophisticated finger food for an aesthetic board, offering a dramatic look with its long, elegant spears and charred tips. The flavor is a perfect balance of smoky, earthy, and sweet, especially when finished with a dusting of salty parmesan and a hint of lemon zest. We love the tactile experience of picking up a spear and feeling that definitive ‘snap’ when you bite into it—a sign of perfect cooking that retains the vegetable’s integrity while mellowing its grassy notes into something deeply savory.
Ingredients
- 1 bunch fresh asparagus, woody ends trimmed
- 2 tbsp olive oil
- 1/2 tsp garlic powder
- 1/4 cup shaved parmesan cheese
- Lemon wedges
- Flaky sea salt
How to make it
- Prepare the asparagus by snapping off the tough, woody bottom ends. A pro tip is to hold the spear at both ends and bend it; it will naturally break at the point where the stalk becomes tender.
- Toss the spears in a bowl with olive oil, garlic powder, and a pinch of salt until they are evenly coated. The oil acts as a heat conductor to ensure even browning.
- Place a grill pan over high heat or use your outdoor grill. Once the pan is smoking slightly, lay the asparagus in a single layer across the grates, perpendicular to the bars to get those beautiful char marks.
- Grill for 3-5 minutes, rolling them occasionally with tongs. You are looking for the skin to blister and turn bright green with dark charred spots while the center remains slightly firm.
- Remove from heat and immediately shower them with shaved parmesan and lemon zest while they are still hot so the cheese slightly adheres. Arrange them in a neat pile on your board for a structural, vertical element.
How to Toss a Refreshing Fruit-Forward Summer Salad?
Why we love this
This salad is a masterclass in the ‘sweet and savory’ profile, combining the juicy, dripping sweetness of summer fruits with the sharp, salty punch of cheese and fresh greens. The aroma is purely intoxicating—a mix of ripe berries, bruised mint, and balsamic glaze that makes your mouth water instantly. Its visual appeal is undeniable, with deep purples, bright reds, and vibrant greens that act as the ‘jewelry’ of your food board, providing a light, hydrating component that cleanses the palate between heavier bites.
Ingredients
- 4 cups mixed baby greens or arugula
- 1 cup fresh blueberries
- 1 cup sliced strawberries
- 1/2 cup goat cheese or feta crumbles
- 1/4 cup toasted pecans or walnuts
- Balsamic glaze for drizzling
How to make it
- Start with a base of chilled greens. If using arugula, the peppery notes will provide a nice contrast to the sweet fruit; if using baby greens, the flavor will be more subtle.
- In a small dry skillet over medium heat, toast your pecans for 2-3 minutes until they become fragrant and slightly darkened. This extra step adds a professional depth of flavor and crunch that raw nuts lack.
- Scatter the berries over the greens. Do not toss them in too vigorously, as berries are delicate and can stain the greens if bruised.
- Crumble the goat cheese over the top in large, rustic chunks. The creaminess of the cheese will act as a ‘glue’ for the other ingredients.
- Just seconds before placing the board on the table, drizzle the balsamic glaze in a zigzag pattern across the salad. This ensures the greens stay crisp and the presentation looks sharp and intentional.
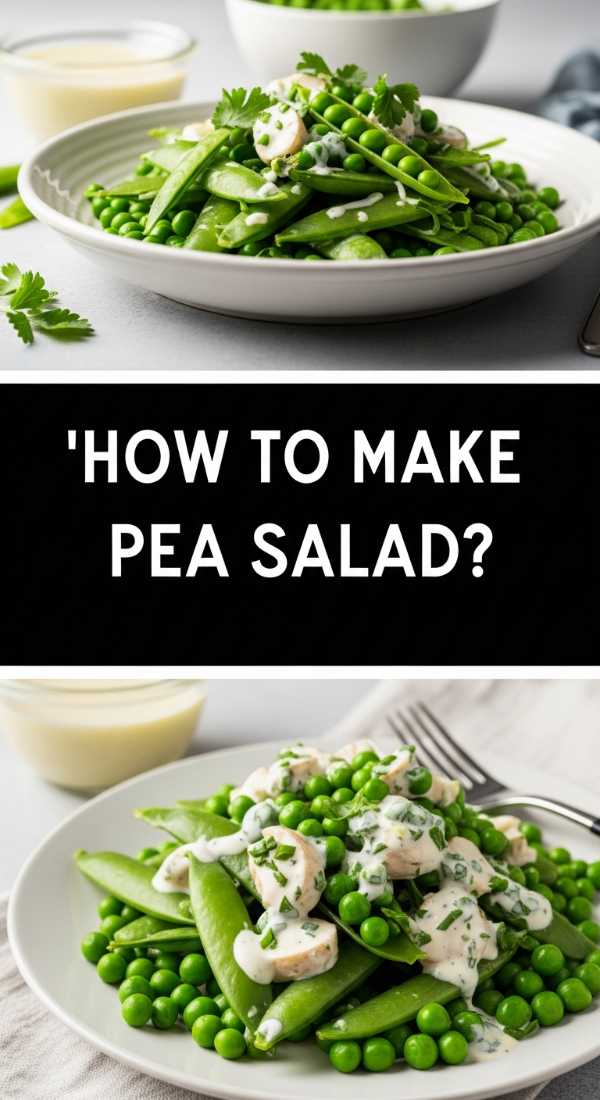
How to Recreate Grandma’s Creamy Pea Salad?
Why we love this
Pea salad is a retro classic that has made a major comeback because of its satisfyingly creamy texture and the playful ‘pop’ of cold peas in every bite. It carries a savory, smoky scent from the inclusion of crisp bacon bits, balanced by the sharpness of cheddar cheese and a hint of sweet red onion. It’s a comforting, cold side dish that feels substantial and familiar, providing a nostalgic anchor to your board that reminds everyone of summer potlucks and family reunions, all while looking modern and chic in a glass bowl.
Ingredients
- 4 cups frozen peas, thawed and drained
- 1/2 cup mayonnaise
- 1/2 cup sour cream
- 1 cup sharp cheddar cheese, cubed small
- 1/2 cup crispy bacon bits
- 1/4 cup red onion, finely minced
- 1 tsp sugar
How to make it
- Ensure your peas are completely thawed and, more importantly, patted dry. Any excess moisture on the peas will thin out the dressing and make the salad watery.
- In a large bowl, whisk together the mayonnaise, sour cream, and sugar. The sugar doesn’t make it ‘sweet’ but rather balances the acidity of the sour cream and the saltiness of the bacon.
- Fold in the peas, cheddar cheese cubes, and minced red onion. Cubing the cheese instead of shredding it provides a much better textural contrast against the soft peas.
- Add the crispy bacon bits last. If you are making this ahead of time, hold the bacon until right before serving to ensure it retains its crunch.
- Season with plenty of black pepper. Refrigerate for at least 2 hours before serving; this salad is significantly better when it’s ice-cold and the dressing has had time to thicken around the ingredients.
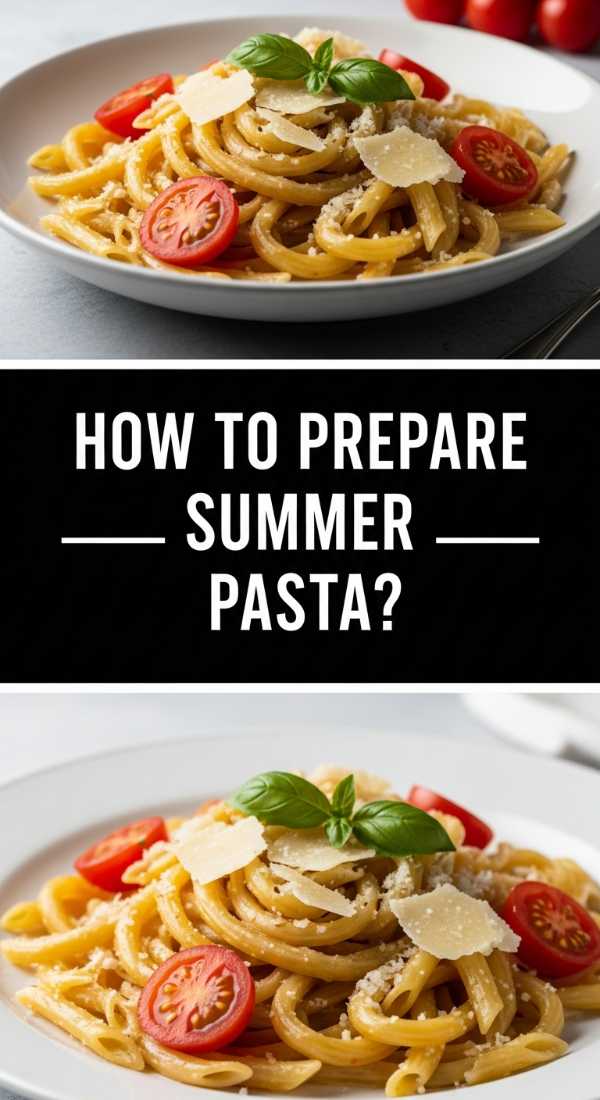
How to Sauté a Garlic Herb Summer Pasta?
[IMAGE_10]
Why we love this
This pasta dish is the embodiment of simplicity, relying on high-quality aromatics to create a sauce that is light, buttery, and incredibly fragrant. The scent of garlic gently golden-ing in olive oil, followed by the addition of handfuls of fresh basil, is enough to draw anyone to the table. It’s a flexible dish that feels elegant and high-end, yet it’s made with ingredients you likely already have in your pantry, providing a silky, herb-flecked base that can be enjoyed warm or at room temperature as part of your spread.
Ingredients
- 1 lb linguine or angel hair pasta
- 1/2 cup extra virgin olive oil
- 6 cloves garlic, thinly sliced
- 1/2 tsp red pepper flakes
- 1 cup fresh basil leaves, chiffonade
- 1/2 cup grated Parmesan cheese
- Zest of 1 lemon
How to make it
- Cook the pasta in a large pot of boiling salted water. For this recipe, you want the pasta perfectly al dente, as it will cook for an additional minute in the sauce. Save 1 cup of the starchy pasta water before draining.
- In a wide skillet, heat the olive oil over low-medium heat. Add the thinly sliced garlic and red pepper flakes. The key is to ‘infuse’ the oil; the garlic should turn a pale golden color but never brown or go dark, which would make the oil bitter.
- Add half of the saved pasta water to the skillet and whisk vigorously to create an emulsion with the oil. This creates a light, ‘creamless’ sauce that clings to the noodles.
- Transfer the cooked pasta to the skillet. Use tongs to toss the noodles continuously, adding more pasta water if the dish looks dry, until the sauce is glossy and coats every strand.
- Turn off the heat and toss in the fresh basil, lemon zest, and parmesan cheese. The residual heat will melt the cheese and wilt the basil just enough to release its perfume without losing its bright color. Serve immediately on a large platter.
Conclusion
Building a viral aesthetic food board isn’t about how much you spend, but how you arrange your flavors and textures to create an inviting experience. By mixing these warm dips, zesty salads, and perfectly grilled proteins, you create a visual story that encourages guests to graze, chat, and enjoy. Remember, the best boards are messy, full, and clearly made with love. So grab a large tray, start with your bowls, and fill in the gaps with the delicious recipes we’ve covered today. Happy hosting!