
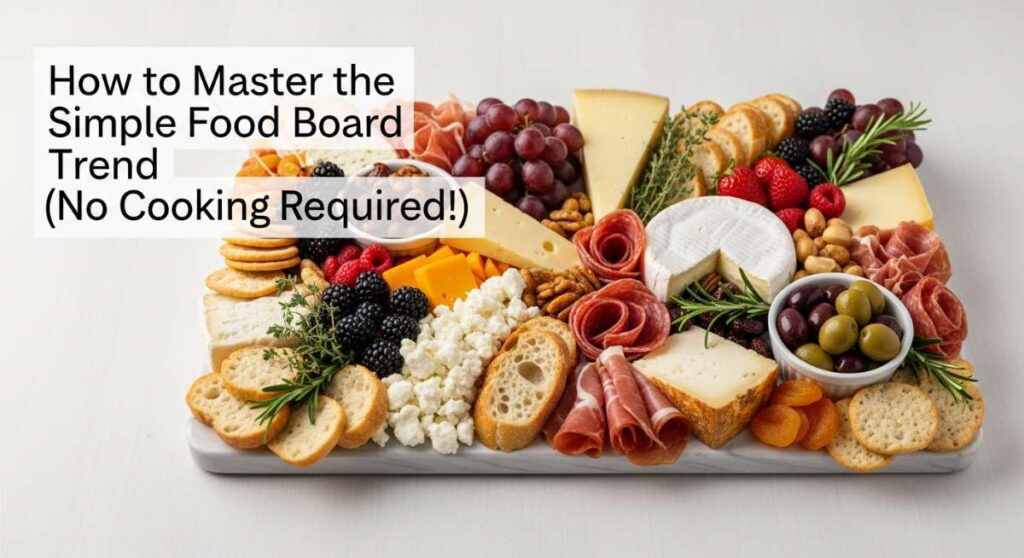
How to Master the Simple Food Board Trend (No Cooking Required!)
There is something inherently magical about the way a simple board of food can transform an ordinary afternoon into a celebration of connection and flavor. We’ve all been there—longing for those slow, sun-drenched moments where the only thing on the agenda is good conversation and even better snacks. The ‘Simple Food Board’ trend isn’t just about eating; it’s about reclaiming our time and finding joy in the effortless assembly of seasonal treasures that require little more than a beautiful platter and a hungry heart.
In our fast-paced world, the board represents a pause button. It’s an invitation to linger over a piece of sharp cheese, a handful of sun-warmed berries, or a perfectly seasoned morsel while the world outside slows to a crawl. Whether you’re hosting a backyard gathering or simply treating yourself to an elevated solo lunch, mastering the art of the board is about celebrating the ingredients themselves, allowing their natural textures and vibrant colors to take center stage without the stress of complex kitchen maneuvers.
How to make summer salads?

Why we love this
A summer salad is the literal breath of fresh air your palate craves during the peak of heat. Imagine the satisfying crunch of crisp romaine married with the velvety softness of a perfectly ripe peach, all drizzled in a zesty vinaigrette that makes every flavor pop. The aroma is a heady mix of torn garden basil and the sweet, earthy scent of sun-ripened tomatoes, creating a sensory experience that feels like a cool breeze on a humid day. It’s light, vibrant, and perfectly captures the essence of a July garden in every forkful.
Ingredients
- 2 cups baby arugula or mixed field greens
- 1 ripe nectarine or peach, sliced thin
- 1/2 cup heirloom cherry tomatoes, halved
- 2 oz goat cheese crumbles
- 1/4 cup toasted walnuts
- Balsamic glaze and extra virgin olive oil
- Flaky sea salt and cracked black pepper
How to make it
- Begin by selecting a shallow wooden bowl or a wide marble board to allow the ingredients to spread out rather than get weighed down in a deep bowl.
- Wash and thoroughly dry your greens using a salad spinner; moisture is the enemy of a crisp salad, so ensure every leaf is bone-dry before assembly.
- Layer the greens as a base, then artfully nestle the fruit slices and tomato halves among the leaves, ensuring an even distribution of color across the board.
- Sprinkle the goat cheese and walnuts over the top, then drizzle the olive oil in a slow, steady stream from a height of six inches to ensure light, even coverage.
- Finish with a zigzag of balsamic glaze and a generous pinch of flaky salt just before serving to prevent the greens from wilting under the acidity.
How to bake strawberry pie?

Why we love this
There is nothing quite as evocative as the scent of a strawberry pie bubbling away in the oven, filling the entire house with the aroma of caramelized sugar and buttery pastry. The texture is a masterclass in contrasts: a flaky, golden-brown crust that shatters upon impact, giving way to a warm, jammy center of ruby-red berries that have softened into a luscious, sweet-tart filling. It feels like a hug in dessert form, a nostalgic nod to country kitchens and the simple pleasure of fruit picked at its absolute peak.
Ingredients
- 2 discs of refrigerated or homemade pie dough
- 4 cups fresh strawberries, hulled and halved
- 3/4 cup granulated sugar
- 1/4 cup cornstarch
- 1 tablespoon lemon juice
- 1 teaspoon vanilla extract
- 1 egg (for egg wash) and coarse sugar for topping
How to make it
- Preheat your oven to 400°F (200°C) and place a baking sheet on the bottom rack to catch any drips from the bubbling fruit.
- In a large mixing bowl, gently toss the strawberries with the sugar, cornstarch, lemon juice, and vanilla until every berry is coated in a glossy, thick sheen.
- Roll out the bottom crust and fit it into a 9-inch pie plate, leaving an inch of overhang; pour the strawberry mixture into the shell, mounding it slightly in the center.
- Top with the second crust (either solid with vents or a lattice pattern) and crimp the edges tightly to seal in the juices.
- Brush the top with a whisked egg wash, sprinkle with coarse sugar, and bake for 45-50 minutes until the crust is deep golden and the filling bubbles thickly through the vents.
How to marinate grilled chicken?

Why we love this
Grilled chicken is the versatile backbone of any great food board, offering a savory, smoky depth that anchors lighter elements. When marinated correctly, the meat remains incredibly succulent, infused with the bright notes of citrus and the woody undertones of fresh herbs like rosemary and thyme. The char from the grill adds a sophisticated bitterness that balances the richness of the marinade, resulting in a protein that smells like a summer cookout and tastes like a gourmet feast.
Ingredients
- 1.5 lbs chicken breasts or thighs
- 1/3 cup extra virgin olive oil
- 1/4 cup fresh lemon juice
- 3 cloves garlic, smashed
- 2 tablespoons fresh rosemary, chopped
- 1 teaspoon smoked paprika
- Salt and pepper to taste
How to make it
- Place your chicken between two sheets of plastic wrap and pound them to an even thickness (about 3/4 inch) to ensure they cook evenly without drying out the edges.
- In a gallon-sized resealable bag, whisk together the olive oil, lemon juice, garlic, rosemary, and paprika until the oil and acid are emulsified.
- Add the chicken to the bag, squeeze out the excess air, and massage the marinade into the meat so every inch is covered; refrigerate for at least 30 minutes, but ideally 4 hours.
- Preheat your grill to medium-high heat (about 400°F) and lightly oil the grates to prevent sticking.
- Grill the chicken for 6-7 minutes per side, only flipping once, until the internal temperature reaches exactly 165°F (74°C) as measured by a digital thermometer.
How to mix pina coladas?

Why we love this
A pina colada is more than just a drink; it is a vacation in a glass that instantly transports you to a tropical shoreline. The texture is luxuriously creamy, a frosty blend of velvety coconut cream and the vibrant, acidic zing of fresh pineapple. It smells like sunshine and sea salt, with a sweetness that is perfectly tempered by the icy cold temperature. Sipping one feels indulgent and celebratory, making it the perfect liquid companion to a board of fresh fruit and salty nuts.
Ingredients
- 2 oz white rum
- 2 oz cream of coconut (like Coco Lopez)
- 4 oz pineapple juice
- 1/2 cup frozen pineapple chunks
- 1 cup crushed ice
- Garnish: Pineapple wedge and maraschino cherry
How to make it
- Chill your hurricane or highball glasses in the freezer for at least 10 minutes prior to mixing to ensure the drink stays frosty until the last sip.
- Combine the rum, cream of coconut, pineapple juice, and frozen pineapple chunks in a high-speed blender.
- Add the crushed ice and blend on the highest setting for 30-45 seconds until the mixture is completely smooth and has a thick, slushy consistency.
- Pour the mixture into your chilled glasses, using a spoon to help guide the thick liquid if necessary.
- Garnish with a fresh pineapple wedge on the rim and a cherry on top; serve immediately with a wide straw to handle the thick texture.
How to use sourdough discard?
Why we love this
Sourdough discard is the secret weapon for adding a sophisticated, tangy depth to your board’s crackers or breads. There is a rustic charm to using every part of the fermentation process, resulting in a flavor profile that is both complex and deeply satisfying. The aroma of baking discard is warm and yeasty, with a sharp sour note that promises a savory crunch. It creates a beautiful golden texture that is sturdy enough to hold heavy dips but delicate enough to melt in your mouth.
Ingredients
- 1 cup sourdough discard (unfed)
- 1/4 cup melted butter or olive oil
- 1/2 teaspoon fine sea salt
- 2 tablespoons dried herbs (like herbes de Provence)
- Coarse sea salt for topping
How to make it
- Preheat your oven to 325°F (165°C) and line a large baking sheet with a piece of high-quality parchment paper.
- In a medium bowl, stir together the sourdough discard, melted butter, fine salt, and dried herbs until a smooth, uniform batter forms.
- Pour the batter onto the parchment paper and use an offset spatula to spread it as thin as possible—ideally 1/16th of an inch—covering the entire sheet.
- Sprinkle the top with coarse sea salt and bake for 10 minutes; remove from the oven and use a pizza cutter to score the batter into squares.
- Return to the oven for another 20-25 minutes until the crackers are deep golden brown and snap easily when touched; let cool completely to achieve maximum crunch.
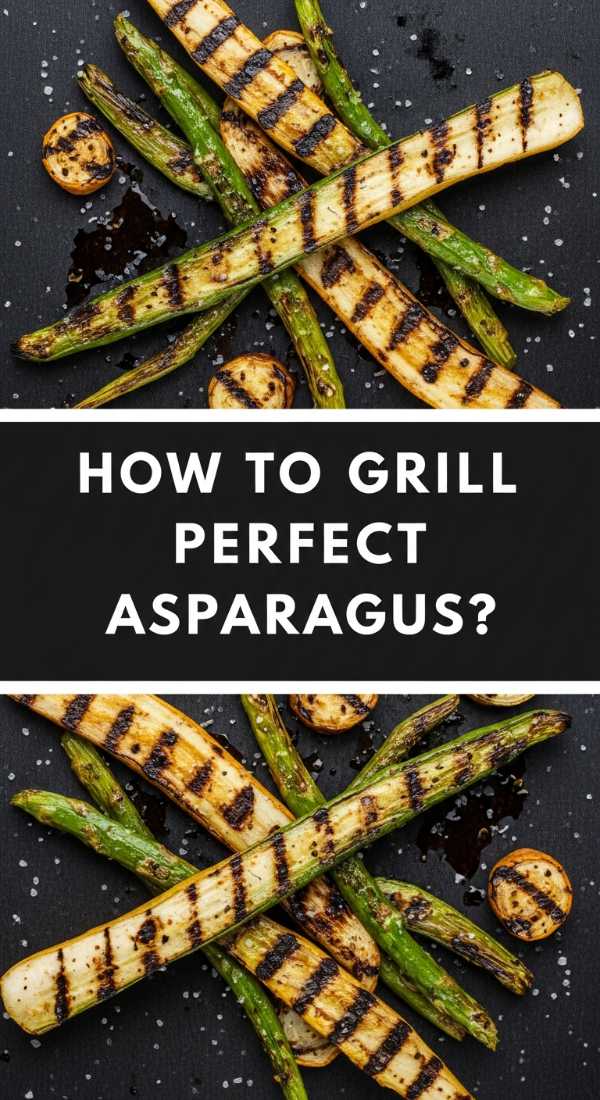
How to grill perfect asparagus?

Why we love this
Grilled asparagus is the ultimate spring and summer side, offering a delightful tender-crisp texture that feels both elegant and earthy. The high heat of the grill caramelizes the natural sugars in the stalks, creating charred, crispy tips that contrast beautifully with the juicy, snap-fresh center. The aroma of roasting greens mingled with lemon zest and garlic is intoxicating, making it a standout addition to any savory food board that needs a pop of vibrant color and a healthy crunch.
Ingredients
- 1 bunch fresh asparagus (medium thickness)
- 2 tablespoons olive oil
- 1/2 teaspoon garlic powder
- 1/2 teaspoon salt
- 1/2 lemon (for juicing)
- Lemon zest for garnish
How to make it
- Trim the woody ends off the asparagus by finding the natural breaking point near the bottom of the stalk and snapping them, or trimming the bottom 2 inches with a sharp knife.
- Toss the asparagus in a large bowl or on a sheet tray with olive oil, salt, and garlic powder until every spear is thinly and evenly coated.
- Preheat your grill to medium-high heat; if the grates are wide, use a grill basket to prevent the spears from falling through into the flames.
- Place the asparagus perpendicular to the grill grates and cook for 3-5 minutes, rolling them occasionally with tongs until they are bright green and have distinct char marks.
- Remove immediately from the heat, squeeze fresh lemon juice over the top while they are still sizzling, and finish with a sprinkle of fresh zest.
How to craft spring mocktails?
Why we love this
Spring mocktails are a celebration of effervescence and botanical beauty, offering a sophisticated alternative to alcohol that everyone can enjoy. They are characterized by their light, bubbly texture and the use of floral infusions like elderflower or rose. The scent is often a garden-fresh mix of bruised mint and citrus oils, providing a sensory lift that feels incredibly refreshing. These drinks bring a sense of ceremony to the table, with their soft pastel hues and delicate garnishes perfectly complementing a light, airy food board.
Ingredients
- 1/2 cup sparkling water or club soda
- 2 tablespoons cucumber-mint simple syrup
- 1 tablespoon fresh lime juice
- Fresh strawberries, sliced
- Mint sprigs for garnish
- Ice cubes
How to make it
- To make the syrup, simmer equal parts water and sugar with cucumber slices and mint leaves for 5 minutes, then strain and cool completely.
- Fill a highball glass or a large wine glass halfway with fresh ice cubes to keep the drink chilled without diluting it too quickly.
- Pour in the cucumber-mint syrup and fresh lime juice, stirring gently with a long bar spoon to combine the flavors at the bottom.
- Top the glass with sparkling water, pouring slowly down the side of the glass to preserve as much carbonation as possible.
- Add the strawberry slices directly into the glass and garnish with a slapped mint sprig (slapping the mint releases the essential oils for a better aroma).
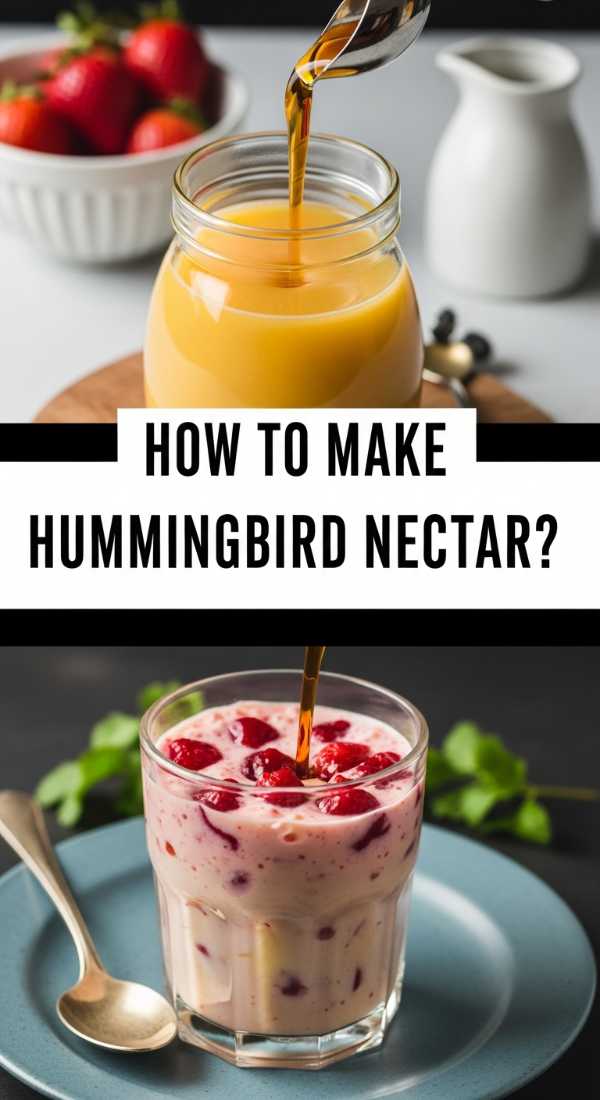
How to make hummingbird nectar?
Why we love this
While not for the human palate, preparing hummingbird nectar is a beautiful ritual that enhances the atmosphere of your outdoor dining experience. Watching these tiny, shimmering birds dart in and out of your garden adds a layer of natural theater to your gathering. The nectar itself is a pure, simple solution that mimics the sweet heart of a flower, and the process of making it is a mindful act of hospitality for the creatures that make our summer gardens so vibrant and alive.
Ingredients
- 1 cup granulated white sugar (do not use honey or brown sugar)
- 4 cups filtered water
How to make it
- In a medium saucepan, combine the sugar and water over medium heat, stirring constantly until the sugar crystals have completely dissolved.
- Bring the mixture to a gentle boil for exactly two minutes; this helps to kill any bacteria or impurities in the water and sugar that could harm the birds.
- Remove the pan from the heat and allow the nectar to cool completely to room temperature; never put warm nectar into a feeder as it can warp the plastic or harm the birds.
- Fill your clean hummingbird feeders with the solution, ensuring there are no leaks.
- Store any leftover nectar in a clean, sealed glass jar in the refrigerator for up to one week, and be sure to change the nectar in your feeders every 3-5 days to keep it fresh.
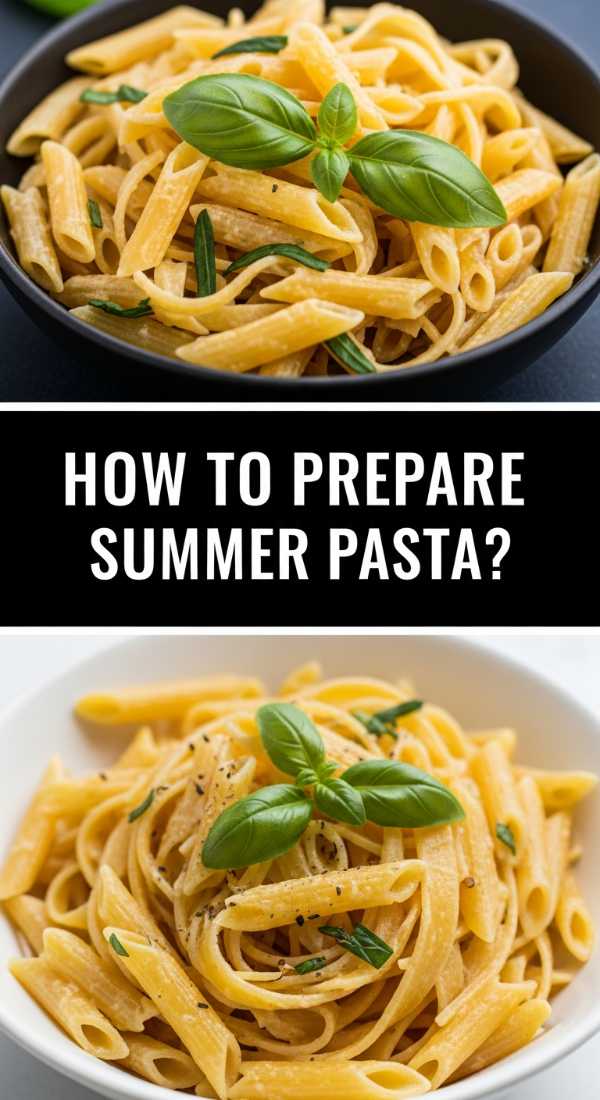
How to prepare summer pasta?

Why we love this
Summer pasta is a masterclass in simplicity, trading heavy creams and long-simmered sauces for the brightness of olive oil and raw, garden-fresh ingredients. The texture of al dente noodles coated in a light, silken sheen of garlic-infused oil is incredibly satisfying, especially when punctuated by the burst of a warm cherry tomato. It smells like a Mediterranean kitchen—garlic, basil, and high-quality parmesan—and it serves as a wonderful, filling centerpiece for a large grazing board when served at room temperature.
Ingredients
- 12 oz spaghetti or linguine
- 1/2 cup extra virgin olive oil
- 4 cloves garlic, thinly sliced
- 1 pint cherry tomatoes, halved
- 1/2 cup fresh basil leaves, torn
- 1/2 cup freshly grated Parmesan cheese
- Red pepper flakes (optional)
How to make it
- Bring a large pot of heavily salted water (it should taste like the sea) to a rolling boil and cook the pasta for 1 minute less than the package directions suggest.
- While the pasta cooks, heat the olive oil in a large skillet over low-medium heat; add the garlic slices and cook until they are fragrant and just beginning to turn golden (do not burn them).
- Add the cherry tomatoes and a pinch of red pepper flakes to the oil, cooking for 3-4 minutes until the tomatoes just begin to soften and release their juices.
- Reserve 1/2 cup of pasta water, then drain the noodles and add them directly to the skillet with the oil and tomatoes.
- Toss vigorously over low heat, adding the pasta water as needed to create a glossy emulsion, then remove from heat and fold in the basil and Parmesan just before serving.
How to bake spring cookies?
[IMAGE_10]
Why we love this
Spring cookies are like little bites of sunshine, often infused with floral notes like lavender or the bright tang of lemon zest. The texture is soft and buttery, with a tender crumb that practically melts on the tongue, followed by the slight crunch of a sugar glaze. They smell like a blooming meadow and citrus groves, offering a delicate sweetness that isn’t overwhelming. Placed on a food board, they provide a charming, whimsical finish that feels both sophisticated and deeply comforting.
Ingredients
- 2 1/2 cups all-purpose flour
- 1 cup unsalted butter, softened
- 1 cup granulated sugar
- 1 egg
- 1 teaspoon lemon extract
- 1 tablespoon lemon zest
- 1/2 teaspoon baking powder
- Royal icing and pastel food coloring (optional)
How to make it
- Cream the softened butter and granulated sugar together in a stand mixer for 3-4 minutes until the mixture is pale, light, and fluffy.
- Add the egg, lemon extract, and lemon zest, beating until well combined; the zest provides the essential oils for that signature spring flavor.
- Whisk the flour and baking powder together, then gradually add to the wet ingredients on low speed until a soft dough forms; do not overmix, or the cookies will be tough.
- Chill the dough for at least 1 hour, then roll out on a floured surface and cut into spring shapes like flowers or butterflies.
- Bake at 350°F (175°C) for 8-10 minutes until the edges are just barely set; they should remain pale for a soft texture. Cool completely before decorating with pastel-tinted icing.
Mastering the Board: Final Thoughts
Creating a viral-worthy food board is less about following strict rules and more about embracing the colors and flavors of the season. By mixing these prepared elements with simple, raw ingredients, you create a tapestry of food that is as beautiful as it is delicious. Remember to vary the heights, textures, and colors on your board to keep the eye moving, and most importantly, enjoy the process of sharing this bounty with the people you love.