
There is something truly magical about the way a beautifully arranged food board can transform a simple gathering into an unforgettable event. We’ve all been there—the stress of hosting, the worry about whether the appetizers are enough, and the desire to actually spend time with our guests instead of being stuck in the kitchen. I remember the first time I set out a DIY board for my best friend’s birthday; the way her eyes lit up and the immediate conversation it sparked made me realize that boards aren’t just about food; they are about shared experiences.
The secret to a viral-worthy board lies in the balance of textures, colors, and that ‘wow’ factor that makes everyone reach for their phones before they reach for a bite. It’s about taking those classic comfort foods we all adore—like warm sugar cookies or fluffy pancakes—and presenting them in a way that feels intentional and abundant. Today, I’m sharing five of my favorite board concepts that use simple techniques to create a high-end, social-media-ready spread that your guests will be talking about for months.
The Ultimate Sugar Cookie Decorating Board
Why we love this
This board is a nostalgic dream come true, bringing the sweet, buttery aroma of fresh-baked sugar cookies right to the center of your table. There is a specific kind of joy in seeing a tray piled high with perfectly golden edges and soft, pale centers, waiting to be adorned with colorful sprinkles and velvet-smooth icing. The cookies themselves have a delicate snap that gives way to a melt-in-your-mouth texture, creating a sensory experience that feels both cozy and celebratory. It turns a simple dessert into an interactive activity that keeps guests engaged and smiling.
Ingredients
- 2 3/4 cups all-purpose flour
- 1 teaspoon baking soda
- 1/2 teaspoon baking powder
- 1 cup softened unsalted butter
- 1 1/2 cups white sugar
- 1 egg
- 1 teaspoon vanilla extract
- Assorted royal icing colors
- Edible pearls and sprinkles
How to make it
- Begin by whisking your dry ingredients—flour, baking soda, and baking powder—in a medium bowl to ensure there are no clumps and the leavening agents are evenly distributed.
- In a large stand mixer, cream together the softened butter and white sugar on medium-high speed for about 3 to 5 minutes until the mixture is pale, light, and incredibly fluffy; this aeration is key for a soft cookie.
- Add the egg and vanilla extract, beating until just combined, then slowly incorporate the dry ingredients on low speed, being careful not to overmix, which can lead to a tough, bready texture.
- Roll the dough into small, even balls or use a cookie cutter for specific shapes, then place them on a parchment-lined baking sheet at least 2 inches apart to allow for slight spreading.
- Bake in a preheated oven at 375°F (190°C) for 8 to 10 minutes; the trick is to pull them out just as the edges turn a very light golden brown while the centers still look slightly underbaked—they will firm up as they cool on the pan.
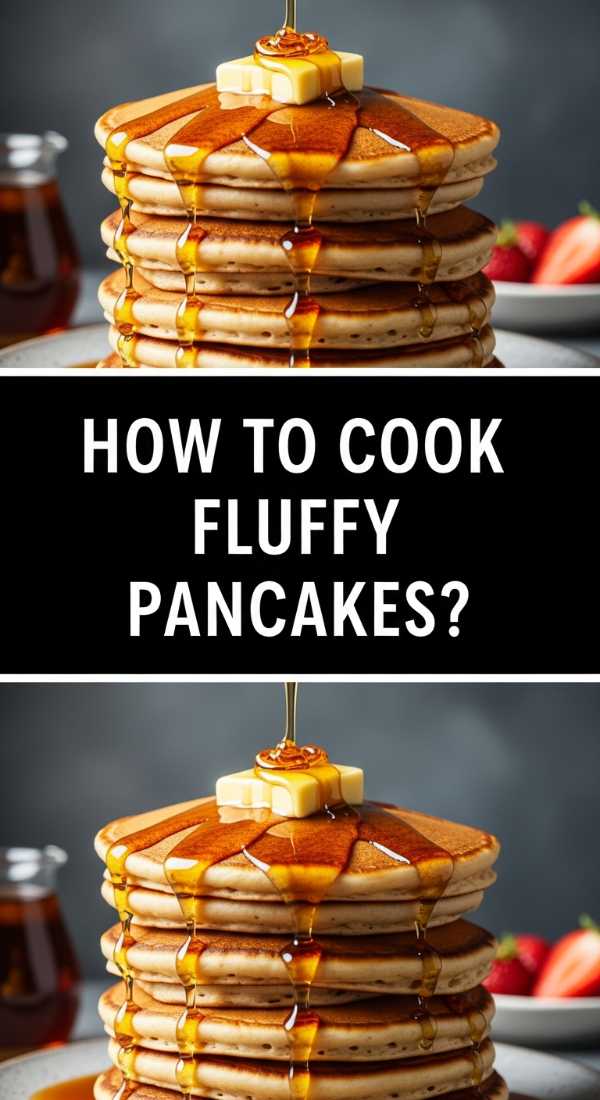
The Sunday Morning Fluffy Pancake Board

Why we love this
Nothing says ‘welcome home’ like the scent of warm maple syrup and the sight of a towering stack of golden, cloud-like pancakes surrounded by fresh berries and whipped cream. These pancakes are the epitome of comfort, with a light, airy crumb that practically dissolves on the tongue and a subtle hint of buttermilk tang. The visual appeal of the steam rising from the board combined with the vibrant colors of seasonal fruit makes this a viral sensation for any brunch lover. It’s a feast for the eyes and the soul, encouraging everyone to dig in and customize their own perfect plate.
Ingredients
- 1 1/2 cups all-purpose flour
- 3 1/2 teaspoons baking powder
- 1 tablespoon white sugar
- 1 teaspoon salt
- 1 1/4 cups milk
- 1 egg
- 3 tablespoons melted butter
- Fresh blueberries, strawberries, and maple syrup for the board
How to make it
- Sift the flour, baking powder, sugar, and salt into a large bowl to create a well in the center, ensuring the batter stays light and free of dry pockets.
- In a separate jug, whisk the milk, egg, and melted butter together before pouring the wet mixture into the dry well; stir gently with a whisk until just combined—lumps are perfectly okay and actually help create a fluffier texture.
- Heat a non-stick griddle or heavy-bottomed skillet over medium-low heat and lightly grease with a tiny bit of butter or oil; a lower heat ensures the pancake cooks through without burning the exterior.
- Scoop about 1/4 cup of batter per pancake onto the hot surface and wait for bubbles to form on the surface and the edges to look set and matte before flipping.
- Flip once with a confident, quick motion and cook for another 1-2 minutes until both sides are a beautiful golden brown, then transfer to a warm board and cover with a clean cloth until serving to maintain that pillowy softness.
The Gooey Cheesy Bake Dipping Board
Why we love this
This board is the definition of indulgence, featuring a molten, golden-brown cheese bake that sits as the crown jewel surrounded by crusty bread and crisp vegetables. The aroma of bubbling sharp cheddar and nutty parmesan wafting through the air is enough to draw a crowd within seconds. When you dip a piece of toasted baguette into the center, the cheese pulls away in long, satisfying strings, offering a rich, savory flavor that is perfectly balanced by the crunch of the accompaniments. It’s hearty, warm, and creates an irresistible focal point that encourages communal snacking.
Ingredients
- 2 cups shredded sharp cheddar cheese
- 1 cup shredded mozzarella for stretch
- 8 oz cream cheese, softened
- 1/2 cup mayonnaise
- 2 cloves garlic, minced
- 1/4 teaspoon smoked paprika
- Toasted baguette slices and celery sticks for dipping
How to make it
- Preheat your oven to 375°F (190°C) and lightly grease a small ceramic baking dish that will fit neatly in the center of your wooden food board.
- In a large mixing bowl, combine the softened cream cheese and mayonnaise, beating them together until the mixture is completely smooth and free of lumps.
- Fold in the shredded cheddar, mozzarella, minced garlic, and smoked paprika, ensuring the spices are evenly distributed throughout the cheese blend for a consistent flavor profile in every bite.
- Spread the mixture into the prepared baking dish and smooth the top, then place in the oven to bake for 20 to 25 minutes; you are looking for the edges to be bubbling vigorously and the top to have developed a beautiful, speckled golden crust.
- Remove from the oven and let it rest for 5 minutes to allow the cheese to set slightly so it clings to the bread, then place the hot dish onto the board and surround it with your dipping elements for immediate serving.
The Designer Cupcake Frosting Station
Why we love this
There is an undeniable elegance to a board filled with perfectly domed cupcakes and bowls of silky, high-gloss buttercream frosting. The sight of piped swirls and intricate textures creates a professional, bakery-style aesthetic that is surprisingly easy to achieve at home. Each bite of a perfectly frosted cupcake offers a contrast between the moist, tender cake and the rich, airy sweetness of the frosting that melts instantly. This board allows guests to marvel at the craftsmanship of the decorations while choosing the flavor profile that speaks to their sweet tooth.
Ingredients
- 12 pre-baked vanilla or chocolate cupcakes
- 1 cup unsalted butter, softened
- 3-4 cups powdered sugar, sifted
- 2 tablespoons heavy cream
- 1 teaspoon vanilla bean paste
- Piping bags and assorted tips (1M or 2D recommended)
How to make it
- Ensure your cupcakes are completely cooled to room temperature before you even think about frosting; any residual heat will melt the butter in your icing and cause it to slide right off.
- In a stand mixer fitted with the paddle attachment, cream the softened butter on medium speed for at least 5 minutes until it becomes pale, almost white, and very airy.
- Add the powdered sugar one cup at a time on low speed to avoid a sugar cloud, then add the vanilla bean paste and heavy cream, increasing the speed to high for another 2 minutes to whip the frosting into a cloud-like consistency.
- Fit your piping bag with a star tip and fill it halfway with frosting, twisting the top of the bag to create pressure; this gives you better control over the flow of the icing.
- Starting from the outer edge of the cupcake, squeeze with steady pressure and move in a circular motion toward the center, slightly overlapping each layer to create a tall, professional swirl, then finish with a quick ‘flick’ of the wrist to create a neat peak.
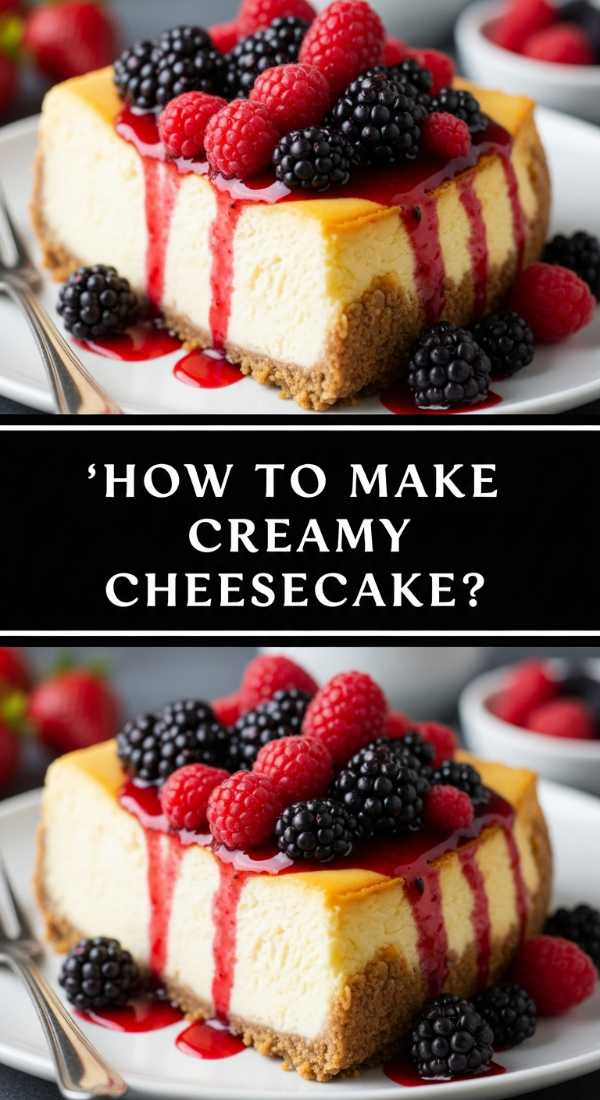
The Miniature Creamy Cheesecake Sampler

Why we love this
Cheesecake is the ultimate luxury dessert, and presenting it as a board of bite-sized treats makes it feel even more special and accessible. Each miniature cake features a buttery, crisp graham cracker crust topped with a filling that is incredibly smooth, dense, and tangy. The aesthetic of the board is heightened by the various toppings—vibrant fruit compotes, chocolate drizzles, and crushed nuts—that offer a burst of flavor and texture in every single mouthful. It’s a sophisticated way to serve a classic dessert, providing a little taste of decadence for everyone without the need for messy slicing.
Ingredients
- 1 1/2 cups graham cracker crumbs
- 3 tablespoons melted butter
- 16 oz cream cheese, room temperature
- 1/2 cup sugar
- 2 eggs, room temperature
- 1/2 cup sour cream
- 1 teaspoon vanilla extract
- Assorted toppings (caramel, raspberries, chocolate chips)
How to make it
- Line a mini-muffin tin with paper liners and press a mixture of graham cracker crumbs and melted butter into the bottom of each, baking for 5 minutes at 325°F (165°C) to set the crust and ensure it stays crunchy.
- In a clean bowl, beat the room-temperature cream cheese and sugar until perfectly smooth; using room-temperature ingredients is the most critical step to avoid tiny white lumps in your final cheesecake.
- Add the eggs one at a time, mixing on the lowest speed possible just until incorporated to prevent adding excess air, which causes the cheesecakes to puff up and then crack as they cool.
- Fold in the sour cream and vanilla, then pour the batter into the prepared liners, filling them nearly to the top, and bake for 15-18 minutes until the edges are set but the centers still have a slight jiggle.
- Turn off the oven and crack the door open, letting the cheesecakes cool inside for 30 minutes before moving them to the fridge; this gradual temperature change prevents cracking and ensures that signature creamy, dense texture before you arrange them on your viral board.
Wrapping Up Your Viral Board
Creating a food board that goes viral is all about the love and detail you put into the preparation. Whether you’re whipping up a stack of the fluffiest pancakes or piping the perfect swirl onto a cupcake, the key is to keep things fresh, colorful, and abundant. These boards aren’t just snacks; they are the centerpieces of your memories. So grab your biggest wooden tray, pick one of these themes, and get ready to be the host everyone is talking about!
Frequently Asked Questions
Can I prepare these boards in advance? Yes! Most of the components, like the sugar cookies or the cheesecake bites, can be made a day ahead. However, assemble the final board just before guests arrive to keep everything looking fresh and vibrant.
How do I keep the warm items hot? For items like pancakes or cheesy bakes, use a warmed ceramic dish or a small warming stone hidden under a cloth on the board to help retain heat while serving.
What is the best type of board to use? A large, food-safe wooden or marble slab is ideal. Make sure it has been properly seasoned with mineral oil if it’s wood to prevent staining from oils and sauces.