
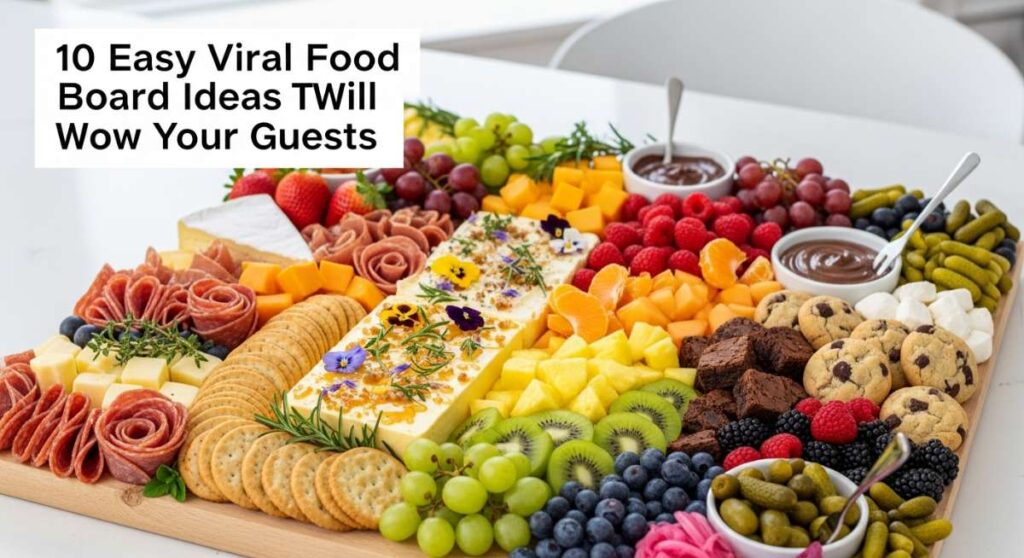
10 Easy Viral Food Board Ideas That Will Wow Your Guests
There is something inherently magical about the way a shared board brings people together. I remember the first time I set out a massive, colorful spread for my closest friends—the room instantly filled with laughter, the clinking of glasses, and the collective ‘oohs’ and ‘aahs’ that every host dreams of hearing. It’s not just about the food; it’s about the experience of grazing, discovering new flavor combinations, and the visual feast that starts the party before the first bite is even taken.
In today’s fast-paced world, hosting shouldn’t feel like a chore. These viral food board ideas are designed to be effortless yet high-impact, focusing on fresh ingredients and simple techniques that yield professional-looking results. Whether you are planning a sun-drenched backyard gathering or a cozy indoor dinner, these boards will help you create a ‘wow’ factor that lingers long after the last crumb is gone. Let’s dive into these ten simple yet stunning ideas that will make you the ultimate host.
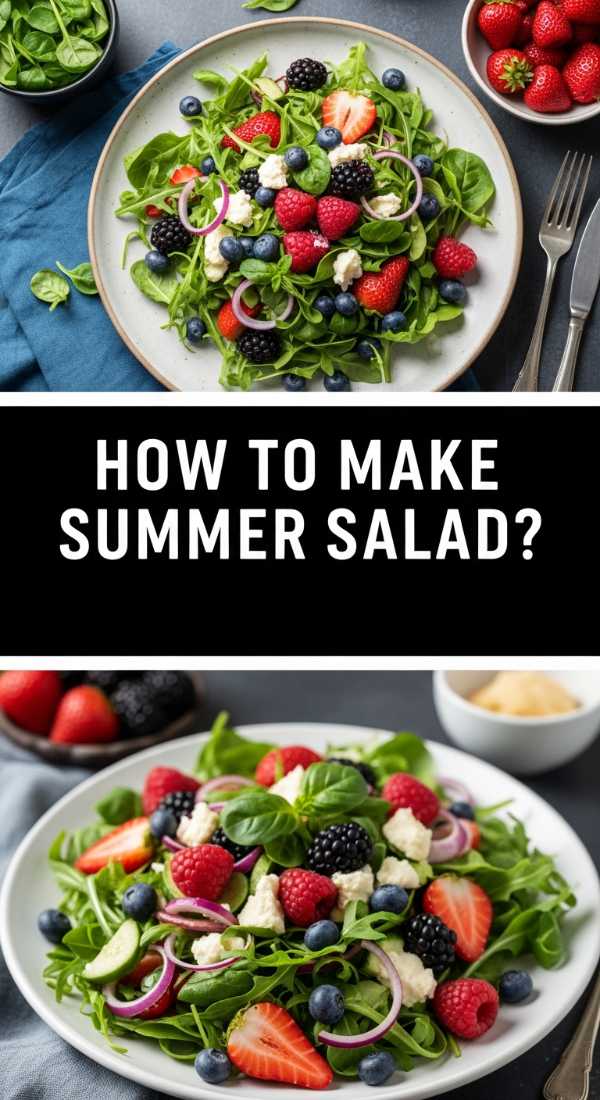
How to make summer salad?
Why we love this
Nothing captures the essence of a warm July afternoon quite like a vibrant summer salad board. The crunch of baby arugula paired with the explosive sweetness of peak-season strawberries creates a symphony of textures that dance on the tongue. As the creamy feta crumbles melt into the balsamic glaze, you get a beautiful balance of salty and sweet, while the earthy aroma of toasted walnuts rounds out every bite. It is light, refreshing, and looks like a masterpiece of natural colors on any table.
Ingredients
- 4 cups baby arugula
- 2 cups sliced strawberries
- 1/2 cup crumbled feta cheese
- 1/4 cup toasted walnuts
- Balsamic glaze drizzle
- Extra virgin olive oil
- Sea salt and cracked black pepper
How to make it
- Begin by washing and thoroughly drying your arugula; use a salad spinner to ensure no excess moisture dilutes the flavors.
- Scatter the greens across a large wooden board as a base layer, fluffing them up to create volume.
- Slice your strawberries vertically into thin hearts and distribute them evenly over the greens for a pop of bright red color.
- Toast your walnuts in a dry skillet over medium-low heat for 3-5 minutes, shaking frequently until they smell fragrant and look slightly golden; let them cool before adding to the board.
- Sprinkle the feta cheese crumbles generously over the top, followed by the cooled walnuts.
- Just before serving, whisk your olive oil with salt and pepper and drizzle it lightly, then finish with a dramatic zig-zag of thick balsamic glaze.
How to grill juicy chicken?

Why we love this
A platter of perfectly grilled chicken is the ultimate crowd-pleaser, offering a smoky aroma that instantly signals a good time. When done right, the exterior boasts beautiful, caramelized grill marks that give way to an incredibly tender and succulent interior. The scent of charred lemon and garlic wafts through the air, promising a savory experience that is both comforting and sophisticated. It’s the kind of dish that makes people reach for seconds and thirds, especially when served with a side of cooling herb aioli.
Ingredients
- 1.5 lbs chicken breasts or thighs
- 1/4 cup olive oil
- 4 cloves minced garlic
- 1 tsp smoked paprika
- Zest and juice of 1 lemon
- Fresh oregano and thyme
How to make it
- Pat the chicken completely dry with paper towels to ensure a good sear; if using breasts, pound them to an even thickness of about 3/4 inch.
- In a bowl, whisk together olive oil, garlic, lemon juice, zest, paprika, and chopped herbs to create a marinade.
- Submerge the chicken in the marinade for at least 30 minutes, but ideally 2 hours, in the refrigerator to allow the enzymes to tenderize the meat.
- Preheat your grill to high heat (around 450°F) and oil the grates thoroughly to prevent sticking.
- Place the chicken on the grill and sear for 5-6 minutes without moving it to develop deep grill marks, then flip once.
- Reduce heat to medium and continue cooking until the internal temperature reaches exactly 165°F; remove immediately and tent with foil for 10 minutes to allow the juices to redistribute.
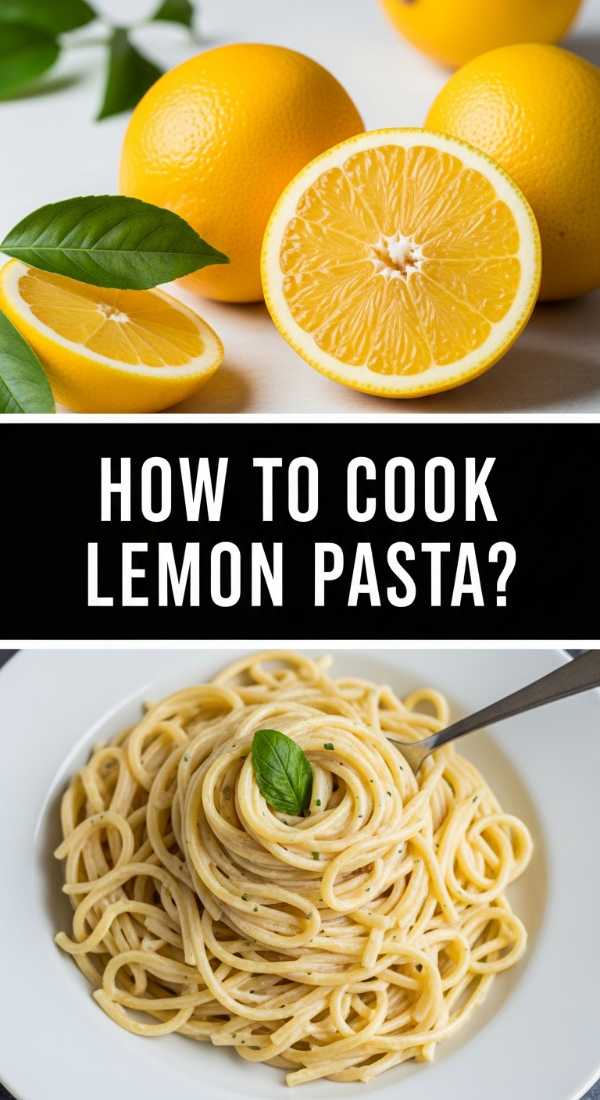
How to cook lemon pasta?
Why we love this
Lemon pasta is the epitome of ‘simple elegance,’ turning pantry staples into a dish that feels like a trip to the Amalfi Coast. The silky, buttery sauce coats every strand of pasta, carrying the bright, zesty fragrance of fresh lemons and the sharp bite of aged parmesan. There is a luxurious creaminess that comes from the emulsification of pasta water and cheese, creating a mouthfeel that is rich yet surprisingly light. It’s a comforting, aromatic bowl of sunshine that satisfies the soul.
Ingredients
- 1 lb linguine or spaghetti
- 2 large lemons (zest and juice)
- 1/2 cup unsalted butter
- 1 cup freshly grated Parmesan cheese
- 1/2 cup heavy cream (optional)
- Fresh basil and red pepper flakes
How to make it
- Bring a large pot of heavily salted water to a rolling boil; the water should taste like the sea to properly season the pasta.
- Cook the pasta until it is ‘al dente’—usually 1-2 minutes less than the package instructions—as it will finish cooking in the sauce.
- While pasta cooks, melt butter in a large skillet over medium heat and stir in the lemon zest and garlic until fragrant, taking care not to brown the butter.
- Reserved 1 cup of starchy pasta water before draining the noodles.
- Add the lemon juice and half the pasta water to the skillet, then toss in the hot pasta and the parmesan cheese.
- Vigorously toss the pasta over low heat, adding more pasta water as needed until a glossy, creamy sauce forms that clings to the noodles.
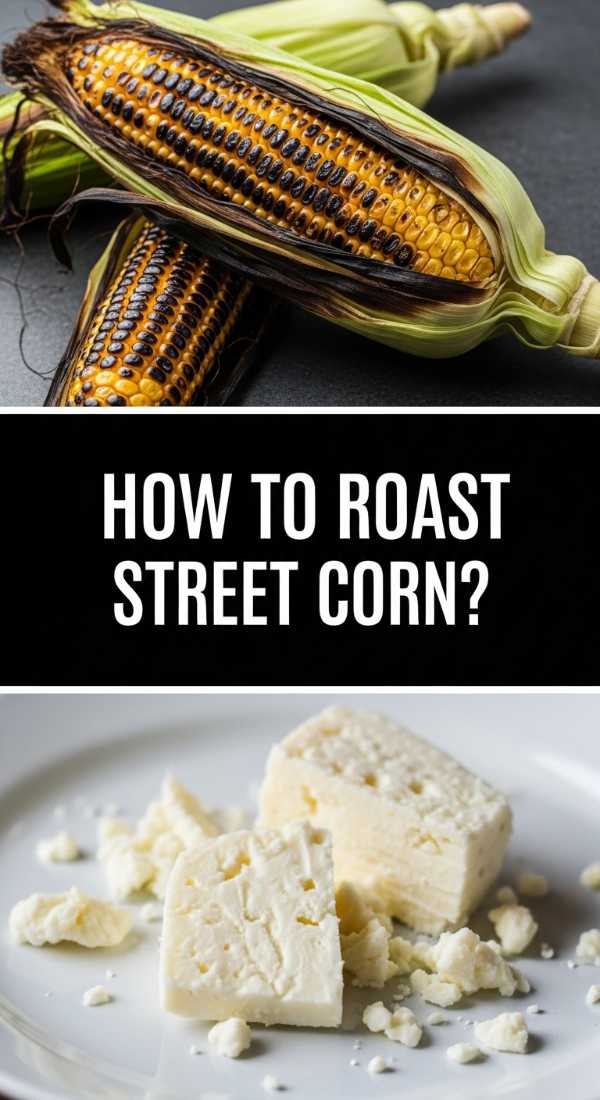
How to roast street corn?
Why we love this
Roasted street corn, or Elote, is a textural masterpiece that brings the vibrant energy of a summer fair right to your kitchen. Each kernel is charred to perfection, offering a sweet, smoky pop that contrasts beautifully with the thick, cool coating of lime-infused crema. The salty tang of cotija cheese and the spicy kick of chili powder create a flavor profile that is bold, messy, and absolutely addictive. It’s a sensory experience that involves sticky fingers and big smiles.
Ingredients
- 6 ears of fresh sweet corn
- 1/4 cup mayonnaise
- 1/4 cup sour cream or Mexican crema
- 1/2 cup crumbled Cotija cheese
- 1 tsp chili powder or Tajin
- Fresh cilantro and lime wedges
How to make it
- Peel back the husks of the corn but leave them attached at the base to use as a handle, removing all silk.
- Heat a grill or a cast-iron griddle to medium-high heat and lightly brush the corn with oil.
- Roast the corn for about 10-12 minutes, turning frequently, until the kernels are bright yellow and have charred spots on all sides.
- In a small bowl, whisk together the mayo, sour cream, and a squeeze of lime juice until smooth.
- Brush the warm corn generously with the mayo mixture, then roll each ear in the crumbled Cotija cheese until well-coated.
- Dust with chili powder and garnish with chopped cilantro; serve immediately with extra lime wedges for squeezing.
How to make fresh tacos?

Why we love this
A fresh taco board is the ultimate interactive dining experience, allowing every guest to become their own chef. The aroma of warm, toasted corn tortillas fills the room, acting as the perfect canvas for a variety of colorful toppings. From the crunch of radishes to the creamy richness of avocado and the zing of house-made salsa, every bite is a customizable explosion of flavor. It’s a social way to eat that encourages passing bowls and sharing favorites, making it the heart of any party.
Ingredients
- Small corn or flour tortillas
- Protein of choice (seasoned beef, shrimp, or beans)
- Thinly sliced radishes
- Pickled red onions
- Fresh pico de gallo
- Avocado slices and lime wedges
How to make it
- Prepare your chosen protein with a blend of cumin, chili powder, and garlic, cooking until juicy and well-browned.
- Warm your tortillas individually on a dry skillet over medium-high heat for about 30 seconds per side until they develop brown ‘freckles’ and become pliable.
- Keep the tortillas warm by wrapping them in a clean kitchen towel or a dedicated tortilla warmer.
- Arrange the protein in the center of your board and surround it with small bowls containing the radishes, onions, and salsa.
- Slice the avocados at the very last second and spritz with lime juice to prevent browning.
- Assemble by layering the protein first, followed by the heavy toppings, and finishing with a squeeze of lime and a sprig of cilantro.
How to bake honey salmon?
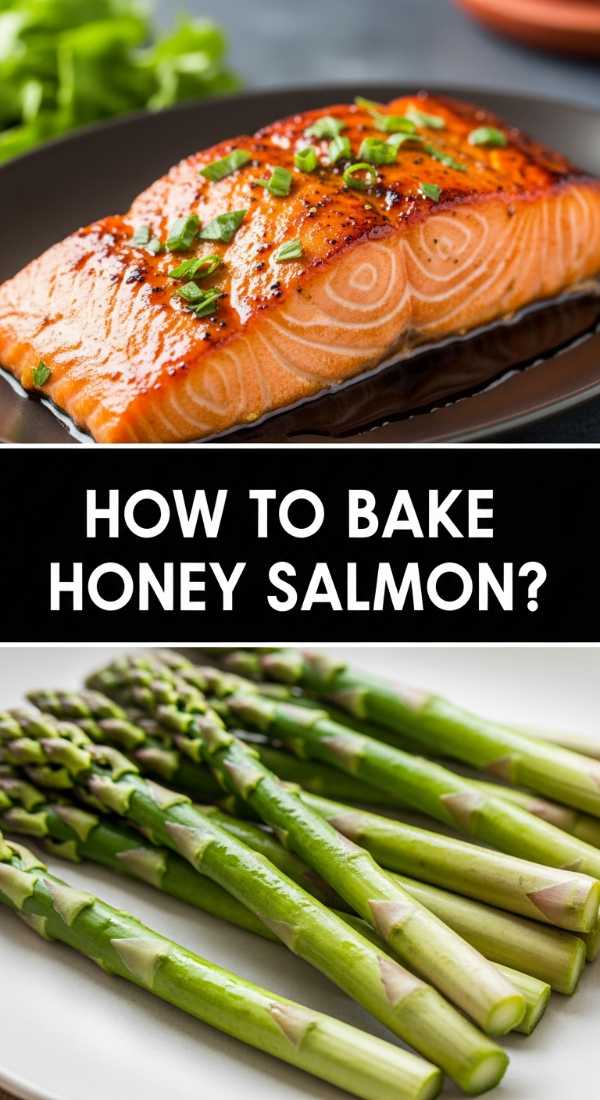
Why we love this
Honey salmon is a showstopper that balances sophisticated flavors with incredible ease. As it bakes, the honey and soy sauce glaze reduces into a sticky, mahogany-colored lacquer that infuses the fish with a deep, umami sweetness. The salmon remains buttery and moist, flaking easily under a fork to reveal a tender, pink center. The scent of caramelized ginger and garlic is intoxicating, making this the star of any dinner board when paired with steamed greens or grains.
Ingredients
- 4 salmon fillets (6 oz each)
- 1/4 cup honey
- 2 tbsp soy sauce
- 1 tbsp grated fresh ginger
- 2 cloves minced garlic
- Sliced green onions for garnish
How to make it
- Preheat your oven to 400°F (200°C) and line a baking sheet with parchment paper for easy cleanup.
- In a small saucepan, simmer the honey, soy sauce, ginger, and garlic over medium heat for 3-5 minutes until the mixture thickens slightly into a syrup.
- Pat the salmon fillets dry and place them on the baking sheet; season lightly with salt, keeping in mind the soy sauce is already salty.
- Brush a thick layer of the honey glaze over each fillet, ensuring the tops and sides are well-covered.
- Bake for 12-15 minutes, depending on thickness; the fish should be opaque and flake easily when tested with a fork in the thickest part.
- For an extra-viral look, turn on the broiler for the last 2 minutes to get those edges slightly charred and bubbly.
How to grill veggie skewers?

Why we love this
Veggie skewers bring a rainbow of colors and a wealth of earthy flavors to your food board. There is something deeply satisfying about the charred, slightly sweet taste of bell peppers and red onions after they’ve spent time over an open flame. The zucchini becomes tender yet retains a bite, while the balsamic drizzle adds a sophisticated tang that ties everything together. They are visual proof that vegetables can be the most exciting part of the meal when treated with a little smoke and fire.
Ingredients
- Red and yellow bell peppers
- Zucchini and yellow squash
- Red onion
- Whole cremini mushrooms
- Olive oil and balsamic glaze
- Dried oregano and garlic salt
How to make it
- If using wooden skewers, soak them in water for at least 30 minutes to prevent them from burning on the grill.
- Cut all vegetables into uniform 1-inch chunks to ensure they cook at the same rate.
- Toss the vegetable pieces in a large bowl with olive oil, garlic salt, and oregano until every surface is lightly coated.
- Thread the vegetables onto the skewers, alternating colors and types for the most attractive presentation.
- Grill over medium-high heat for 8-10 minutes, rotating every few minutes until the vegetables are tender and have distinct grill marks.
- Remove from heat, arrange on your board, and finish with a generous drizzle of thick balsamic glaze.
How to make turkey burgers?

Why we love this
Turkey burgers often get a bad rap, but when made with care, they are incredibly juicy and packed with savory flavor. These burgers offer a lighter alternative to beef without sacrificing that classic ‘grill-out’ satisfaction. The secret lies in the aromatics mixed into the meat, ensuring every bite is moist and seasoned to perfection. When served on a toasted brioche bun with a slice of melted cheese, they become a gourmet centerpiece that feels both healthy and indulgent.
Ingredients
- 1 lb ground turkey (93% lean is best)
- 1/4 cup grated onion (including juices)
- 1 tbsp Worcestershire sauce
- 2 cloves minced garlic
- Brioche buns
- Toppings: Lettuce, tomato, avocado, swiss cheese
How to make it
- In a large bowl, gently mix the ground turkey with the grated onion, Worcestershire sauce, and garlic; do not overwork the meat, or the burgers will become tough.
- Form the mixture into 4 even patties, about 1/2 inch thick, and use your thumb to make a small indentation in the center of each to prevent bulging during cooking.
- Preheat a skillet or grill to medium heat and lightly oil the surface.
- Cook the patties for 5-6 minutes on the first side, then flip once.
- Add a slice of cheese during the last 2 minutes of cooking and cover with a lid to melt it perfectly.
- Cook until the internal temperature reaches a safe 165°F; serve on toasted buns with your favorite condiments.
How to make quinoa bowls?

Why we love this
Quinoa bowls are the ultimate ‘clean girl’ aesthetic dish, offering a beautiful arrangement of superfoods that feel as good as they look. The nuttiness of the fluffy quinoa provides a perfect base for the massaged kale and roasted chickpeas. When drizzled with a creamy, lemon-tahini dressing, the flavors meld into something truly spectacular—earthy, bright, and deeply satisfying. It’s a nutrient-dense board option that provides sustained energy and a stunning array of textures.
Ingredients
- 1 cup quinoa (rinsed)
- 2 cups water or vegetable broth
- 2 cups chopped kale
- 1 can chickpeas (drained and roasted)
- 1/2 cup cucumber and cherry tomatoes
- Tahini dressing (tahini, lemon, maple syrup)
How to make it
- Combine quinoa and broth in a saucepan; bring to a boil, then cover and simmer on low for 15 minutes until liquid is absorbed and quinoa is fluffy.
- While quinoa cooks, toss chickpeas with olive oil and cumin, then roast at 400°F for 20 minutes until crunchy.
- Place the kale in a bowl with a splash of olive oil and a pinch of salt; ‘massage’ the leaves with your hands for 2 minutes until they turn dark green and soften.
- Arrange the quinoa as the base of the bowl or board, then place clusters of kale, roasted chickpeas, cucumbers, and tomatoes on top.
- Whisk together the tahini, lemon juice, and a splash of warm water until it reaches a pourable consistency.
- Drizzle the dressing over the bowl in a swirl pattern and top with hemp seeds or microgreens for a professional finish.
How to make zucchini fries?

Why we love this
Zucchini fries are the crispy, golden answer to a craving for something fried but much lighter. Each wedge is coated in a seasoned panko and parmesan crust that shatters with a satisfying crunch, revealing a tender, succulent interior. The hint of salty parmesan paired with a zesty dipping sauce makes these absolutely irresistible as an appetizer or a side. They are best served hot and piled high on a board, where their golden hue and aromatic herbs can truly shine.
Ingredients
- 2 medium zucchinis
- 1/2 cup all-purpose flour
- 2 large eggs (beaten)
- 1 cup Panko breadcrumbs
- 1/2 cup grated Parmesan cheese
- 1 tsp garlic powder and dried parsley
How to make it
- Preheat your oven to 425°F (220°C) and place a wire rack over a baking sheet; this allows air to circulate for maximum crispiness.
- Slice the zucchini into 3-inch long sticks, about 1/2 inch thick, ensuring they are uniform.
- Set up three bowls: one with flour, one with the beaten eggs, and one with a mixture of Panko, parmesan, and spices.
- Dredge each zucchini stick in flour, dip in egg, and then press firmly into the Panko mixture until fully coated.
- Arrange the fries on the wire rack so they aren’t touching, which prevents steaming.
- Bake for 15-20 minutes until they are a deep golden brown and feel firm to the touch; serve immediately with marinara or spicy mayo.
Conclusion
Creating a viral food board is less about following a strict recipe and more about embracing the joy of fresh ingredients and beautiful presentation. From the smoky char of street corn to the delicate sweetness of honey-baked salmon, these ten ideas offer something for every palate and every occasion. The next time you host, remember that the most important ingredient is the connection you build with your guests. So, grab a board, start prepping, and watch as your table becomes the heart of the home!
Frequently Asked Questions
- What is the best board to use for these spreads?
- A large, food-safe wooden board is classic, but you can also use marble slabs or even clean parchment paper laid directly on your table for a more rustic, ‘grazing table’ look.
- How do I keep the hot items warm on a board?
- The trick is to prep your cold items first and add the hot components (like the chicken or fries) at the very last second. You can also pre-warm your board in a low oven if it’s made of stone or thick wood.
- Can I make these boards ahead of time?
- You can certainly chop the vegetables and prepare the dressings up to 24 hours in advance. However, the assembly should happen within an hour of serving to ensure everything stays fresh and crisp.