

Why This Simple Food Board Trend is Taking Over Your Feed
There is something inherently magical about the moment a sprawling, colorful food board is placed in the center of a table. It’s an instant conversation starter, a visual feast that signals the start of a shared experience. In a world where we’re often rushed and eating on the go, the ‘Food Board’ trend has reclaimed the joy of lingering over a meal, turning simple ingredients into a communal masterpiece that feels both luxurious and approachable.
I remember the first time I set one out for a Sunday brunch; the room immediately filled with the sound of laughter and the clinking of plates as friends reached for different textures and flavors. It’s not just about the food; it’s about the organized chaos of textures—the crunch of golden panko, the pull of melted cheese, and the vibrant colors of fresh garnish. It’s about creating a landscape of flavors that invites everyone to build their own perfect bite, making every guest feel like part of the creative process.
How to make crispy chicken katsu

Why we love this
There is nothing quite like the auditory satisfaction of slicing into a perfectly fried chicken katsu. The exterior is a craggy, golden-brown landscape of airy panko breadcrumbs that shatter upon impact, revealing a steaming, incredibly juicy interior that has been seasoned to perfection. As the aroma of toasted bread and savory poultry wafts up, you realize it’s the ultimate comfort food—elegant enough for a curated board but soulful enough to satisfy any craving for something fried and hearty.
Ingredients
- 2 boneless skinless chicken breasts
- 1 cup all-purpose flour
- 2 large eggs, beaten
- 2 cups panko breadcrumbs
- Salt and black pepper to taste
- Neutral oil for frying (canola or vegetable)
How to make it
- Begin by butterfly-cutting the chicken breasts to ensure even thickness, then pound them with a meat mallet until they are about half an inch thick; this ensures they cook quickly and remain juicy.
- Season both sides of the chicken generously with salt and black pepper to build a base layer of flavor.
- Set up a dredging station with three shallow bowls: one with flour, one with the beaten eggs, and one with panko breadcrumbs.
- Dredge each piece of chicken in flour, shaking off the excess, then dip into the egg wash until fully coated, and finally press firmly into the panko, ensuring every nook and cranny is covered in crumbs for maximum crunch.
- Heat about an inch of oil in a heavy-bottomed skillet over medium-high heat until it reaches 350°F (175°C); you can test this by dropping a panko crumb in—if it sizzles immediately, it’s ready.
- Carefully lower the chicken into the hot oil and fry for 3-4 minutes per side until the coating is a deep, golden mahogany and the internal temperature reaches 165°F.
- Transfer the katsu to a wire cooling rack rather than paper towels to allow air to circulate, which keeps the bottom from getting soggy while the meat rests for 5 minutes before slicing.
How to make cheesy ham sliders

Why we love this
These sliders are the quintessential crowd-pleaser, offering a symphony of sweet, salty, and savory notes in every handheld bite. As they bake, the Swiss cheese transforms into a molten, lacey blanket that binds the smoky ham to the soft, pillowy Hawaiian rolls. The buttery glaze on top browns into a slightly tacky, savory crust infused with onion and poppy seeds, creating a sensory experience that is warm, gooey, and impossible to eat just one of.
Ingredients
- 1 package (12 count) sweet Hawaiian rolls
- 1 lb thinly sliced deli ham
- 1/2 lb Swiss cheese slices
- 1/2 cup unsalted butter, melted
- 1 tbsp Dijon mustard
- 1 tsp Worcestershire sauce
- 1 tbsp poppy seeds
- 1 tsp dried minced onion
How to make it
- Preheat your oven to 350°F (175°C) and grease a 9×13 inch baking dish lightly to prevent the rolls from sticking to the bottom.
- Using a long serrated knife, slice the entire slab of rolls in half horizontally, keeping them connected, and place the bottom half into the prepared baking dish.
- Layer the sliced ham evenly over the bottom buns, folding the slices to create height and texture, then top with an overlapping layer of Swiss cheese.
- Place the top half of the rolls back over the cheese to close the sandwiches.
- In a small bowl, whisk together the melted butter, Dijon mustard, Worcestershire sauce, poppy seeds, and dried minced onion until well combined.
- Pour the butter mixture evenly over the rolls, using a pastry brush to ensure the sides and tops are completely saturated with the savory glaze.
- Cover the dish with foil and bake for 15 minutes to melt the cheese, then remove the foil and bake for another 5-10 minutes until the tops are golden brown and slightly crisp to the touch.
How to cook savory japanese ramen

Why we love this
Ramen is more than a soup; it is a warm embrace in a bowl that features a complex interplay of umami-rich broth and springy, alkaline noodles. The scent of ginger, garlic, and toasted sesame oil fills the kitchen as the broth simmers, promising a deep, layered flavor profile that coats the palate. Topping it with a jammy-yolked egg and crisp scallions adds a freshness that cuts through the richness, making every slurp a discovery of different textures and intense savory goodness.
Ingredients
- 2 portions ramen noodles (fresh or dried)
- 4 cups chicken or pork broth
- 2 tbsp soy sauce
- 1 tbsp miso paste
- 1 tsp grated ginger
- 2 cloves garlic, minced
- Toppings: Soft-boiled egg, sliced green onions, nori sheets, and bamboo shoots
How to make it
- In a large pot, sauté the minced garlic and grated ginger in a splash of oil over medium heat for about 1 minute until fragrant but not browned.
- Pour in the broth and bring it to a gentle simmer; once simmering, whisk in the soy sauce and miso paste until the miso is completely dissolved and no clumps remain.
- Let the broth simmer on low for at least 15-20 minutes to allow the flavors to marry and deepen in intensity.
- While the broth simmers, boil a separate pot of water and cook the ramen noodles according to package instructions—usually 2-3 minutes—ensuring they stay slightly ‘al dente’ as they will continue to soften in the hot soup.
- Prepare your soft-boiled eggs by boiling them for exactly 6 minutes and 30 seconds, then immediately shocking them in an ice bath to stop the cooking process.
- Divide the cooked noodles into two deep bowls and ladle the piping hot broth over them until the noodles are submerged.
- Top artistically with the halved jammy egg, a handful of sliced scallions, a square of nori, and a drizzle of chili oil if you prefer a bit of heat.
How to cook garlic butter rolls

Why we love this
The aroma of yeast and roasted garlic wafting through the house is enough to bring anyone to the kitchen in anticipation. These rolls are cloud-like in their softness, with a delicate crumb that pulls apart effortlessly to reveal a center infused with herbaceous butter. The top crust is brushed with a generous amount of garlic-flecked butter and a sprinkle of flaky sea salt, providing a sharp contrast to the sweet, doughy interior that melts in your mouth with every bite.
Ingredients
- 1 pack of dinner roll dough (store-bought or homemade)
- 1/2 cup unsalted butter, softened
- 4 cloves garlic, finely minced
- 2 tbsp fresh parsley, chopped
- 1/2 tsp flaky sea salt
How to make it
- If using frozen dough, allow the rolls to thaw and rise in a warm, draft-free spot until they have doubled in size and look light and airy.
- Preheat your oven to 375°F (190°C) and line a baking sheet with parchment paper or lightly grease a round cake pan for a ‘pull-apart’ effect.
- In a small saucepan, melt the butter over low heat and add the minced garlic, cooking it gently for 2-3 minutes to infuse the butter without letting the garlic turn bitter or brown.
- Stir in the chopped parsley and a pinch of salt to the butter mixture, then remove from heat.
- Bake the rolls for 12-15 minutes until they are puffed and the tops have achieved a beautiful light golden-brown hue.
- Immediately upon removing the rolls from the oven, brush them liberally with the warm garlic butter while they are still hot so the bread absorbs the flavor.
- Finish with a sprinkle of flaky sea salt and serve warm while the centers are still steamy and soft.
How to make fluffy japanese omelet

Why we love this
Tamagoyaki, or the Japanese rolled omelet, is a masterclass in delicate textures and balanced flavors, combining a hint of sweetness with the savory depth of dashi. Each layer is paper-thin and meticulously folded, resulting in a dense yet incredibly soft, custard-like consistency that feels luxurious on the tongue. The bright yellow color adds a pop of sunshine to any food board, while its cool or room-temperature serving style makes it a versatile and sophisticated addition to a shared meal.
Ingredients
- 4 large eggs
- 2 tbsp dashi (or chicken stock)
- 1 tbsp sugar
- 1 tsp soy sauce
- A pinch of salt
- Neutral oil for greasing the pan
How to make it
- In a medium bowl, whisk the eggs gently with the dashi, sugar, soy sauce, and salt, being careful not to incorporate too much air; you want a smooth liquid, not a frothy one.
- Strain the egg mixture through a fine-mesh sieve into another bowl to ensure the omelet is perfectly smooth and free of any stringy egg white bits.
- Heat a rectangular tamagoyaki pan (or a small non-stick skillet) over medium-low heat and lightly oil the surface using a paper towel dipped in oil.
- Pour a thin layer of the egg mixture into the pan, swirling to cover the entire bottom; as soon as it sets but is still slightly wet on top, start rolling it from one end to the other.
- Push the rolled log to the end of the pan, re-oil the empty space, and pour in another thin layer of egg, making sure to lift the first roll so the new liquid flows underneath it.
- Repeat this process of pouring and rolling until all the egg mixture is used, creating a thick, multi-layered log.
- Remove the log from the pan and let it rest for a few minutes on a bamboo mat to set its shape before slicing into 1-inch thick pieces to reveal the beautiful internal spirals.
How to bake pull apart bread
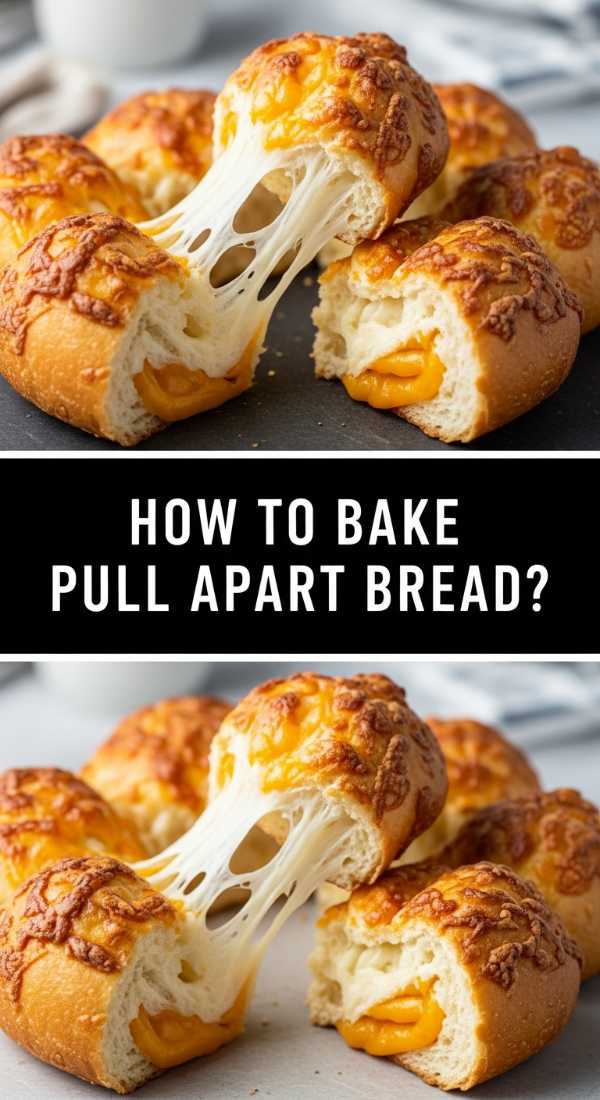
Why we love this
Pull-apart bread is the ultimate interactive food, designed specifically for sharing and getting your hands a little messy. As you tug on a piece, you’re rewarded with long, theatrical strands of melted mozzarella and the scent of toasted herbs. The edges of the bread become incredibly crispy and buttery in the oven, while the crevices remain soft and soaked in savory oils, making every bite a perfect balance of crunch and chew that keeps everyone coming back for more.
Ingredients
- 1 large loaf of sourdough or artisan bread
- 1/2 cup butter, melted
- 2 cups shredded mozzarella cheese
- 1/4 cup chopped fresh herbs (rosemary, thyme, parsley)
- 3 cloves garlic, minced
How to make it
- Preheat your oven to 350°F (175°C) and line a baking sheet with a large piece of aluminum foil that can later be folded over the bread.
- Using a sharp bread knife, cut the loaf of bread in a crosshatch pattern, slicing vertically and horizontally at 1-inch intervals but stopping just before you hit the bottom crust so the loaf stays intact.
- Mix the melted butter with the minced garlic and fresh herbs in a small bowl until well combined.
- Using a spoon or a brush, drizzle the garlic butter deep into all the crevices of the bread, ensuring the interior is well-seasoned.
- Stuff the shredded mozzarella cheese into the cracks, pushing it down so it’s nestled deep within the loaf for maximum ‘cheese pull’ potential.
- Wrap the entire loaf in the aluminum foil and bake for 15 minutes, then open the foil to expose the top and bake for another 10 minutes until the cheese is bubbly and the bread tips are golden and toasted.
- Serve immediately while the cheese is at its stretchiest, placing it right in the center of your food board.
How to cook tender teriyaki chicken

Why we love this
There is a seductive quality to a perfectly glazed teriyaki chicken, with its shiny, dark amber coating that clings to every curve of the meat. The chicken thighs remain incredibly succulent, providing a fatty richness that pairs beautifully with the sweet and salty punch of the sauce. As the sugar in the glaze caramelizes over the heat, it develops a slight char that adds a smoky dimension, creating a dish that feels both comforting and high-end, especially when garnished with toasted sesame seeds.
Ingredients
- 1 lb boneless, skinless chicken thighs
- 1/2 cup soy sauce
- 1/4 cup mirin
- 1/4 cup sake (or water)
- 2 tbsp brown sugar
- 1 tsp grated ginger
- 1 tsp cornstarch mixed with 1 tsp water (slurry)
How to make it
- Pat the chicken thighs dry with paper towels and season lightly with salt and pepper; drying the skin ensures better searing and sauce adhesion.
- In a small saucepan, combine the soy sauce, mirin, sake, brown sugar, and ginger; simmer over medium heat for 5 minutes until the sugar is fully dissolved.
- Whisk in the cornstarch slurry and continue to simmer for another 2 minutes until the sauce thickens enough to coat the back of a spoon, then set aside.
- Heat a tablespoon of oil in a large skillet over medium-high heat and sear the chicken thighs for 5-6 minutes on each side until they are fully cooked and have a nice brown crust.
- Pour the prepared teriyaki sauce into the skillet with the chicken, turning the heat to medium-low.
- Flip the chicken repeatedly in the sauce for 2-3 minutes as it bubbles and reduces, ensuring every inch of the meat is coated in a thick, glossy glaze.
- Let the chicken rest for 3 minutes before slicing into strips, allowing the juices to redistribute for maximum tenderness.
How to make breakfast slider sandwiches

Why we love this
Breakfast sliders are the hero of any morning gathering, condensing all the best parts of a full breakfast into a neat, buttery package. The combination of fluffy scrambled eggs, crispy salty bacon, and sharp cheddar cheese nested within a sweet bun creates a flavor profile that hits every satisfaction point. The tops are typically brushed with a maple-butter glaze, adding a hint of sweetness that perfectly complements the savory fillings, making these a sophisticated yet cozy addition to a brunch-themed food board.
Ingredients
- 12-count pack Hawaiian rolls
- 6 large eggs, scrambled
- 8 slices of cooked bacon, halved
- 6 slices of cheddar cheese
- 2 tbsp butter, melted
- 1 tbsp maple syrup
How to make it
- Preheat your oven to 350°F (175°C) and prepare your bacon ahead of time until it is crispy and drained of excess grease.
- Slice the pack of rolls in half horizontally and place the bottom half on a parchment-lined baking sheet.
- Layer the cheddar cheese slices over the bottom buns, then top with a thick, even layer of the fluffy scrambled eggs.
- Place the halved bacon strips over the eggs, ensuring every slider gets two pieces for consistent crunch.
- Place the top half of the rolls onto the sandwiches and press down gently to stabilize the layers.
- Whisk the melted butter and maple syrup together and brush the mixture generously over the tops of the rolls.
- Bake for 10-12 minutes until the cheese is fully melted and the tops of the buns are toasted and slightly sticky from the maple glaze.
How to prepare fresh salmon sashimi
![]()
Why we love this
Fresh salmon sashimi is the ultimate test of simplicity, relying entirely on the quality of the fish and the precision of the cut. The texture is buttery and silken, practically melting on the tongue with a clean, oceanic sweetness that is incredibly refreshing. Its vibrant coral color provides a stunning visual contrast on a board, and when paired with a touch of fiery wasabi and the salty bite of soy sauce, it offers a clean, sophisticated flavor profile that balances out the heavier, cooked elements of the spread.
Ingredients
- 1 lb sushi-grade salmon fillet
- Wasabi paste
- High-quality soy sauce
- Pickled ginger for cleansing the palate
- Optional: Shiso leaves or shredded daikon radish for garnish
How to make it
- Ensure your salmon is ‘sushi-grade’ or ‘sashimi-grade,’ which means it has been handled and frozen specifically to be safe for raw consumption.
- Keep the salmon in the coldest part of your refrigerator until the very moment you are ready to slice it; cold fish is much easier to cut cleanly.
- Using a very sharp long-bladed knife (a yanagiba is traditional, but a sharp chef’s knife works), identify the grain of the fish and prepare to cut across it.
- Place your non-dominant hand lightly on the fish and use one long, fluid pulling motion with the knife to slice the salmon into 1/4 inch thick rectangles. Avoid a ‘sawing’ motion, as this will tear the delicate flesh.
- Angle your knife slightly (about 45 degrees) if you prefer ‘sogu-giri’ style slices, which creates more surface area for the soy sauce to cling to.
- Arrange the slices on your food board over a bed of shredded daikon or shiso leaves to keep them slightly elevated and beautifully presented.
- Serve immediately with small dishes of soy sauce and small mounds of wasabi and ginger on the side.
How to cook sticky glazed rolls
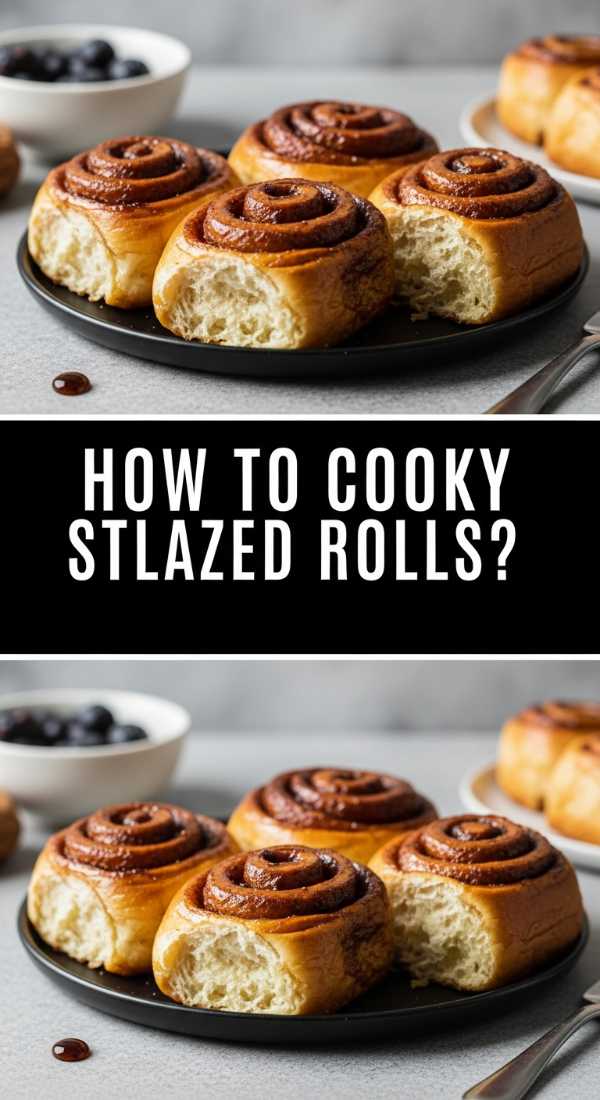
Why we love this
There is a primal joy in pulling apart a sticky glazed roll and seeing the glistening, tacky syrup stretch between the pieces. These rolls are a decadent treat, featuring a bottom that has practically fried in a mixture of butter and sugar to create a crunchy, toffee-like crust. The scent of cinnamon and caramelized sugar is intoxicating, and the way the glaze coats your fingers as you eat makes the experience feel indulgent and wonderfully tactile—a perfect sweet finale for a diverse food board.
Ingredients
- 1 tube of refrigerated biscuit or cinnamon roll dough
- 1/2 cup brown sugar
- 1/4 cup unsalted butter
- 2 tbsp heavy cream
- 1/2 tsp cinnamon
- Optional: 1/2 cup chopped pecans
How to make it
- Preheat your oven to 350°F (175°C) and select a round baking pan or a heavy cast-iron skillet for the best caramelization.
- In a small saucepan, combine the butter, brown sugar, heavy cream, and cinnamon over medium heat, stirring until the butter is melted and the sugar has dissolved into a smooth syrup.
- If using pecans, sprinkle them into the bottom of the baking pan, then pour the hot sugar mixture over them.
- Cut your dough into bite-sized pieces or use the pre-cut rolls, placing them side-by-side on top of the glaze in the pan.
- Bake for 18-22 minutes until the dough is puffed and deep golden brown, and the glaze is bubbling vigorously around the edges.
- Allow the rolls to cool in the pan for exactly 5 minutes—no longer, or the sugar will harden and stick to the pan—then carefully invert the pan onto a serving platter.
- The sticky glaze will run down the sides of the warm rolls, creating a beautiful, glossy coating that is ready to be pulled apart and enjoyed.
The Magic of the Shared Board
In the end, the viral food board trend isn’t just about the recipes—it’s about the feeling of abundance and the ease of gathering. Whether you’re piling up crispy katsu or delicate sashimi, the goal is to create a space where food is an interactive experience. So, grab your largest platter, pick a few of these favorites, and get ready to see your friends’ faces light up as they dive into your very own edible masterpiece.