

Why This Simple Food Board is Taking Over Your Social Media Feed
There is something deeply hypnotic about the way a well-curated food board looks on a screen, isn’t there? We’ve all been there—scrolling through our feeds after a long day, only to be stopped mid-swipe by a vibrant explosion of colors, textures, and the promise of a shared meal. It’s more than just food; it’s an invitation to slow down, to gather around a table with people we love, and to celebrate the simple joy of a perfectly ripe strawberry or the smoky char of a grilled vegetable. These boards have become the ultimate symbol of modern hospitality: effortless yet intentional.
The secret to why these boards are going viral isn’t just the aesthetics; it’s the accessibility. We live in a fast-paced world, and the idea that we can create a stunning, mouth-watering spread without spending eight hours in the kitchen is incredibly liberating. Whether it’s a nostalgic pie that reminds you of childhood summers or a zesty pasta salad that tastes like sunshine, these dishes are designed to be enjoyed together. They tell a story of comfort, creativity, and the delicious simplicity of seasonal ingredients.
Easy Shoney’s Strawberry Pie Copycat

Why we love this
This pie is pure nostalgia in every bite, featuring a mountain of ruby-red, glossed strawberries nestled in a perfectly golden, flaky crust. The contrast between the chilled, sweet glaze and the fresh, juicy berries creates a sensory explosion that feels like a cool breeze on a humid July afternoon. As you cut into it, the vibrant red sauce drips ever so slightly, and the aroma of sweet berries fills the air, making it impossible to wait for a second slice. It’s the kind of dessert that looks like it came from a professional bakery but feels like home.
Ingredients
- 1 pre-baked 9-inch pie crust
- 1 quart fresh strawberries, hulled
- 1 cup granulated sugar
- 2 tablespoons cornstarch
- 1 cup water
- 1 package (3 oz) strawberry flavored gelatin
- Whipped cream for serving
How to make it
- Begin by preparing your pie crust; if using a store-bought refrigerated crust, bake it according to the package instructions until it is a light, golden brown and let it cool completely on a wire rack to ensure it stays crisp.
- Carefully wash and hull your strawberries, patting them completely dry with a paper towel—this is crucial as excess moisture will thin out your glaze—then arrange them stem-side down in the cooled pie shell.
- In a medium saucepan over medium heat, whisk together the sugar, cornstarch, and water until the mixture is smooth and the lumps have dissolved.
- Bring the mixture to a gentle boil, stirring constantly; you will see it transform from a cloudy liquid to a thick, translucent glaze, which usually takes about 3 to 5 minutes of consistent bubbling.
- Once thickened, remove from heat and immediately whisk in the strawberry gelatin powder until it is fully dissolved and the color is a deep, glowing red.
- Let the glaze cool for about 10 minutes so it’s thick enough to coat but still pourable, then slowly pour it over the strawberries, ensuring every berry is encased in the sweet mixture.
- Refrigerate the pie for at least 3-4 hours, or until the glaze is firmly set, before slicing and serving with a generous dollop of whipped cream.
Creamy Rotel Dip for Parties
Why we love this
Nothing says ‘party’ quite like a warm bowl of creamy, spicy cheese dip that stays perfectly melt-in-your-mouth soft until the very last chip is dipped. The aroma of seasoned ground beef mingled with the tang of green chilies and the richness of melted cheese is enough to draw a crowd to the kitchen in seconds. It has a silky, velvety texture that coats each tortilla chip perfectly, offering a satisfying crunch followed by a slow, comforting heat. It’s the ultimate low-effort, high-reward crowd-pleaser that brings a cozy, communal vibe to any gathering.
Ingredients
- 1 lb ground beef or pork sausage
- 1 block (16 oz) Velveeta cheese, cubed
- 1 can (10 oz) Ro-Tel Diced Tomatoes and Green Chilies
- 1/2 cup whole milk (optional, for thinning)
- 1 teaspoon taco seasoning
- Fresh cilantro for garnish
How to make it
- In a large skillet over medium-high heat, brown the ground meat, breaking it into small crumbles with a wooden spoon until no pink remains and it is slightly crispy.
- Drain the excess fat thoroughly to ensure your dip isn’t greasy, then sprinkle the meat with taco seasoning for an extra layer of flavor.
- Lower the heat to low-medium and add the cubed Velveeta cheese and the entire can of Ro-Tel (do not drain the juices, as they provide essential acidity and flavor).
- Stir the mixture frequently as the cheese begins to melt; the goal is a slow melt to prevent the cheese from scorching or becoming grainy.
- If the dip feels too thick, whisk in the milk one tablespoon at a time until you reach a luscious, pourable yet thick consistency.
- Transfer the mixture to a small slow cooker on the ‘warm’ setting to keep it velvety throughout your event, and garnish with fresh cilantro right before the guests arrive.
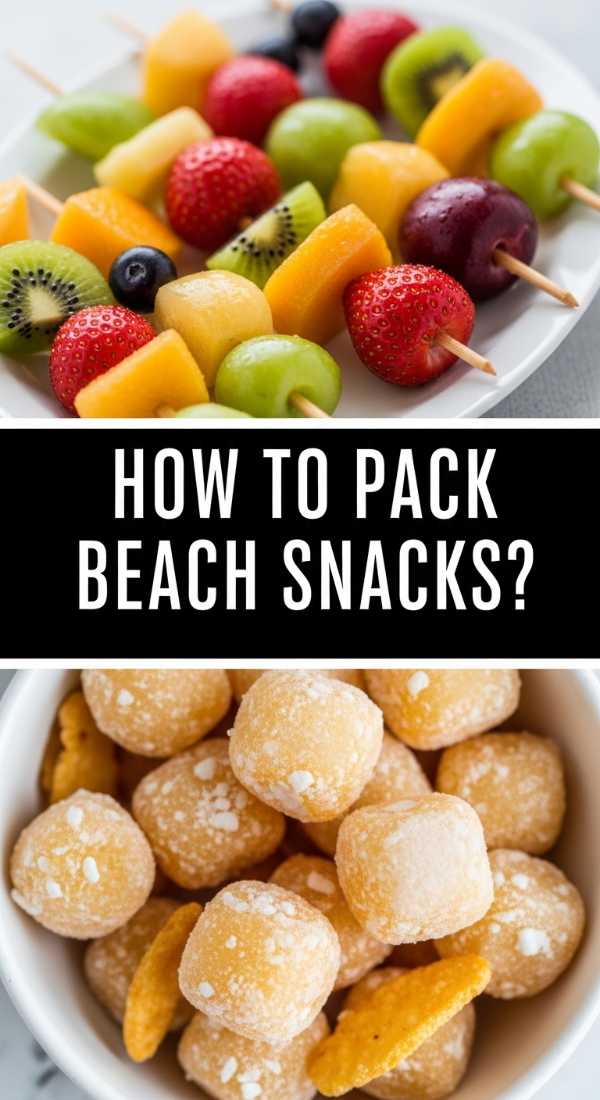
Healthy Beach Snack Ideas

Why we love this
Eating at the beach should be about freshness and hydration, and these snacks are designed to keep you feeling light while you soak up the sun. Imagine the crisp snap of a chilled cucumber or the sweet, hydrating burst of a watermelon wedge, all seasoned with just a hint of lime and sea salt. These snacks are not only visually stunning on a wooden board against the backdrop of the ocean, but they also provide the energy you need for a day in the waves. The combination of bright colors and refreshing textures makes every bite feel like a celebration of summer.
Ingredients
- Chilled watermelon wedges
- Cucumber slices with Tajin seasoning
- Frozen grapes
- Individual hummus cups with baby carrots
- Almonds or walnuts
- Fresh berries
How to make it
- Start by prepping your fruit; slice the watermelon into easy-to-grab triangles, leaving the rind on to act as a natural ‘handle’ for sandy hands.
- For the cucumbers, peel them in alternating strips for a pretty pattern, slice them into thick rounds, and toss them in a bowl with a squeeze of lime juice and a dusting of Tajin for a spicy, tangy kick.
- Freeze your grapes for at least 4 hours prior to the beach trip; they act as delicious, edible ice cubes that stay cold even in the heat.
- Assemble your individual hummus cups by placing a few tablespoons of hummus at the bottom of a small plastic cup and sticking 3-4 baby carrots vertically into the dip for mess-free snacking.
- Pack everything into a high-quality insulated cooler with plenty of ice packs, placing the heaviest items at the bottom and the delicate berries on top to prevent crushing.
Homemade Whipped Butter Squishy Texture

Why we love this
There is something incredibly indulgent about butter that has been whipped into a cloud-like, ‘squishy’ consistency that spreads like a dream over a warm piece of sourdough. It’s light, airy, and carries a delicate saltiness that dances on the tongue, melting instantly into every crevice of your bread. The texture is so soft and ethereal that it feels more like a mousse than a condiment, elevating a simple breakfast into a gourmet experience. Watching it swirl into perfect peaks in the bowl is just as satisfying as the rich, buttery aroma that fills the room.
Ingredients
- 1 cup (2 sticks) high-quality unsalted butter, softened
- 1/2 teaspoon flaky sea salt
- 1 tablespoon heavy cream or whole milk
- Optional: Honey or chopped herbs
How to make it
- Begin with butter that is perfectly room temperature; it should give easily when pressed with a finger but not be oily or melting.
- Place the butter in the bowl of a stand mixer fitted with the whisk attachment, or use a hand mixer in a deep bowl to prevent splattering.
- Start whipping on low speed to break up the sticks, then gradually increase to high speed for about 5 to 7 minutes.
- As the butter whips, it will change from a deep yellow to a pale, off-white color and double in volume; this is the air being incorporated for that signature ‘squishy’ texture.
- Slowly drizzle in the heavy cream and add the sea salt, continuing to whip for another 2 minutes until the mixture is incredibly light and fluffy.
- Transfer the butter to a decorative bowl and serve immediately at room temperature for the best texture, or store in the fridge and re-whip briefly before your next use.
Stress-Free Pre Made Camping Meals
Why we love this
Camping is all about the great outdoors, not spending the whole time hovering over a temperamental camp stove, which is why pre-made meals are a total game-changer. These meals bring the comfort of a home-cooked dinner to the wilderness, with flavors that have had time to meld and deepen overnight. There’s a rustic charm to pulling a foil-wrapped packet of savory goodness out of the cooler and hearing it sizzle as it hits the hot grate. It’s the ultimate way to enjoy a hearty, warm meal under the stars without the stress of cleanup or complicated prep work.
Ingredients
- Pre-marinated chicken or steak tips
- Chopped bell peppers and onions
- Pre-cooked pasta or grain salads
- Heavy-duty aluminum foil
- Individual yogurt parfaits in jars
- Pre-mixed pancake batter in a squeeze bottle
How to make it
- For the main event, chop your proteins and vegetables into uniform bite-sized pieces and toss them with olive oil and your favorite spice rub inside a gallon-sized freezer bag.
- Seal the bag tightly, removing as much air as possible, and let it marinate in your fridge for at least 12 hours before leaving for your trip.
- At the campsite, simply dump the contents onto a large sheet of heavy-duty foil, fold the edges to create a sealed packet, and place it directly on the grill or near the edge of the hot coals.
- Cook for 15-20 minutes, flipping once, until the meat is juicy and the vegetables are tender-crisp with a hint of char.
- For breakfast, prepare your pancake batter at home and pour it into a clean, empty ketchup bottle; when morning comes, you can easily squeeze perfect rounds onto a greased griddle without any bowls or spoons.
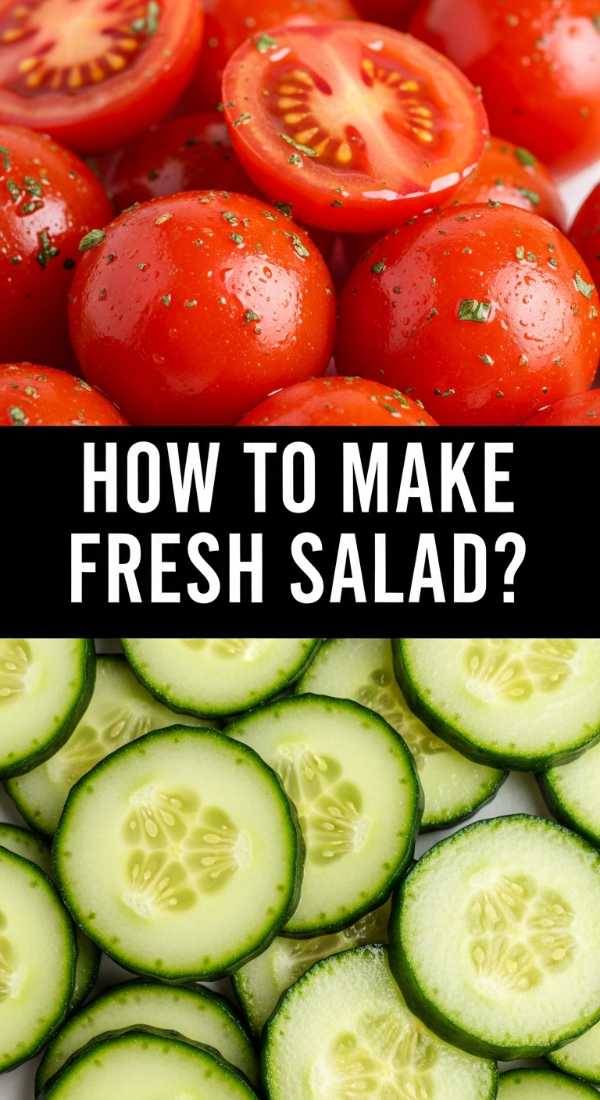
Classic Tomato Cucumber Salad Recipe

Why we love this
This salad is the embodiment of a summer garden, celebrating the peak of the season with every crisp, refreshing bite. The juices from the ripe, sun-warmed tomatoes mingle with a tangy red wine vinaigrette to create a natural ‘sauce’ that is best soaked up with a piece of crusty bread. The cool, watery crunch of the cucumber provides the perfect counterpoint to the soft, jammy tomatoes and the sharp bite of red onion. It’s light, vibrant, and carries the scent of fresh basil, making it the perfect side dish for any outdoor barbecue or heavy main course.
Ingredients
- 4 large garden-ripe tomatoes, chopped
- 2 English cucumbers, sliced into half-moons
- 1/2 small red onion, thinly sliced
- 1/4 cup extra virgin olive oil
- 2 tablespoons red wine vinegar
- Handful of fresh basil leaves, torn
- Salt and cracked black pepper to taste
How to make it
- Start by slicing your tomatoes into irregular, bite-sized chunks; using a variety of heirloom tomatoes can add beautiful color and different levels of sweetness to the dish.
- Slice your English cucumbers (which have thinner skin and fewer seeds) into half-moons about a quarter-inch thick to ensure they maintain their crunch against the softer tomatoes.
- Soak the thinly sliced red onions in a bowl of ice water for 10 minutes before adding them to the salad; this removes the harsh ‘bite’ and keeps them crisp.
- In a small jar, whisk together the olive oil, red wine vinegar, salt, and pepper until emulsified, then pour it over the vegetables in a large wooden bowl.
- Toss gently to coat everything in the dressing, then let the salad sit at room temperature for at least 20 minutes; this allows the salt to draw out the tomato juices, creating a delicious nectar at the bottom of the bowl.
- Just before serving, scatter the torn basil leaves over the top to keep them from bruising or turning dark.
Mastering Grilled Veggies on the Grill
Why we love this
Grilling vegetables transforms them from simple sides into the star of the show, adding a deep, smoky complexity and a beautiful caramelized sweetness. There is something primal and satisfying about the sight of bright green asparagus or vibrant bell peppers marked with dark, charred grill lines. The texture is the real winner here—tender on the inside but with a slightly crisp, smoky exterior that pops with flavor. It’s an easy way to eat the rainbow, and the aroma of searing vegetables over an open flame is enough to make anyone’s mouth water.
Ingredients
- Zucchini and yellow squash, sliced lengthwise
- Bell peppers, quartered and seeded
- Asparagus, woody ends trimmed
- Red onion wedges
- Balsamic glaze
- Olive oil, salt, and garlic powder
How to make it
- Preheat your grill to medium-high (about 400°F) and ensure the grates are scrubbed clean and lightly oiled to prevent sticking.
- In a large bowl, toss your prepared vegetables with a generous amount of olive oil, kosher salt, and garlic powder; ensure every piece is lightly coated to help with heat conduction.
- Place the sturdier vegetables like onions and peppers on the grill first, as they take the longest to soften—usually about 8-10 minutes.
- Add the zucchini and asparagus later, as they only need about 3-5 minutes per side to achieve those beautiful grill marks without turning into mush.
- Use long-handled tongs to flip the veggies only once; the less you move them, the better the sear and the more intact the texture will remain.
- Remove the vegetables once they are tender but still have a bit of ‘snap,’ and immediately drizzle with a high-quality balsamic glaze for a sweet and tangy finish.
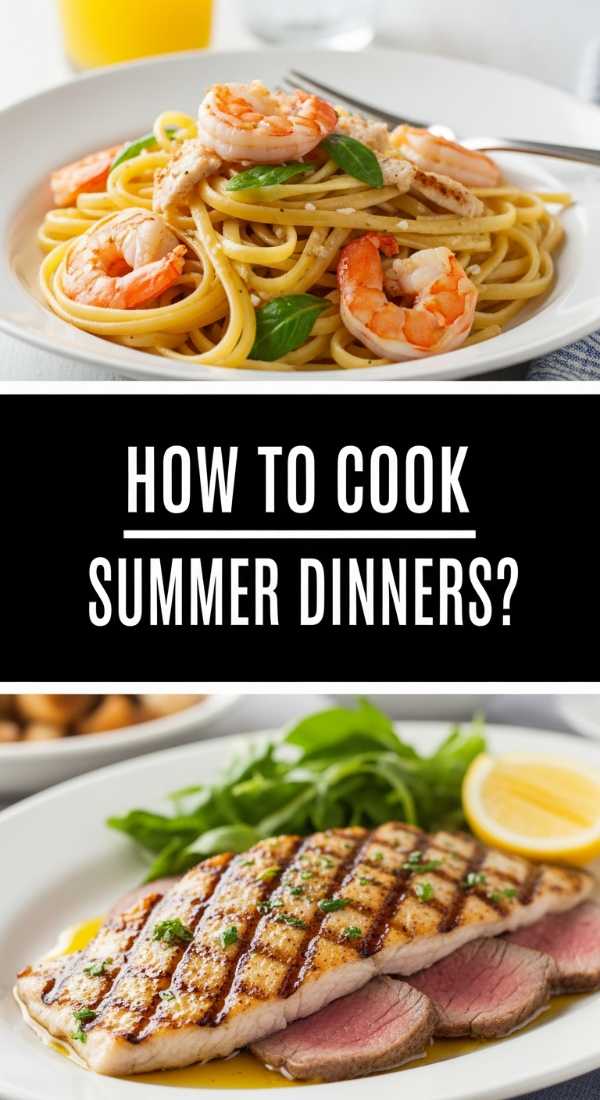
Simple and Easy Summer Meals
Why we love this
When the temperature rises, the last thing anyone wants is a heavy meal that leaves them feeling sluggish; these simple summer meals are all about lightness and speed. They prioritize raw or minimally cooked ingredients that let the natural flavors shine, often featuring a balance of protein, healthy fats, and seasonal produce. The joy of these meals lies in their versatility—you can serve them on a large platter for the family or pack them up for a picnic in the park. Every bite feels clean, nourishing, and perfectly suited for a sunny afternoon spent outdoors.
Ingredients
- Rotisserie chicken (store-bought for ease)
- Fresh mozzarella pearls
- Arugula or spinach
- Toasted nuts or seeds
- Avocado slices
- Lemon-tahini dressing
How to make it
- Start with a base of pre-washed greens like baby arugula, which provides a peppery bite that pairs beautifully with the richness of summer fruits or cheeses.
- Shred a store-bought rotisserie chicken while it’s still warm; the meat will be more succulent and easier to pull apart into bite-sized pieces.
- Layer the chicken over the greens, then add creamy elements like sliced avocado or mozzarella pearls to provide a satisfying, healthy fat component.
- For a bit of crunch, toast a handful of pine nuts or sunflower seeds in a dry pan for 2 minutes until fragrant and golden, then sprinkle them over the top.
- Whisk together a quick dressing of lemon juice, tahini, and a splash of maple syrup, and drizzle it over the meal right before serving to keep the greens from wilting.
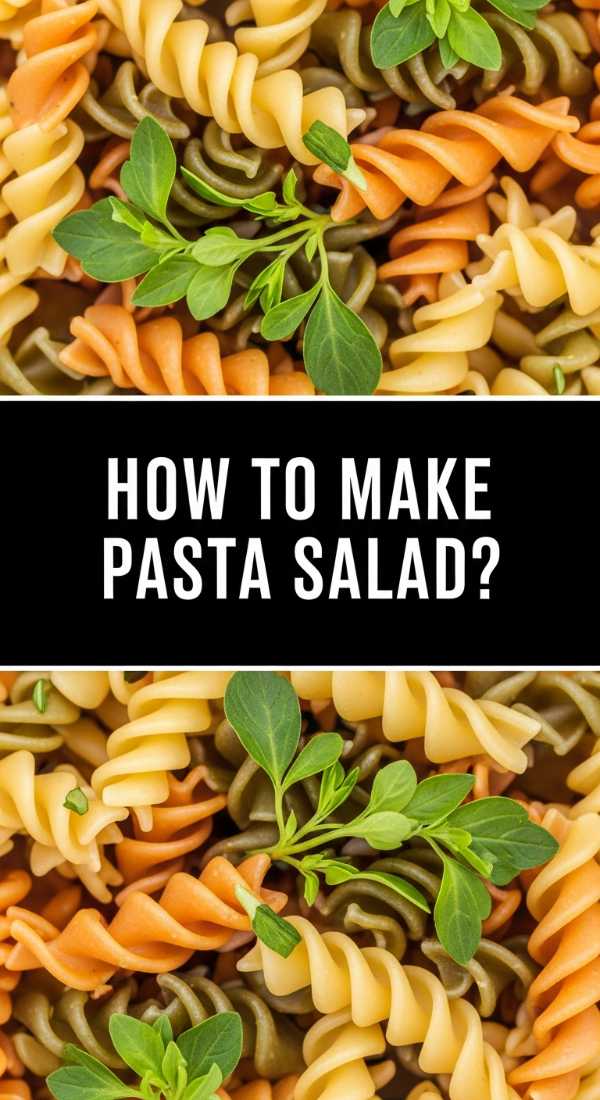
Zesty Summer Pasta Salad

Why we love this
A good pasta salad is the backbone of any viral food board, offering a tangy, herbaceous flavor profile that only gets better as it sits. The rotini spirals are the perfect vessel for trapping bits of salty feta, zesty vinaigrette, and spicy salami, ensuring every forkful is a different experience. It’s cool, refreshing, and incredibly satisfying, with a chewy pasta texture that contrasts beautifully with the crunch of raw vegetables. Whether you’re at a potluck or a quiet backyard dinner, this dish is always the one people keep coming back to for ‘just one more scoop.’
Ingredients
- 1 lb rotini or fusilli pasta
- 1 cup cherry tomatoes, halved
- 1/2 cup English cucumber, diced
- 1/4 cup red onion, finely minced
- 1/2 cup crumbled feta cheese
- 1/2 cup sliced black olives
- Italian vinaigrette (olive oil, lemon, oregano, red pepper flakes)
How to make it
- Cook the pasta in a large pot of heavily salted water—it should taste like the ocean—until it is strictly ‘al dente’; overcooked pasta will turn mushy once it absorbs the dressing.
- Drain the pasta and immediately rinse it under cold running water to stop the cooking process and wash away excess starch, which prevents the noodles from sticking together.
- In a very large mixing bowl, combine the cooled pasta with the tomatoes, cucumbers, onions, olives, and feta cheese.
- Prepare the dressing by whisking together 1/2 cup olive oil, the juice of one lemon, 1 teaspoon of dried oregano, and a pinch of red pepper flakes for a subtle heat.
- Pour half of the dressing over the salad and toss thoroughly, then refrigerate for at least 2 hours to let the flavors meld.
- Just before serving, pour the remaining dressing over the salad and toss again, as the pasta will have absorbed much of the initial liquid.
Perfect Grilled Chicken Skewers
[IMAGE_10]
Why we love this
There’s something undeniably appealing about food served on a stick—it’s portable, fun, and creates the most incredible surface area for caramelization. These chicken skewers are marinated until the meat is impossibly tender, then grilled over high heat until the edges are dark, crispy, and infused with smoky flavor. The aroma of garlic and charred lemon zest wafting from the grill is a siren song for anyone nearby. When you pull a piece of chicken off the skewer, it should be juicy and dripping with flavor, making it the perfect protein anchor for your viral food board.
Ingredients
- 2 lbs chicken thighs, cut into 1-inch cubes
- 1/4 cup olive oil
- 3 cloves garlic, minced
- 1 tablespoon smoked paprika
- 1 teaspoon cumin
- Wooden or metal skewers
- Fresh lemon wedges for serving
How to make it
- If using wooden skewers, soak them in water for at least 30 minutes before grilling to prevent them from catching fire or splintering.
- In a large bowl, whisk together the olive oil, garlic, paprika, and cumin to create a thick, fragrant marinade.
- Add the cubed chicken thighs—which are more flavorful and forgiving on the grill than breasts—and toss until every piece is thoroughly coated; marinate for at least 1 hour.
- Thread the chicken onto the skewers, leaving a tiny bit of space between each piece so the heat can circulate and brown all sides evenly.
- Preheat the grill to high and place the skewers down, letting them sear undisturbed for 5-6 minutes until they release easily from the grate.
- Flip and cook for another 5 minutes, or until the internal temperature reaches 165°F and the exterior has a beautiful, charred crust.
- Squeeze fresh lemon juice over the hot skewers immediately upon removing them from the grill to brighten the smoky flavors.
The Art of the Simple Spread
As we’ve explored, the reason these simple food boards are taking over our feeds isn’t just about how they look, but how they make us feel. They represent a return to basics—fresh ingredients, easy techniques, and the joy of sharing a meal without the pressure of perfection. By focusing on a few high-quality components and presenting them with a bit of love, you can create a viral-worthy moment in your own home. So, the next time you’re planning a meal, remember that the most beautiful boards are the ones that are meant to be eaten, enjoyed, and shared with those who matter most.