
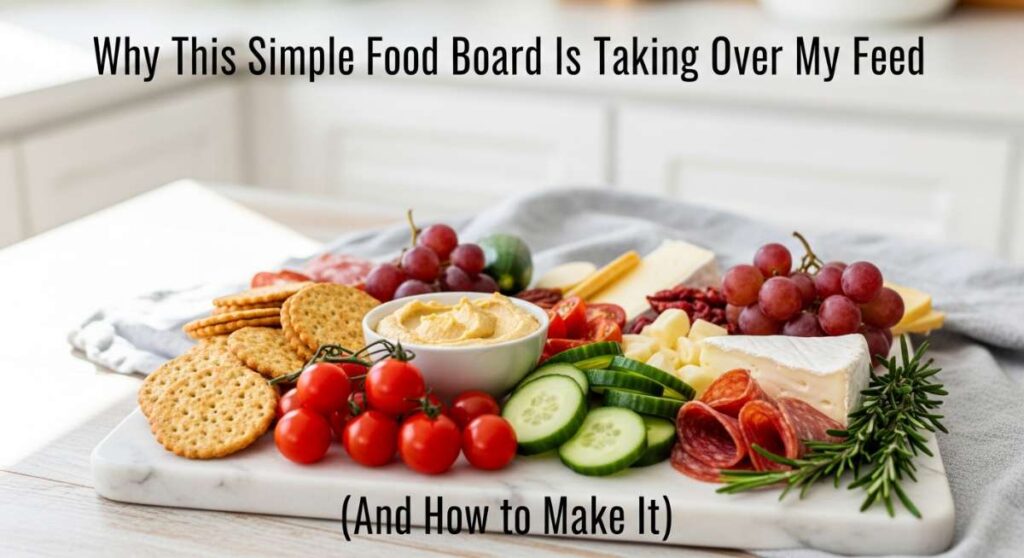
Why This Simple Food Board Is Taking Over My Feed (And How to Make It)
There is something undeniably magical about the way a perfectly curated food board looks when it catches the golden hour light. You’ve seen them—those effortless spreads of vibrant colors, textures, and flavors that seem to whisper of long, lazy afternoons spent with friends on a sun-drenched patio. For me, these boards aren’t just about the food; they are about the connection they foster, the slow grazing that leads to deep conversations, and the simple joy of sharing something beautiful and nourishing with the people you love.
Lately, my feed has been overflowing with these ‘Simple Food Boards,’ and honestly, I am here for it. They bridge the gap between a formal meal and a casual snack, offering a little bit of everything for everyone. Whether you’re hosting a backyard bash or just want to elevate a Tuesday night at home, mastering these summer staples is the key to creating that viral aesthetic without the stress. Let’s dive into the essential components that make a board truly unforgettable.
How to make the perfect summer pasta

Why we love this
This pasta is the embodiment of summer on a plate, capturing the essence of a garden in full bloom. The aroma of garlic gently sizzling in high-quality olive oil mingles with the sweet, bright scent of cherry tomatoes as they blister and burst, releasing their juices to form a silky, natural sauce. Every bite offers a contrast between the al dente bite of the pasta and the creamy, cool indulgence of fresh burrata melting into the warmth, finished with the peppery punch of torn basil leaves that wake up your palate.
Ingredients
- 1 lb Spaghetti or Linguine
- 2 pints Cherry tomatoes
- 4 cloves Garlic, thinly sliced
- 1/2 cup Extra virgin olive oil
- 1 ball Fresh Burrata
- 1 bunch Fresh basil
- Red pepper flakes, salt, and black pepper
How to make it
- Bring a large pot of heavily salted water (it should taste like the sea) to a rolling boil. Add your pasta and cook for approximately 8-10 minutes, or until it is just shy of al dente.
- While the pasta cooks, place a large skillet over medium-low heat and add the olive oil and sliced garlic. Sauté the garlic for 2-3 minutes until it turns a pale golden color; do not let it brown or it will turn bitter.
- Increase the heat to medium and add the whole cherry tomatoes. Cook for 7-10 minutes, stirring occasionally, until the skins begin to wrinkle and pop. Use the back of a wooden spoon to gently press some of the tomatoes to release their juices.
- Season the tomato mixture with salt, pepper, and a pinch of red pepper flakes.
- Using tongs, transfer the pasta directly from the water into the skillet. Add a 1/2 cup of starchy pasta water to the pan.
- Toss vigorously over medium-high heat for 2 minutes. This emulsifies the oil and pasta water into a glossy sauce that clings to the noodles.
- Remove from heat, top with torn burrata and fresh basil, and serve immediately while the cheese is still beautifully creamy.
How to make creamy rotel dip

Why we love this
There is a nostalgic comfort in a bowl of warm rotel dip that is simply unmatched at any gathering. The texture is velvety and luscious, coating every curve of a salty tortilla chip with a rich, cheesy embrace that carries a subtle, smoky heat from the green chilies. It’s the kind of dish that draws people together, standing around the bowl, dipping and laughing as the savory aroma of browned sausage and melted cheese fills the room, creating an atmosphere of pure, unpretentious fun.
Ingredients
- 1 lb Ground breakfast sausage (spicy or mild)
- 16 oz Velveeta cheese, cubed
- 2 cans (10 oz each) Rotel Diced Tomatoes & Green Chilies
- 1/2 cup Shredded sharp cheddar
- Fresh cilantro for garnish
How to make it
- Place a large, heavy-bottomed skillet or Dutch oven over medium-high heat. Add the ground sausage and cook, breaking it into small crumbles with a spatula.
- Continue cooking for 6-8 minutes until the sausage is deeply browned and no pink remains. This browning adds crucial umami flavor to the dip.
- Carefully drain the excess fat from the pan, leaving just a thin coating to keep the meat moist.
- Reduce the heat to low. Add the cubed Velveeta and the two cans of Rotel (including the liquid, which helps thin the cheese to the perfect dipping consistency).
- Stir constantly with a heat-resistant spatula for about 5-7 minutes. You are looking for a slow melt; high heat will cause the cheese to grain or separate.
- Once the Velveeta is fully melted and smooth, stir in the shredded sharp cheddar for an extra layer of depth and stretch.
- Transfer to a slow cooker on the ‘warm’ setting or a serving bowl. Garnish with fresh cilantro and serve with sturdy corn chips.
How to make homemade hummingbird food

Why we love this
Creating your own hummingbird nectar is a small act of stewardship that brings a vibrant spark of life to your outdoor space. There is a quiet, meditative joy in watching these tiny, iridescent creatures dart through the air, their wings a blur of motion as they hover gracefully at your feeder. The clear, simple syrup mimics natural flower nectar perfectly, ensuring your garden guests stay energized and healthy without the need for artificial dyes or preservatives, making your backyard a true sanctuary.
Ingredients
- 1 cup White granulated sugar
- 4 cups Filtered water
How to make it
- Measure 4 cups of filtered water into a medium saucepan. Using filtered water ensures there are no harsh chemicals like chlorine that could harm the birds.
- Bring the water to a gentle boil over high heat. This helps dissolve the sugar quickly and kills any bacteria or fungi that might be present in the water.
- Add 1 cup of white granulated sugar to the boiling water. Stir continuously with a clean spoon until the sugar is completely dissolved and the liquid is perfectly clear.
- Boil the mixture for exactly 2 minutes. This is long enough to ensure stability but short enough that you don’t evaporate too much water, which would change the 4:1 ratio.
- Remove the pan from the heat and let the nectar cool to room temperature. This is a critical step; never put hot nectar into a plastic feeder or serve it to birds.
- Store any extra nectar in a clean, airtight glass jar in the refrigerator for up to two weeks.
- Fill your clean bird feeder and hang it in a shaded spot to prevent the sugar from fermenting too quickly in the summer heat.
How to cook healthy summer dinner

Why we love this
A healthy summer dinner should feel like a celebration of lightness and vitality, rather than a restriction. Imagine a piece of wild-caught salmon, its edges perfectly seared to a crisp while the center remains tender and flaky, seasoned with a bright medley of lemon zest and fresh dill. Accompanied by charred asparagus that still retains a satisfying snap, this meal offers a clean, refreshing profile that leaves you feeling energized and nourished, perfectly capturing the breezy, effortless spirit of the season.
Ingredients
- 2 Salmon fillets (6 oz each)
- 1 bunch Asparagus, woody ends trimmed
- 2 tbsp Olive oil
- 1 Lemon, sliced into rounds
- 2 cloves Garlic, minced
- Fresh dill and parsley
How to make it
- Preheat your oven to 400°F (200°C) and line a large sheet pan with parchment paper for easy cleanup and to prevent sticking.
- Pat the salmon fillets completely dry with a paper towel. This is the secret to getting a good sear and preventing the fish from steaming.
- Place the salmon and the trimmed asparagus on the sheet pan. Drizzle both with olive oil and rub the minced garlic onto the salmon.
- Season generously with sea salt, cracked black pepper, and a sprinkle of fresh dill. Place lemon slices directly on top of the salmon to infuse it with citrus oils as it cooks.
- Roast in the center rack of the oven for 12-15 minutes. You will know the salmon is done when it reaches an internal temperature of 145°F and flakes easily with a fork.
- For the asparagus, look for a vibrant green color with slightly charred tips. If you prefer them crispier, you can toss them in the pan halfway through.
- Garnish with fresh parsley and an extra squeeze of lemon juice before serving.
How to make fresh summer salad
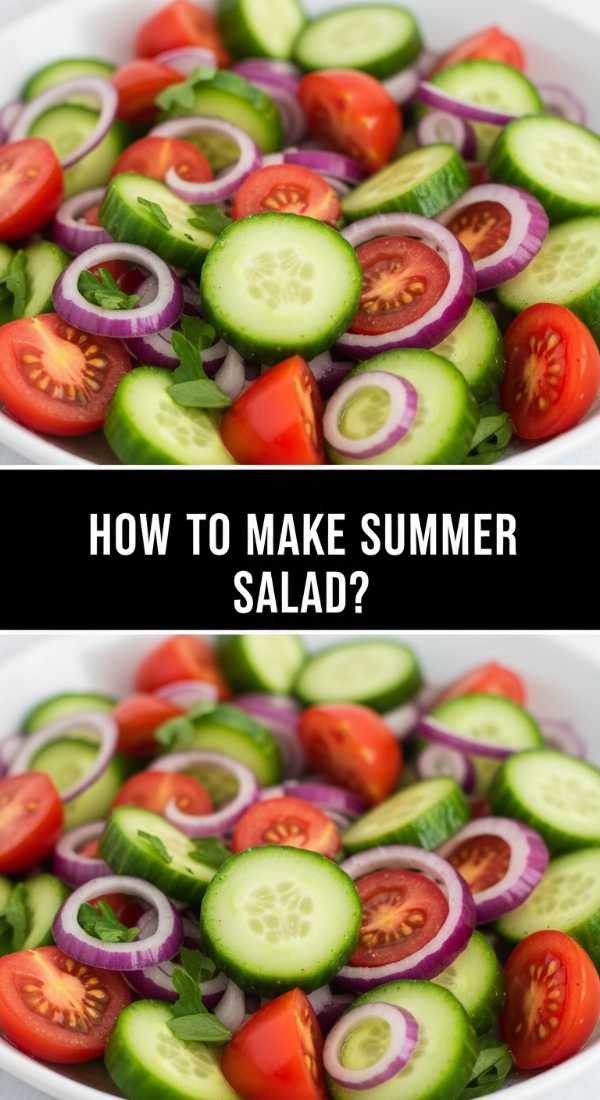
Why we love this
This salad is a masterclass in balance, playing with the sweet, the salty, and the herbaceous in every crunchy bite. The cold, juicy sweetness of ripe watermelon provides a shocking but delightful contrast to the creamy, briny crumbles of feta cheese, while the aromatic freshness of mint leaves cuts through the richness. It is incredibly hydrating and visually stunning, making it the ultimate center-piece for a food board that tastes as bright and refreshing as a dip in a cool pool on a sweltering July afternoon.
Ingredients
- 6 cups Cubed seedless watermelon (chilled)
- 1 cup Feta cheese, crumbled
- 1/2 Red onion, very thinly sliced
- 1/2 cup Fresh mint leaves, torn
- 2 tbsp Extra virgin olive oil
- 1 Lime, juiced
- Flaky sea salt
How to make it
- Begin by cubing a cold, seedless watermelon into 1-inch squares. Using a chilled melon is essential as it maintains the structural integrity of the fruit and provides the best mouthfeel.
- Soak the thinly sliced red onions in a bowl of ice water for 10 minutes. This “shocks” them, removing the harsh bite and leaving behind a crisp, mild onion flavor.
- In a small bowl, whisk together the lime juice and extra virgin olive oil to create a simple vinaigrette.
- In a large, shallow serving bowl, gently layer the watermelon cubes. Avoid over-mixing, as watermelon is delicate and can easily bruise or lose its juice.
- Drain the onions and pat them dry, then scatter them over the watermelon along with the crumbled feta cheese.
- Just before serving, sprinkle the torn mint leaves over the top. Tearing the leaves by hand instead of chopping them prevents the edges from bruising and turning black.
- Drizzle the dressing over the salad and finish with a generous pinch of flaky sea salt to make the sweetness of the melon pop.
How to prep summer meals
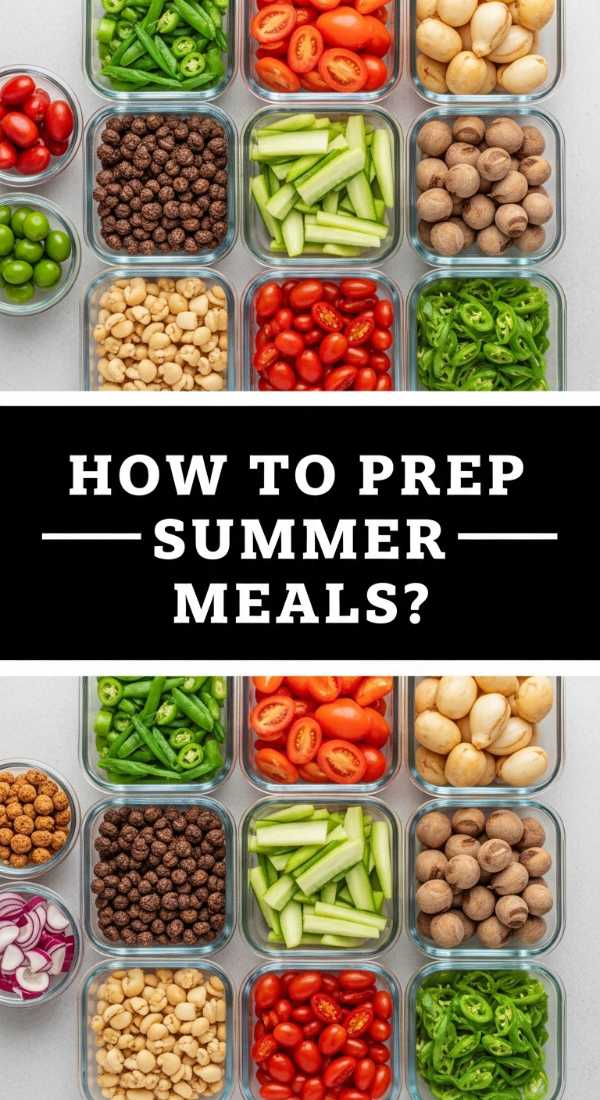
Why we love this
Summer meal prep is all about reclaiming your time so you can spend more hours in the sunshine and fewer hours in a hot kitchen. By preparing versatile components like quinoa, roasted vegetables, and vibrant dressings in advance, you create a “choose-your-own-adventure” fridge that makes healthy eating effortless. There’s a deep satisfaction in opening your refrigerator to see organized glass containers filled with colorful, crisp ingredients that are ready to be assembled into a gourmet bowl at a moment’s notice.
Ingredients
- 3 cups Cooked quinoa or farro
- 4 Chicken breasts, grilled and sliced
- 1 pint Roasted bell peppers and zucchini
- 1 jar Lemon-tahini dressing
- 2 cups Shredded kale or spinach
- Mason jars or airtight glass containers
How to make it
- Batch cook your base grain (like quinoa) by simmering 1.5 cups of dry grain in 3 cups of broth for 15 minutes. Let it cool completely before portioning to avoid sogginess.
- Grill or roast your protein. For chicken, season with lemon and oregano and cook until the internal temperature hits 165°F. Let it rest for 10 minutes before slicing to keep the juices inside.
- Prepare your vegetables. Roast a tray of peppers, onions, and zucchini at 425°F for 20 minutes with olive oil and salt until caramelized.
- Assemble “Mason Jar Salads” to keep greens fresh. Pour 2 tablespoons of dressing at the bottom of the jar first.
- Layer your ingredients from heartiest to most delicate: start with the roasted veggies, then the chicken, then the quinoa.
- Finish the jar by packing the shredded kale or spinach at the very top. This keeps the greens far away from the dressing so they stay crisp for up to 4 days.
- When ready to eat, simply shake the jar into a bowl and toss. Everything will be perfectly coated and fresh.
How to grill best kabobs

Why we love this
Kabobs are the quintessential outdoor food, offering a smoky, charred exterior and a succulent, flavorful interior that feels like a party on a stick. The scent of woodsmoke mingling with marinating meats and caramelizing vegetables is the ultimate herald of summer. Each skewer is a personalized portion of perfection, where the high heat of the grill creates those coveted dark grill marks and a deep, savory crust, while the inside remains tender and bursting with the juices of the marinade.
Ingredients
- 2 lbs Top sirloin or Chicken thighs, cut into 1.5-inch cubes
- 2 Bell peppers (any color), cut into chunks
- 1 Red onion, cut into wedges
- 1 cup Zucchini slices
- 1/2 cup Soy sauce, 1/4 cup Olive oil, 2 tbsp Honey (for marinade)
- Metal or wooden skewers
How to make it
- If using wooden skewers, soak them in water for at least 30 minutes. This prevents them from catching fire or splintering on the hot grill.
- Whisk together the soy sauce, olive oil, honey, and minced garlic in a bowl. Place your cubed meat in a gallon-sized bag, pour in the marinade, and refrigerate for at least 2 hours (or overnight for maximum flavor).
- Thread the skewers, alternating between meat and vegetables. Do not pack them too tightly; leaving a tiny bit of space between items allows the heat to circulate and cook everything evenly.
- Preheat your grill to medium-high (about 400°F). Lightly oil the grates using a folded paper towel dipped in oil and held with tongs.
- Place the kabobs on the grill. Cook for 10-12 minutes for beef (medium-rare) or 12-15 minutes for chicken.
- Rotate the skewers a quarter-turn every 3-4 minutes. This ensures an even char on all sides and prevents the vegetables from burning while the meat cooks.
- Brush any remaining (boiled/safe) marinade over the skewers during the last 2 minutes of cooking for a glossy, flavorful finish. Let rest for 5 minutes before serving.
How to make summer desserts

Why we love this
Summer desserts should be an ode to the season’s bounty, emphasizing the natural sweetness of sun-ripened berries and stone fruits. A rustic berry galette, with its buttery, flaky crust folded haphazardly over a bubbling center of jammy strawberries and blueberries, captures a sense of cozy, homemade charm. The aroma of baking pastry and warm sugar is intoxicating, and when served with a melting scoop of vanilla bean ice cream, it creates a hot-and-cold sensation that is the absolute pinnacle of indulgence.
Ingredients
- 1 Refrigerated pie crust (or homemade)
- 3 cups Mixed berries (strawberries, blueberries, raspberries)
- 1/4 cup Sugar + 1 tbsp for sprinkling
- 1 tbsp Cornstarch
- 1 Egg (for egg wash)
- 1 tsp Vanilla extract
How to make it
- Preheat your oven to 425°F (220°C). Roll out your pie crust on a sheet of parchment paper until it is about 12 inches in diameter.
- In a large bowl, gently toss the berries with 1/4 cup sugar, cornstarch, and vanilla extract. The cornstarch is vital as it thickens the fruit juices, preventing a soggy crust.
- Pile the fruit mixture into the center of the dough, leaving a 2-inch border all the way around the edge.
- Fold the edges of the dough up and over the fruit, pleating it as you go. The center should remain open, showing off the vibrant colors of the berries.
- Whisk the egg with a splash of water and brush the crust thoroughly. This creates a beautiful, professional-looking golden sheen.
- Sprinkle the crust with the remaining tablespoon of sugar for a sweet, crunchy texture.
- Bake for 20-25 minutes until the crust is deep golden brown and the fruit filling is bubbling thick. Allow it to cool for at least 15 minutes to let the filling set before slicing.
How to make summer drinks

Why we love this
There is nothing quite as revitalizing as the first sip of a handcrafted summer drink, beads of condensation forming on the glass as it fights the midday heat. A cucumber mint lemonade offers a sophisticated twist on a childhood classic, combining the crisp, clean flavor of garden-fresh cucumbers with the cooling tingle of muddled mint. It’s a sensory experience that starts with the bright, citrusy scent and ends with a clean, refreshing finish that perfectly resets your palate between bites of savory food board treats.
Ingredients
- 1 cup Fresh lemon juice (about 6-8 lemons)
- 3/4 cup Sugar (adjust to taste)
- 4 cups Cold water
- 1 English cucumber, thinly sliced
- 1/2 cup Fresh mint leaves
- Ice cubes
How to make it
- Make a simple syrup by heating 1 cup of the water and the sugar in a small pot until the sugar dissolves. Let it cool completely. This prevents sugar crystals from settling at the bottom of your cold drink.
- In a large pitcher, place the mint leaves and a few slices of cucumber. Use a muddler or the back of a spoon to gently bruise the leaves to release their essential oils.
- Add the fresh lemon juice and the cooled simple syrup to the pitcher. Stir well to combine.
- Pour in the remaining 3 cups of cold water. Taste and add more water or sugar if you prefer a different balance of tartness and sweetness.
- Add the remaining cucumber slices to the pitcher. These will infuse the drink with a subtle, refreshing spa-like flavor over time.
- Refrigerate for at least 30 minutes before serving to allow the flavors to marry.
- Serve in tall glasses filled with plenty of ice, garnishing with a fresh sprig of mint and a lemon wheel.
How to make picnic sides

Why we love this
Picnic sides are the unsung heroes of the food board, providing the essential textures and tangy notes that tie the whole spread together. A Mediterranean orzo salad, packed with briny olives, crunchy cucumbers, and zesty lemon dressing, offers a delightful chew and a burst of brightness that complements grilled meats and heavy cheeses alike. These sides are designed to be enjoyed at room temperature, making them the perfect, low-maintenance addition to an outdoor feast where the focus is on relaxation and enjoyment.
Ingredients
- 1 cup Orzo pasta, cooked and cooled
- 1/2 cup Kalamata olives, halved
- 1/2 cup Diced English cucumber
- 1/4 cup Red onion, finely minced
- 1/4 cup Crumbled feta
- Dressing: 3 tbsp Olive oil, 1 tbsp Red wine vinegar, 1 tsp Dried oregano
How to make it
- Cook the orzo in boiling salted water for 7-9 minutes until al dente. Drain and immediately rinse with cold water to stop the cooking process and remove excess starch so the grains don’t stick together.
- In a large mixing bowl, whisk together the olive oil, red wine vinegar, dried oregano, salt, and pepper to create a zesty vinaigrette.
- Add the cooled orzo to the bowl and toss thoroughly to ensure every grain is coated in the dressing while it is still slightly porous.
- Fold in the halved olives, diced cucumbers, and minced red onions. The cucumbers provide a necessary crunch that contrasts with the soft pasta.
- Add the crumbled feta last, folding it in gently so it doesn’t break down into a paste and cloud the salad.
- Cover and refrigerate for at least one hour. This resting period is crucial for the orzo to absorb the flavors of the vinaigrette.
- Before serving on your board, give it a final toss and add a squeeze of fresh lemon to brighten the flavors back up.
The Art of the Summer Spread
Building the perfect food board is less about following strict rules and more about embracing the abundance of the season. When you combine these recipes—the warm pasta, the cooling salads, and the charred kabobs—you create a tapestry of flavors that invites everyone to slow down and savor the moment. Remember, the best boards are the ones that are messy, colorful, and surrounded by the people who make your life sweet. So, grab a tray, start cooking, and let your creativity run wild!