
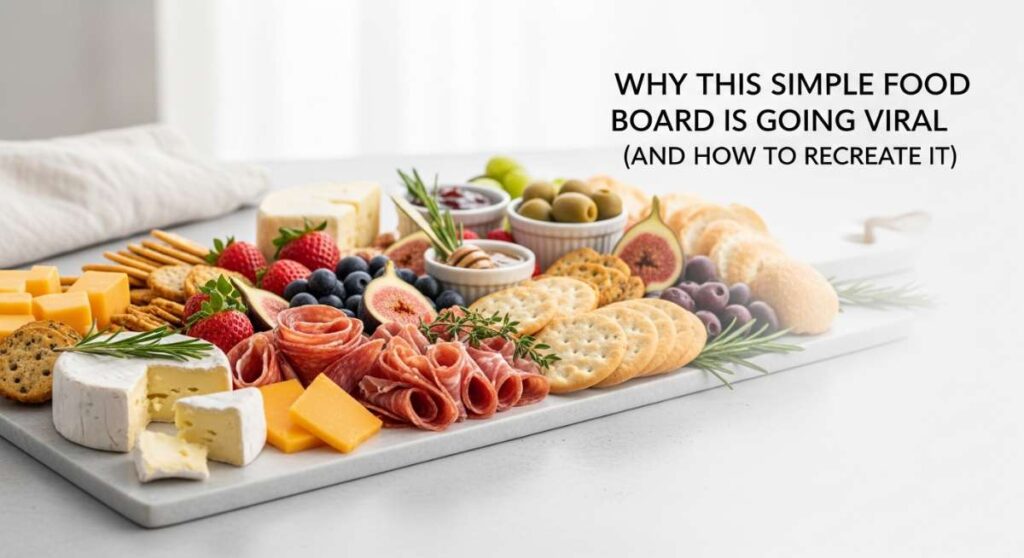
Why This Simple Food Board is Going Viral (and How to Recreate It)
There’s something about a shared meal that feels like magic, especially when it’s presented on a sprawling, colorful board that invites everyone to dig in. Lately, my social media feeds have been exploding with these ‘Simple Food Boards,’ and I finally realized why: they strip away the formality of dinner and replace it with connection and creativity. It’s not just about the food; it’s about the laughter that happens while passing the cheese knife and the collective ‘ooh’ when a new dish hits the center of the table.
As the seasons shift and the light stays in our kitchens just a little longer, I’ve found myself leaning into this viral trend more than ever. It’s the perfect canvas for celebrating spring’s bounty, from vibrant greens to delicate floral sweets. Today, I’m pulling back the curtain on how you can recreate this viral sensation at home, incorporating everything from slow-cooked comfort to sparkling treats that will have your guests reaching for their phones before their forks.
7 Easy Ways to Bake Spring Cakes (Step-by-Step Guide)

Why we love this
The aroma of zesty lemon peel mingling with the sweet, heady scent of vanilla bean is the ultimate herald of spring. We love these cakes because their crumb is as light as a whisper, offering a delicate texture that practically melts on the tongue. There is a profound sense of joy in seeing a pale gold sponge emerge from the oven, promising a flavor profile that is both bright and comforting. It’s the kind of treat that pairs perfectly with a crisp glass of iced tea on a sunny afternoon porch.
Ingredients
- 2 cups all-purpose flour
- 1.5 cups granulated sugar
- 3 large eggs, room temperature
- 1 cup unsalted butter, softened
- 1/2 cup whole milk
- 2 tbsp lemon zest
- 1 tsp vanilla extract
- 2 tsp baking powder
How to make it
- Begin by preheating your oven to 350°F (175°C) and thoroughly greasing a 9-inch round cake pan with butter and a dusting of flour to ensure a clean release.
- In a large mixing bowl, cream together the softened butter and sugar using an electric mixer on medium-high speed for at least 5 minutes until the mixture looks pale, fluffy, and significantly increased in volume.
- Add the eggs one at a time, beating for 30 seconds after each addition to create a stable emulsion; then stir in the vanilla extract and lemon zest for that signature spring fragrance.
- In a separate bowl, sift the flour and baking powder together to remove any lumps and ensure an even rise.
- Alternate adding the dry ingredients and the milk to the butter mixture, starting and ending with the dry ingredients, and folding gently with a spatula just until combined to avoid over-working the gluten, which can make the cake tough.
- Pour the batter into the prepared pan, smoothing the top, and bake for 30-35 minutes or until a skewer inserted into the center comes out clean and the edges pull away slightly from the pan.
- Let the cake cool in the pan for 10 minutes before transferring it to a wire rack to cool completely, preventing the bottom from becoming damp with trapped steam.
10 Quick Ways to Prep Spring Dinners (Step-by-Step Guide)

Why we love this
Spring dinners should feel like a breath of fresh air—fast, vibrant, and bursting with the snap of young vegetables. We love this approach because it focuses on high-impact flavors like garlic, mint, and tender asparagus that require minimal manipulation to shine. The sensory experience is all about the ‘crunch’ of a perfectly blanched pea and the savory richness of a seared protein, all coming together in under thirty minutes. It’s the perfect solution for busy weeknights when you still want to feel like you’ve treated yourself to a gourmet meal.
Ingredients
- 1 lb chicken breast or firm tofu, sliced
- 1 bunch thin asparagus, trimmed
- 2 cups snap peas
- 3 cloves garlic, minced
- 2 tbsp olive oil
- 1 tbsp fresh lemon juice
- Red pepper flakes to taste
- Salt and cracked black pepper
How to make it
- Set a large heavy-bottomed skillet or wok over medium-high heat and add the olive oil, waiting until it shimmers but does not smoke.
- Season your protein of choice generously with salt and pepper, then sear in the hot pan until a golden-brown crust forms on both sides, ensuring the internal temperature reaches 165°F for chicken.
- Remove the protein from the pan and set it aside to rest, which allows the juices to redistribute and stay moist.
- In the same pan, toss in the asparagus and snap peas, sautéing for only 3-4 minutes so they retain their bright green color and a slight snap when bitten.
- Add the minced garlic and red pepper flakes during the last 60 seconds of cooking, stirring constantly to prevent the garlic from burning and turning bitter.
- Deglaze the pan with a splash of lemon juice, scraping up any browned bits (the fond) from the bottom for maximum flavor.
- Toss the protein back into the pan for 30 seconds to reheat and coat in the lemon-garlic sauce before serving immediately on your food board.
5 Fresh Ways to Cook Spring Recipes (Step-by-Step Guide)

Why we love this
These recipes are a celebration of the ‘green’ season, focusing on the earthy sweetness of root vegetables and the peppery bite of fresh radishes. We love the way a simple drizzle of honey or a sprinkle of flaky sea salt can transform humble ingredients into a centerpiece-worthy dish. The aroma of chopped herbs like dill and parsley filling the kitchen creates an atmosphere of renewal and vitality. It’s about eating with the rhythm of nature, feeling nourished by the very first harvests of the year.
Ingredients
- 1 lb baby carrots with tops
- 1 bunch radishes, halved
- 2 tbsp honey
- 1 tbsp apple cider vinegar
- Fresh dill and parsley, chopped
- Toasted walnuts for crunch
How to make it
- Preheat your oven to 400°F (200°C), a high heat that will encourage the natural sugars in the vegetables to caramelize quickly.
- Scrub the baby carrots and radishes, leaving a bit of the green tops on the carrots for a rustic, farm-to-table aesthetic.
- In a small bowl, whisk together the honey, apple cider vinegar, and a tablespoon of olive oil until emulsified.
- Arrange the vegetables in a single layer on a parchment-lined baking sheet, ensuring they aren’t crowded, which would cause them to steam rather than roast.
- Drizzle the honey glaze over the vegetables and toss with your hands to ensure every nook and cranny is coated.
- Roast for 15-20 minutes, turning halfway through, until the radishes are tender and the carrots have charred edges.
- Remove from the oven and immediately shower with fresh herbs and toasted walnuts while the vegetables are still hot, allowing the herbs to release their aromatic oils.
8 Fun Ways to Make Glitter Dumplings (Step-by-Step Guide)

Why we love this
This is where the ‘viral’ factor truly kicks in—glitter dumplings are a whimsical, sparkling addition that turns a food board into a party. We love the unexpected contrast between the savory, umami-rich filling and the shimmering, edible gold or silver dust on the translucent skins. The texture is a delightful journey from the silky, chewy wrapper to the juicy, ginger-spiced interior. It’s a playful reminder that food should be fun, adventurous, and maybe just a little bit extra for those special weekend gatherings.
Ingredients
- 1 pack round dumpling wrappers
- 1/2 lb ground pork or mushrooms
- 2 green onions, finely chopped
- 1 tbsp soy sauce
- 1 tsp grated ginger
- Edible luster dust (gold or silver)
- Small food-safe paintbrush
How to make it
- In a medium bowl, combine your filling (pork or mushrooms) with the chopped green onions, soy sauce, and ginger, mixing vigorously in one direction until the mixture becomes slightly tacky and cohesive.
- Place a dumpling wrapper in the palm of your hand and spoon about a teaspoon of filling into the center, taking care not to overfill which leads to bursting.
- Wet the edges of the wrapper with a small amount of water and pleat the edges together tightly, pressing firmly to create a waterproof seal.
- Prepare a steamer basket by lining it with perforated parchment or cabbage leaves to prevent sticking.
- Steam the dumplings over boiling water for 8-10 minutes until the wrappers look translucent and the filling feels firm to the touch.
- Once steamed, remove them carefully and let them air dry for 60 seconds; this slight tackiness helps the glitter adhere.
- Using a dry, food-safe paintbrush, gently dab the edible luster dust onto the tops of the dumplings, creating a gradient or full shimmer effect for a stunning visual impact.
12 Simple Ways to Use Crockpots (Step-by-Step Guide)

Why we love this
The crockpot is the unsung hero of the food board, providing a warm, central anchor like a succulent pulled meat or a creamy dip. We love the ‘set it and forget it’ philosophy that fills the entire home with the rich, savory perfume of slow-cooked garlic and herbs all day long. The texture of meat that has been braised for hours is incomparable—it yields to the gentlest pressure of a fork, offering a buttery richness that balances the fresh, crisp elements of the board. It’s the ultimate comfort food made effortlessly.
Ingredients
- 3 lb pork shoulder or beef chuck
- 1 cup beef or vegetable broth
- 1 onion, sliced
- 3 cloves garlic, smashed
- 2 tbsp brown sugar
- 1 tbsp smoked paprika
- Salt and pepper
How to make it
- Season the entire surface of the meat liberally with salt, pepper, and smoked paprika, rubbing it into the fibers for deep flavor penetration.
- Place the sliced onions and smashed garlic at the bottom of the crockpot to act as a natural roasting rack and flavor base.
- Set the meat on top of the onions and pour the broth and brown sugar around the sides, being careful not to wash the spice rub off the top of the meat.
- Cover the crockpot with a tight-fitting lid and set the temperature to ‘Low’—slow and steady is the key to breaking down tough connective tissues into tender gelatin.
- Cook for 8 to 10 hours; the visual cue for doneness is when the meat easily pulls apart with two forks with zero resistance.
- Remove the meat to a bowl, shred it, and add a ladle of the cooking liquid (the jus) back in to keep it incredibly moist.
- Serve in a small crock or bowl directly on the board, surrounded by rolls or crackers for easy assembly.
6 Tasty Ways to Serve Spring Soups (Step-by-Step Guide)

Why we love this
Spring soups are all about elegance and vibrant color, ranging from a pale minty green to a sunset orange. We love serving these in small glass jars or cups on a board because it allows for easy sipping and adds a beautiful vertical element to the presentation. The flavors are concentrated and clean, often featuring the sweet notes of young peas or the zing of ginger. The silky-smooth texture of a well-blended soup provides a luxurious mouthfeel that feels indulgent yet light and healthy.
Ingredients
- 4 cups fresh shelled peas
- 1 large leek, white part only, sliced
- 4 cups vegetable stock
- 1/4 cup fresh mint leaves
- 1/2 cup heavy cream or coconut milk
- Lemon zest for garnish
How to make it
- In a large pot, sauté the sliced leeks in a tablespoon of butter over medium-low heat until they are soft and translucent but not browned.
- Add the vegetable stock and bring the mixture to a gentle boil before dropping in the fresh peas.
- Simmer the peas for only 3-5 minutes; any longer and they will lose their vibrant green color and turn a dull olive hue.
- Remove the pot from the heat and stir in the fresh mint leaves, letting them steep for a minute to release their cooling oils.
- Use an immersion blender to puree the soup directly in the pot until it is completely smooth and velvety.
- Stir in the cream or coconut milk to add richness and a beautiful pastel green tone.
- Pour the soup into small individual jars, top with a pinch of lemon zest, and arrange them in the corners of your food board for a sophisticated touch.
5 Dreamy Ways to Style Cakes (Step-by-Step Guide)

Why we love this
Styling is where a simple cake becomes a work of art that captures the essence of a spring meadow. We love using edible flowers and organic textures because they bring a sense of the outdoors in, making the board feel alive and curated. The visual appeal of a ‘naked’ cake with wisps of frosting or a crown of pansies creates an emotional response—it feels artisanal and thoughtful. It’s about the details: the way a dusting of powdered sugar looks like morning frost or how a sprig of rosemary adds a rustic, earthy charm.
Ingredients
- Pre-baked sponge cake
- Buttercream frosting
- Fresh pansies or violas (edible)
- Fresh berries
- Sprigs of thyme or rosemary
- Powdered sugar
How to make it
- Apply a thin ‘crumb coat’ of frosting to your cooled cake, using an offset spatula to smooth it so the layers of the cake slightly peek through for a ‘dreamy, rustic’ look.
- Chill the cake for 20 minutes to set the first layer before adding any decorative dollops of frosting on top.
- Select edible flowers that have been washed and dried carefully; ensure they are a food-safe variety like pansies, nasturtiums, or lavender.
- Place the flowers in an asymmetrical crescent shape around one side of the cake’s top to create visual movement and a naturalistic feel.
- Tuck in small sprigs of herbs and fresh berries between the flowers to fill in gaps and add contrasting colors like deep red and forest green.
- Just before serving, use a fine-mesh sieve to lightly dust the entire cake with powdered sugar from a height of about 10 inches for an even, ethereal glow.
- Place the cake on a pedestal or directly on the wood of the board to highlight its handcrafted beauty.
10 Best Ways to Eat Healthy (Step-by-Step Guide)

Why we love this
Healthy eating on a food board doesn’t feel like a chore; it feels like an abundance of nature’s best candy. We love the crunch of raw heirloom carrots, the creaminess of a homemade beet hummus, and the salty pop of olives. The sensory experience is a rainbow of colors that signals to your brain that you’re getting a wide array of nutrients. It’s the ultimate way to nourish your body while still feeling completely satisfied, as the variety of textures and flavors keeps your palate engaged and happy.
Ingredients
- 1 head radicchio, leaves separated
- 1 cup hummus (beet or classic)
- Cucumber ribbons
- Watermelon radishes, thinly sliced
- A handful of almonds and walnuts
- Flaky sea salt and za’atar
How to make it
- Start by choosing a variety of vegetables with different colors—aim for at least four different hues to maximize phytonutrients and visual appeal.
- Use a mandoline or a very sharp knife to slice the radishes into paper-thin rounds, which makes them easier to eat and more visually striking.
- Create ‘cucumber ribbons’ by using a vegetable peeler to slice the long way down a cucumber, stopping when you reach the seeds.
- Arrange the radicchio leaves like small cups or bowls on the board, providing a natural, crunchy vessel for dips.
- Spoon your hummus into a small ceramic bowl, use the back of a spoon to create a ‘swirl’ or well in the center, and fill it with high-quality olive oil and a dusting of za’atar.
- Intersperse clusters of raw nuts and seeds in the small gaps between the larger vegetables to add healthy fats and protein.
- Finish the entire vegetable section with a light sprinkle of flaky sea salt to draw out the natural sweetness of the produce.
7 Great Ways to Cook Slowly (Step-by-Step Guide)

Why we love this
Slow cooking is an exercise in patience that rewards you with flavors that are impossible to achieve with high heat. We love the way onions transform into a jam-like consistency and how tough cuts of meat become so tender they practically dissolve. This method creates a deep, soulful warmth that acts as a beautiful counterpoint to the fresh, raw elements on your viral food board. It’s about the ritual of the ‘long simmer,’ a technique that fills the kitchen with a sense of calm and anticipation for the feast ahead.
Ingredients
- 2 lbs onions, thinly sliced
- 4 tbsp butter
- 1 tsp sugar
- 2 sprigs fresh thyme
- 1/2 cup dry white wine
- Salt to taste
How to make it
- Melt the butter in a heavy-bottomed Dutch oven over medium-low heat, ensuring it doesn’t brown.
- Add the sliced onions and a pinch of salt, stirring to coat them completely in the fat.
- Cover the pot and let the onions sweat for about 15 minutes until they are soft and translucent.
- Remove the lid, add the sugar (which aids in caramelization), and turn the heat to the lowest possible setting.
- Cook for at least 45 to 60 minutes, stirring every 10 minutes; the onions should slowly turn a deep, rich mahogany brown through the Maillard reaction.
- Deglaze the pan with the white wine, using a wooden spoon to scrape up the dark, concentrated glaze that has formed on the bottom of the pot.
- Simmer until the wine has evaporated and you are left with a thick, spreadable onion confit that can be served in a jar as a decadent topping for bread or meat.
8 Vibrant Ways to Prep Soup (Step-by-Step Guide)
[IMAGE_10]
Why we love this
Prepping soup is a rhythmic, meditative process that sets the stage for a successful board. We love the ‘mise en place’—the neat piles of chopped celery, carrots, and onions—that represent the building blocks of flavor. The texture of a well-prepped soup starts with the precision of the cut; small, uniform dice ensure that every spoonful is perfectly balanced. It’s a vibrant, colorful stage of cooking that reminds us how much care goes into the foundation of a meal, even before the heat is ever turned on.
Ingredients
- 3 large carrots, peeled
- 2 stalks celery
- 1 large white onion
- 4 cloves garlic
- Fresh ginger (1 inch knob)
- Fresh turmeric (optional for color)
How to make it
- Begin by washing all your produce thoroughly under cold water to remove any grit or soil.
- Peel the carrots and slice them into uniform 1/4-inch rounds or half-moons so they cook at the same rate.
- Dice the onion and celery into a fine ‘brunoise’ (small cubes); the consistency in size is crucial for even sautéing and a professional mouthfeel.
- Grate the fresh ginger and turmeric using a microplane, which turns them into a fine paste that will distribute evenly throughout the liquid base.
- Mince the garlic finely, but keep it in a separate pile as it cooks much faster than the onions and carrots.
- Organize your prepped ingredients into small bowls or neat piles on your cutting board—this is your ‘flavor kit.’
- Start your soup by sautéing the ‘holy trinity’ (onion, carrot, celery) in oil until softened, only adding the garlic and ginger at the very end to preserve their volatile aromatic compounds.
- Store any extra prepped vegetables in airtight containers for up to 3 days, making your next batch of soup a breeze to start.
Conclusion
Creating a viral food board isn’t about perfection; it’s about the abundance of choices and the joy of sharing. By combining the slow-cooked richness of a crockpot roast with the whimsical shimmer of glitter dumplings and the freshness of spring produce, you create a dining experience that engages all the senses. So, grab your largest board, pick a few of these guides, and start building your own masterpiece. Your guests—and your soul—will thank you!