
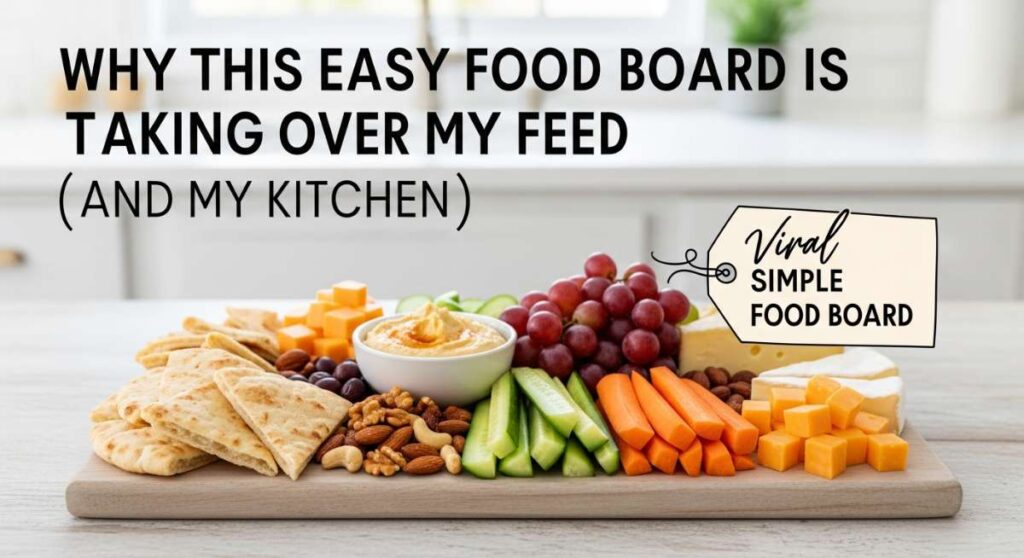
Why This Easy Food Board is Taking Over My Feed (And My Kitchen)
There is something almost magical about the way the light hits a perfectly curated food board on a Saturday afternoon. Lately, my social media feed has been a kaleidoscope of vibrant colors, artisanal cheeses, and fresh seasonal produce, and honestly, I am not complaining. It’s more than just a trend; it’s a lifestyle shift toward grazing, sharing, and celebrating the simple beauty of ingredients. I used to spend hours stressing over multi-course meals, but this shift toward the ‘viral food board’ has brought the joy back into my kitchen, allowing me to host friends without the frantic energy of a boiling stovetop.
As the seasons change and the air turns sweet with the scent of blooming jasmine, my cravings have shifted from heavy, comforting stews to things that feel bright, crisp, and alive. This blog post is a love letter to that transition. Whether you’re planning a quiet Sunday brunch or a boisterous backyard BBQ, these ideas are designed to be approachable yet stunning. I’ve gathered my favorite viral-inspired boards and recipes that have been staples in my home lately, all focused on that effortless ‘cool girl’ kitchen aesthetic that we all secretly (or not so secretly) crave.
So, grab a glass of iced tea, pull up a chair, and let’s dive into the delicious world of seasonal entertaining. From the intricate details of floral cake designs to the rustic charm of sourdough discard snacks, there is something here for every skill level. My goal is to show you that you don’t need a culinary degree to make food that looks like it belongs in a magazine—you just need a little inspiration and the right seasonal ingredients to let nature do the heavy lifting.
7 Beautiful Spring Cake Designs (Easy Step-by-Step)

Why we love this
There is nothing quite as breathtaking as a cake that looks like a wildflower meadow in full bloom. The texture of silky Swiss meringue buttercream paired with the delicate crunch of edible pansies creates a sensory experience that feels both sophisticated and whimsical. When you slice into a light lemon sponge, the aroma of citrus zest fills the room, instantly lifting the mood of any gathering. This design is all about embracing imperfection—the way petals fall naturally and the soft, organic swirls of frosting make it feel homemade in the best possible way, evoking memories of garden parties and sun-drenched afternoons.
Ingredients
- Vanilla or Lemon sponge cake layers
- White chocolate ganache or Swiss meringue buttercream
- Assorted edible flowers (pansies, violas, or lavender)
- Fresh berries for garnish
- Gold leaf accents (optional)
How to make it
- Begin by chilling your cake layers thoroughly; a cold cake is much easier to frost and won’t crumble as you apply the base layer. Place the first layer on a rotating cake stand and apply a generous dollop of buttercream, spreading it evenly with an offset spatula.
- Apply a thin ‘crumb coat’ to the entire exterior of the cake. This layer seals in any loose crumbs. Use a bench scraper held at a 45-degree angle against the side of the cake while rotating the stand to create a smooth, translucent finish. Chill for 30 minutes until firm.
- Apply the final layer of frosting. For a ‘rustic’ look, use the back of a spoon to create small, rhythmic swoops across the surface. Ensure the edges are slightly raised for a modern, unfinished aesthetic.
- Gently press your edible flowers into the sides and top of the cake. Start from the bottom and work your way up in a diagonal ‘climbing’ pattern to mimic a natural garden growth. Use tweezers for precision to avoid smudging the frosting.
- Finish with a light dusting of powdered sugar or a few flakes of gold leaf to catch the light, and serve at room temperature for the best flavor profile.
10 Healthy Spring Dinner Recipes You’ll Love

Why we love this
Spring dinners should feel like a breath of fresh air after the density of winter comfort food. We love these recipes because they lean heavily on the ‘green’ factor—think snappy asparagus, tender sweet peas, and vibrant herbs like mint and dill that wake up the palate. The texture is all about the contrast between roasted, caramel-edged vegetables and the lightness of lean proteins like flaky white fish or lemon-marinated chicken. Every bite feels restorative and nourishing, leaving you satisfied but energized enough for an evening walk in the twilight.
Ingredients
- Seasonal greens (asparagus, snap peas, spinach)
- Lean proteins (Salmon, Cod, or Chicken breast)
- Ancient grains (Quinoa, Farro, or Bulgur)
- Lemon, garlic, and extra virgin olive oil
- Fresh soft herbs (parsley, mint, chives)
How to make it
- Preheat your oven to 400°F (200°C). This high heat is crucial for achieving a light char on vegetables without overcooking the delicate interiors. Line a large sheet pan with parchment paper for easy cleanup.
- Toss your selected vegetables in a bowl with high-quality olive oil, minced garlic, and a pinch of flaky sea salt. Spread them in a single layer; crowding the pan will cause the vegetables to steam rather than roast.
- Nestle your protein among the vegetables. If using salmon, skin-side down is best to keep the flesh moist. Season the protein with lemon zest and cracked black pepper.
- Roast for 12-15 minutes. You are looking for the salmon to flake easily with a fork or the chicken to reach an internal temperature of 165°F. The vegetables should be vibrant green with slightly browned tips.
- While roasting, prepare a quick herb oil by blending parsley, mint, and olive oil. Drizzle this over the hot dish immediately after removing it from the oven to release the aromatic oils of the herbs. Serve over a bed of fluffy quinoa.
5 Best Summer Salad Recipes for BBQ Season

Why we love this
A great summer salad is the unsung hero of the barbecue, providing a necessary acidic crunch to balance out smoky, grilled meats. These recipes are a celebration of peak-season produce, where the sweetness of heirloom tomatoes meets the salty punch of feta or halloumi. The aroma of torn basil leaves and the zing of a balsamic reduction create a profile that is both cooling and complex. We love how these salads look in a large wooden bowl—an explosion of reds, greens, and purples that screams summer joy and makes everyone reach for seconds.
Ingredients
- Base greens or fruit (Arugula, Watermelon, or Romaine)
- Creamy element (Feta, Goat cheese, or Burrata)
- Crunchy topping (Toasted pine nuts, Sunflower seeds, or Croutons)
- Acidic dressing (Balsamic, Lemon juice, or Apple cider vinegar)
- Fresh garden herbs
How to make it
- For a fruit-based salad like watermelon and feta, cube the cold fruit into uniform 1-inch pieces. This ensures a consistent mouthfeel and allows the dressing to coat every surface evenly.
- If using greens like arugula or kale, massage a small amount of olive oil and salt into the leaves first. This softens the fibrous structure of the greens, making them more palatable and helping the dressing adhere better.
- Whisk your vinaigrette in a separate small bowl. A classic ratio is 3 parts oil to 1 part acid. Emulsify the mixture by adding a teaspoon of Dijon mustard, which helps the oil and vinegar stay combined.
- Layer your ingredients rather than tossing them aggressively. Start with the greens/fruit, sprinkle the cheese and nuts over the top, and then drizzle the dressing just before serving to prevent wilting.
- Garnish with whole herb leaves like basil or mint. For an extra touch of flavor, toast your nuts in a dry pan over medium heat for 2-3 minutes until fragrant and golden brown, then add them while still slightly warm.
8 Quick Spring Crockpot Meals for Busy Nights

Why we love this
Slow cooking isn’t just for winter; it’s the ultimate hack for busy spring evenings when you’d rather be outside than hovering over a stove. The magic of these recipes lies in the ‘set and forget’ mentality, resulting in meat so tender it falls apart at the touch of a fork. Imagine coming home to the scent of honey, garlic, and ginger wafting through the house—it’s an instant stress reliever. These meals emphasize lighter sauces and tender spring vegetables, proving that the crockpot can produce dishes that feel surprisingly modern and fresh.
Ingredients
- Main protein (Chicken thighs, Pork shoulder, or Beef chuck)
- Aromatics (Onion, Garlic, Ginger)
- Liquid base (Chicken stock, Coconut milk, or Soy sauce)
- Honey or Maple syrup for sweetness
- Snap peas or Bok choy (added at the end)
How to make it
- Sear your meat in a hot skillet before placing it in the crockpot. This ‘Maillard reaction’ creates a deep, caramelized flavor profile that slow cooking alone cannot achieve. Only sear for 2 minutes per side until a crust forms.
- Deglaze the skillet with a splash of stock or wine, scraping up the browned bits, and pour all those juices into the crockpot. This is where the concentrated flavor lives.
- Place the aromatics and liquids into the pot, ensuring the meat is at least half-submerged. Set the cooker to ‘Low’ for 6-8 hours. Cooking on low preserves the integrity of the proteins, making them succulent rather than rubbery.
- About 30 minutes before serving, add your delicate spring vegetables like snap peas or spinach. Adding them too early will turn them gray and mushy; you want them to just barely steam in the residual heat.
- If the sauce is too thin, whisk a tablespoon of cornstarch with cold water to create a slurry. Stir this into the pot and turn it to ‘High’ for the last 15 minutes to thicken the sauce into a glossy glaze that coats the meat.
6 Creamy Spring Soup Recipes to Try Now

Why we love this
There is a specific kind of comfort found in a vibrant green spring soup that manages to be creamy without being heavy. We adore the silky, velvet-like texture of a blended pea or asparagus soup, especially when finished with a swirl of cold crème fraîche and a sprinkle of lemon zest. The flavor is clean and bright, capturing the very essence of the garden. Served with a crusty piece of sourdough, it’s the perfect transition meal for those slightly chilly spring evenings when you want something warm but still light enough to feel like the new season.
Ingredients
- Green vegetables (Peas, Asparagus, Leeks)
- Potatoes (Yukon Gold for creaminess)
- Vegetable or Chicken broth
- Crème fraîche or Heavy cream
- Fresh mint or Basil
How to make it
- Sauté chopped leeks and garlic in butter over medium-low heat. The goal is to soften them until translucent without browning, which would muddy the bright green color of the final soup.
- Add cubed potatoes and your broth. Simmer until the potatoes are fork-tender. Potatoes provide a natural starch that makes the soup creamy without needing excessive amounts of dairy.
- Add your green vegetables (like peas or chopped asparagus) during the last 5 minutes of simmering. Overcooking greens destroys their chlorophyll, turning the soup a dull olive color instead of a vibrant emerald.
- Use an immersion blender to process the soup until completely smooth. For an even more professional, ‘restaurant-style’ silkiness, pour the blended soup through a fine-mesh sieve to remove any remaining fibers.
- Stir in a splash of cream and a squeeze of fresh lemon juice just before serving. The acidity of the lemon cuts through the richness and makes the vegetable flavors pop. Garnish with a sprig of mint and a few whole peas.
7 Top Summer Pasta Salads for Your Cookout

Why we love this
Pasta salad is the ultimate canvas for summer creativity, and we love it for its sheer versatility. It’s the dish that actually tastes better the next day after the pasta has had time to soak up the herb-infused vinaigrette. The texture is a delightful mix of chewy al dente pasta, crunchy cucumbers, and creamy pockets of feta or mozzarella. It smells like a Mediterranean holiday—lemon, oregano, and high-quality olive oil. It’s the dependable crowd-pleaser that fits perfectly on a food board or in a picnic basket, holding its own against any main course.
Ingredients
- Short pasta shapes (Orzo, Fusilli, or Farfalle)
- Fresh veggies (Cherry tomatoes, Cucumber, Bell peppers)
- Kalamata olives and Red onion
- Feta cheese or Mini mozzarella pearls
- Homemade Italian dressing or Lemon-herb vinaigrette
How to make it
- Cook your pasta in heavily salted water until it is ‘al dente’—firm to the bite. Pasta for salad should never be overcooked, as it will continue to soften once the dressing is added.
- Drain the pasta and immediately toss it with a small amount of the dressing while it is still warm. This allows the pasta to absorb the flavors deep into its core rather than just having the sauce sit on top.
- Let the pasta cool to room temperature before adding the fresh vegetables and cheese. Adding them to hot pasta will wilt the greens and melt the cheese, resulting in a greasy texture.
- Finely dice the red onions and soak them in cold water for 10 minutes before adding. This removes the harsh ‘bite’ and keeps them crisp and sweet.
- Just before serving, add a fresh hit of herbs and a final drizzle of olive oil. If the pasta has absorbed all the liquid and looks dry, a splash of pasta water or extra lemon juice will revive the glossy finish.
10 Decorated Spring Cookies Recipes You Must Bake

Why we love this
Baking these cookies is like an art project you can eat. We love the meticulous but meditative process of piping royal icing into delicate floral shapes or pastel patterns. The scent of vanilla bean and almond extract fills the kitchen, creating an atmosphere of cozy productivity. The texture is a perfect balance: a soft, buttery sugar cookie base with a crisp, sweet icing shell that snaps when you bite into it. These are the showstoppers of any food board, looking like tiny edible jewels that are almost too pretty to consume—almost.
Ingredients
- Buttery sugar cookie dough (Chilled)
- Royal icing (Meringue powder, powdered sugar, water)
- Gel food coloring (Pastel tones)
- Decorative sprinkles or sanding sugar
- Vanilla and Almond extracts
How to make it
- Roll out your chilled dough to a consistent 1/4 inch thickness. Use spacers on your rolling pin if possible to ensure even baking. Cut into spring shapes like butterflies, flowers, or eggs.
- Bake at 350°F (175°C) just until the edges are barely golden. Let them cool completely on a wire rack. Any residual heat will cause the royal icing to melt and run off the edges.
- Prepare your royal icing in two consistencies: ‘Outline’ (thick like toothpaste) and ‘Flood’ (thinner like maple syrup). Tint your icing using gel colors, which provide vibrant hues without thinning the mixture.
- Pipe a border around the edge of the cookie with the outline icing. Let it set for 2 minutes, then fill the center with the flood icing. Use a toothpick or scribe tool to pop any air bubbles and push the icing into the corners.
- Allow the base layer to dry for at least 4-6 hours before adding detailed designs on top, such as flower petals or dots. This ensures the colors don’t bleed into each other and the details stay sharp.
8 Best Healthy Grilling Recipes for Summer

Why we love this
Grilling is the soul of summer cooking, offering a smoky depth of flavor that you simply can’t get indoors. We love these healthy options because they swap heavy marinades for fresh herb rubs and citrus-based glazes. The texture of charred zucchini or perfectly seared shrimp is incredible—crisp on the outside and juicy on the inside. The aroma of wood smoke mixing with grilling pineapple or corn on the cob is the quintessential scent of a July evening. It’s cooking at its most elemental and satisfying, making healthy eating feel like an indulgence.
Ingredients
- Protein (Shrimp, Lean steaks, or Tofu)
- Veggies for skewers (Bell peppers, Red onion, Zucchini)
- Marinade (Olive oil, Lime juice, Garlic, Cumin)
- Fresh salsa or Chimichurri for serving
- Wooden or metal skewers
How to make it
- If using wooden skewers, soak them in water for at least 30 minutes to prevent them from catching fire on the grill. Preheat your grill to medium-high (about 400°F).
- Cut your protein and vegetables into uniform sizes to ensure they cook at the same rate. Thread them onto the skewers, leaving a tiny bit of space between each item so the heat can circulate.
- Brush the grates with a high-smoke-point oil (like grapeseed oil) right before placing the skewers down. This creates a non-stick surface and helps achieve those professional-looking grill marks.
- Grill for 3-5 minutes per side. Avoid moving the skewers too much; let them sit undisturbed to develop a proper sear. Use tongs to flip them only once.
- Remove from the heat and immediately tent with foil for 5 minutes. This ‘resting’ period allows the juices to redistribute throughout the protein, ensuring every bite is succulent. Serve with a side of fresh chimichurri.
5 Delicious Spring Brunch Ideas for Sunday

Why we love this
Sunday brunch is a sacred ritual, and these spring ideas bring a touch of elegance to the table. We love the mix of savory and sweet, like a creamy avocado toast board topped with radishes and ‘everything’ seasoning, or a fluffy Dutch baby pancake topped with macerated strawberries. The vibe is relaxed and celebratory. The aroma of freshly brewed coffee mingling with baking pastries is pure bliss. These ideas are designed for lingering over the table, catching up with loved ones while enjoying food that feels both fancy and completely fuss-free.
Ingredients
- Sourdough bread or Brioche
- Ripe avocados and Radishes
- Fresh berries and Citrus fruit
- Eggs (Poached or Scrambled)
- Smoked salmon and Capers
How to make it
- For an ‘Avocado Toast Board,’ slice a loaf of sourdough and toast it under the broiler with a brush of olive oil until golden and crisp. Arrange the slices on one side of a large wooden board.
- In a bowl, mash ripe avocados with lime juice, salt, and red pepper flakes. Place the mash in a decorative bowl in the center of the board.
- Surround the avocado with small bowls of toppings: thinly sliced radishes, soft-boiled eggs (6.5 minutes in boiling water, then an ice bath), smoked salmon, and microgreens.
- For a sweet element, serve a large bowl of seasonal fruit salad tossed with a honey-lime dressing and fresh mint. The acidity of the lime keeps the fruit from browning and adds a zesty punch.
- Allow guests to build their own toasts. This interactive element makes brunch feel like an event rather than just a meal, and it ensures everyone gets exactly what they like.
7 Sourdough Discard Recipes That Are So Easy
[IMAGE_10]
Why we love this
Sourdough discard is the hidden gem of the kitchen, and we love these recipes because they turn ‘waste’ into absolute magic. There is a deep, tangy complexity that discard adds to crackers, pancakes, or muffins that you just can’t get from standard flour. The texture of sourdough discard crackers is exceptionally light and flaky, with a satisfying crunch that makes them addictive. We love the rustic, artisanal feel of these snacks—they look beautiful tucked into the corners of a cheese board, telling a story of patience and sustainable kitchen practices.
Ingredients
- Sourdough discard (Unfed)
- All-purpose flour or Whole wheat flour
- Melted butter or Olive oil
- Herbs (Rosemary, Thyme)
- Flaky sea salt for topping
How to make it
- For simple sourdough crackers, mix equal parts discard and flour with a tablespoon of melted butter until a cohesive dough forms. Wrap in plastic and let it rest for 30 minutes at room temperature to relax the gluten.
- Preheat your oven to 325°F (160°C). Rolling the dough out very thin is the secret to a great crunch. Aim for paper-thinness—you should almost be able to see the parchment paper through the dough.
- Brush the top of the dough with a tiny bit of water or oil and sprinkle generously with flaky sea salt and dried rosemary. Use a pizza cutter to score the dough into squares or diamonds.
- Bake for 15-20 minutes, rotating the pan halfway through. The crackers are done when they are golden brown and feel firm to the touch. They will continue to crisp up as they cool.
- Once completely cool, snap them along the scored lines. Store in an airtight container for up to a week. They are the perfect tangy companion to a sharp cheddar or a creamy brie on your viral food board.
The Art of the Everyday Board
As we’ve explored everything from floral cakes to savory sourdough crackers, I hope you’ve seen that the magic of a great food board lies in the details. It’s about taking those simple, seasonal ingredients and presenting them with a bit of intention and a lot of love. Whether you’re hosting a massive summer cookout or just making a quick spring dinner for yourself, remember that the best meals are the ones that make you feel connected—to the season, to your ingredients, and to the people around your table. Now, go forth and create something beautiful in your own kitchen!
Frequently Asked Questions
Have questions about building the perfect viral food board or mastering these spring recipes? Check out some of the most common queries below to help you get started on your culinary journey.