

Why This Easy DIY Food Board Is Going Viral Right Now
There is something inherently magical about a shared meal that brings people together, but the recent trend of the ‘Ultimate Variety Board’ has taken my hosting game to a whole new level. It is not just about cheese and crackers anymore; it is about a curated experience of textures, temperatures, and bold flavors that look as stunning as they taste. I remember the first time I set one of these out—my guests didn’t just eat; they explored, laughed, and lingered over every bite, making the evening feel truly intentional and warm.
The secret to why this specific board is going viral lies in its versatility. It blends the comfort of a home-cooked meal with the aesthetic appeal of a professional catering spread, all while being surprisingly manageable for any home cook. Whether you are craving something sweet, savory, or wholesome, this collection of dishes ensures every person at the table finds their new favorite obsession. Let’s dive into the recipes that make this viral board the talk of the internet.
How to bake feijoa crumble?

Why we love this
This crumble is the epitome of cozy, late-autumn comfort, filling your kitchen with a perfume that is part pineapple, part strawberry, and entirely intoxicating. As it bakes, the feijoas break down into a luscious, jammy consistency that contrasts perfectly with the golden, buttery peaks of the oat topping. Every spoonful offers a delightful interplay between the slightly tart fruit and the sweet, cinnamon-infused crunch, making it the perfect centerpiece for a dessert-heavy board. It’s the kind of dish that demands you slow down and savor the warmth of the moment.
Ingredients
- 8-10 ripe feijoas, scooped out and halved
- 1/2 cup brown sugar
- 1 tsp ground cinnamon
- 1 cup all-purpose flour
- 1 cup rolled oats
- 100g cold unsalted butter, cubed
- 1/2 cup shredded coconut
- Pinch of sea salt
How to make it
- Preheat your oven to 180°C (350°F) and lightly grease a medium-sized baking dish with butter.
- In a large bowl, toss the scooped feijoa pulp with half of the cinnamon and a tablespoon of the brown sugar to help the juices macerate.
- In a separate bowl, combine the flour, oats, remaining sugar, cinnamon, coconut, and salt.
- Incorporate the cold butter cubes into the dry mixture using your fingertips or a pastry cutter, rubbing the mixture together until it resembles coarse breadcrumbs with some larger, pea-sized clumps for extra texture.
- Spread the feijoa mixture evenly across the bottom of the prepared dish.
- Generously scatter the crumble topping over the fruit, ensuring you don’t pack it down—keeping it loose allows the heat to circulate and create a crispier finish.
- Bake for 30–35 minutes until the fruit juices are bubbling up at the edges and the topping has turned a deep, golden brown.
- Let it rest for 10 minutes before serving to allow the fruit juices to thicken into a syrup.
How to make energy balls?

Why we love this
These energy balls are like little bites of pure sunshine, offering a chewy, decadent texture that feels like a treat but fuels like a meal. The combination of nutty almond butter and the natural sweetness of Medjool dates creates a base that is both rich and satisfyingly dense. With every bite, you get the subtle crunch of chia seeds and the smooth melt of dark chocolate chips, providing a balanced energy boost that wards off the afternoon slump. They are the ultimate ‘grab-and-go’ addition to your food board, looking like artisanal truffles but packing a nutritional punch.
Ingredients
- 1 cup pitted Medjool dates
- 1/2 cup creamy almond butter
- 1/2 cup rolled oats
- 2 tbsp chia seeds
- 1/4 cup dark chocolate chips
- 1 tsp vanilla extract
- Pinch of salt
How to make it
- Place the pitted dates in a food processor and pulse until they form a thick, sticky paste or a cohesive ball.
- Add the almond butter, rolled oats, chia seeds, vanilla, and salt to the processor and pulse again until all ingredients are thoroughly integrated and the mixture holds together when pressed.
- Transfer the mixture to a bowl and fold in the dark chocolate chips by hand to ensure they remain intact.
- Scoop about a tablespoon of the mixture at a time and roll firmly between your palms to create smooth, round spheres roughly the size of a golf ball.
- If the mixture is too sticky, chill it in the refrigerator for 20 minutes before rolling.
- Place the finished balls on a parchment-lined tray and refrigerate for at least 30 minutes to set their structure.
- Store in an airtight container in the fridge for up to two weeks for the perfect chewy consistency.
How to prep protein bowls?

Why we love this
The beauty of a protein bowl lies in its vibrant geometry and the incredible explosion of fresh, clean flavors that dance on the palate. Imagine a base of fluffy, nutty quinoa topped with crisp greens, earthy roasted vegetables, and a perfectly seasoned protein that provides a satisfying, muscular bite. The interplay of the creamy avocado against the sharp tang of a lemon-tahini dressing creates a luxurious mouthfeel that makes healthy eating feel like an indulgence. It is a visually stunning component that brings a sense of balance and vitality to any food board.
Ingredients
- 1 cup cooked quinoa or farro
- 200g grilled chicken breast or firm tofu, sliced
- 1 cup baby spinach or kale
- 1/2 cucumber, sliced
- 1/4 red onion, thinly shaved
- 1/2 avocado, sliced
- 2 tbsp pumpkin seeds
- Dressing: 2 tbsp tahini, juice of half a lemon, 1 tsp maple syrup
How to make it
- Begin by preparing your grain base; ensure the quinoa is cooked in vegetable broth for extra depth of flavor and fluffed thoroughly with a fork.
- Season your protein (chicken or tofu) with salt, pepper, and smoked paprika, then sear in a hot pan with a drizzle of olive oil until golden and cooked through (internal temp of 165°F for chicken).
- Prepare the dressing by whisking tahini, lemon juice, maple syrup, and a splash of warm water together until it reaches a smooth, pourable consistency.
- Arrange the spinach in the base of a wide, shallow bowl to create a bed for the other ingredients.
- Place the grains in one quadrant, the protein in another, and fill the remaining space with the cucumber, onion, and avocado.
- Toasted the pumpkin seeds in a dry pan over medium heat for 2 minutes until they pop slightly, then sprinkle them over the top for a nutty crunch.
- Drizzle the dressing in a zig-zag pattern across the entire bowl just before serving to maintain the crispness of the vegetables.
How to cook garlic shrimp?
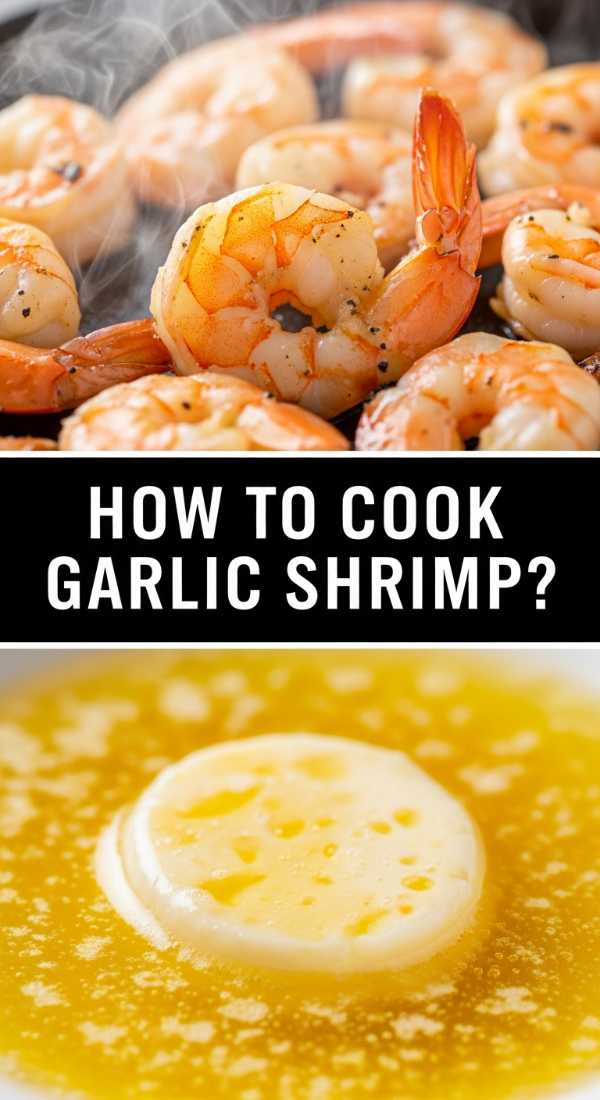
Why we love this
Garlic shrimp is the undisputed star of the savory section, offering a succulent, snappy texture that is drenched in a rich, aromatic butter sauce. As the shrimp hit the hot pan, they transform into beautiful pink curls, soaking up the pungent garlic and the bright, citrusy notes of fresh lemon. The aroma alone is enough to draw everyone to the table, promising a decadent experience that feels like a coastal getaway. It’s a fast, high-impact dish that adds a touch of elegance and a lot of flavor to your viral board spread.
Ingredients
- 500g large shrimp, peeled and deveined
- 4 cloves garlic, minced
- 3 tbsp unsalted butter
- 1 tbsp olive oil
- 1/2 tsp red pepper flakes
- Fresh parsley, chopped
- Juice of 1 lemon
How to make it
- Pat the shrimp dry with paper towels; this is crucial for getting a proper sear rather than steaming them in their own moisture.
- Heat the olive oil and 1 tablespoon of butter in a large skillet over medium-high heat until the butter is foaming.
- Add the shrimp in a single layer, ensuring they aren’t crowded, and sear for about 1-2 minutes until the bottom edges turn pink and opaque.
- Flip the shrimp and immediately add the remaining butter, minced garlic, and red pepper flakes.
- Sauté for another 1-2 minutes, spooning the melting garlic butter over the shrimp continuously—be careful not to burn the garlic; it should turn golden and fragrant, not dark brown.
- Remove the skillet from the heat as soon as the shrimp are opaque throughout and have formed a ‘C’ shape (if they curl into an ‘O’, they are overcooked).
- Stir in the lemon juice and fresh parsley, tossing well to coat every shrimp in the silky sauce.
How to roast sweet potatoes?

Why we love this
Roasted sweet potatoes are a masterclass in the magic of caramelization, where high heat transforms a humble root vegetable into candy-like morsels with charred edges and a creamy, melt-in-your-mouth interior. The natural sugars intensify in the oven, creating a deep, earthy sweetness that is perfectly complemented by a sprinkle of flaky sea salt and aromatic herbs. They provide a grounding, hearty element to the board that feels both rustic and sophisticated. Each cube is a burst of warmth, making them an irresistible snack that bridges the gap between side dish and star attraction.
Ingredients
- 2 large sweet potatoes, cubed into 1-inch pieces
- 2 tbsp extra virgin olive oil
- 1 tsp smoked paprika
- 1/2 tsp garlic powder
- 1/2 tsp dried thyme
- Salt and cracked black pepper to taste
How to make it
- Preheat your oven to 210°C (425°F) and place a large baking sheet inside to get hot; this helps sear the potatoes immediately upon contact.
- In a large mixing bowl, toss the sweet potato cubes with olive oil, paprika, garlic powder, thyme, salt, and pepper until every piece is thoroughly coated.
- Carefully remove the hot baking sheet and spread the potatoes in a single layer, ensuring they have plenty of space between them—if they are too close, they will steam instead of roast.
- Roast for 15 minutes, then use a spatula to flip the cubes to ensure even browning on all sides.
- Return to the oven for another 10–15 minutes until the edges are dark golden and slightly crisp, and the centers are easily pierced with a fork.
- For an extra flavor boost, turn on the broiler for the final 2 minutes, watching closely to prevent burning.
How to make tomato soup?

Why we love this
There is nothing quite as nostalgic or soul-warming as a bowl of velvety tomato soup, especially when it is elevated with roasted aromatics and a touch of cream. The flavor is a complex balance of bright acidity and deep, savory richness, with the scent of basil lingering in every spoonful. Its smooth, thick texture provides a comforting contrast to the crunchy elements on your food board, acting as a dip or a standalone sipper. It feels like a warm hug in a bowl, reminding everyone of rainy days and cozy kitchen memories.
Ingredients
- 1kg ripe tomatoes, halved (or 2 cans of whole peeled tomatoes)
- 1 white onion, chopped
- 3 cloves garlic, smashed
- 500ml vegetable broth
- 1/4 cup heavy cream or coconut milk
- Handful of fresh basil leaves
- 2 tbsp olive oil
How to make it
- If using fresh tomatoes, roast them on a baking sheet with the onion and garlic at 200°C (400°F) for 30 minutes until charred and soft. If using canned, sauté the onion and garlic in a pot first.
- Transfer the roasted vegetables (including all the juices) or the canned tomatoes into a large soup pot.
- Add the vegetable broth and bring the mixture to a gentle simmer over medium heat for about 10–15 minutes to allow the flavors to meld.
- Stir in the fresh basil leaves, then use an immersion blender to puree the soup until it is completely smooth and velvety.
- Return the pot to low heat and stir in the heavy cream, stirring constantly until the soup takes on a beautiful orange-red hue and is heated through.
- Taste and adjust seasoning with salt, pepper, and a pinch of sugar if the tomatoes are too acidic.
How to bake lime tart?

Why we love this
This lime tart is a zesty, refreshing explosion that cleanses the palate and delights the senses with its sharp, citrusy brilliance. The filling is impossibly silky, striking a perfect chord between the punchy tartness of fresh lime juice and the mellow sweetness of condensed milk. Nestled in a buttery, crumbly graham cracker crust, the tart offers a satisfying textural contrast that feels light yet indulgent. Its bright, pale green color adds a pop of freshness to the board, making it the ultimate finish to a multi-course grazing experience.
Ingredients
- 1.5 cups graham cracker crumbs
- 1/2 cup melted butter
- 2 cans (14 oz each) sweetened condensed milk
- 1 cup fresh lime juice (Key limes preferred)
- 1 tbsp lime zest
- 3 egg yolks
How to make it
- Preheat your oven to 175°C (350°F). Combine graham cracker crumbs and melted butter in a bowl, pressing the mixture firmly into the bottom and up the sides of a 9-inch tart pan.
- Bake the crust for 8–10 minutes until it is lightly golden and set, then let it cool slightly.
- In a large mixing bowl, whisk the egg yolks with the lime zest until they are pale and slightly thickened.
- Slowly pour in the sweetened condensed milk while whisking, followed by the lime juice, stirring until the mixture is completely smooth and has thickened slightly due to the acid in the lime.
- Pour the filling into the pre-baked crust and smooth the top with a spatula.
- Bake for 15–18 minutes; the tart should be set around the edges but still have a slight, jell-o-like jiggle in the center—do not overbake or the top will crack.
- Cool at room temperature for an hour, then refrigerate for at least 4 hours (ideally overnight) to allow the filling to set into a dense, creamy texture.
How to make chickpea snacks?

Why we love this
These roasted chickpeas are the ultimate addictive snack, offering a crunch that rival any potato chip but with a wholesome, nutty undertone. Tossed in a blend of smoky and spicy seasonings, they become little flavor bombs that are impossible to stop eating. The exterior becomes incredibly crisp in the oven, while the inside retains a slight, pleasant chewiness. They are the perfect ‘filler’ for a food board, tucked into the small gaps between larger dishes to provide a constant source of savory satisfaction.
Ingredients
- 2 cans (15 oz) chickpeas, drained and rinsed
- 2 tbsp olive oil
- 1 tsp smoked paprika
- 1/2 tsp cumin
- 1/2 tsp garlic powder
- 1/4 tsp cayenne pepper (optional)
- Salt to taste
How to make it
- The most important step for crunch: dry the chickpeas thoroughly. Roll them between two clean kitchen towels until every trace of moisture is gone; remove any loose skins that fall off.
- Preheat your oven to 200°C (400°F). Place the dry chickpeas on a baking sheet and roast them *plain* for 15 minutes first to draw out remaining moisture.
- Remove from the oven and drizzle with olive oil, then sprinkle the spices and salt over them. Toss directly on the pan until evenly coated.
- Return to the oven for another 15–20 minutes, shaking the pan every 5 minutes.
- Watch for the ‘clinking’ sound—when you shake the pan and the chickpeas sound like marbles hitting the metal, they are done.
- Turn off the oven and crack the door open, letting the chickpeas sit inside for another 10 minutes to reach maximum crispness as they cool.
How to cook lemon chicken?

Why we love this
Lemon chicken is a classic for a reason, but when prepared with a focus on golden, crispy skin and a bright, reduction-style sauce, it becomes a viral sensation. The meat stays incredibly juicy and tender, infused with the zingy aroma of fresh lemon and the earthy notes of rosemary or oregano. As the sauce reduces, it turns into a glossy glaze that clings to the chicken, providing a burst of sunshine in every bite. It’s a sophisticated, high-protein addition that brings a sense of ‘main dish’ authority to your communal board.
Ingredients
- 4 boneless, skin-on chicken thighs
- Juice and zest of 2 lemons
- 3 cloves garlic, minced
- 1/2 cup chicken broth
- 1 tbsp honey
- Fresh rosemary or thyme
- 2 tbsp butter
How to make it
- Season the chicken thighs generously with salt and pepper. Heat a large cast-iron skillet over medium-high heat with a splash of oil.
- Place chicken skin-side down and sear for 6–8 minutes without moving them; this ensures the skin becomes incredibly crispy and golden brown.
- Flip the chicken and cook for another 5 minutes, then remove from the pan and set aside on a plate.
- In the same pan, sauté the garlic for 30 seconds, then pour in the chicken broth, lemon juice, lemon zest, honey, and herbs.
- Scrape the bottom of the pan to release the ‘fond’ (the flavorful brown bits) and simmer the liquid until it reduces by half and starts to thicken.
- Whisk in the butter to create a mounting ‘beurre blanc’ style sauce, then return the chicken to the pan, skin-side up, to warm through for 2 minutes.
- Spoon the sauce over the meat (avoiding the skin to keep it crisp) and serve immediately.
How to make lentil soup?

Why we love this
This lentil soup is a hearty, earth-bound embrace that feels both ancient and perfectly modern. The lentils break down just enough to thicken the broth into a rich, stew-like consistency, flavored with a base of mirepoix and warm, grounding spices like cumin and turmeric. Each spoonful is a dense mosaic of textures, offering a savory depth that is incredibly filling without ever feeling heavy. It’s the kind of dish that anchors a food board, providing a warm, nourishing contrast to lighter snacks and fresh fruits.
Ingredients
- 1 cup dried green or brown lentils, rinsed
- 1 onion, 2 carrots, 2 celery stalks (finely diced)
- 3 cloves garlic, minced
- 1.5 liters vegetable broth
- 1 can (14 oz) crushed tomatoes
- 1 tsp cumin and 1/2 tsp turmeric
- Lemon wedges and fresh parsley for garnish
How to make it
- In a large Dutch oven, sauté the onion, carrots, and celery in olive oil over medium heat until the onions are translucent and the carrots have softened (about 8 minutes).
- Add the garlic, cumin, and turmeric, stirring for 1 minute until the spices are toasted and fragrant.
- Stir in the rinsed lentils, crushed tomatoes, and vegetable broth. Increase heat to bring the mixture to a boil.
- Once boiling, reduce the heat to low, cover the pot, and simmer for 30–40 minutes. Check the lentils; they should be tender but not mushy.
- For a creamier texture, take two cups of the soup and blend it in a blender or use an immersion blender for just a few pulses, then stir it back into the pot.
- Stir in a big squeeze of fresh lemon juice at the very end—the acidity is vital for brightening the earthy flavors of the lentils.
- Garnish with fresh parsley and a drizzle of olive oil before serving in small, rustic bowls on your board.
Conclusion
Creating a viral food board isn’t just about the recipes; it’s about the joy of assembly and the shared experience of eating. By combining these ten diverse dishes—from the zesty lime tart to the savory garlic shrimp—you create a landscape of flavor that invites everyone to dig in. So, grab your largest platter, invite your favorite people over, and watch as this simple, stunning DIY board becomes the highlight of your season. Happy hosting!