
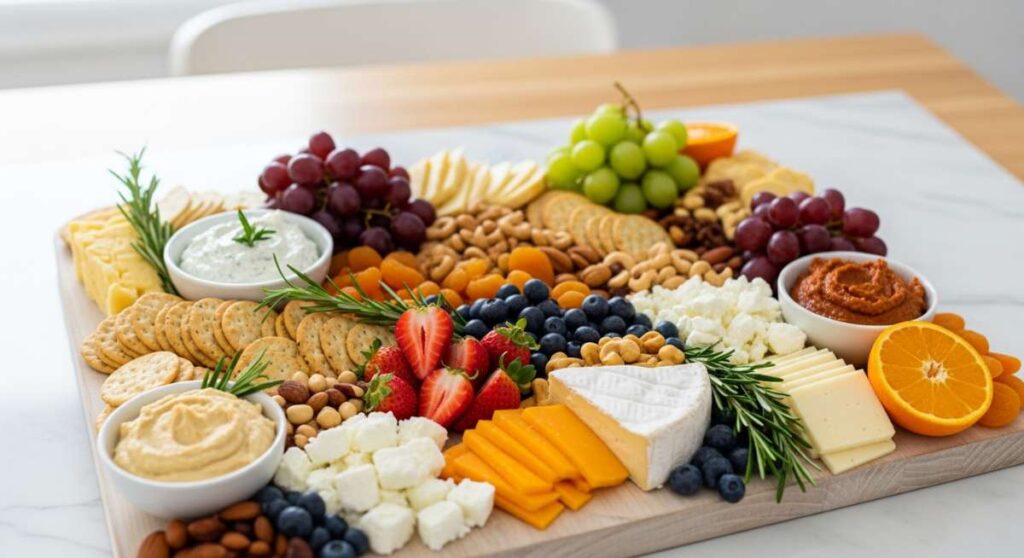
We have all been there: the doorbell rings in twenty minutes, your house is mostly clean, but you haven’t even thought about the appetizers yet. There is a specific kind of panic that sets in when you want to be the ‘hostess with the mostess’ but your schedule says otherwise. That is exactly why I fell head over heels for the viral snack board trend; it transforms humble pantry staples into a literal work of art that guests can’t stop snapping photos of before they dive in.
Creating the perfect board isn’t just about food; it is about creating a centerpiece for conversation. There is something so incredibly intimate and warm about a group of friends hovering over a beautiful spread, reaching for a slice of sharp cheddar or a honey-drizzled fig while laughter fills the room. It evokes a sense of European leisure, where time slows down and the only thing that matters is the crunch of a cracker and the company you keep.
How to select the perfect wooden board for your base?
Why we love this
The foundation of your snack board sets the entire mood for your gathering, acting as the canvas for your culinary masterpiece. A high-quality acacia or walnut board offers a rich, deep grain that provides a stunning contrast against pale cheeses and vibrant fruits. The tactile warmth of the wood, the subtle earthy scent of conditioned timber, and the substantial weight of a solid slab create an inviting, rustic atmosphere that immediately puts your guests at ease and signals that a special treat is about to be shared.
Ingredients
- A large acacia or walnut wooden board (at least 18 inches)
- Food-grade mineral oil
- Soft lint-free cloth
How to make it
- Select a board that is proportionate to your guest count; for a party of four to six, an 18-inch circular or rectangular board is ideal. Ensure the surface is flat and free of deep gouges that could harbor bacteria.
- Deep clean the board using a mild soap and warm water, then dry it immediately with a towel. Never soak your board, as this can cause the wood to warp or crack over time.
- Apply a generous amount of food-grade mineral oil to a soft cloth and rub it into the grain of the wood. This seasons the board, giving it a beautiful low-luster sheen and preventing the wood from absorbing odors or juices from the food.
- Buff the board with a dry section of the cloth until the surface feels smooth and not greasy. Let it sit for at least 30 minutes before placing any food on it to ensure the oil has fully penetrated the fibers.
How to create the signature salami river for flow?

Why we love this
The ‘salami river’ is the secret technique that gives viral boards that professional, abundant look that seems to flow effortlessly across the wood. There is something deeply satisfying about the rhythmic, overlapping folds of cured meat, smelling of garlic and black pepper, winding its way between mounds of cheese and nuts. It adds a sense of movement and artistry to the board, making the spread look lush and bountiful rather than static, while also making it incredibly easy for guests to grab a single, perfectly portioned slice.
Ingredients
- 2 packages of thinly sliced Genoa or Sopressata salami
- A small glass or ramekin (optional, for shaping)
How to make it
- Take a single slice of salami and fold it in half to create a semi-circle, then fold it in half again to create a small triangle or ‘fan’ shape. This adds height and texture to the presentation.
- Begin placing the folded slices at one end of the board, slightly overlapping them so the folded edge faces upward. This creates a ruffled effect that looks like a moving stream.
- Continue placing the folded slices in a gentle ‘S’ curve that snakes from one corner of the board toward the center. Keep the slices packed tightly together so they support each other and maintain their upright shape.
- If you prefer a ‘salami rose’ look, fold slices over the rim of a small glass until you have several layers, then flip the glass over onto the board. The result is a dense, floral meat arrangement that acts as a beautiful anchor point for your river.
How to choose cheeses for maximum flavor impact?

Why we love this
Cheese is the undisputed star of any snack board, providing a symphony of textures and tastes that range from the buttery melt of a triple-cream brie to the crystalline crunch of an aged gouda. The aroma of a well-aged cheddar combined with the tangy, floral notes of a goat cheese coated in herbs creates a sensory experience that is both sophisticated and comforting. Each bite offers a new discovery, especially when the creamy fats of the cheese are balanced against the saltiness of the meats and the sweetness of the fruit.
Ingredients
- 1 wheel of soft cheese (Brie or Camembert)
- 1 wedge of hard cheese (Manchego or Aged White Cheddar)
- 1 log of semi-soft cheese (Herbed Goat Cheese or Gorgonzola)
- Cheese knives for each variety
How to make it
- Select three distinct textures: soft, hard, and semi-soft. This variety ensures that every guest finds something they love and provides different structural elements for the board layout.
- Remove your cheeses from the refrigerator at least 45 to 60 minutes before serving. Cheese serves best at room temperature, which allows the fats to soften and the full profile of the flavors and aromas to bloom.
- Prep the hard cheese by slicing it into uniform triangles or cubes; for Manchego, leave the rind on the outer edge for a traditional look. For the soft brie, slice a small wedge out of the wheel to ‘invite’ guests to start, or score the top in a crosshatch pattern for a drizzle of honey later.
- Place the cheeses in a triangular formation on the board first, as they are your ‘anchor’ pieces. Ensure there is plenty of space between them to build the rest of the board’s components.
How to incorporate seasonal fruits for vibrant color?

Why we love this
Fruit provides the necessary acidic brightness and natural sweetness that cuts through the rich, salty elements of the meats and cheeses. Seeing a cluster of deep purple grapes or a scatter of ruby-red pomegranate seeds adds a pop of jewel-toned color that makes the board look alive and fresh. The burst of juice from a perfectly ripe blackberry followed by the floral scent of a sliced pear creates a refreshing palate cleanser between bites of savory snacks, making the entire eating experience feel light and balanced.
Ingredients
- 1 bunch of red or green grapes
- 1 cup of fresh berries (raspberries, blackberries, or blueberries)
- 1 seasonal fruit (sliced pears, apples, or figs)
- Lemon juice (to prevent browning)
How to make it
- Wash and thoroughly dry all fruit. Moisture is the enemy of a snack board as it can make crackers soggy and cause cheeses to slip.
- Keep grapes on the vine but cut the main bunch into smaller ‘snips’ of 3-4 grapes each. This allows guests to pick up a small portion without struggling to pull fruit off a large, communal stem.
- Slice apples or pears just before serving to maintain crispness. If you must slice them early, toss them lightly in a mixture of water and a squeeze of lemon juice to prevent oxidation and browning.
- Tuck the smaller berries into the ‘nooks and crannies’ of the board. Place them near the soft cheeses like Brie, as fruit and creamy cheese are a classic pairing that guests naturally gravitate toward.
How to add the perfect crunch with gourmet nuts?

Why we love this
Nuts are the unsung heroes of the snack board, providing a much-needed structural crunch and a deep, toasted savoriness that lingers on the tongue. Whether it’s the buttery, smooth texture of a Marcona almond or the spicy-sweet kick of a candied pecan, nuts fill the gaps and add a layer of complexity to the spread. Their earthy aroma and varied shapes—from the round spheres of hazelnuts to the rugged edges of walnuts—provide visual interest and a satisfying ‘snap’ that contrasts beautifully with soft jams and cheeses.
Ingredients
- 1/2 cup Marcona almonds (salted)
- 1/2 cup candied pecans or walnuts
- 1/4 cup pistachios (shelled or unshelled)
How to make it
- Select at least two types of nuts: one salty and one sweet. This caters to different palates and allows for more creative pairing options with the other items on the board.
- If using raw nuts, toast them in a dry skillet over medium heat for 3-5 minutes until they become fragrant and slightly golden. This step is crucial as it releases the essential oils and significantly improves the flavor profile.
- Place the nuts in small ‘piles’ rather than scattering them individually. This creates a more organized aesthetic and makes it easier for guests to grab a handful.
- Scatter a few nuts near the honey or jams, as the combination of salt, crunch, and sweetness is a proven crowd-pleaser that encourages guests to experiment with different flavor combinations.
How to style honeycomb for that rustic wow factor?
Why we love this
Adding a piece of raw honeycomb is the ultimate ‘pro’ move that elevates a simple board to a gourmet experience. There is something incredibly primal and beautiful about the geometric wax cells dripping with translucent, golden nectar. The scent is pure summer—floral, sweet, and clean. When guests spread a bit of the waxy, chewy comb onto a piece of sharp cheddar, they get a multidimensional flavor explosion that is sweet, salty, and texturally fascinating, making for a memorable culinary moment.
Ingredients
- 1 small block of raw honeycomb
- Honey dipper or small silver spoon
- Fresh thyme sprigs (for garnish)
How to make it
- Purchase a high-quality, local raw honeycomb. It should be firm and not completely submerged in liquid honey so that it holds its shape on the board.
- Cut a small rectangular block (about 2×3 inches) using a sharp, warm knife. Placing the knife in hot water and wiping it dry before cutting helps slide through the wax without crushing the delicate cells.
- Place the honeycomb directly onto the board near the softest cheese, or inside a small shallow ceramic dish if you want to contain the drips.
- Drizzle a tiny bit of extra liquid honey over the top to give it a ‘glistening’ look that catches the light. Garnish the honey area with a sprig of fresh thyme to add an aromatic, herbal contrast to the intense sweetness.
How to pick the best crackers for dipping and stacking?
Why we love this
Crackers are the essential transport system for your board, but they should be so much more than just a vessel. From the delicate, airy crunch of a water cracker to the hearty, seeded bite of a multi-grain flatbread, the right selection provides the necessary backbone for your toppings. The toasted grain aroma and the subtle hint of sea salt on a well-baked cracker enhance the flavors of everything they carry, ensuring that each ‘perfect bite’ has a solid, satisfying base that doesn’t crumble under pressure.
Ingredients
- 1 box of classic water crackers (neutral flavor)
- 1 box of seeded flatbreads or artisanal crisps
- 1 bag of toasted baguette slices (crostini)
How to make it
- Select three different shapes and textures. A round water cracker, a long rectangular flatbread, and a small toasted baguette slice provide visual variety and different ‘platforms’ for different cheeses.
- To make your own crostini, slice a baguette into 1/4 inch rounds, brush lightly with olive oil, and bake at 375°F (190°C) for about 6-8 minutes until the edges are golden brown and the centers are crisp.
- Fan the crackers out in rows or clusters. Do not just pile them in a heap; instead, overlap them in a ‘shingle’ pattern following the curves of the meat and cheese you have already placed.
- Ensure you have a ‘neutral’ option like the water cracker. Some cheeses have very complex flavor profiles that can be overwhelmed by highly seasoned or heavily seeded crackers.
How to use fresh herbs as a fragrant garnish?

Why we love this
Garnishing with fresh herbs is the final touch that breathes life into your snack board, transforming it from a collection of food into a vibrant, garden-fresh display. The woody, pine-like scent of rosemary or the bright, peppery aroma of fresh basil adds an olfactory layer that enhances the appetite. These pops of deep green break up the browns and yellows of the crackers and cheeses, providing a visual ‘rest’ for the eyes and making the entire arrangement look like it was styled for a magazine shoot.
Ingredients
- 3-4 sprigs of fresh rosemary
- 1 bunch of fresh thyme
- Small bunch of sage or basil leaves
How to make it
- Wash the herbs and pat them completely dry. Limp or wet herbs will wilt quickly and look unappealing on the board.
- Tuck longer sprigs of rosemary under the edges of the cheese blocks or along the ‘salami river’ to act as a natural border. The height of the rosemary adds a nice 3D element to the board.
- Scatter smaller leaves of thyme or oregano over the soft cheeses. This not only looks beautiful but allows a few leaves to stick to the cheese, adding a subtle herbal flavor to the bites.
- Use herbs to fill in any ‘bald spots’ where the wooden board is visible. This ‘filler’ technique is what gives the board that signature lush, overflowing look that is so popular on social media.
How to balance sweet and savory elements?

Why we love this
The magic of a viral snack board lies in the intentional balance of contrasting flavors, often referred to as ‘flavor bridging.’ When you pair a salty prosciutto with a sweet dried apricot, or a sharp blue cheese with a dollop of fig jam, you are creating a complex taste profile that hits every part of the palate. This balance prevents the palate from becoming fatigued by too much salt or fat, keeping your guests reaching for ‘just one more bite’ as they discover how a tiny drop of balsamic glaze can completely change the character of a piece of parmesan.
Ingredients
- 1 jar of fig jam or apricot preserves
- 1/2 cup of dried fruits (apricots or cranberries)
- Balsamic glaze or Mike’s Hot Honey
- Prosciutto or salty ham
How to make it
- Place your ‘sweet’ anchors (jams and preserves) in small ramekins or bowls. This prevents the sticky liquids from running into the crackers and making them soft.
- Apply the ‘Rule of Two’: for every salty item (meat or hard cheese), ensure there is a sweet counterpart (fruit or jam) nearby. Position the fig jam next to the Brie, and the dried apricots next to the salty nuts.
- Add a ‘bridge’ element like a balsamic glaze. Drizzle this sparingly over the harder cheeses or the sliced pears to tie the savory and sweet worlds together.
- Taste a few combinations yourself as you build. If the board feels too heavy on the meat, add more fresh grapes or a dish of cornichons (pickles) to provide acidity and brightness to cut through the salt.
How to maintain freshness until guests arrive?
Why we love this
There is nothing worse than a beautiful board that has gone ‘sweaty’ or stale because it sat out too long. Maintaining freshness ensures that the cheese stays creamy without becoming oily, the crackers remain crisp, and the fruit stays plump and hydrated. Serving a board at its peak freshness shows your guests that you care about the quality of the ingredients and the experience of the meal. A perfectly preserved board looks as good when the last guest arrives as it did when you finished styling it, preserving that ‘wow’ moment for everyone.
Ingredients
- Plastic wrap or beeswax wrap
- A damp (not wet) paper towel
- A cool, draft-free area for storage
How to make it
- Assemble the ‘dry’ elements (nuts, crackers) and the ‘wet’ elements (meats, cheeses, fruits) separately if you are preparing more than two hours in advance. Combine them just before the guests arrive to keep the crackers from absorbing moisture.
- If the board is fully assembled, cover it tightly with plastic wrap. Ensure the wrap is not touching the surface of the soft cheeses or jams, as it will stick and ruin the presentation when removed.
- For the cheese, if you are in a very dry environment, place a slightly damp paper towel over the cut faces of the cheese before wrapping. This prevents the edges from becoming hard and crusty.
- Keep the board in a cool, dark place but *not* the refrigerator for the final 30 minutes. As mentioned before, cheese and meat are best at room temperature, but they should not be exposed to direct sunlight or heat, which will cause the fats to separate and look unappetizing.
Conclusion
Building the viral simple snack board is less about following a strict recipe and more about embracing the joy of assembly. It is an act of creativity that rewards you with both a stunning visual and a delicious feast. Whether you are hosting a formal holiday gathering or a casual movie night, this board is a guaranteed conversation starter that brings people together. So grab your favorite wooden board, find some beautiful cheeses, and start folding that salami—your guests are going to be absolutely blown away!