
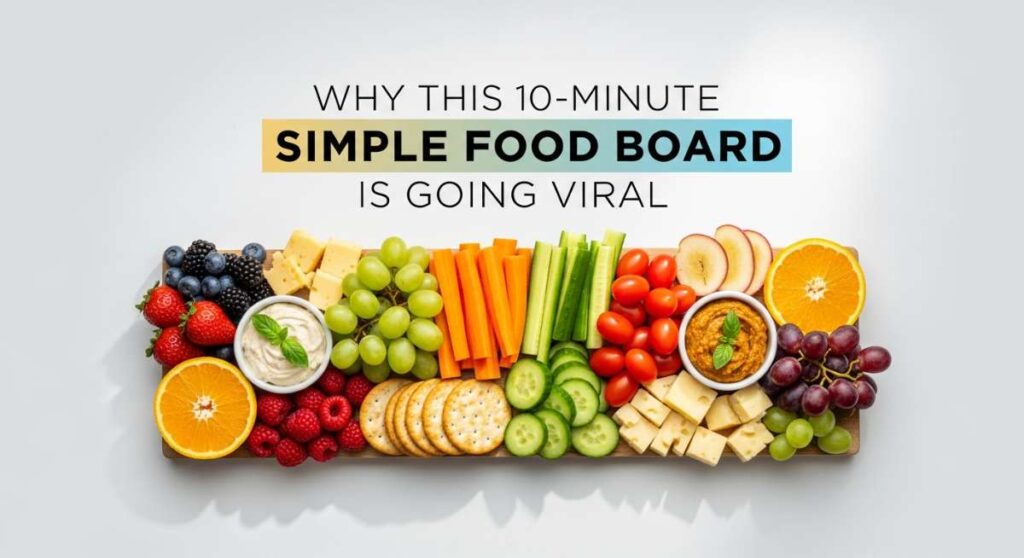
Why This 10-Minute Simple Food Board Is Going Viral
We’ve all been there—that frantic 5:00 PM scramble where the kitchen feels like a battlefield and the hunger is real. But lately, my social media feed has been taken over by something that feels like a warm hug in the middle of the chaos: the ‘Simple Food Board.’ It’s not just a meal; it’s an aesthetic, a communal experience, and honestly, the ultimate hack for anyone who wants to eat like a gourmet chef without spending three hours at the stove. It’s about taking those humble, everyday ingredients and laying them out in a way that feels intentional and celebratory.
The beauty of this viral trend is its flexibility. Whether you’re hosting a last-minute get-together or just trying to survive a Tuesday night, these boards allow you to mix and match textures, temperatures, and flavors. There is something so satisfying about seeing a spread of vibrant vegetables, perfectly seared proteins, and zesty pastas all within arm’s reach. It turns dinner into a conversation piece, and today, I’m sharing the ten core components that make these boards absolutely irresistible.
How to make summer pasta?

Why we love this
There is nothing quite like the bright, sun-kissed flavors of a fresh summer pasta to lift your spirits. Imagine the scent of hand-torn basil mingling with the zesty aroma of lemon zest and the richness of high-quality olive oil. The texture is a delightful contrast between the silky, al dente strands of noodle and the burst of juicy, blistered cherry tomatoes that pop with every bite. It’s a light, refreshing dish that feels like a warm breeze on a Mediterranean patio, making it the perfect centerpiece for a shared food board.
Ingredients
- 1/2 lb Linguine or Spaghetti
- 2 cups Cherry tomatoes
- 3 cloves Garlic, thinly sliced
- 1/4 cup Extra virgin olive oil
- 1/2 cup Fresh basil leaves
- 1 Lemon (zested and juiced)
- 1/2 cup Grated Parmesan cheese
- Red pepper flakes, salt, and black pepper
How to make it
- Fill a large pot with water and add a generous amount of salt—it should taste like the sea. Bring to a rolling boil and cook your pasta for about 1-2 minutes less than the package directions to ensure a perfect al dente bite.
- While the pasta cooks, heat olive oil in a large skillet over medium-low heat. Add the sliced garlic and a pinch of red pepper flakes, letting them infuse the oil for 2 minutes until the garlic is golden but not brown.
- Increase the heat to medium and toss in the whole cherry tomatoes. Cook them, stirring occasionally, until the skins begin to wrinkle and burst, releasing their sweet juices to create a natural sauce.
- Before draining the pasta, reserve 1 cup of the starchy pasta water. This is the secret to a silky sauce!
- Transfer the pasta directly into the skillet with the tomatoes. Add the lemon juice and half of the reserved pasta water.
- Toss vigorously over medium heat, adding more pasta water if needed, until the sauce coats every strand. Turn off the heat and stir in the fresh basil, lemon zest, and Parmesan cheese. Season with salt and pepper to taste before serving.
How to cook healthy chicken?

Why we love this
Healthy chicken doesn’t have to mean boring or dry; when done right, it is the succulent, protein-packed anchor of your food board. This preparation focuses on a herb-crusted exterior that locks in the moisture, resulting in a tender interior that practically melts in your mouth. The aroma of rosemary and thyme wafting through the kitchen creates a sense of homey comfort, while the lean profile keeps the meal feeling light and energizing. It’s a versatile staple that pairs beautifully with everything from fresh greens to roasted tubers.
Ingredients
- 2 Boneless, skinless chicken breasts
- 1 tbsp Avocado oil
- 1 tsp Dried oregano
- 1 tsp Garlic powder
- 1/2 tsp Smoked paprika
- Fresh rosemary and thyme sprigs
- Salt and cracked black pepper
How to make it
- Start by patting the chicken breasts completely dry with paper towels. This step is crucial for achieving a beautiful golden sear rather than steaming the meat.
- Place the chicken between two sheets of plastic wrap and gently pound them with a mallet or rolling pin until they are an even thickness (about 3/4 inch). This ensures they cook uniformly.
- In a small bowl, mix the oregano, garlic powder, smoked paprika, salt, and pepper. Rub the spice blend and avocado oil over both sides of the chicken.
- Heat a heavy-bottomed skillet or cast-iron pan over medium-high heat. You’ll know it’s ready when a drop of water sizzles and evaporates instantly.
- Lay the chicken in the pan and leave it undisturbed for 5-6 minutes. Resist the urge to peek! You want a deep golden crust to form.
- Flip the chicken and add the fresh herb sprigs to the pan. Cook for another 5 minutes, or until the internal temperature reaches 165°F (74°C).
- Remove the chicken from the pan and let it rest on a cutting board for at least 5-8 minutes before slicing. This allows the juices to redistribute, ensuring every bite is moist.
How to sear juicy shrimp?

Why we love this
Shrimp is the ultimate “fast food” for the sophisticated palate, offering a snappy texture and a sweet, oceanic flavor that feels incredibly decadent. When seared in a hot pan with butter and garlic, they develop a caramelized edge that is simply addictive. The visual appeal of pink, curled shrimp nestled on a food board instantly elevates the entire presentation, making it feel like a catered event. It’s that perfect combination of luxury and ease that fits right into the viral lifestyle aesthetic.
Ingredients
- 1 lb Large shrimp (peeled and deveined)
- 2 tbsp Unsalted butter
- 1 tbsp Olive oil
- 4 cloves Garlic, minced
- 1/2 tsp Chili flakes
- Fresh parsley, chopped
- Lemon wedges for serving
How to make it
- Ensure your shrimp are completely thawed and patted dry. Wet shrimp will boil in the pan rather than searing.
- Season the shrimp lightly with salt and chili flakes in a bowl, tossing to coat evenly.
- Heat the olive oil and 1 tablespoon of butter in a wide skillet over high heat. High heat is essential for a quick sear that doesn’t overcook the delicate center.
- Add the shrimp in a single layer, making sure they aren’t crowded. Cook for exactly 90 seconds until the edges turn pink and opaque.
- Flip the shrimp over and immediately add the remaining butter and the minced garlic. The garlic should sizzle and become fragrant but shouldn’t burn.
- Spoon the melting garlic butter over the shrimp as they finish cooking for another 60-90 seconds.
- As soon as the shrimp form a “C” shape, remove them from the heat. Overcooked shrimp form an “O” and become rubbery. Garnish with parsley and a squeeze of lemon juice.
How to roast sweet potatoes?
Why we love this
There is a magical transformation that happens when sweet potatoes hit a hot oven—they turn into candy-like morsels with crispy, caramelized skins and a velvety, pillowy interior. The natural sugars intensify, creating a deep, earthy sweetness that balances the savory elements of your board. Watching them turn a vibrant, sunset orange as they roast is a visual treat, and the comforting warmth they provide makes them a crowd favorite during any season. They are the ultimate healthy comfort food that feels like an indulgence.
Ingredients
- 2 Large sweet potatoes
- 2 tbsp Olive oil
- 1/2 tsp Cumin
- 1/2 tsp Cinnamon (optional for depth)
- 1/2 tsp Flaky sea salt
- Fresh cilantro for garnish
How to make it
- Preheat your oven to 425°F (220°C). A high temperature is the only way to get those coveted crispy edges.
- Scrub the sweet potatoes clean and dice them into uniform 1-inch cubes. Keeping the size consistent ensures they all finish cooking at the same time.
- In a large bowl, toss the cubes with olive oil, cumin, cinnamon, and salt. Make sure every cube is glistening with oil.
- Spread the potatoes onto a large baking sheet. Crucial tip: Do not crowd the pan. If the cubes are touching, they will steam. Use two pans if necessary.
- Roast for 25-30 minutes. Halfway through, use a spatula to flip and toss the potatoes so they brown on all sides.
- Test for doneness by piercing a larger cube with a fork; it should slide in with zero resistance.
- For an extra crispy finish, turn the broiler on for the last 2 minutes, watching closely to prevent burning. Sprinkle with extra flaky salt and cilantro before serving.
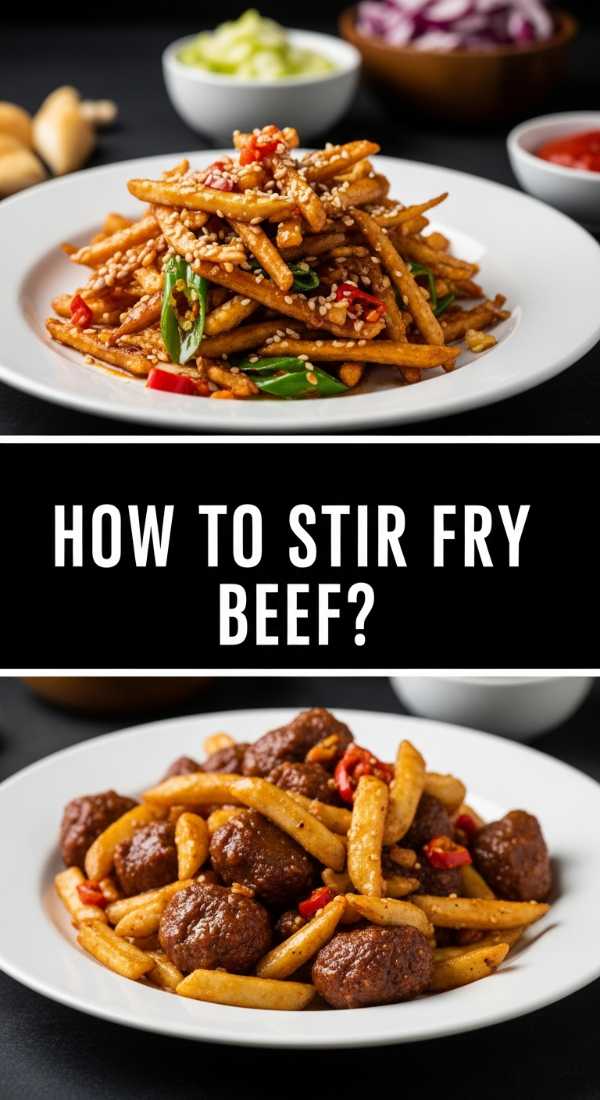
How to stir fry beef?

Why we love this
Stir fry beef is all about the “wok hei”—that elusive smoky flavor that comes from high-heat cooking. The thin strips of beef become incredibly tender and savory, coated in a glossy, umami-rich sauce that tingles the taste buds. It’s a fast-paced, high-energy way to cook that brings a sense of excitement to the kitchen. The combination of ginger, garlic, and soy creates an aroma that is instantly mouth-watering, making this a bold and satisfying addition to any viral food board.
Ingredients
- 1 lb Flank steak or Sirloin, thinly sliced against the grain
- 2 tbsp Soy sauce
- 1 tbsp Toasted sesame oil
- 1 tbsp Grated fresh ginger
- 3 cloves Garlic, minced
- 2 cups Broccoli florets or Snap peas
- 1 tbsp Cornstarch
How to make it
- The secret to tender stir-fry beef is the cut. Slice your beef very thinly against the grain (the lines of muscle fiber). If you find this difficult, freeze the meat for 20 minutes beforehand to firm it up.
- In a bowl, whisk together soy sauce, sesame oil, ginger, garlic, and cornstarch. Toss the beef in this marinade and let it sit for at least 15 minutes.
- Heat a wok or a large cast-iron skillet over very high heat until it is smoking slightly. Add a tablespoon of high-smoke-point oil (like peanut or vegetable oil).
- Add the beef in a single layer. Let it sear for 1 minute without moving it to get a dark crust, then stir-fry for another 2 minutes until just browned. Remove the beef and set aside.
- Add the vegetables to the same pan with a splash of water. Cover for 1 minute to steam-fry them until they are bright green and crisp-tender.
- Return the beef and any remaining marinade to the pan. Toss everything together for 1 minute until the sauce thickens and coats the beef and veggies in a shiny glaze.
- Serve immediately while the steam is still rising and the flavors are at their peak.
How to bake mexican tacos?

Why we love this
Baked tacos are a game-changer for hosting because they allow you to serve a dozen crispy, cheesy tacos all at once. The smell of toasted corn shells and melting Monterey Jack cheese is practically a siren song for guests. There’s something deeply satisfying about the crunch of the shell giving way to a warm, spiced filling, topped with the cool creaminess of avocado or sour cream. It’s a fun, hands-on addition to a board that invites everyone to grab a taco and start customizing.
Ingredients
- 12 Hard taco shells
- 1 lb Lean ground beef or turkey
- 1 packet Taco seasoning (or cumin, chili powder, onion powder)
- 2 cups Shredded Mexican blend cheese
- 1 can Refried beans
- Toppings: Jalapeños, diced tomatoes, cilantro
How to make it
- Preheat your oven to 400°F (200°C). Find a 9×13 inch baking dish that will hold the taco shells upright.
- In a skillet over medium-high heat, brown the ground meat until no pink remains. Drain the excess fat.
- Add the taco seasoning and a small splash of water, simmering for 5 minutes until the meat is well-coated and flavorful.
- Place the empty taco shells in the baking dish, standing them up side-by-side.
- Spread a spoonful of warm refried beans into the bottom of each shell—this acts as “glue” and prevents the bottom from getting soggy.
- Top the beans with a generous portion of the taco meat, then pile on the shredded cheese.
- Bake for 8-10 minutes until the shells are extra crispy and the cheese is bubbly and golden.
- Garnish with your favorite cold toppings like jalapeños and cilantro before placing the whole dish (or individual tacos) onto your board.
How to prepare fast meals?

Why we love this
Fast meals are the unsung heroes of a busy lifestyle, proving that you don’t need hours to create something nourishing and beautiful. These are the “pantry pull-togethers” that rely on smart techniques and bold seasonings to deliver maximum impact with minimal effort. The feeling of putting a complete, colorful meal on the table in under 15 minutes is incredibly empowering. It’s about efficiency without sacrifice—using high-quality ingredients that speak for themselves and require very little fussing.
Ingredients
- 1 can Chickpeas, drained and rinsed
- 1 bag Pre-washed baby spinach
- 1 jar Sun-dried tomatoes
- Feta cheese crumbles
- Store-bought rotisserie chicken (shredded)
- Balsamic glaze
How to make it
- The key to fast meals is preparation and “assembly cooking.” Start by organizing all your components on the counter.
- In a large skillet over medium heat, toss the drained chickpeas with a little oil and salt for 3-4 minutes until they are warm and slightly nutty.
- Add the shredded rotisserie chicken and sun-dried tomatoes to the pan just to heat them through.
- Turn off the heat and throw in the baby spinach. The residual heat from the chicken and chickpeas will wilt the spinach perfectly in about 30 seconds without making it slimy.
- Transfer the mixture to a large bowl or directly onto your food board.
- Top with a handful of feta cheese for a salty kick and a drizzle of balsamic glaze for acidity and sweetness.
- This method focuses on heat management and using pre-prepped proteins to cut your kitchen time in half while maintaining a fresh, home-cooked feel.
How to roast sunday chicken?

Why we love this
Sunday roast chicken is more than just a dish; it’s a ritual that fills the house with the most comforting, nostalgic aroma imaginable. The skin becomes a crackling, golden-brown masterpiece while the meat underneath remains incredibly succulent and infused with the essence of lemon and garlic. It serves as a grand centerpiece for a food board, offering a sense of abundance and tradition. Tearing into a perfectly roasted bird feels primal and celebratory, making it the ultimate soul food for a weekend gathering.
Ingredients
- 1 Whole chicken (approx. 4 lbs)
- 4 tbsp Softened butter
- 1 Lemon, halved
- 1 head Garlic, sliced crosswise
- Fresh sage, rosemary, and thyme
- Kosher salt and coarse black pepper
How to make it
- Remove the chicken from the fridge 30 minutes before cooking to bring it to room temperature. This is essential for even cooking.
- Preheat your oven to 425°F (220°C). Pat the skin very dry.
- Generously salt and pepper the cavity of the chicken. Stuff it with the lemon halves, garlic head, and half of the fresh herbs.
- Mix the softened butter with chopped herbs and rub it all over the outside of the chicken, even getting some under the skin of the breast.
- Tie the legs together with kitchen twine (trussing) to help the chicken cook evenly and retain its shape.
- Place the chicken on a roasting rack in a pan. Roast for about 1 hour to 1 hour and 15 minutes.
- Baste the chicken with its own juices every 20 minutes. The chicken is done when the juices run clear and the internal temperature of the thigh reaches 165°F.
- Let the chicken rest for at least 15-20 minutes before carving. This ensures the juices stay in the meat rather than running out on the board.
How to season ground chicken?

Why we love this
Ground chicken is a blank canvas that, with the right seasoning, can become a flavor powerhouse. Because it’s leaner than beef, it carries spices like cumin, coriander, and lime with a clean, bright finish that doesn’t feel heavy. It has a light, crumbly texture that works perfectly in lettuce wraps or as a savory pile on a Mediterranean-style board. The satisfaction comes from transforming a simple, affordable ingredient into something that tastes complex and vibrant, proving that healthy eating is anything but dull.
Ingredients
- 1 lb Ground chicken
- 1 tbsp Soy sauce or Tamari
- 1 tsp Smoked paprika
- 1 tsp Ground cumin
- 1/2 tsp Onion powder
- Fresh lime juice
- Fresh cilantro and scallions
How to make it
- Heat a large non-stick skillet over medium-high heat with a teaspoon of oil.
- Add the ground chicken and use a sturdy wooden spoon or meat masher to break it into small, even crumbles.
- Cook undisturbed for 3 minutes to allow the bottom to brown. Ground chicken can look grey if it’s just stirred constantly, so let it get some color!
- Add the smoked paprika, cumin, and onion powder. Stir well to coat every piece of meat.
- Pour in the soy sauce. This adds salt but also helps with browning and depth of flavor (umami).
- Continue cooking for another 4-5 minutes until the chicken is fully cooked through and slightly crispy on the edges.
- Remove from heat and immediately squeeze fresh lime juice over the meat to brighten the flavors. Finish with a shower of fresh cilantro and sliced scallions for a pop of freshness.
How to cook egg dinners?
[IMAGE_10]
Why we love this
There is something rebellious and cozy about having eggs for dinner. Whether it’s a frittata or a shakshuka-style pan, eggs provide a rich, silken texture that feels indulgent yet light. The sight of a bright yellow yolk breaking and drizzling over roasted vegetables or crusty bread is pure food porn. It’s an affordable, quick, and highly customizable protein source that brings a rustic, farmhouse vibe to your viral food board, making the meal feel intimate and relaxed.
Ingredients
- 6 Large eggs
- 1/2 cup Heavy cream or Whole milk
- 1 cup Sautéed mushrooms or spinach
- 1/2 cup Goat cheese or Feta
- Fresh chives, finely chopped
- Salt and white pepper
How to make it
- For a perfect dinner frittata, start by whisking the eggs, cream, salt, and white pepper in a bowl until very frothy.
- Heat an oven-safe non-stick skillet over medium heat and add your pre-sautéed vegetables (like mushrooms or spinach).
- Pour the egg mixture over the vegetables. Use a spatula to gently lift the edges, letting the raw egg flow underneath for about 2 minutes.
- Once the bottom is set but the top is still runny, sprinkle the goat cheese or feta over the surface.
- Transfer the skillet to a preheated broiler (high setting) for 2-4 minutes. Watch it like a hawk! You want it to puff up and turn light golden brown.
- Remove from the oven and let it stand for 2 minutes to finish setting in the center.
- Slide the frittata out onto your food board and garnish with fresh chives. Slice it into wedges like a pizza for easy sharing.
Conclusion: The Art of the Board
Creating a viral food board isn’t about perfection; it’s about the joy of variety and the ease of preparation. By mastering these ten elements, you can mix and match to create a stunning spread that caters to every craving and dietary need. The next time you find yourself overwhelmed by the question of “what’s for dinner?”, remember that a wooden board and a few well-executed, simple dishes are all you need to turn a mundane meal into a viral sensation. Happy plating!