

I’ll be the first to admit it: I used to spend hours meticulously arranging artisanal cheeses and expensive prosciutto on marble slabs, trying to create that ‘perfect’ charcuterie look. But lately, I’ve noticed a shift in my own kitchen and across my feed. We are collectively craving something more approachable, more nostalgic, and frankly, more delicious than a $40 block of moldy blue cheese. Enter the ‘Simple Food Board’—the viral trend that trades pretense for pure comfort.
The magic of the simple food board isn’t just about the convenience; it’s about the memories. It’s that feeling of a summer potluck where the flavors are bold, the ingredients are fresh from the garden, and everything is meant to be eaten with your hands or a simple fork. Whether you’re hosting a backyard bash or just looking to elevate a weeknight family dinner, these recipes are the building blocks of a board that people will actually clear in minutes.
How to make the best rotel dip?

Why we love this
This dip is the ultimate crowd-pleaser, offering a warm, velvety texture that clings perfectly to every single corn chip. The aroma of seasoned beef mingling with melted cheese and the slight acidic zing of diced tomatoes creates an irresistible scent that fills the kitchen the moment it hits the bowl. It’s a sensory experience that feels like home, providing a spicy, savory kick that stays with you and keeps everyone reaching for just one more scoop until the bowl is scraped clean.
Ingredients
- 1 lb lean ground beef
- 1 block (32 oz) Velveeta or processed cheese, cubed
- 2 cans (10 oz each) Rotel Diced Tomatoes with Green Chilies
- 1 tsp taco seasoning
- 1/2 cup whole milk (optional, for thinning)
How to make it
- Place a large skillet over medium-high heat and add the ground beef, breaking it up with a wooden spoon as it browns to ensure small, uniform crumbles. Cook for 7-9 minutes until no pink remains, then drain the excess grease thoroughly to prevent the dip from becoming oily.
- While the meat is browning, cube your cheese into 1-inch pieces; smaller cubes melt more evenly and prevent scorching on the bottom of the pot.
- Reduce the heat to low and add the cubed cheese and both cans of undrained Rotel tomatoes directly into the skillet with the meat. The liquid from the tomatoes is essential for achieving the right consistency.
- Stir constantly with a heat-resistant spatula to move the melting cheese from the bottom of the pan to the top. If the mixture feels too thick or begins to pull away from the sides, stir in a splash of milk to reach a silky, pourable state.
- Once fully melted and combined, sprinkle in the taco seasoning and simmer on the lowest setting for 5 minutes, allowing the flavors to meld together perfectly before serving warm.
How to make chicken caesar wraps?

Why we love this
There is something deeply satisfying about the contrast between a warm, grilled tortilla and the ice-cold, crisp snap of romaine lettuce inside. As you bite through the soft wrap, you’re met with the creamy, garlic-forward richness of the dressing and the salty punch of freshly shaved parmesan cheese. It’s a bright, textural masterpiece that feels light enough for a summer lunch but hearty enough to satisfy a serious hunger, leaving a refreshing tang on the palate.
Ingredients
- 2 cups cooked chicken breast, sliced into strips
- 2 large flour tortillas
- 3 cups chopped Romaine lettuce
- 1/2 cup Caesar dressing
- 1/4 cup shredded Parmesan cheese
- 1/2 cup croutons, lightly crushed
How to make it
- Begin by preparing your chicken; if using cold leftovers, gently warm them in a pan over medium heat with a teaspoon of olive oil to restore their juiciness without drying them out.
- In a large mixing bowl, toss the chopped Romaine lettuce with the Caesar dressing until every leaf is glistening and evenly coated. Adding the dressing to the greens first ensures you don’t get ‘dry spots’ in your wrap.
- Lay your tortillas flat on a clean surface and warm them in the microwave for 10 seconds or on a dry skillet for 15 seconds per side; this makes them pliable and prevents tearing during the rolling process.
- Layer the dressed lettuce in the center of the tortilla, followed by the chicken strips, a generous sprinkle of Parmesan cheese, and the crushed croutons for that essential hidden crunch.
- Fold the sides of the tortilla inward over the filling, then roll tightly from the bottom up, keeping the tension firm. Slice on a sharp diagonal to showcase the beautiful layers inside.
How to make strawberry pie?
Why we love this
This pie is like a slice of pure sunshine, boasting a vibrant, glossy ruby-red glaze that catches the light beautifully on any dessert board. The scent is dominated by the floral sweetness of peak-season strawberries, balanced by the buttery, flaky aroma of a perfectly baked golden crust. Every bite provides a cooling sensation, with the soft, yieldy fruit melting into the sweet glaze, creating a dessert that feels celebratory, nostalgic, and utterly fresh all at once.
Ingredients
- 1 pre-baked 9-inch pie crust
- 2 lbs fresh strawberries, hulled
- 1 cup granulated sugar
- 3 tbsp cornstarch
- 1 cup water
- 1/2 package (3 oz) strawberry gelatin powder
How to make it
- Wash and hull your strawberries, selecting about 1 lb of the most uniform berries to leave whole or halved for the top layer, while slightly mashing a few for the base to add texture.
- In a medium saucepan over medium heat, whisk together the sugar, cornstarch, and water. Stir constantly to ensure no lumps form in the cornstarch, which is the key to a clear, professional-looking glaze.
- Bring the mixture to a boil, then reduce heat and simmer for about 3-5 minutes until it thickens and becomes translucent. It should be thick enough to coat the back of a spoon heavily.
- Remove the pan from the heat and immediately whisk in the strawberry gelatin powder until completely dissolved. This adds both the intense color and the structural integrity needed for the pie to slice cleanly.
- Arrange the fresh strawberries into the pre-baked crust, then pour the warm glaze over the top, using a spatula to ensure it seeps into all the crevices. Refrigerate for at least 4 hours, or until the glaze is firm and set to the touch.
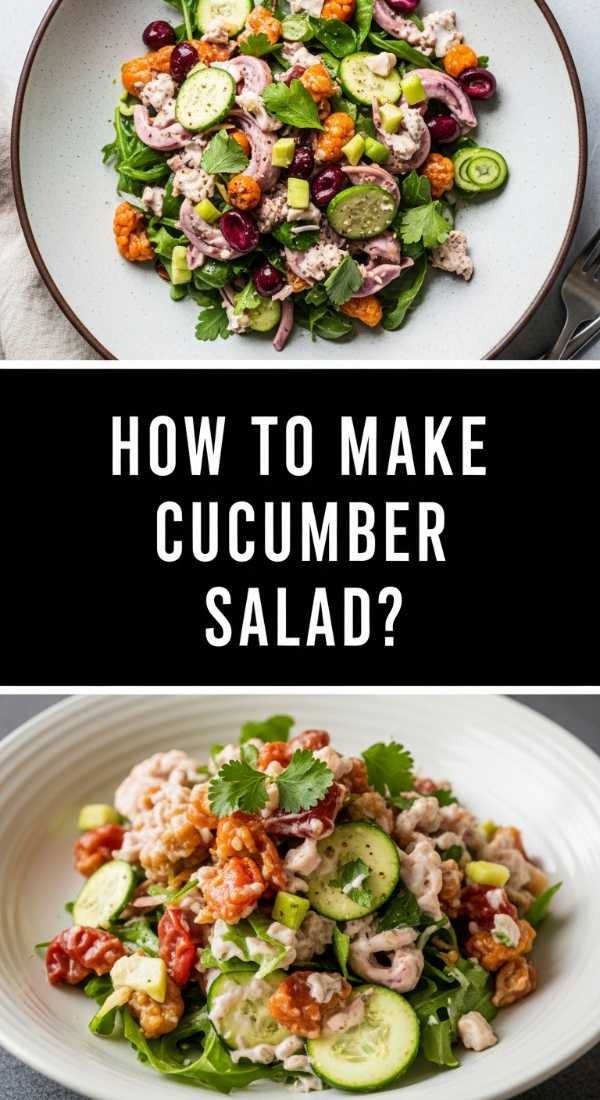
How to make tomato cucumber salad?
Why we love this
This salad is the definition of garden-fresh simplicity, offering a symphony of textures ranging from the snap of English cucumbers to the soft, juicy yield of vine-ripened tomatoes. The aroma is sharp and herbaceous, thanks to a liberal dose of fresh dill and the acidic brightness of red wine vinegar that cuts through any heavy meal. It’s a palate cleanser that feels incredibly hydrating, leaving your mouth feeling refreshed and your senses awakened by the clean, earthy flavors of summer.
Ingredients
- 3 large cucumbers, sliced
- 4 large tomatoes, cubed
- 1/2 red onion, thinly sliced
- 1/4 cup extra virgin olive oil
- 2 tbsp red wine vinegar
- 2 tbsp fresh dill, chopped
- Salt and black pepper to taste
How to make it
- Slice your cucumbers into 1/4 inch rounds; if the skins are thick, peel them in alternating strips to create a beautiful ‘striped’ look that also allows the dressing to soak in better.
- Cube your tomatoes into bite-sized pieces, ensuring you use a serrated knife to avoid squashing the fruit and losing the precious juices that help form the base of the dressing.
- In a small glass jar or bowl, whisk together the olive oil, red wine vinegar, salt, and pepper until emulsified. The vinegar provides the ‘bite’ while the oil carries the herbal notes of the dill throughout the dish.
- Combine the cucumbers, tomatoes, and thinly sliced red onions in a large glass bowl. Pour the dressing over the vegetables and toss gently with large spoons to avoid breaking the tomatoes.
- Stir in the fresh dill and let the salad marinate at room temperature for 15-20 minutes before serving. This allows the salt to draw a bit of moisture out of the vegetables, creating a flavorful ‘liquor’ at the bottom of the bowl.
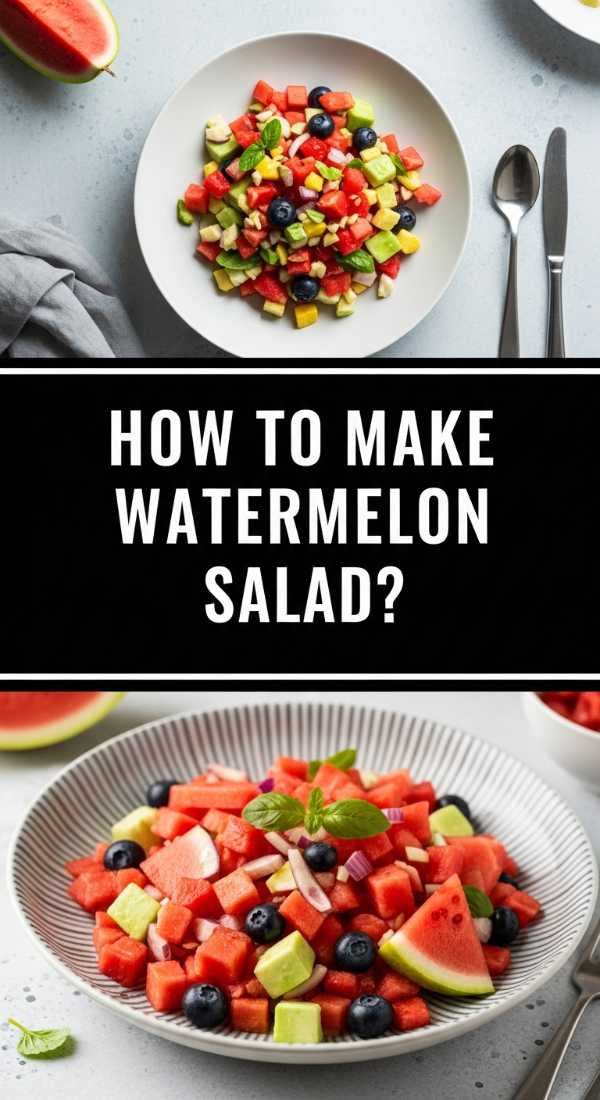
How to make watermelon salad?

Why we love this
This salad is a masterclass in flavor balancing, pitting the intense, sugary sweetness of cold watermelon against the salty, creamy crumble of feta cheese. The scent of bruised mint leaves adds a cooling, aromatic top note that makes the entire dish feel sophisticated and modern. It’s incredibly visually striking on a food board, with the bright pink fruit contrasting against the white cheese and emerald greens, offering a burst of hydration that is practically essential for outdoor entertaining.
Ingredients
- 6 cups seedless watermelon, cubed
- 1/2 cup crumbled Feta cheese
- 1/4 cup fresh mint leaves, torn
- 2 tbsp lime juice
- 1 tbsp honey (optional)
- A pinch of sea salt
How to make it
- Start with a cold watermelon directly from the fridge; the temperature contrast is vital for the refreshing quality of this dish. Cube the fruit into uniform 1-inch squares for a neat presentation.
- Place the watermelon cubes into a large chilled bowl to maintain their crispness while you prepare the remaining components.
- In a small bowl, whisk together the lime juice and honey until the honey is fully dissolved. This light dressing will enhance the natural sugars of the watermelon without overpowering the delicate mint.
- Drizzle the dressing over the watermelon and toss very gently. Add the torn mint leaves—tearing them by hand rather than chopping with a knife prevents them from bruising and turning brown too quickly.
- Sprinkle the crumbled feta and a pinch of flaky sea salt over the top just before serving. Do not toss after adding the cheese, as the feta can ‘cloud’ the watermelon juices and make the salad look messy.
How to make sun tea?
Why we love this
Sun tea is more than just a drink; it’s a slow-living ritual that captures the literal essence of a summer afternoon in a glass jar. The resulting brew is remarkably smooth, lacking the bitterness that can sometimes come from boiling water, leaving a clean and naturally sweet tea flavor. As the amber liquid swirls over ice cubes, the subtle scent of black tea and lemon slices wafts up, promising a crisp, thirst-quenching experience that feels like a reward for a long day in the sun.
Ingredients
- 8 black tea bags (standard size)
- 1 gallon filtered water
- 1 lemon, sliced
- Fresh mint sprigs
- Honey or sugar to taste
How to make it
- Choose a clean, one-gallon glass jar with a tight-fitting lid. Glass is essential here, as plastic can leach flavors into the tea during the long exposure to sunlight.
- Fill the jar with cool, filtered water and submerge the tea bags, hanging the strings over the edge of the jar for easy removal later.
- Place the jar in a spot that receives direct, intense sunlight for at least 3 to 5 hours. You will see the water gradually transform from clear to a deep, glowing amber as the sun gently extracts the tea’s essence.
- Once the tea has reached your desired strength, remove the bags and bring the jar inside immediately. Do not leave it out overnight, as this can encourage bacterial growth.
- Sweeten while the tea is still slightly warm from the sun so the sugar dissolves easily. Stir in lemon slices and mint, then refrigerate until ice-cold before serving over large cubes.
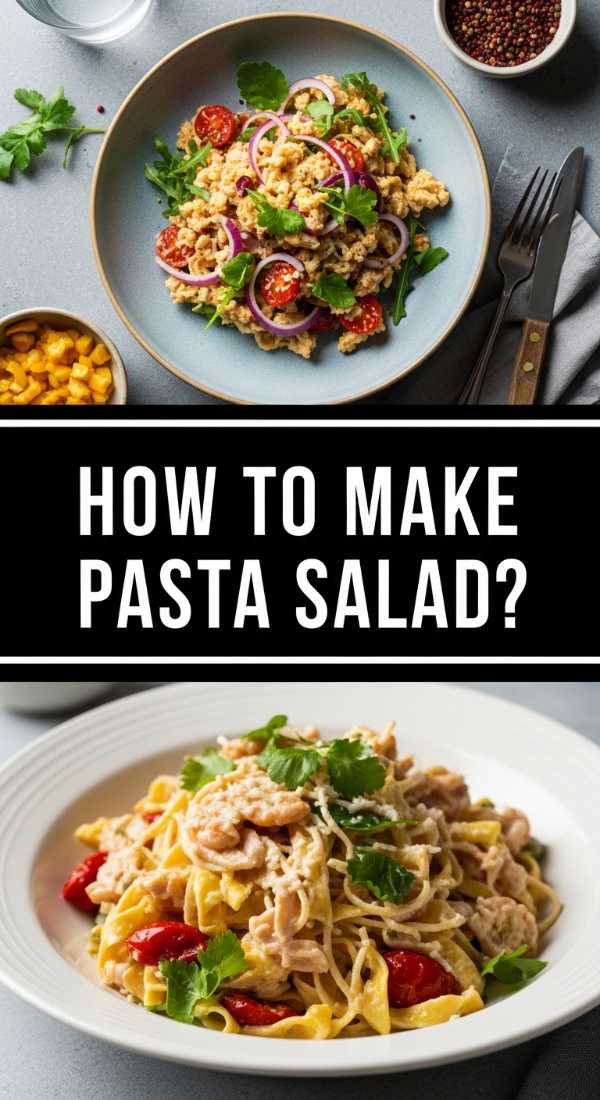
How to make pasta salad?

Why we love this
This Italian-inspired pasta salad is a textured delight, featuring al dente rotini that holds pockets of zesty dressing in every spiral. The combination of spicy salami, mild provolone, and briny olives creates a savory profile that is deeply satisfying and endlessly munchable. It’s the kind of dish that actually tastes better as it sits, making it the perfect centerpiece for a food board where guests can graze slowly, enjoying the herb-flecked, vinegary goodness of a classic deli favorite.
Ingredients
- 1 lb rotini or fusilli pasta
- 1 cup Italian dressing (homemade or store-bought)
- 1/2 lb hard salami, cubed
- 1/2 lb provolone cheese, cubed
- 1 can (2.25 oz) sliced black olives
- 1 bell pepper, diced
- 1/2 cup grated Parmesan cheese
How to make it
- Boil a large pot of heavily salted water and cook the pasta until it is ‘al dente’—usually 1-2 minutes less than the package instructions. This is crucial because the pasta will absorb the dressing and soften further as it sits.
- Drain the pasta and immediately rinse it under cold running water. This stops the cooking process and washes away excess starch, ensuring the spirals remain distinct and don’t stick together.
- In a massive mixing bowl, combine the cooled pasta with the cubed salami, provolone, bell peppers, and olives. Using cubes of cheese and meat rather than thin slices provides a better ‘bite’ and holds up better on a board.
- Pour half of the Italian dressing over the mixture and toss thoroughly to coat. Add the Parmesan cheese and toss again; the cheese will cling to the oiled pasta, creating a flavorful crust.
- Cover and refrigerate for at least 2 hours. Just before serving, toss with the remaining half of the dressing, as the pasta will have soaked up the initial dose, and this second pour restores the glossy, zesty finish.
How to grill chicken marinade?

Why we love this
There is nothing quite like the smoky, charred aroma of chicken hitting a hot grill after soaking in a bright, citrusy marinade. This recipe ensures the meat remains incredibly succulent and tender, with a flavor profile that balances the zip of lemon with the earthy depth of garlic and oregano. The result is a beautifully lacquered piece of protein that looks stunning on a board and tastes like a Mediterranean vacation, offering a juicy, savory punch in every single bite.
Ingredients
- 2 lbs chicken breasts or thighs
- 1/4 cup olive oil
- 3 tbsp lemon juice
- 4 cloves garlic, minced
- 1 tsp dried oregano
- 1 tsp salt and 1/2 tsp black pepper
How to make it
- In a gallon-sized resealable bag or a shallow glass dish, whisk together the olive oil, lemon juice, minced garlic, oregano, salt, and pepper. The acid in the lemon juice tenderizes the proteins while the oil ensures the chicken won’t stick to the grill grates.
- Place the chicken in the marinade, ensuring every piece is fully submerged. Seal the bag, pressing out as much air as possible to maximize the contact between the liquid and the meat.
- Refrigerate for at least 30 minutes, but no more than 4 hours. Marinading too long in citrus can actually break down the fibers too much, resulting in a mushy texture rather than a firm, juicy one.
- Preheat your grill to medium-high heat (about 400°F). Clean and oil the grates thoroughly using a pair of tongs and a folded paper towel dipped in vegetable oil.
- Grill the chicken for 6-8 minutes per side. Use an instant-read thermometer to pull the chicken once it hits 160°F; the carryover cooking will bring it to the safe 165°F while keeping the interior moist and tender.
How to make banana bread?

Why we love this
Banana bread is the ultimate comfort food, filling the house with a warm, spiced scent that feels like a giant hug. The texture is the real star here—a dark, caramelized outer crust that gives way to a dense, moist, and incredibly soft center that almost melts on the tongue. It adds a lovely rustic element to a simple food board, providing a sweet, buttery counterpoint to the more savory snacks and serving as a reminder of the simple joy found in a well-loved family recipe.
Ingredients
- 3 very ripe bananas, mashed
- 1/3 cup melted butter
- 1/2 cup sugar
- 1 egg, beaten
- 1 tsp vanilla extract
- 1 tsp baking soda
- A pinch of salt
- 1.5 cups all-purpose flour
How to make it
- Preheat your oven to 350°F (175°C) and grease a 4×8-inch loaf pan thoroughly with butter or non-stick spray to ensure a clean release after baking.
- In a large mixing bowl, mash the ripe bananas with a fork until they are mostly smooth with just a few small lumps. The riper the bananas (brown spots are good!), the sweeter and moister your bread will be.
- Stir the melted butter into the mashed bananas until fully incorporated. Add the sugar, beaten egg, and vanilla extract, whisking until the mixture is light and well-combined.
- Sprinkle the baking soda and salt over the wet mixture, then gently fold in the flour using a spatula. Do not overmix; stop the moment you no longer see streaks of white flour, as overworking the gluten will result in a tough, rubbery loaf.
- Pour the batter into the prepared pan and bake for 50-60 minutes. Test for doneness by inserting a toothpick into the center; it should come out clean or with just a few moist crumbs. Let it cool in the pan for 10 minutes before transferring to a wire rack.
How to make lemonade bars?
[IMAGE_10]
Why we love this
These bars are a vibrant, pucker-inducing delight that brings a bright pop of yellow to your food board. The buttery, shortbread-like crust provides a sturdy, crumbly base that perfectly supports the thick, velvety lemon curd on top. As you take a bite, the initial sweetness is quickly followed by a sharp, refreshing citrus tang that dances on the tongue, finished with a delicate dusting of powdered sugar that feels like a light summer snowfall.
Ingredients
- For the Crust: 1 cup butter (softened), 1/2 cup sugar, 2 cups flour
- For the Filling: 4 eggs, 1.5 cups sugar, 1/4 cup flour, 2/3 cup fresh lemon juice
- Powdered sugar for dusting
How to make it
- Preheat your oven to 350°F. For the crust, cream together the softened butter and 1/2 cup sugar in a medium bowl, then stir in the 2 cups of flour until a crumbly dough forms.
- Press the dough firmly into the bottom of an ungreased 9×13 inch baking pan, using the bottom of a measuring cup to ensure an even, flat surface. Bake the crust for 15-20 minutes until it is just barely beginning to turn a light golden brown.
- While the crust bakes, prepare the filling by whisking the eggs, 1.5 cups of sugar, and 1/4 cup of flour together. Gradually whisk in the fresh lemon juice—using fresh juice is non-negotiable for that bright, authentic lemonade flavor.
- Pour the lemon mixture over the hot, pre-baked crust. This ensures the layers bond together and prevents the filling from soaking too deeply into the base.
- Bake for an additional 20-25 minutes, or until the filling is set and no longer jiggles in the center. Allow the bars to cool completely at room temperature, then chill in the fridge for 2 hours. Dust generously with powdered sugar and slice into squares with a warm, damp knife for clean edges.
The End of the Fancy Cheese Era
As much as we love a good wedge of Manchego, the Simple Food Board is proof that we don’t need to spend a fortune to create an unforgettable experience. By focusing on high-quality versions of the classics—those dishes that bring a smile to everyone’s face—you create an atmosphere that is relaxed, inviting, and authentically you. So, clear off that big wooden board, whip up a batch of sun tea, and let the food do the talking. Simplicity has never tasted so good.
Frequently Asked Questions
How do I arrange a simple food board?
Start with your largest items, like the bowl of pasta salad or the plate of chicken wraps, and place them at opposite corners. Fill in the gaps with the smaller items like the lemon bars or banana bread slices, and use fresh herbs or extra lemon wedges as ‘garnish’ to make the board look professional without being overly fussy.
Can I make these recipes ahead of time?
Absolutely! In fact, the pasta salad, sun tea, and lemonade bars actually benefit from being made the day before. The rotel dip and chicken wraps are best assembled shortly before serving to maintain their texture, but you can prep the ingredients (like browning the meat or slicing the lettuce) hours in advance.
What is the best way to transport a food board?
If you’re heading to a potluck, I recommend transporting the individual components in sealed containers and assembling the board once you arrive. This prevents the watermelon juice from soaking into your banana bread or the wraps from getting squished during the drive!