
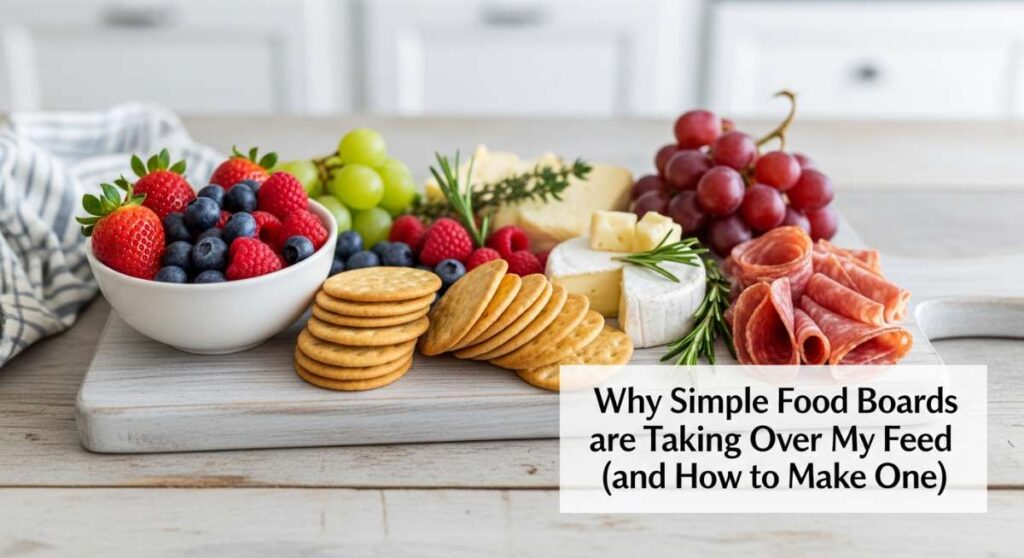
There’s something about a perfectly assembled food board that just feels like a hug for the soul. I remember the first time I traded my traditional dinner plates for a sprawling wooden board covered in textures and colors; the room’s energy shifted instantly. It wasn’t just about the food anymore; it was about the shared experience, the lingering fingers reaching for one last olive, and the effortless beauty of a meal that looks like a work of art without the stress of a five-course production.
Lately, my feed has been overflowing with these ‘simple food boards,’ and I honestly think it’s because we’re all craving a return to tactile, communal eating. Whether it’s a lazy Sunday afternoon or a chaotic Tuesday night, the board lifestyle allows us to slow down and appreciate the ingredients. It’s about more than just cheese and crackers; it’s a canvas for whatever season we find ourselves in, from refreshing summer dips to cozy camping preps.
In this post, I’ve curated the ultimate guide to the boards and lifestyle snacks that are currently dominating my kitchen. We’re diving into everything from the perfect summer party dips to the ‘snackle boxes’ that are revolutionizing my road trips. Grab your favorite wooden board and let’s get into the details of why these simple joys are taking over—and exactly how you can recreate the magic at home.
10 Best Summer Party Dips You’ll Love

Why we love this
There is nothing quite like the cooling sensation of a creamy, herb-flecked dip on a sweltering July afternoon. This particular spread captures the essence of summer with its bright, zesty citrus notes and the crunch of garden-fresh vegetables. When you dive in with a warm piece of pita, you get a symphony of textures—the silkiness of whipped feta meeting the snap of a cucumber. It’s an aromatic powerhouse that fills the room with the scent of fresh dill and lemon peel, instantly signaling to your guests that the party has officially started.
Ingredients
- 16 oz high-quality Greek yogurt
- 8 oz feta cheese, crumbled
- 2 cloves garlic, minced finely
- 1 tablespoon fresh dill, chopped
- 1 organic lemon, zested and juiced
- 1/2 cup English cucumber, finely diced
- 2 tablespoons extra virgin olive oil
- Pinch of red pepper flakes
- Sea salt and cracked black pepper to taste
- Assorted crudités for serving
How to make it
- Begin by straining your Greek yogurt through a cheesecloth for about 30 minutes if you prefer a thicker, more spreadable consistency; this ensures the dip won’t become watery after adding the vegetables.
- In a high-powered food processor, combine the crumbled feta, minced garlic, and lemon juice. Pulse on medium speed until the feta breaks down into a smooth, creamy paste, scraping down the sides as needed.
- Gently fold the feta mixture into the Greek yogurt using a rubber spatula, maintaining the airy volume of the yogurt.
- Stir in the fresh dill, lemon zest, and the finely diced cucumber. Ensure the cucumber is patted dry with a paper towel before adding to prevent excess moisture.
- Drizzle the top with high-quality extra virgin olive oil and a sprinkle of red pepper flakes for a subtle heat.
- Refrigerate for at least one hour before serving; this allows the garlic and herb flavors to marry and intensify. Serve chilled on a large board surrounded by colorful bell peppers and radishes.
5 Easy Homemade Hummingbird Food Recipes
Why we love this
Creating your own hummingbird nectar is a meditative ritual that invites the wonders of nature right to your window. Unlike store-bought versions that often contain unnecessary red dyes, this homemade solution is pure, safe, and mimics the natural sweetness hummingbirds find in wild flora. Watching the iridescent wings beat at impossible speeds while they sip from your feeder provides a sense of calm and connection to the ecosystem. It’s a simple way to turn your backyard into a sanctuary filled with the soft whirring of these tiny, magical visitors.
Ingredients
- 1 cup granulated white sugar (do not use honey or brown sugar)
- 4 cups filtered water
- Large saucepan
- Fine-mesh strainer
- Clean hummingbird feeder
How to make it
- Pour 4 cups of filtered water into a large saucepan and bring it to a steady, rolling boil over medium-high heat. Boiling the water is critical as it removes impurities and helps the sugar dissolve completely for a shelf-stable nectar.
- Once the water reaches a boil, pour in 1 cup of granulated white sugar. Stir constantly with a clean spoon until the sugar granules are entirely invisible and the liquid is crystal clear.
- Continue to boil the mixture for exactly two minutes. This brief boiling period helps to slow the growth of bacteria and mold once the nectar is in the feeder.
- Remove the pan from the heat and let it cool completely to room temperature. Never put hot nectar into a feeder, as it can warp plastic and harm the birds.
- Once cooled, pour the nectar into your clean feeder. If you have extra, store it in a sealed glass jar in the refrigerator for up to one week.
- Place the feeder in a shaded area to prevent the nectar from fermenting too quickly in the summer sun, and change the solution every 2-3 days.
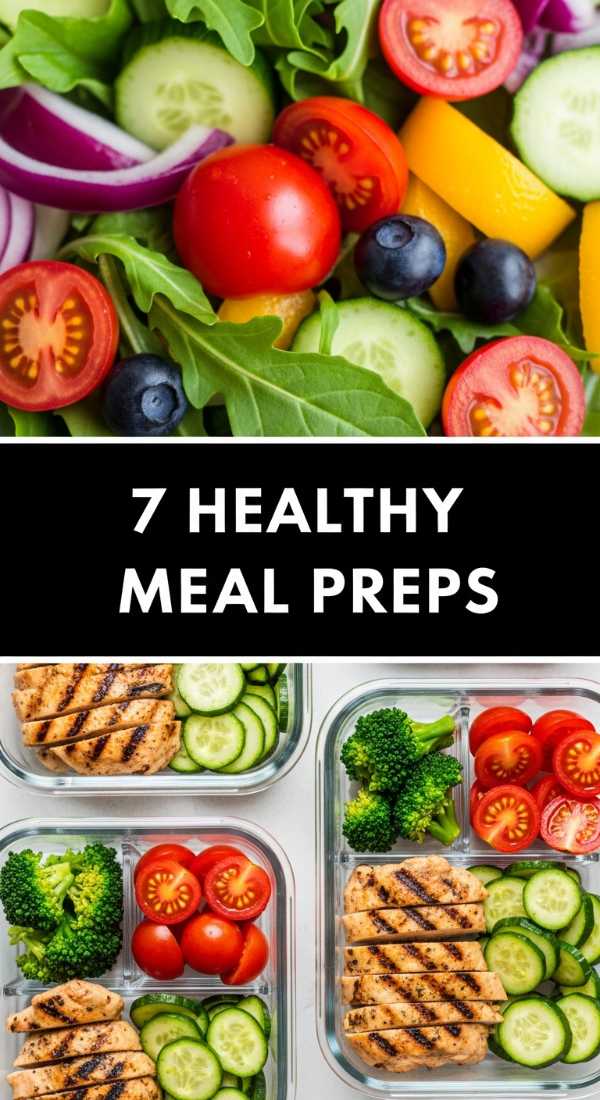
7 Healthy Summer Meal Prep Ideas
Why we love this
Summer meal prep is all about preserving the vibrancy of the season while keeping your kitchen cool. These grain-based bowls are a lifesaver during busy weeks, offering a mosaic of colors from roasted sweet potatoes to emerald kale. The aroma is earthier and more grounded than your typical salad, thanks to a base of nutty quinoa and a drizzle of tahini dressing. Eating these feels like fueling your body with pure sunshine; every bite is packed with energy-giving nutrients that keep you feeling light yet satisfied through the longest days of the year.
Ingredients
- 2 cups dry quinoa, rinsed
- 3 large sweet potatoes, cubed
- 2 cans chickpeas, drained and patted dry
- 4 cups shredded kale
- 1 cup cherry tomatoes, halved
- 1/2 cup tahini
- 3 tablespoons maple syrup
- 1 tablespoon smoked paprika
- Olive oil, salt, and pepper
How to make it
- Preheat your oven to 400°F (200°C) and line two large baking sheets with parchment paper to ensure even roasting and easy cleanup.
- Toss the cubed sweet potatoes and chickpeas with olive oil, smoked paprika, salt, and pepper. Spread them in a single layer on the sheets; overcrowding will cause them to steam rather than crisp.
- Roast for 25-30 minutes, tossing halfway through, until the potatoes are tender and the chickpeas have a satisfying crunch.
- While the veggies roast, cook the quinoa by combining 2 cups of grain with 4 cups of water. Bring to a boil, then cover and simmer on low for 15 minutes until the water is absorbed and the quinoa is fluffy.
- Prepare the dressing by whisking tahini, maple syrup, and a splash of warm water until it reaches a smooth, pourable consistency.
- Divide the quinoa, roasted veggies, kale, and tomatoes into seven airtight containers. Keep the dressing in small separate jars to prevent the kale from wilting, ensuring a fresh crunch every single day.
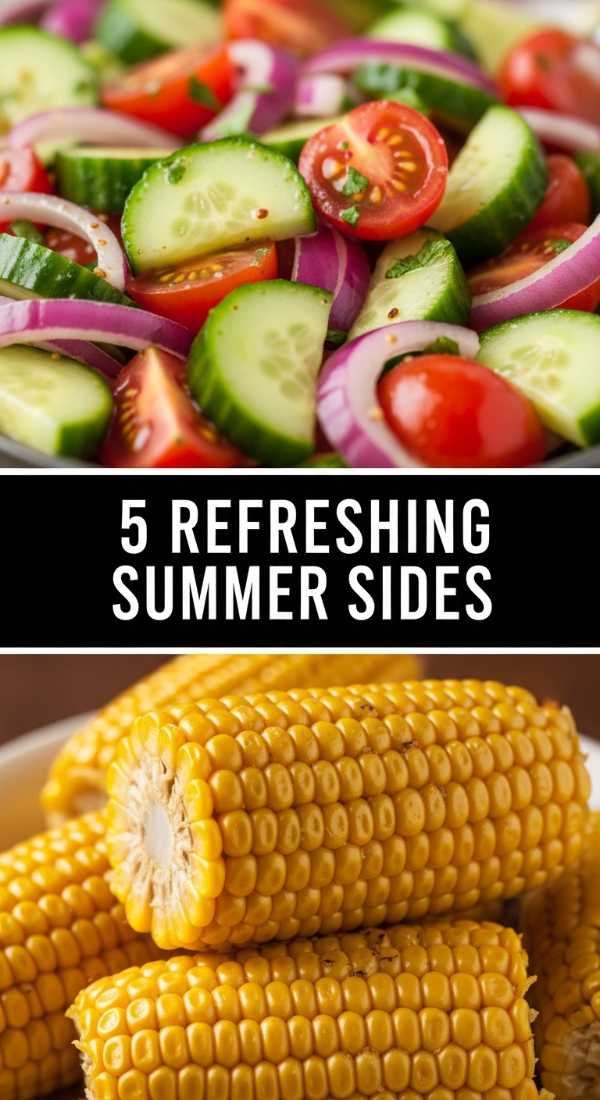
5 Refreshing Summer Side Dishes To Try
Why we love this
When the grill is hot, you need a side dish that provides a sharp, refreshing contrast to the smoky char of the main course. This watermelon and feta salad is the ultimate summer refresher, offering a burst of hydration with a sophisticated salty-sweet profile. The scent of torn mint leaves mingling with lime juice is intoxicatingly fresh, cutting through the heavy humidity of a backyard BBQ. It’s light, jewel-toned, and possesses a crispness that makes it the most sought-after bowl on the table every single time.
Ingredients
- 1 medium seedless watermelon, cubed
- 1 cup Bulgarian feta, crumbled
- 1/2 small red onion, thinly sliced into half-moons
- 1/4 cup fresh mint leaves, torn
- 1/4 cup extra virgin olive oil
- 2 limes, juiced
- Flaky sea salt
How to make it
- Start by chilling your watermelon in the refrigerator for at least 4 hours before prep; a cold watermelon is essential for the refreshing temperature contrast this dish provides.
- Slice the red onion as thinly as possible. To mellow out the bite of the raw onion, soak the slices in a small bowl of ice water for 10 minutes, then drain and pat dry.
- In a large, wide serving bowl, gently combine the chilled watermelon cubes and the mellowed red onions.
- Whisk the lime juice and olive oil together in a small ramekin until emulsified, then drizzle it evenly over the watermelon.
- Scatter the crumbled feta and the torn mint leaves over the top. It’s important to tear the mint by hand rather than chopping with a knife to prevent bruising and to release the aromatic oils.
- Finish with a generous sprinkle of flaky sea salt right before serving to draw out the sweetness of the fruit without making the salad soggy.
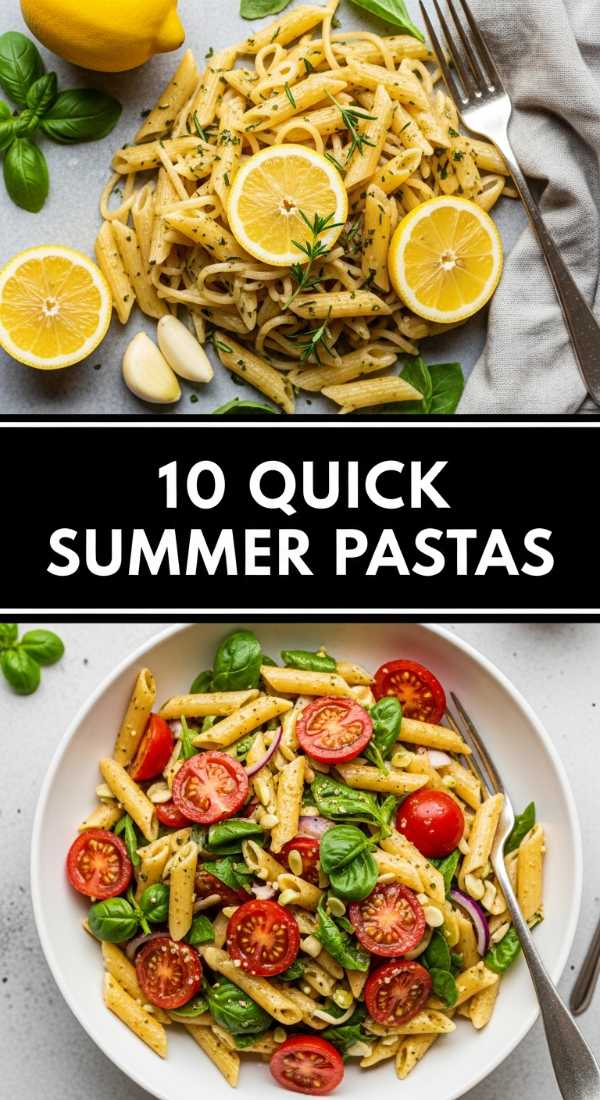
10 Quick Summer Pasta Recipes

Why we love this
Summer pasta should never be heavy; it should be a celebration of the vine-ripened bounty. This 15-minute cherry tomato and garlic pasta smells like a dream—garlic sizzling in golden oil while the tomatoes pop and release their sugary juices to form a natural, silky sauce. The texture is all about the ‘al dente’ bite of the pasta against the softness of the burst tomatoes. It’s the kind of meal that makes you feel like you’re sitting on a terrace in Italy, with the steam rising to meet the evening breeze.
Ingredients
- 1 lb spaghetti or linguine
- 3 cups cherry tomatoes
- 6 cloves garlic, thinly sliced
- 1/2 cup high-quality olive oil
- 1/2 teaspoon red pepper flakes
- 1 cup fresh basil leaves
- 1/2 cup grated Parmesan cheese
- Reserved pasta water
How to make it
- Bring a large pot of heavily salted water to a rolling boil. Add the pasta and cook for 1-2 minutes less than the package directions; the pasta will finish cooking in the sauce.
- While the pasta cooks, heat the olive oil in a large skillet over medium-low heat. Add the sliced garlic and red pepper flakes. Sauté for 2-3 minutes until the garlic is golden and fragrant, but be careful not to burn it, as burnt garlic turns bitter.
- Increase the heat to medium and add the whole cherry tomatoes. Cook for 5-7 minutes, stirring occasionally, until the skins begin to blister and pop. Use the back of a wooden spoon to gently crush a few of them to release their juices.
- Before draining the pasta, reserve 1 cup of the starchy cooking water. This is the secret to a silky sauce.
- Add the undercooked pasta directly into the skillet with the tomatoes. Pour in half of the reserved pasta water and toss vigorously over medium heat.
- Continue tossing until the water emulsifies with the oil and tomato juices, coating every strand of pasta. Add more water if it looks dry. Remove from heat, stir in the fresh basil and Parmesan, and serve immediately.
8 Best Pre Made Camping Meals

Why we love this
Nothing beats the smell of a campfire, but prepping food in the dirt can be a hassle. These pre-made foil pack fajitas are a game-changer for the outdoor enthusiast. Imagine opening a steaming foil packet to reveal perfectly charred peppers and juicy, lime-marinated chicken, all infused with a hint of woodsmoke. The convenience of having everything chopped and seasoned beforehand means more time in the hammock and less time cleaning up. It’s hearty, comforting, and tastes even better under a canopy of stars.
Ingredients
- 1.5 lbs chicken breast, sliced into strips
- 3 bell peppers, sliced
- 1 large onion, sliced
- 2 tablespoons taco seasoning
- 3 tablespoons olive oil
- 1 lime, sliced into rounds
- Heavy-duty aluminum foil
How to make it
- At home, combine the chicken strips, peppers, and onions in a large mixing bowl. Toss thoroughly with olive oil and your favorite taco seasoning until every piece is evenly coated.
- Tear off four large sheets of heavy-duty aluminum foil (approximately 12×12 inches). It is vital to use heavy-duty foil to prevent tearing over the direct heat of a campfire or grill.
- Divide the chicken and vegetable mixture evenly onto the center of each foil sheet. Top each portion with a slice of lime to infuse the steam with citrus.
- Fold the foil over the food and crimp the edges tightly to create a sealed pouch. This seal is crucial as it traps the moisture, essentially steaming the chicken in its own juices while the exterior chars.
- Pack the foil pouches into your cooler. When you’re ready to eat at the campsite, place the pouches directly on a grill grate over the fire or onto hot coals.
- Cook for 20-25 minutes, flipping once halfway through using tongs. Carefully open the pouch (watch for the hot steam!) to ensure the chicken is opaque throughout and the vegetables are tender-crisp.
6 Best Starbucks Summer Drinks To Order

Why we love this
There is a specific kind of joy found in the first sip of a customized Starbucks summer drink—the clink of ice cubes against the plastic cup and the vibrant swirl of fruit inclusions. These drinks are visual masterpieces, often featuring ombre layers of pink, purple, and gold. The taste is a refreshing explosion of tropical flavors like hibiscus, passionfruit, and creamy coconut milk. It’s an instant afternoon pick-me-up that feels like a mini-vacation in a cup, providing that much-needed icy caffeine kick during the hottest part of the day.
Ingredients
- Passion Tango Iced Tea base
- Coconut milk (substitute for water)
- 4 pumps of sugar-free vanilla syrup
- Scoop of dried strawberries
- Ice
How to make it
- This ‘Pink Drink’ hack starts with ordering a Venti Passion Tango Iced Tea, but the key is to ask the barista to replace the water with coconut milk. The fat in the coconut milk gives the drink a velvety, creamy mouthfeel.
- Request 4 pumps of sugar-free vanilla syrup. This adds a subtle sweetness that rounds out the tartness of the hibiscus tea without making it cloying.
- Ask for ‘heavy inclusions’ of dried strawberries. As the dried fruit sits in the cold liquid, it rehydrates and bleeds its natural pink color into the drink, intensifying the flavor.
- Ensure the barista shakes the drink vigorously in the shaker. Shaking doesn’t just mix the ingredients; it aerates the coconut milk and chills the entire beverage to a bone-cold temperature.
- Pour over fresh ice into a clear cup to appreciate the beautiful pastel aesthetic.
- Pro tip: If you want a caffeinated version, ask for a splash of Green Coffee Extract or order the Strawberry Açaí Refresher as the base instead of the herbal tea.
5 Pretty Mother’s Day Dessert Boxes

Why we love this
A dessert box is like a love letter in edible form. These Mother’s Day boxes are designed to be a sensory delight, filled with the delicate scent of vanilla bean and the floral notes of lavender-infused shortbread. The texture is a curated mix of soft, fudgy brownies, crisp macarons, and velvety chocolate-dipped strawberries. Presenting one of these feels incredibly special—it’s the intentionality of the arrangement, the pastel ribbons, and the variety of treats that makes it feel much more personal than a single store-bought cake.
Ingredients
- Miniature lemon tarts
- Handmade lavender shortbread cookies
- Chocolate covered strawberries
- French macarons (raspberry and vanilla)
- Fresh sprigs of mint and edible pansies for garnish
- Decorative bakery box with dividers
How to make it
- Start by selecting a sturdy bakery box with adjustable dividers. The dividers are essential to keep the different textures separate so the moisture from the strawberries doesn’t soften the crisp shortbread.
- Bake your shortbread cookies 24 hours in advance to allow the lavender flavor to settle and the texture to become perfectly firm.
- Dip the strawberries in high-quality melted dark chocolate and let them set on wax paper in the fridge. For an extra touch, drizzle with white chocolate for a professional look.
- Arrange the larger items first, like the lemon tarts and brownie bites, in the corner compartments to anchor the box.
- Fill the remaining slots with the delicate macarons and cookies. Group them by color to create a cohesive, ombre effect that looks stunning when the lid is opened.
- Fill any small gaps with fresh mint leaves and edible pansies. This not only looks beautiful but adds a fresh, garden-like aroma to the box. Tie the exterior with a silk ribbon and a handwritten note.
7 Best Kabobs On The Grill

Why we love this
Grilling kabobs is the ultimate way to get that perfect char on every single side of your protein. There is something primal and satisfying about the scent of searing steak and sweet pineapple wafting through the backyard. The texture is a delightful contrast between the caramelized, almost crunchy exterior of the vegetables and the tender, juice-filled center of the meat. It’s a meal that encourages you to eat with your hands, leaning into the casual, sun-drenched vibes of a classic American summer cookout.
Ingredients
- 2 lbs sirloin steak, cut into 1-inch cubes
- 1 fresh pineapple, cubed
- 2 red bell peppers, cut into chunks
- 1 red onion, cut into wedges
- 1/2 cup soy sauce
- 1/4 cup honey
- 2 tablespoons ginger, grated
- Wooden or metal skewers
How to make it
- If using wooden skewers, soak them in water for at least 30 minutes before grilling. This prevents them from catching fire or splintering under the high heat.
- Whisk together the soy sauce, honey, and grated ginger in a bowl. Place the steak cubes in a zip-top bag with half of the marinade and let it sit for at least 2 hours in the fridge to tenderize the fibers.
- Thread the skewers, alternating between steak, pineapple, pepper, and onion. Don’t pack the pieces too tightly together; leaving a tiny bit of space allows the heat to circulate and brown all sides evenly.
- Preheat your grill to medium-high (about 400°F). Clean the grates thoroughly and lightly oil them to prevent the honey in the marinade from sticking.
- Place the kabobs on the grill. Cook for 8-10 minutes, turning every 2-3 minutes. Use a brush to apply the reserved, clean marinade during the last 4 minutes of cooking to create a sticky, lacquered glaze.
- Check the steak for a medium-rare finish (internal temp 135°F). Remove from the grill and let them rest for 5 minutes before serving to allow the juices to redistribute.
5 Fun Snackle Box Ideas For Adults
[IMAGE_10]
Why we love this
The ‘snackle box’ is the ultimate evolution of the food board, made portable for the person on the go. Opening a multi-compartment tackle box to find a treasure trove of gourmet snacks is an instant mood booster. It’s about the joy of variety—one minute you’re enjoying a sharp piece of aged cheddar, the next a handful of Truffle Marcona almonds or a piece of dark chocolate. It feels like a personalized picnic that fits in your lap, making everything from beach days to long flights feel like a luxury experience.
Ingredients
- Multi-compartment plastic organizer (BPA free)
- Salami rose or prosciutto ribbons
- Cubed Manchego and Gouda cheese
- Dried apricots and figs
- Marcona almonds and pistachios
- Gourmet olives (pitted)
- Dark chocolate sea salt squares
How to make it
- Select a clean, food-safe plastic organizer with at least 10-12 small compartments. Make sure the lid fits tightly to keep the snacks fresh and prevent items from jumping between sections during travel.
- Start with the ‘wet’ or oily items like olives and pickles. Place these in silicone cupcake liners inside the compartments to ensure no moisture leaks into the crackers or nuts.
- Create ‘salami roses’ by folding circles of salami over the rim of a small glass and then placing them in a corner compartment; this adds a professional, aesthetic touch to the box.
- Fill the middle sections with a variety of cheeses. Use different shapes—cubes, slices, and wedges—to keep the visual interest high.
- Add the ‘crunch’ factor by filling sections with nuts and pretzels. Ensure these are away from any fruit that might release moisture.
- Finish the box by filling the remaining gaps with dried fruits and a few squares of high-quality dark chocolate for a sweet finish. Snap the lid shut and you’re ready for any adventure!
The Beauty of the Simple Board Lifestyle
As we’ve explored, the rise of the simple food board isn’t just a passing trend—it’s a reflection of how we want to live. We want meals that are beautiful but approachable, social but relaxed, and varied enough to satisfy every craving. Whether you’re filling a tackle box for a road trip or assembling a lush dip for your best friends, the goal is the same: to find joy in the assembly and connection in the sharing. So, the next time you’re feeling overwhelmed by a recipe, remember that sometimes the best meal is the one you build, piece by piece, on a simple wooden board.
Frequently Asked Questions
Find answers to common questions about creating the perfect food boards and summer snacks.