

Why Everyone Is Obsessed With This Simple Viral Food Board
There is something undeniably magical about a giant, overflowing board of warm, crispy, and savory finger foods that brings people together like nothing else. In a world where we are often rushed, sitting down to pick at a variety of textures and flavors feels like a luxurious pause—a tactile celebration of comfort. It’s the kind of meal that turns a casual Tuesday into an event and a weekend gathering into a core memory, all without the formality of a three-course dinner.
I first saw this trend popping up on my feed and realized it wasn’t just about the food; it was about the vibe. It’s that ‘come as you are’ energy where everyone can find their favorite bite, whether it’s a gooey cheese stick or a spicy popper. This board is the ultimate crowd-pleaser because it hits every craving: salty, spicy, crunchy, and savory. It’s visual storytelling at its best, and honestly, your kitchen is about to smell better than a five-star gastropub.
How to make crispy wings?

Why we love this
There is nothing quite like the sound of that first bite into a perfectly rendered, glass-shatteringly crispy chicken wing. The aroma of toasted skin and salt fills the room, promising a juicy, tender interior that pulls effortlessly away from the bone. It is a sensory masterpiece of heat and texture, where the subtle tang of the seasoning dances on your tongue, making it impossible to stop at just one. Every wing is a tiny, golden treasure that feels both indulgent and deeply satisfying.
Ingredients
- 2 lbs Chicken wings (flats and drums separated)
- 1 tbsp Baking powder (aluminum-free)
- 1 tsp Kosher salt
- 1/2 tsp Black pepper
- 1/2 tsp Garlic powder
- Neutral oil spray
How to make it
- Begin by patting the wings extremely dry with paper towels; moisture is the enemy of crispiness, so ensure there is no surface dampness.
- In a large bowl, toss the dried wings with baking powder, salt, pepper, and garlic powder until every nook and cranny is lightly coated. The baking powder changes the pH of the skin, allowing it to brown and crisp more effectively.
- Arrange the wings on a wire rack set over a rimmed baking sheet, ensuring they do not touch to allow for maximum air circulation.
- Place them in a cold oven and turn it to 425°F (218°C). This slow ramp-up in temperature helps render the fat before the skin crisps up.
- Bake for 45-50 minutes, flipping halfway through. You are looking for a deep golden-brown color and a skin texture that feels hard and resonant when tapped with a fork.
How to fry cheese sticks?

Why we love this
The cheese stick is the ultimate nostalgic comfort food, offering a decadent contrast between a gritty, herb-flecked crust and a center of molten, stretchy mozzarella. As you pull it apart, the cheese strings out in a beautiful, milky ribbon that catches the light, while the scent of dried oregano and toasted breadcrumbs heightens the anticipation. It is warm, salty, and incredibly satisfying, providing a soft, pillowy mouthfeel that is perfectly punctuated by the crunch of the fried exterior.
Ingredients
- 12 Mozzarella string cheese sticks
- 1/2 cup All-purpose flour
- 2 Large eggs (beaten)
- 1 cup Italian seasoned breadcrumbs
- 1/4 cup Grated Parmesan cheese
- Vegetable oil for frying
How to make it
- Start by freezing your string cheese sticks for at least 2 hours; this prevents them from melting completely and leaking out before the crust is browned.
- Set up a dredging station with three shallow bowls: one with flour, one with the beaten eggs, and one with a mix of breadcrumbs and Parmesan.
- Coat each frozen cheese stick in flour, then dip in egg, then coat in breadcrumbs. For an extra-thick shell, dip it back into the egg and then the breadcrumbs a second time.
- Heat about 2 inches of oil in a heavy-bottomed skillet to 350°F (175°C). Use a thermometer to ensure the oil isn’t too hot, which would burn the outside, or too cool, which would make them greasy.
- Fry the sticks in small batches for about 30-60 seconds per side until they are golden brown. Remove immediately and drain on a wire rack.
How to roast potato wedges?

Why we love this
A tray of roasted potato wedges is a rustic, earthy delight that smells of charred rosemary and caramelized starch. The edges become dark and ruggedly crisp, while the centers remain as light and fluffy as a cloud, absorbing all the savory notes of the olive oil and sea salt. There is a primal satisfaction in the weight of a thick wedge, its warmth radiating through your fingers as you dip it into a cool sauce, creating a perfect temperature harmony.
Ingredients
- 4 Large Russet potatoes
- 3 tbsp Extra virgin olive oil
- 1 tsp Smoked paprika
- 1 tsp Dried rosemary
- 1/2 tsp Onion powder
- Flaky sea salt to finish
How to make it
- Preheat your oven to 400°F (200°C) and scrub your potatoes clean, leaving the skin on for texture and flavor.
- Cut each potato in half lengthwise, then into quarters, and finally into eighths to create uniform wedges that will cook at the same rate.
- Soak the wedges in a bowl of cold water for 30 minutes to remove excess starch; this is the secret to getting a fluffy interior and a crisp exterior.
- Drain and pat the wedges completely dry. In a large bowl, toss them with olive oil, paprika, rosemary, and onion powder until well-coated.
- Spread the wedges on a parchment-lined baking sheet in a single layer, ensuring the flat sides are touching the pan. Roast for 35-40 minutes, flipping halfway through when the bottoms are deep golden and release easily from the paper.
How to cook spring rolls?

Why we love this
Spring rolls are like little packages of pure joy, featuring a delicate, translucent wrapper that bubbles up into a thousand tiny, crisp points when cooked. The aroma is a complex blend of sesame, ginger, and sweet cabbage, promising a vibrant and crunchy vegetable filling hidden inside the golden sheath. Each bite offers a clean, sharp snap that gives way to a savory, umami-rich center, making them a light yet deeply flavorful addition to any festive food board.
Ingredients
- 1 pack Spring roll wrappers
- 1 cup Shredded cabbage and carrots
- 1/2 cup Finely chopped mushrooms
- 1 tbsp Soy sauce
- 1 tsp Toasted sesame oil
- 1 Egg (for sealing)
- Oil for shallow frying
How to make it
- In a pan over medium heat, sauté the cabbage, carrots, and mushrooms with soy sauce and sesame oil just until softened. Let the mixture cool completely; if it’s hot, it will tear the wrappers.
- Lay a wrapper in a diamond shape. Place two tablespoons of filling near the bottom corner.
- Fold the bottom corner over the filling, tuck in the sides tightly, and roll upward. Brush the top corner with beaten egg to seal it firmly.
- Heat 1 inch of oil in a pan to 365°F (185°C). You can test the heat by sticking a wooden spoon in; if bubbles form around it, the oil is ready.
- Fry the rolls for 2-3 minutes, turning occasionally, until they are a uniform light golden brown. Drain on paper towels to maintain the crunch.
How to bake party pigs?

Why we love this
The ‘party pig’ is the quintessential crowd-pleaser, combining the buttery, flaky layers of puff pastry with the salty, snappy bite of a mini sausage. As they bake, the pastry puffs up into a golden honeycomb of dough that practically melts in your mouth, releasing a rich, yeasty scent that draws everyone to the kitchen. It’s a classic combination of textures—the soft, airy crunch of the breading against the firm, savory meat—that feels both whimsical and incredibly delicious.
Ingredients
- 1 sheet Refrigerated puff pastry (thawed)
- 24 Cocktail sausages (lil’ smokies)
- 1 Egg (beaten)
- 1 tbsp Everything bagel seasoning
- Dijon mustard for serving
How to make it
- Preheat your oven to 400°F (200°C) and line a baking sheet with parchment paper.
- Unroll your puff pastry and cut it into small triangles or rectangles roughly 1 inch by 3 inches in size.
- Place a cocktail sausage at the wide end of the pastry and roll it up snugly, placing it seam-side down on the baking sheet so it doesn’t unroll during baking.
- Brush the tops of the pastry with the beaten egg wash to give them a glossy, professional finish, and sprinkle generously with everything bagel seasoning.
- Bake for 15-18 minutes. Look for the pastry to have risen significantly and developed a deep, honey-gold color. The sausages should be heated through and slightly browned at the ends.
How to prep party sliders?
Why we love this
There is a communal joy in pulling apart a tray of party sliders, as the melted cheese stretches and the buttery, glazed buns pull away from one another with a soft hiss. The aroma of toasted onion and garlic butter is intoxicating, signaling a bite that is rich, savory, and perfectly balanced. With every mouthful, you get a hit of savory ham or beef, the sharp tang of Swiss cheese, and the sweetness of a Hawaiian roll, creating a multi-layered flavor profile that is pure comfort.
Ingredients
- 12-pack Slider rolls (Hawaiian style)
- 1/2 lb Sliced deli ham or roast beef
- 6 slices Swiss or Provolone cheese
- 1/4 cup Melted butter
- 1 tbsp Dijon mustard
- 1 tsp Worcestershire sauce
- 1 tbsp Dried minced onions
How to make it
- Preheat the oven to 350°F (175°C). Without separating the individual rolls, slice the entire block of rolls in half horizontally using a long serrated knife.
- Place the bottom half of the rolls in a baking dish. Layer the meat evenly across the bread, followed by a layer of cheese slices that overlap slightly.
- Place the top half of the rolls back on. In a small bowl, whisk together the melted butter, Dijon mustard, Worcestershire sauce, and minced onions.
- Pour this savory butter mixture evenly over the tops of the rolls, using a brush to ensure every inch of the bread is coated.
- Cover the dish with foil and bake for 10 minutes to melt the cheese. Remove the foil and bake for another 5-10 minutes until the tops are toasted, brown, and slightly crisp.
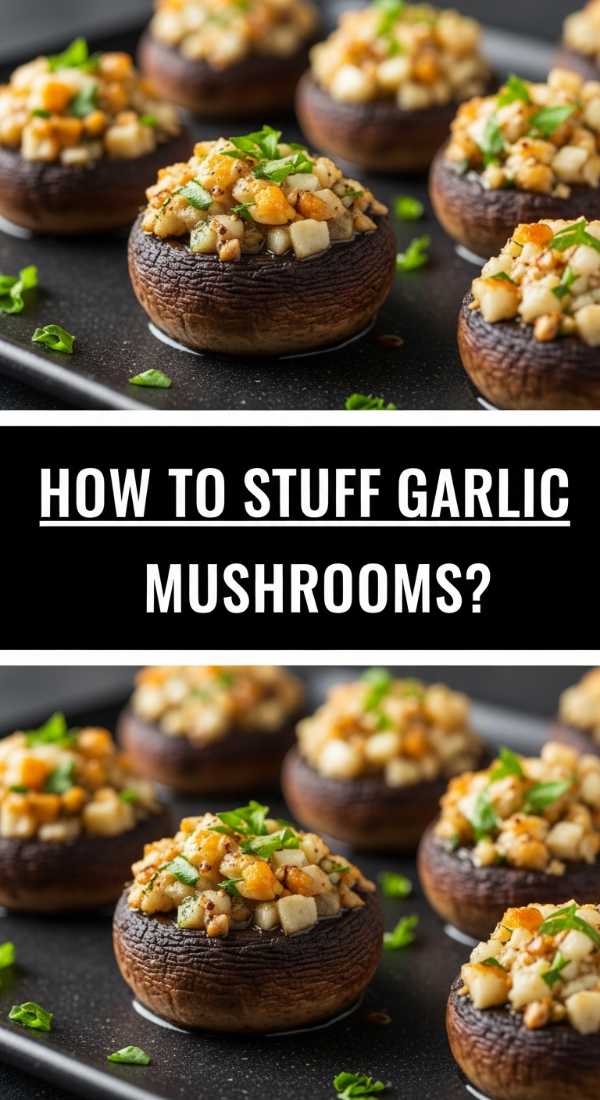
How to stuff garlic mushrooms?

Why we love this
These stuffed mushrooms are tiny umami bombs, offering a meaty, earthy texture that acts as a perfect vessel for a rich, garlicky filling. As they roast, the mushrooms release their natural juices, which mingle with the melted butter and herbs to create a concentrated burst of savory flavor in every bite. The topping becomes a golden, crunchy crust that contrasts beautifully with the tender, succulent mushroom cap, making them feel like a sophisticated, gourmet treat that belongs on the finest grazing boards.
Ingredients
- 1 lb Cremini or white button mushrooms
- 2 tbsp Butter
- 2 cloves Garlic (minced)
- 1/4 cup Breadcrumbs
- 1/4 cup Grated Parmesan
- 2 tbsp Fresh parsley (chopped)
- 2 tbsp Cream cheese (softened)
How to make it
- Clean the mushrooms with a damp cloth and carefully pop out the stems. Finely chop the stems to use in the filling.
- In a small skillet, sauté the chopped stems and minced garlic in butter over medium heat until fragrant and soft (about 3-4 minutes).
- In a bowl, mix the sautéed stems with the cream cheese, breadcrumbs, Parmesan, and parsley until a thick paste forms.
- Stuff each mushroom cap generously with the mixture, pressing it down slightly so it stays put.
- Arrange on a baking sheet and bake at 400°F (200°C) for 20 minutes. The mushrooms should be tender and shrunken slightly, with the stuffing appearing golden brown and slightly bubbly.
How to toast tomato bruschetta?
Why we love this
Bruschetta is the ultimate palate cleanser on a heavy board, providing a bright, acidic burst of fresh tomatoes and pungent basil against a charred, garlic-rubbed toast. The scent of fresh olive oil and balsamic glaze is incredibly inviting, and the crunch of the toasted sourdough provides a sturdy base for the juicy, vibrant topping. It’s a celebration of simple, high-quality ingredients that brings a touch of Mediterranean sunshine to your spread, feeling both light and incredibly satisfying.
Ingredients
- 1 Baguette or Sourdough loaf
- 4 Roma tomatoes (diced)
- 2 cloves Garlic (1 minced, 1 whole)
- 1/4 cup Fresh basil (chiffonade)
- 2 tbsp Extra virgin olive oil
- 1 tbsp Balsamic glaze
- Salt and pepper to taste
How to make it
- In a bowl, combine the diced tomatoes, minced garlic, basil, 1 tablespoon of olive oil, salt, and pepper. Let this sit for at least 15 minutes at room temperature to allow the flavors to marry.
- Slice the bread into 1/2-inch thick rounds. Brush both sides lightly with the remaining olive oil.
- Toast the bread in a 400°F (200°C) oven for about 5-8 minutes, or grill them on a stovetop pan until they have distinct char marks and are firm to the touch.
- While the bread is still warm, rub the cut side of the whole garlic clove across the surface of each slice. The heat from the toast will melt the garlic into the bread.
- Just before serving, spoon the tomato mixture onto the toasts and drizzle with a thick balsamic glaze for a sweet and tangy finish.
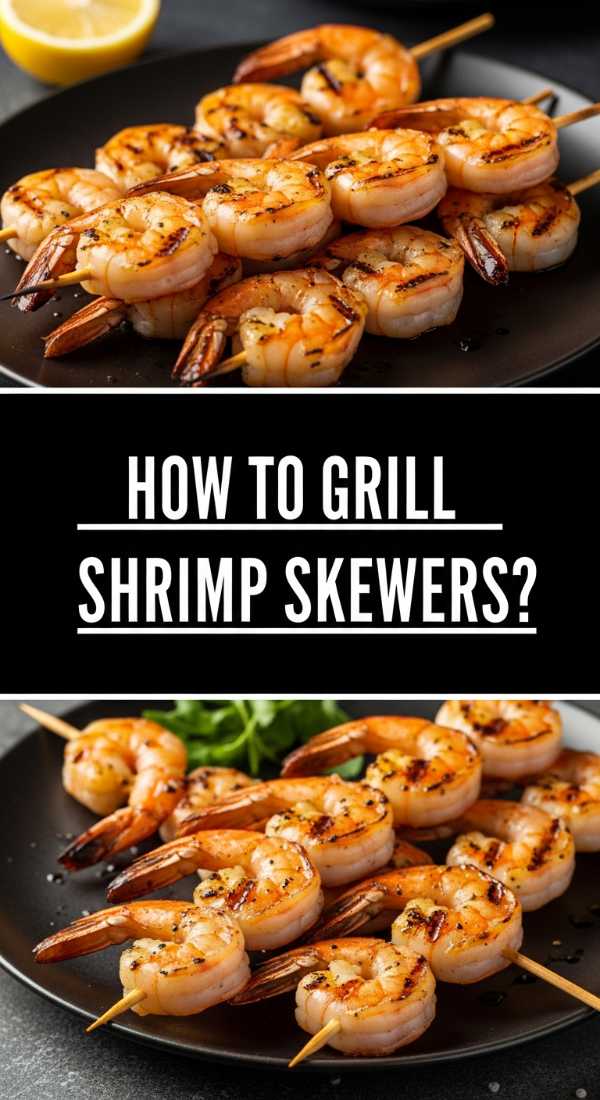
How to grill shrimp skewers?

Why we love this
Shrimp skewers bring a smokey, charred element to the board that feels instantly elevated and festive. The shrimp turn a beautiful, vibrant pink as they hit the heat, curling into perfect, succulent bites that carry the bright notes of lemon and the heat of chili flakes. The texture is firm yet tender, with a slight snap to the skin that releases a burst of oceanic sweetness. They are the perfect ‘light’ protein that adds a pop of color and a sophisticated flair to your comfort food layout.
Ingredients
- 1 lb Large shrimp (peeled and deveined)
- 2 tbsp Olive oil
- 1 tsp Chili flakes
- 1 tsp Dried oregano
- 1 Lemon (zested and juiced)
- Wooden skewers (soaked in water for 30 mins)
How to make it
- In a large bowl, marinate the shrimp with olive oil, chili flakes, oregano, lemon zest, and half the lemon juice for about 15-20 minutes. Don’t go longer, or the acid will cook the shrimp.
- Thread 3-4 shrimp onto each soaked wooden skewer, ensuring they are pierced through the tail and the head end so they don’t spin when flipped.
- Heat a grill pan or outdoor grill to medium-high heat. Lightly oil the grates to prevent sticking.
- Place the skewers on the grill and cook for 2-3 minutes per side. You are looking for an opaque, pearly white center and a bright pink exterior with slight char marks.
- Remove from the heat and immediately drizzle with the remaining lemon juice to brighten the flavors before adding to your board.
How to make spicy poppers?
[IMAGE_10]
Why we love this
The jalapeño popper is a thrilling dance between fire and ice, featuring the sharp, peppery heat of a fresh chili balanced by the cool, velvety richness of melted cream cheese. As you bite through the crispy breaded shell, the heat hits your palate first, followed immediately by the soothing creaminess of the filling. The aroma is smoky and spicy, promising a bold flavor experience that wakes up the taste buds and adds an addictive kick to the board that keeps everyone coming back for more.
Ingredients
- 10-12 Large jalapeños
- 8 oz Cream cheese (softened)
- 1 cup Shredded cheddar cheese
- 1/2 tsp Cumin
- 1 cup Panko breadcrumbs
- 2 Eggs (beaten)
- Oil for frying
How to make it
- Slice the jalapeños in half lengthwise and use a small spoon to scrape out all the seeds and white membranes (this is where the heat lives; remove more for a milder popper).
- In a bowl, mix the cream cheese, cheddar cheese, and cumin until smooth. Stuff each jalapeño half with the cheese mixture, smoothing it flat.
- Dip each stuffed pepper first into the beaten egg and then press firmly into the panko breadcrumbs. For a more secure coating, repeat the egg and panko dip a second time.
- Heat oil in a heavy skillet to 365°F (185°C). Carefully place the poppers into the oil, cheese-side up initially, then flipping carefully.
- Fry for about 2-3 minutes until the breadcrumbs are golden and the pepper is slightly softened. Drain on a paper towel and serve with a side of ranch or cool lime crema.
The Final Word on the Viral Board
Building a food board like this is less about following a strict recipe and more about creating an atmosphere of abundance and joy. By mixing different textures—the crunch of the wings, the stretch of the cheese, and the freshness of the bruschetta—you create a dining experience that feels interactive and alive. Don’t worry about perfection; the beauty of a viral food board lies in its messy, delicious variety. So, grab your biggest wooden plank, start frying, and watch how quickly your living room becomes the favorite spot in the house.