
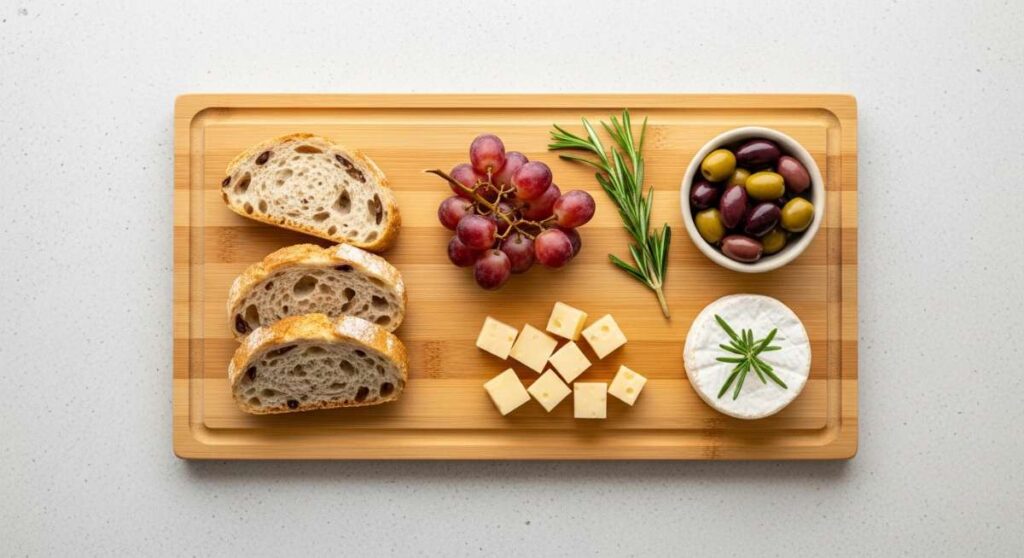
Why Everyone is Obsessed With This Simple Food Board Trend
There is something inherently magical about a shared meal that doesn’t feel like a formal production. In the last year, we have seen a massive shift away from plated dinners toward the communal, vibrant world of food boards. It is not just about the food; it is about the visual feast that greets you the moment you walk into the room, promising variety, comfort, and a bit of a ‘choose your own adventure’ dining experience. Whenever I set a board down on the table, the energy in the room immediately lifts, and conversation starts flowing as naturally as the honey over the cheese.
The obsession stems from a deep-seated desire for connection and simplicity. We are all craving ways to host friends without spending five hours trapped in the kitchen. This trend celebrates the beauty of raw ingredients, the art of arrangement, and the joy of picking up a little bit of everything with your hands. Whether it is a Tuesday night at home or a big birthday bash, these boards turn an ordinary meal into an interactive event that feels curated, thoughtful, and incredibly indulgent.
HOW TO MAKE CRISPY CHICKEN?

Why we love this
There is nothing quite like the auditory satisfaction of that first bite into a perfectly golden, crispy chicken tender nestled on a snack board. The contrast between the shattered-glass crunch of the seasoned breading and the steaming, succulent meat inside creates a sensory experience that is both nostalgic and deeply satisfying. As the aroma of garlic and toasted flour wafts up, it evokes memories of childhood comfort, yet the elevated seasoning makes it feel modern and sophisticated. It is the ultimate anchor for any board, providing a warm, savory weight that pairs beautifully with cool dips.
Ingredients
- 1 lb Chicken breast tenders
- 2 cups Panko breadcrumbs
- 1 cup All-purpose flour
- 2 large Eggs, beaten
- 1 tsp Garlic powder
- 1 tsp Smoked paprika
- Salt and cracked black pepper to taste
- Neutral oil for frying
How to make it
- Begin by patting your chicken tenders completely dry with paper towels; any moisture on the surface will prevent the flour from sticking and result in a soggy coating.
- Set up a dredging station with three shallow bowls: one for flour seasoned with salt and pepper, one for the beaten eggs with a splash of water, and one for the panko mixed with garlic powder and paprika.
- Coat each piece of chicken in the flour, shaking off the excess, then dip into the egg wash ensuring no dry spots remain, and finally press firmly into the panko until thickly coated.
- In a heavy-bottomed cast-iron skillet, heat about half an inch of oil to 350°F (175°C); you can test this by dropping a breadcrumb in—if it sizzles immediately, you are ready.
- Carefully place the chicken in the oil, being careful not to crowd the pan which would drop the temperature too quickly and lead to greasy chicken.
- Fry for 3-4 minutes per side until the exterior is a deep, uniform mahogany gold and the internal temperature reaches 165°F.
- Transfer the chicken to a wire cooling rack rather than paper towels to allow air to circulate, which keeps the bottom from getting soggy as it rests for 2 minutes before serving.
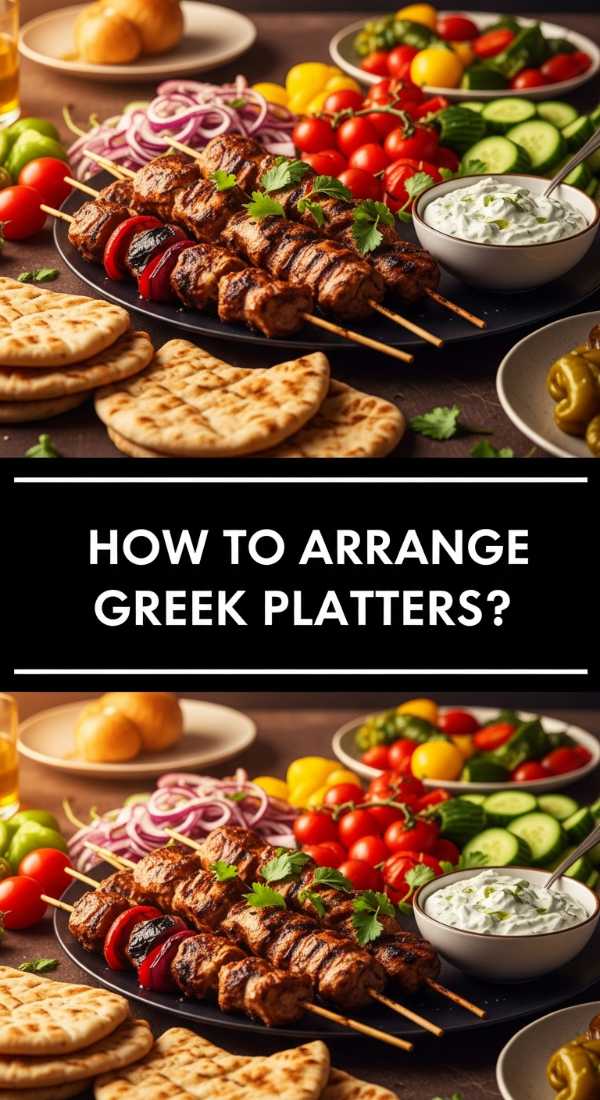
HOW TO ARRANGE GREEK PLATTERS?
Why we love this
A Greek platter is a literal rainbow of nutrition and flavor that brings a Mediterranean breeze right into your dining room. We love the interplay of textures—the snap of a cold Persian cucumber against the creamy, salt-forward crumble of high-quality feta cheese. The brine of Kalamata olives cuts through the rich, earthy notes of hummus, while the vibrant reds of cherry tomatoes add a burst of sweetness. It is a visual masterpiece that feels light and refreshing, making it the perfect centerpiece for a long, sun-drenched afternoon gathering.
Ingredients
- 1 cup Classic Hummus
- 1/2 cup Tzatziki
- 1 cup Kalamata olives
- 2 cups Cherry tomatoes, halved
- 3 Persian cucumbers, sliced into rounds
- 8 oz Feta cheese, cubed or crumbled
- Warm pita bread, cut into triangles
- Fresh sprigs of dill and mint
How to make it
- Start by choosing a large wooden or marble board and placing two small decorative bowls in diagonal corners to act as anchors; fill these with your hummus and tzatziki.
- Create ‘rivers’ of color by fanning out the cucumber slices in a curving line from one bowl toward the center, creating a sense of movement on the board.
- Cluster the cherry tomatoes in a bright group next to the white feta cubes to provide a stark, appetizing color contrast that draws the eye.
- Tuck the warm pita triangles into the remaining gaps, slightly overlapping them to create height and volume, making the board look bountiful.
- Scatter the olives into the small empty spaces left between the larger items to ensure every inch of the board is covered with delicious options.
- Garnish the entire platter with fresh dill and mint sprigs; the aromatic herbs provide a professional finish and a fresh scent that activates the palate.
- Drizzle a small amount of extra virgin olive oil over the hummus and feta just before serving to give them a luxurious, glistening sheen.
HOW TO MAKE CREAMY TOAST?

Why we love this
Creamy toast is the ultimate canvas for flavor exploration, offering a base that is both crunchy and yielding. The sensation of warm, toasted sourdough meeting a thick, cold layer of whipped ricotta or mascarpone is pure luxury on a plate. It feels like a high-end brunch item but is deceptively simple to assemble, providing a decadent mouthfeel that lingers. When topped with a drizzle of honey or a sprinkle of flaky sea salt, it hits every taste bud, balancing sweet, savory, and creamy in one perfect, handheld bite.
Ingredients
- 4 thick slices of Sourdough bread
- 1 cup Whole milk ricotta cheese
- 2 tbsp Heavy cream
- 1 tbsp Honey
- Zest of half a lemon
- Fresh berries or sliced figs for topping
- Flaky sea salt
How to make it
- Place the ricotta and heavy cream in a small food processor or use a hand whisk to whip them together for about 2 minutes until the mixture is light, airy, and cloud-like.
- Toast your sourdough slices in a pan with a little butter over medium heat until the edges are dark brown and the center is sturdy enough to hold the toppings.
- Wait about 30 seconds after toasting before spreading the cheese; this prevents the cold ricotta from melting instantly and becoming runny.
- Apply a generous, thick layer of the whipped ricotta using a back-of-the-spoon technique to create ‘swirls’ and ‘peaks’ that catch the light and toppings.
- Artfully arrange your sliced figs or berries on top, pressing them slightly into the cream so they stay secure during transport.
- Finish with a thin drizzle of honey and a micro-plane of lemon zest to add brightness and a sophisticated aromatic layer.
- Sprinkle a tiny pinch of flaky sea salt over the top to enhance all the flavors and provide a subtle crunch that contrasts the creamy cheese.
HOW TO BAKE CHEESY MUSSELS?

Why we love this
Baking mussels with a cheesy crust transforms simple seafood into a rich, umami-packed appetizer that feels incredibly festive. The aroma of garlic butter bubbling over the delicate, briny mussel meat is enough to make anyone’s mouth water instantly. We love the contrast between the tender, oceanic interior and the golden, bubbling cheese topping that provides a savory, slightly sharp finish. It is a sophisticated addition to any board that brings a touch of coastal elegance and a deep, comforting warmth to the spread.
Ingredients
- 2 lbs Fresh mussels, cleaned and de-bearded
- 1/2 cup Softened unsalted butter
- 3 cloves Garlic, minced
- 1/2 cup Grated Parmesan cheese
- 1/4 cup Panko breadcrumbs
- 2 tbsp Fresh parsley, chopped
- Lemon wedges for serving
How to make it
- Preheat your oven to 400°F (200°C) and line a large baking sheet with parchment paper to catch any drips and make cleanup easier.
- Steam the mussels in a splash of white wine or water for 3-5 minutes just until they pop open; discard any that remain tightly closed as they are not safe to eat.
- Once cooled slightly, remove the top shell of each mussel, leaving the meat attached to the bottom half-shell, and arrange them side-by-side on the baking sheet.
- In a small bowl, cream together the softened butter, minced garlic, and chopped parsley until it forms a smooth, fragrant paste.
- Place a small dollop of the garlic butter onto each mussel, then top with a generous sprinkle of parmesan cheese mixed with panko.
- Bake in the center of the oven for 8-10 minutes until the cheese is bubbling and the breadcrumbs have turned a beautiful toasted gold color.
- Serve immediately with fresh lemon wedges to squeeze over the top, providing a hit of acidity that cuts through the rich, buttery cheese.
HOW TO COOK SPICY APPETIZERS?

Why we love this
Spicy appetizers are the spark plugs of a food board, providing a necessary kick that wakes up the taste buds between milder bites. There is a thrilling heat that builds slowly, usually tempered by a crispy exterior or a cooling dipping sauce. We love how the zing of chili or the warmth of cayenne lingers, making the next sip of a cold beverage feel even more refreshing. These bites add a layer of excitement and bold personality to your spread, ensuring that the flavor profile of your board is never one-note.
Ingredients
- 12 Jalapeño peppers, halved and seeded
- 8 oz Cream cheese, softened
- 1/2 cup Shredded cheddar cheese
- 1 tsp Chili powder
- 1/2 lb Bacon slices, cut in half
- Toothpicks
How to make it
- Wear gloves when handling the jalapeños to avoid skin irritation, and slice them lengthwise, carefully scraping out the seeds and white membranes to control the heat level.
- In a mixing bowl, combine the softened cream cheese, cheddar, and chili powder, mashing them together until the spice is evenly distributed throughout the white cheese.
- Fill each jalapeño half with a generous amount of the cheese mixture, smoothing the top so it is flush with the edges of the pepper.
- Wrap a half-slice of bacon tightly around the center of each stuffed pepper, securing the end with a toothpick so it doesn’t unravel during the cooking process.
- Place the peppers on a wire rack set over a baking sheet; this allows the rendered bacon fat to drip away and ensures the bacon gets crispy all the way around.
- Bake at 400°F (200°C) for 20-25 minutes until the bacon is fully cooked and the jalapeños have softened and started to blister slightly.
- Allow them to rest for 5 minutes before placing on the board; the cheese needs a moment to set so it doesn’t spill out when someone takes a bite.
HOW TO STYLE PARTY FOOD?

Why we love this
Styling party food is where culinary skill meets artistic expression, turning basic ingredients into a visual story that delights your guests before they even take a bite. We love the intentionality of a well-styled board—the way textures are layered and colors are balanced to create a sense of abundance and luxury. It makes the host feel like a creator and the guests feel incredibly special, as if they are partaking in a temporary work of art. The secret is in the ‘organized chaos’ that makes the board look approachable yet high-end.
Ingredients
- Variety of heights (bowls, tiered stands)
- Color-coordinated garnishes (herbs, edible flowers)
- Contrast elements (crunchy vs soft, matte vs glossy)
- Gap fillers (nuts, dried fruits)
How to make it
- Start with your largest items first, such as bowls of dip or large blocks of cheese, placing them off-center to create an asymmetrical, natural look.
- Use the ‘Rule of Threes’ by grouping similar colors or textures in three different spots on the board to lead the eye across the entire display.
- Create height by propping up some items on small ramekins or using taller crackers to lean against rounder fruits, adding a 3D effect to the platter.
- Fill every single gap; a ‘viral’ board looks best when it is overflowing, so use small nuts, seeds, or pomegranate arils to hide the surface of the board itself.
- Consider the ‘flow’ of flavors—place the crackers near the cheese and the fruit near the creamy dips to intuitively guide your guests on how to pair the items.
- Add a ‘hero’ element in the center, like a bunch of frosted grapes or a honeycomb, to act as a focal point that ties all the disparate elements together.
- Wipe the edges of the board with a clean damp cloth before serving to ensure there are no stray crumbs or drips, keeping the presentation professional and clean.
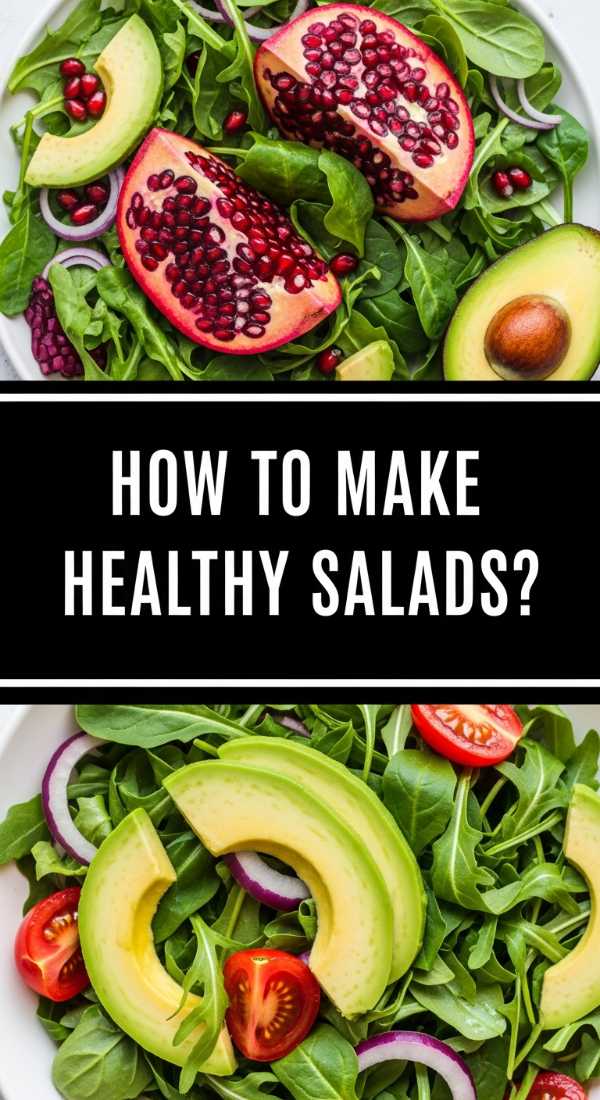
HOW TO MAKE HEALTHY SALADS?
Why we love this
A healthy salad on a food board provides a vibrant, crunchy counterpoint to heavier, savory items. We love the explosive freshness of crisp greens tossed in a bright, acidic dressing that cleanses the palate and adds a pop of garden-fresh flavor. The combination of leafy textures, toasted seeds, and juicy fruits creates a complex mouthfeel that proves ‘healthy’ is synonymous with ‘delicious.’ It brings a lightness to the board that encourages guests to keep grazing without feeling weighed down by the indulgence of cheeses and meats.
Ingredients
- 4 cups Baby kale or Arugula
- 1/2 cup Quinoa, cooked and cooled
- 1/4 cup Toasted pumpkin seeds
- 1 Avocado, sliced
- 1/4 cup Lemon vinaigrette (olive oil, lemon juice, honey, mustard)
- Thinly sliced radishes
How to make it
- If using kale, place the greens in a bowl with a teaspoon of olive oil and a pinch of salt, then ‘massage’ them with your hands for 2 minutes to break down the tough fibers.
- Whisk your vinaigrette ingredients in a small jar until fully emulsified; the honey and mustard act as stabilizers to keep the oil and acid from separating.
- Toss the massaged greens with the cooled quinoa, which adds a nutty texture and serves as a protein-rich base that holds onto the dressing well.
- Wait until the very last second to add the avocado and dressing; this prevents the avocado from browning and the greens from wilting under the acidity.
- Layer the sliced radishes on top in a decorative pattern, as their peppery bite and bright pink edges provide both flavor and visual appeal.
- Sprinkle the toasted pumpkin seeds over the top just before serving to ensure they retain their maximum crunch and don’t absorb moisture from the greens.
- Place the salad in a shallow, wide bowl rather than a deep one; this allows more of the ingredients to be visible and makes it easier for guests to serve themselves.
HOW TO GRILL JUICY BURGERS?

Why we love this
Mini burgers or sliders are a crowd-favorite board addition because they offer the hearty satisfaction of a full meal in a cute, manageable package. We love the smoky aroma of a charred patty meeting the sweetness of a toasted brioche bun, creating a classic flavor profile that everyone enjoys. The sight of melted cheese cascading down the sides of a thick, juicy slider is pure food porn, signaling a meal that is informal, fun, and incredibly tasty. It is the ultimate comfort food that brings a sense of backyard nostalgia to your indoor gathering.
Ingredients
- 1 lb Ground beef (80/20 fat ratio)
- 1 tsp Onion powder
- 1 tsp Salt and 1/2 tsp Black pepper
- 4 slices Sharp cheddar cheese
- 12 Mini brioche buns
- Butter for toasting
How to make it
- Mix your ground beef with the spices gently; overworking the meat will compress the fibers and result in a tough, hockey-puck-like burger.
- Form small patties that are slightly wider than the buns, as the meat will shrink during the cooking process; press a small thumbprint into the center of each to keep them flat.
- Heat a cast-iron griddle or grill to high heat; you want to hear a loud sizzle the moment the meat touches the surface to create a proper Maillard reaction (crust).
- Sear the patties for about 3 minutes on the first side without moving them, then flip and immediately place a small square of cheese on each.
- Cover the pan with a lid for the final 60 seconds of cooking; this traps the steam and ensures the cheese melts perfectly into every nook and cranny of the meat.
- While the meat rests for 2 minutes (essential for retaining juices), toast the buttered brioche buns on the griddle until they are golden and slightly crisp.
- Assemble with a tiny dollop of your favorite sauce and a pickle chip, then secure with a bamboo skewer to keep the slider standing tall on your food board.
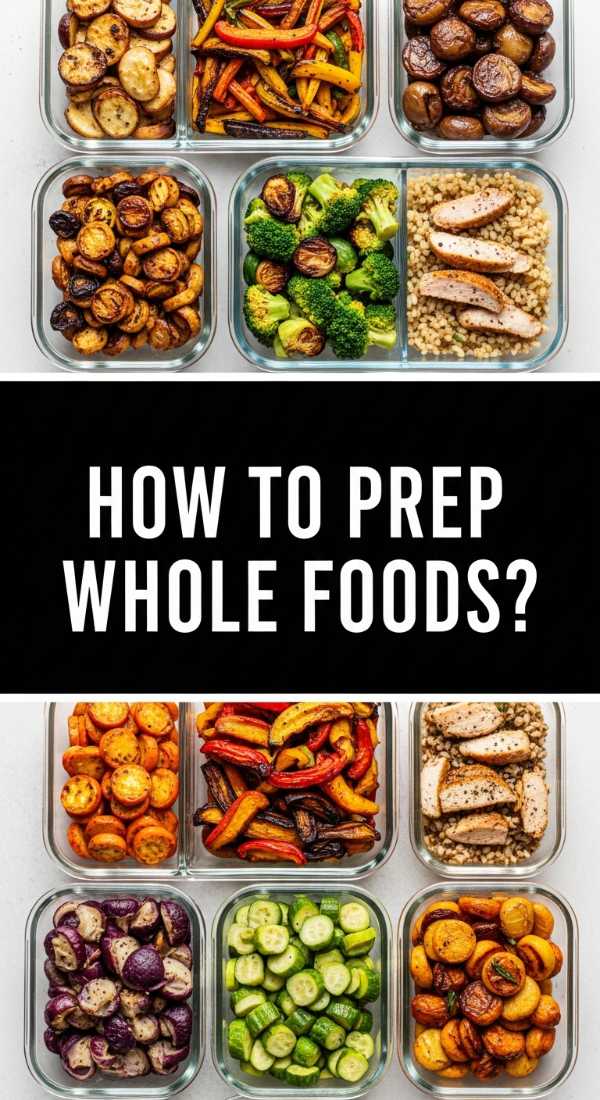
HOW TO PREP WHOLE FOODS?
Why we love this
Prepping whole foods for a board is a celebration of nature’s bounty, showcasing ingredients in their most vibrant, unaltered state. We love the rustic, farm-to-table aesthetic that whole fruits and raw vegetables bring to a display—the deep purple of a halved fig, the rough skin of a walnut, or the bright snap of a raw carrot. It feels honest and grounding, providing a balance to processed items. There is a tactile joy in snapping a fresh stalk of celery or peeling a segment of citrus that connects the diner to the source of their food.
Ingredients
- Heirloom carrots with tops attached
- Fresh figs or plums
- Whole walnuts or almonds in shells
- Snap peas
- Radishes with leaves
- Grapes on the vine
How to make it
- Wash all produce in cold water and a splash of vinegar to remove any residue, then dry them thoroughly so they don’t leak water onto the crackers on your board.
- Leave the green tops on your carrots and radishes but trim them to about an inch; this adds a ‘fresh-picked’ look that makes the board look more professional.
- Slice larger fruits like plums or figs in half to reveal their beautiful interior colors and textures, which provides a natural contrast to the skin.
- Keep grapes in small clusters on the vine rather than plucking them off; this makes for a more elegant presentation and allows guests to grab a small bunch easily.
- If using nuts in shells, provide a small decorative nutcracker nearby; it adds an interactive, old-world element to the dining experience.
- Blanch the snap peas for exactly 60 seconds in boiling water and then shock them in ice water; this turns them a neon green while keeping them perfectly crunchy.
- Arrange these items in the ‘gaps’ between your cooked foods to act as a fresh, colorful buffer that makes the entire board feel more balanced and healthy.
HOW TO SERVE BIRTHDAY SNACKS?

Why we love this
Birthday snacks bring an element of whimsy and celebration that turns a food board into a party. We love the mix of high and low—pairing gourmet cheeses with fun, nostalgic treats like chocolate-covered pretzels or colorful candies. It breaks the rules of traditional dining and embraces the pure joy of celebration. The pops of color and the inclusion of sweet elements alongside the savory make the board feel like a gift in itself, designed to delight guests of all ages and create a festive, lighthearted atmosphere.
Ingredients
- Chocolate-covered pretzels
- Sparkly fruit skewers (melons, berries)
- Small cupcakes or macarons
- Colored popcorn
- Assorted candies or gummies
- Birthday sprinkles for garnishing
How to make it
- Choose a theme color based on the birthday person’s favorites and select at least three snack items that match that palette for a cohesive look.
- Thread chunks of melon and whole berries onto wooden skewers, finishing the tip with a small piece of star-shaped fruit to create ‘magic wands.’
- Place small items like candies or colored popcorn in tiny decorative cupcake liners; this prevents them from rolling around and adds another layer of pattern.
- Intersperse the sweet snacks among the savory ones rather than keeping them separate; the ‘sweet and salty’ mix is a scientifically proven crowd-pleaser.
- Dust the entire board lightly with edible glitter or large-crystal sprinkles right before the guests arrive to give it a magical, celebratory shimmer.
- Add a few sprigs of mint or edible flowers near the sweets to keep the board looking fresh and sophisticated rather than just like a candy bowl.
- If serving cupcakes, use a small tiered stand in the corner of the board to provide height and make the birthday treats the ‘star’ of the show.
The Final Flourish: Why This Trend is Here to Stay
As we have explored, the obsession with food boards isn’t just a passing social media fad; it is a celebration of variety, creativity, and the simple joy of sharing. By combining these different elements—from the crunch of crispy chicken to the freshness of whole foods—you create a dining experience that is inclusive and exciting. These boards remove the pressure of the ‘perfect meal’ and replace it with the ‘perfect moment,’ where everyone finds something they love. So, grab your largest board, get creative with your styling, and watch as your next gathering becomes a viral hit in your own living room.