
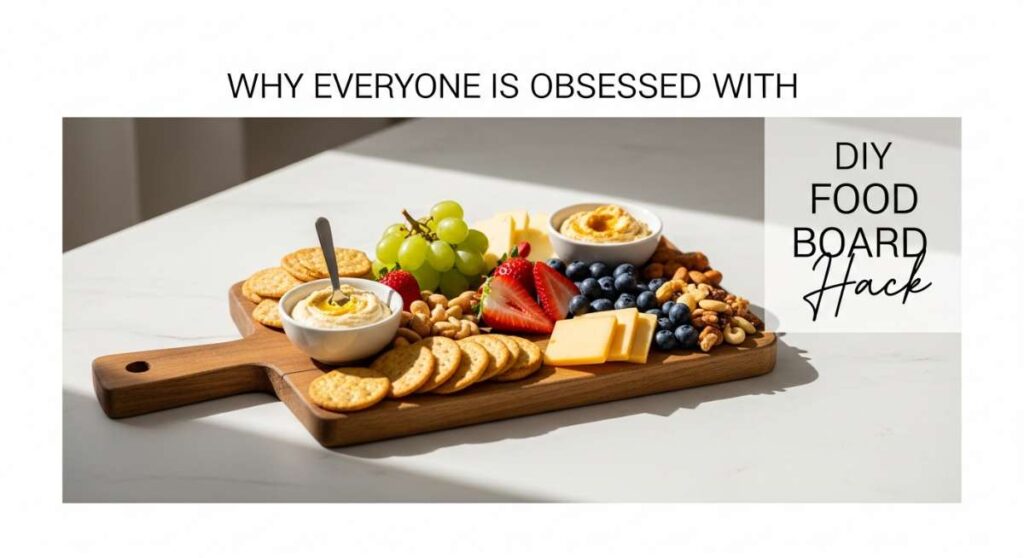
Why Everyone is Obsessed with This Simple DIY Food Board Hack
There is something absolutely magical about the golden hour of a summer evening, where the light hits the patio just right and the air is thick with the scent of blooming jasmine. We’ve all been there—trying to host the perfect get-together but finding ourselves stuck in the kitchen, missing out on the laughter and the stories being shared just a few feet away. That’s why I stumbled upon the ultimate lifestyle hack that has completely transformed how I entertain: the ‘Simple Food Board’ concept. It’s more than just a platter; it’s an invitation to slow down and savor the season without the stress of formal plating.
This DIY board hack is all about abundance and accessibility. Instead of worrying about individual portions, you curate a stunning landscape of flavors that allows guests to graze and customize their experience. Whether you are hosting a beach bash or a quiet backyard sunset dinner, the board becomes the centerpiece of the conversation. In this post, I am sharing the viral recipes and step-by-step guides that fit perfectly onto your summer boards, from savory grilled kabobs to the sweetest seasonal desserts.
7 Best Easy Summer Meals (Step-by-Step Guide)

Why we love this
Summer meals should feel like a breeze, capturing the essence of fresh produce and light textures that don’t weigh you down in the heat. We love this collection because it prioritizes vibrant colors—think deep reds of vine-ripened tomatoes and the bright greens of garden-fresh basil—combined with quick-cooking proteins. There is a sensory delight in the contrast between a crisp, cool vegetable and a warm, pan-seared piece of salmon or chicken. The aroma of citrus zest and cold-pressed olive oil ties everything together, creating a dining experience that feels like a luxury resort meal right in your own dining room.
Ingredients
- 4 Atlantic Salmon fillets
- 1 bunch fresh asparagus, woody ends trimmed
- 2 cups cherry tomatoes
- 3 cloves garlic, minced
- 2 tablespoons extra virgin olive oil
- 1 organic lemon (sliced into rounds)
- Flaky sea salt and cracked black pepper
- Fresh dill for garnish
How to make it
- Begin by preheating your oven to 400°F (200°C). Prepare a large rimmed baking sheet by lining it with parchment paper to prevent sticking and ensure easy cleanup.
- Place the salmon fillets in the center of the board. Surround them with the trimmed asparagus and cherry tomatoes. The visual cue here is a crowded but organized tray; the colors should pop against one another.
- In a small bowl, whisk together the olive oil and minced garlic. Drizzle this mixture evenly over the salmon and vegetables. Use a brush to ensure the salmon is fully coated for a beautiful golden-brown finish.
- Season generously with flaky sea salt and black pepper. Place the lemon slices directly on top of the salmon fillets; the juice will permeate the meat as it roasts, keeping it incredibly moist.
- Roast for 12-15 minutes. You will know it is done when the salmon flakes easily with a fork and reaches an internal temperature of 145°F. The tomatoes should be just starting to burst, releasing their sweet juices.
- Remove from the oven and garnish with fresh dill immediately. The heat from the salmon will slightly wilt the dill, releasing its herbal aroma across the entire board.
5 Viral Chicken Caesar Wraps (Step-by-Step Guide)

Why we love this
There is a reason these wraps have taken the internet by storm—they are the perfect handheld vessel for the ultimate comfort flavor profile. The crunch of the chilled romaine lettuce against the creamy, savory Caesar dressing creates a texture profile that is incredibly satisfying. We love the way the parmesan cheese provides a salty kick that balances the char-grilled flavor of the chicken. Eating these feels like a picnic in a park, with the sun on your skin and a perfectly chilled wrap in your hand that is both filling and refreshing.
Ingredients
- 2 large flour tortillas (burrito size)
- 1 cup cooked chicken breast, sliced
- 2 cups romaine lettuce, finely chopped
- 1/4 cup shaved parmesan cheese
- 3 tablespoons creamy Caesar dressing
- 1/2 cup garlic herb croutons, crushed
- 1 teaspoon fresh lemon juice
How to make it
- Warm your flour tortillas in a dry skillet over medium heat for about 15 seconds per side. This makes them more pliable and prevents them from cracking when you roll them.
- In a large mixing bowl, toss the chopped romaine, sliced chicken, parmesan cheese, and crushed croutons together. The croutons should be broken into smaller bits so they provide crunch in every single bite without being too bulky.
- Add the Caesar dressing and a squeeze of lemon juice to the bowl. Toss thoroughly until every leaf of lettuce is glistening. The lemon juice is a professional tip to brighten the heavy dressing and cut through the richness of the cheese.
- Lay the warm tortilla flat. Place the chicken Caesar mixture in a tight log shape across the center, leaving about two inches on each side.
- Fold the sides of the tortilla inward over the filling, then roll from the bottom up as tightly as possible. A tight roll ensures the dressing doesn’t leak and the wrap holds its shape.
- Slice diagonally with a serrated knife. This creates a beautiful visual for your food board, showing off the green and gold layers inside.
10 Sweetest Summer Dessert Recipes (Step-by-Step Guide)

Why we love this
Summer desserts are all about celebrating the harvest of berries and stone fruits at their absolute peak of sweetness. We love these recipes because they lean into the natural sugars of strawberries, peaches, and blueberries, requiring very little added sugar. Imagine the scent of a warm berry galette wafting through the air, paired with the cold, velvety texture of vanilla bean ice cream melting slowly over the crust. It is a nostalgic experience that brings back memories of childhood summers, sticky fingers, and long evenings spent chasing fireflies.
Ingredients
- 1 pint fresh strawberries, hulled and halved
- 2 large peaches, sliced
- 1 tablespoon honey
- 1 teaspoon vanilla extract
- Store-bought puff pastry sheet
- 1 egg (for egg wash)
- Turbinado sugar for dusting
How to make it
- Thaw the puff pastry at room temperature for 20 minutes. Preheat your oven to 400°F (200°C).
- In a medium bowl, gently toss the halved strawberries and sliced peaches with honey and vanilla extract. Let them sit for 5 minutes to macerate, which allows the natural juices to pool and create a syrup.
- Unfold the puff pastry onto a baking sheet lined with parchment. Use a knife to lightly score a 1-inch border around the edge, being careful not to cut all the way through. This allows the edges to rise while the center stays flat.
- Arrange the fruit mixture inside the scored border. Do not overfill, as the juices will run.
- Whisk the egg with a splash of water and brush the borders of the pastry. Sprinkle the turbinado sugar over the edges for a professional, glittering crunch.
- Bake for 18-22 minutes until the pastry is a deep golden brown and the fruit is bubbling. The visual cue for doneness is the puffiness of the edges; they should look airy and crisp.
8 Ultimate Picnic Side Dishes (Step-by-Step Guide)

Why we love this
A picnic is only as good as its sides, and these recipes are designed to be durable, portable, and utterly delicious even at room temperature. We love the way these dishes use bold aromatics like red onion and fresh parsley to keep the flavors sharp and exciting. There’s something so comforting about the creamy texture of a classic potato salad or the zesty pop of a bean salad while you’re lounging on a blanket. These sides are the supporting actors that often steal the show, offering a variety of textures from crunchy to creamy that keep the palate engaged.
Ingredients
- 1 lb baby gold potatoes
- 1/4 cup red onion, finely diced
- 2 tablespoons dijon mustard
- 1/4 cup Greek yogurt (instead of mayo)
- 1 tablespoon fresh dill, chopped
- 1 tablespoon apple cider vinegar
- Salt and pepper to taste
How to make it
- Place the baby gold potatoes in a large pot and cover with cold water. Add a generous pinch of salt. Bring to a boil and cook for 10-15 minutes or until fork-tender.
- Drain the potatoes and let them cool slightly. While still warm, slice them into halves or quarters. Pro tip: dressing the potatoes while they are warm allows them to absorb the vinegar and mustard flavors more deeply.
- In a small bowl, whisk together the Greek yogurt, dijon mustard, apple cider vinegar, salt, and pepper. This creates a tangy, lighter base compared to traditional heavy mayo.
- Pour the dressing over the warm potatoes and add the diced red onion and fresh dill.
- Fold the ingredients together gently using a spatula to avoid mashing the potatoes. You want the skins to stay intact for texture.
- Refrigerate for at least one hour before serving. The flavors will meld together during this time, and the starch from the potatoes will thicken the dressing into a creamy coating.
6 Best Summer Crockpot Recipes (Step-by-Step Guide)

Why we love this
The crockpot is the unsung hero of summer because it allows you to cook succulent, tender meats without heating up your entire house with the oven. We love this approach because it yields meat that literally falls apart at the touch of a fork, infused with deep, smoky, or citrusy flavors. The aroma of slow-cooked pork or chicken wafting through the house all day builds anticipation for dinner. It’s the ultimate ‘set it and forget it’ method that frees you up to spend the whole day at the pool or the beach, knowing a gourmet-level meal is waiting for you.
Ingredients
- 2 lbs pork shoulder (butt)
- 1 cup BBQ sauce (your favorite brand)
- 1/4 cup apple juice
- 1 tablespoon smoked paprika
- 1 teaspoon garlic powder
- 1 teaspoon onion powder
- Brioche buns for serving
How to make it
- Pat the pork shoulder dry with paper towels. Rub the smoked paprika, garlic powder, and onion powder all over the meat, pressing it in so it adheres.
- Place the seasoned pork in the crockpot. Pour the apple juice around the base of the meat. The juice provides the necessary moisture to steam-cook the pork until it is ultra-tender.
- Cover and cook on LOW for 8 hours or HIGH for 4-5 hours. The low and slow method is highly recommended for the best texture; the meat should be effortlessly shreddable.
- Once cooked, remove the pork from the crockpot and place it on a large cutting board. Shred the meat using two forks, discarding any excess fat.
- Drain most of the liquid from the crockpot, then return the shredded meat to the pot. Stir in the BBQ sauce.
- Let it sit on the ‘warm’ setting for another 20 minutes to allow the sauce to soak into the meat fibers. Serve piled high on toasted brioche buns for a viral-worthy food board addition.
5 Refreshing Summer Cocktail Drinks (Step-by-Step Guide)

Why we love this
A summer afternoon isn’t complete without the clink of ice cubes in a glass and the vibrant zing of a fresh cocktail. We love these drinks because they prioritize fresh-squeezed juices and herbal infusions like mint or basil, which provide an instant cooling sensation. The visual appeal is undeniable—bright pinks from muddled berries or soft greens from cucumbers make these drinks look as good as they taste. It’s an olfactory delight, with the spray of citrus oils and the sweet scent of agave or simple syrup creating a festive, vacation-like atmosphere.
Ingredients
- 2 oz silver tequila or vodka
- 1 oz fresh lime juice
- 1/2 oz agave nectar
- 4-5 fresh mint leaves
- Club soda to top
- Ice cubes
- Lime wheels for garnish
How to make it
- In a sturdy glass or cocktail shaker, place the fresh mint leaves and agave nectar. Use a muddler to gently press the mint—do not shred it, just bruise it to release the aromatic oils.
- Add the fresh lime juice and your choice of spirit (tequila or vodka).
- Fill the shaker with ice and shake vigorously for about 15 seconds. The shaker should feel icy cold to the touch, ensuring the drink is properly chilled and diluted.
- Fill a highball glass with fresh ice. Strain the mixture into the glass.
- Top with a splash of club soda for that essential summer effervescence. The bubbles help carry the scent of the mint to your nose as you sip.
- Garnish with a fresh lime wheel and an extra sprig of mint. Serve immediately while the carbonation is at its peak.
7 Best Kabobs on Grill (Step-by-Step Guide)
Why we love this
Kabobs are the quintessential summer food because they combine the smoky char of the grill with the natural sweetness of roasted vegetables. We love the interactive nature of kabobs; they look stunning laid out on a board, showing off a rainbow of peppers, onions, and marinated meats. The sound of the sizzle as they hit the hot grates and the smell of caramelizing proteins is enough to make anyone’s mouth water. Each bite is a perfect harmony of charred exterior and juicy, tender interior, making them a perennial favorite for any outdoor gathering.
Ingredients
- 1 lb sirloin steak or chicken breast, cut into 1-inch cubes
- 1 red bell pepper, cut into chunks
- 1 red onion, cut into wedges
- 1 zucchini, sliced into thick rounds
- 1/4 cup soy sauce
- 2 tablespoons olive oil
- 1 tablespoon honey
- Wooden or metal skewers
How to make it
- If using wooden skewers, soak them in water for at least 30 minutes. This is a critical step to prevent them from catching fire on the grill.
- In a large bowl, whisk together the soy sauce, olive oil, and honey. Add the meat cubes and toss to coat. Let marinate in the refrigerator for at least 1 hour (or up to 4 hours for steak).
- Preheat your grill to medium-high heat (about 400°F). Ensure the grates are clean and lightly oiled to prevent sticking.
- Thread the meat and vegetables onto the skewers in an alternating pattern. Don’t pack them too tightly; a little space between pieces ensures the heat circulates and cooks everything evenly.
- Place the skewers on the grill. Cook for 8-10 minutes, turning every 2-3 minutes. Look for clear grill marks and an internal temperature of 145°F for steak or 165°F for chicken.
- Remove from the grill and let rest for 5 minutes. This allows the juices to redistribute, ensuring the meat is tender when guests slide it off the skewer.
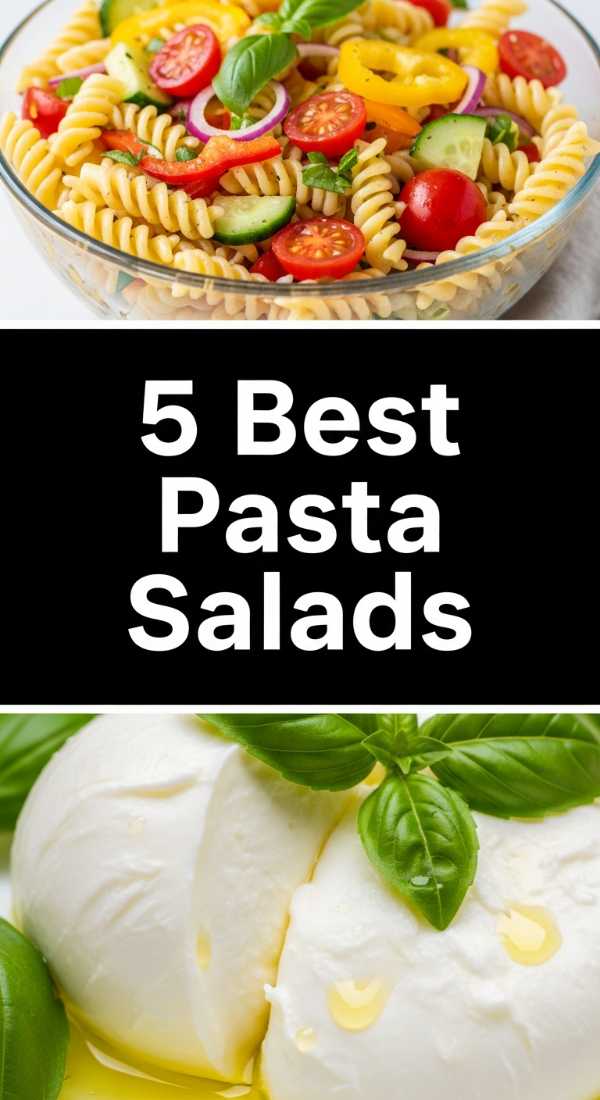
5 Easy Summer Pasta Salads (Step-by-Step Guide)

Why we love this
Pasta salad is the ultimate canvas for summer’s bounty, offering a satisfying heartiness that is still light enough for a hot day. We love the way the nooks and crannies of fusilli or farfalle pasta trap the zesty vinaigrettes, ensuring every bite is a flavor explosion. The combination of al dente pasta with crunchy cucumbers and creamy feta cheese provides a delightful textural variety. It’s a dish that actually tastes better as it sits, making it the perfect make-ahead option for your DIY food board where flavors have time to truly harmonize.
Ingredients
- 8 oz fusilli or rotini pasta
- 1/2 cup cucumber, diced
- 1/2 cup kalamata olives, pitted
- 1/4 cup crumbled feta cheese
- 1/4 cup Italian vinaigrette dressing
- 1/2 teaspoon dried oregano
- Fresh parsley for garnish
How to make it
- Bring a large pot of salted water to a boil. Cook the pasta according to the package instructions, but aim for ‘al dente’—it should have a slight bite. Mushy pasta will fall apart once the dressing is added.
- Drain the pasta and immediately rinse it under cold running water. This stops the cooking process and removes excess starch, which prevents the pasta from sticking together.
- In a large mixing bowl, combine the cooled pasta, diced cucumber, olives, and feta cheese.
- Pour the Italian vinaigrette over the mixture and sprinkle with dried oregano.
- Toss thoroughly to ensure every piece of pasta is coated. If the salad looks dry after a few minutes, add another tablespoon of dressing, as the pasta will absorb the liquid.
- Cover and chill in the refrigerator for at least 30 minutes. Before serving on your board, give it one final toss and garnish with fresh parsley for a pop of color.
10 Best Quick Beach Snacks (Step-by-Step Guide)

Why we love this
Beach snacks need to be easy to eat, mess-free, and incredibly refreshing under the hot sun. We love these options because they focus on hydration and quick energy, like crisp grapes, salty nuts, and chilled veggie sticks. There is something so satisfying about the crunch of a pretzel followed by the sweetness of a cold watermelon wedge while you listen to the waves. These snacks are designed to be grabbed by the handful, making them the perfect low-maintenance addition to a shared board that everyone can enjoy between dips in the ocean.
Ingredients
- 1 cup seedless green grapes, frozen
- 1 cup mini pretzels
- 1/2 cup almonds or walnuts
- 2 cups watermelon cubes
- Individual hummus cups
- Baby carrots and celery sticks
How to make it
- The night before your beach trip, wash the grapes and dry them thoroughly. Place them in a single layer on a baking sheet and freeze for at least 4 hours. Frozen grapes act like little fruit sorbet bites and help keep other items cool.
- Cut the watermelon into uniform 1-inch cubes. Store them in a sealed container to keep the juice contained.
- Wash and prep the carrots and celery into thin sticks that are easy to dip.
- To assemble the board (or a portable snack box), create small ‘zones’ for each item. Place the hummus cups in the center as an anchor.
- Surround the dip with the vegetable sticks and pretzels. Group the nuts together in a small corner.
- Just before serving, add the frozen grapes and cold watermelon. The contrast between the salty nuts and the icy fruit is the professional secret to a snack board that keeps people coming back for more.
8 Fresh Summer Salad Recipes (Step-by-Step Guide)
[IMAGE_10]
Why we love this
Fresh summer salads are the crown jewels of the season, showcasing the raw, unadulterated beauty of garden produce. We love these recipes because they move beyond basic lettuce and explore the world of arugula, spinach, and even fruit-based bases. The smell of freshly torn mint or basil leaves mixed with a sharp balsamic glaze is intoxicating. Each forkful offers a crisp, hydrating experience that cleanses the palate and leaves you feeling energized and light. It is the perfect way to celebrate the earth’s bounty in its most natural and vibrant form.
Ingredients
- 4 cups baby arugula
- 1 cup fresh strawberries, sliced
- 1/4 cup goat cheese, crumbled
- 1/4 cup pecans, toasted
- 2 tablespoons balsamic glaze
- 1 tablespoon extra virgin olive oil
- Pinch of sea salt
How to make it
- Start with a base of baby arugula in a large, shallow bowl. The peppery bite of the arugula provides a sophisticated contrast to the sweet fruit.
- Scatter the sliced strawberries evenly over the greens. For a professional look, ensure the bright red interiors of the berries are facing upward.
- Sprinkle the crumbled goat cheese and toasted pecans over the top. The goat cheese adds a creamy tang, while the pecans provide a necessary earthy crunch.
- In a small jar, shake the olive oil and a pinch of salt together. Drizzle this very lightly over the salad first.
- The final touch is the balsamic glaze. Drizzle it in a zig-zag motion across the entire dish. The glaze is thicker and sweeter than regular vinegar, so it stays on top of the leaves rather than wilting them.
- Serve immediately. Because arugula is a delicate leaf, this salad is best enjoyed as soon as the dressing is applied to maintain that signature crispness.
The Final Word on Your Viral Summer Board
Creating a DIY food board isn’t just about the food; it’s about the feeling of togetherness it fosters. By laying out these viral summer favorites, from the savory kabobs to the refreshing pasta salads, you’re creating a space where guests feel comfortable to graze and chat. Remember, the ‘hack’ is in the simplicity—don’t overthink the placement. Let the colors of the fresh ingredients do the work for you. Here’s to a summer filled with good food, great company, and zero stress in the kitchen!