
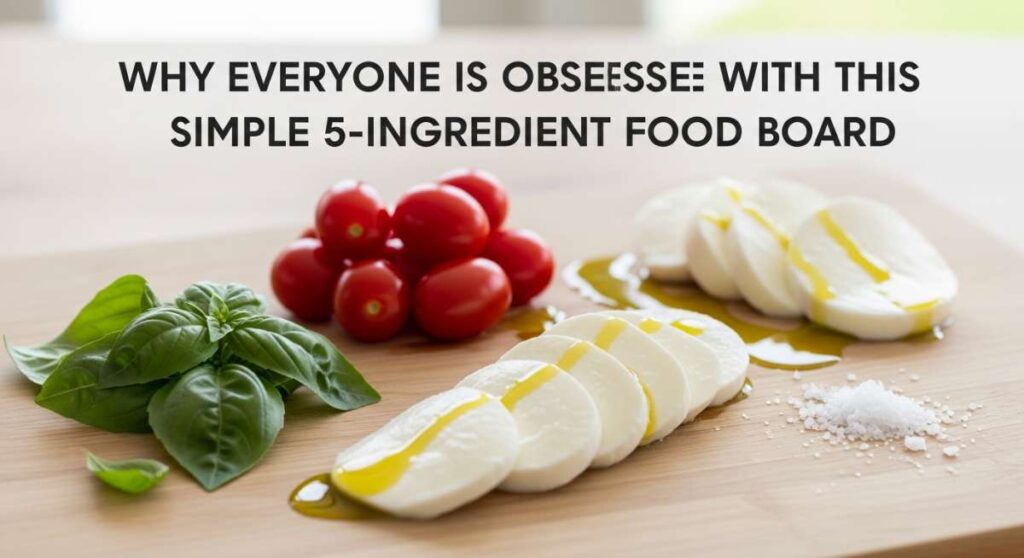
I remember the first time I hosted a dinner party where I didn’t spend the entire evening huddled over a hot stove while my friends laughed in the next room. I had finally discovered the secret that’s currently taking the internet by storm: the art of the intentional food board. It’s more than just a tray; it’s a lifestyle shift that prioritizes connection over complicated kitchen gymnastics, and honestly, it’s changed my life.
There is something inherently magical about a spread that feels both curated and effortless. When you place a 5-ingredient board on the table, you’re inviting your guests into a sensory experience that celebrates the seasons. Whether it’s the brightness of spring or the golden warmth of summer, these simple boards prove that you don’t need a culinary degree to create a viral-worthy moment—you just need the right ingredients and a little bit of heart.
How to cook healthy spring chicken?

Why we love this
There is nothing quite like the aroma of fresh rosemary and lemon zest filling your kitchen on a crisp spring afternoon. This dish captures the essence of the season—the meat is incredibly succulent and tender, with a skin that crackles just enough to satisfy that craving for texture. It feels light and nourishing, leaving you energized rather than weighed down, making it the perfect centerpiece for a board surrounded by fresh greens and crusty bread. It’s a sensory celebration of new beginnings and clean, vibrant flavors.
Ingredients
- 4 Bone-in, skin-on chicken thighs
- 2 Tablespoons extra virgin olive oil
- 1 Large lemon (sliced into rounds)
- 3 Sprigs of fresh rosemary
- 1 Teaspoon flaky sea salt and cracked black pepper
How to make it
- Begin by preheating your oven to 425°F (220°C). High heat is crucial for achieving that golden-brown, crispy skin while keeping the interior moist.
- Pat the chicken thighs completely dry with paper towels; any moisture on the skin will cause it to steam rather than sear, so don’t skip this step.
- In a large cast-iron skillet or roasting pan, rub the olive oil over the chicken, ensuring every nook and cranny is coated.
- Season generously with sea salt and cracked pepper, then tuck the lemon slices and rosemary sprigs under and around the chicken pieces.
- Roast for 25-30 minutes. You’ll know it’s done when the skin is a deep amber color and the juices run clear when pierced with a knife.
- Allow the chicken to rest for at least 5-7 minutes before serving to let the juices redistribute through the meat.
How to make summer pasta?

Why we love this
Summer pasta is like capturing a sunset in a bowl, combining the sweetness of sun-ripened tomatoes with the peppery punch of fresh basil. The texture is silky and light, avoiding heavy creams in favor of a natural sauce created by the emulsion of high-quality olive oil and starchy pasta water. Every bite feels like a warm breeze, offering a refreshing yet satisfying meal that celebrates the peak of garden produce. It’s the kind of dish you want to eat outdoors while the cicadas hum in the background.
Ingredients
- 1 Pound of high-quality Spaghetti or Bucatini
- 2 Cups of cherry tomatoes (halved)
- 1/2 Cup of fresh basil leaves (torn)
- 3 Cloves of garlic (thinly sliced)
- 1/2 Cup of Extra virgin olive oil
How to make it
- Bring a large pot of heavily salted water to a rolling boil—it should taste like the sea to properly season the pasta from the inside out.
- While the pasta cooks, heat the olive oil in a wide skillet over medium-low heat and add the sliced garlic, letting it infuse the oil until it just begins to turn golden and fragrant.
- Add the halved cherry tomatoes to the oil and increase the heat slightly, allowing them to blister and release their juices until a thin, rustic sauce forms.
- Cook the pasta until it is ‘al dente’ (usually 2 minutes less than the package instructions), then use tongs to transfer it directly into the skillet with the tomatoes.
- Add a splash of the starchy pasta water to the skillet and toss vigorously; this creates a glossy emulsion that clings to the noodles.
- Turn off the heat, fold in the fresh torn basil, and serve immediately with a final drizzle of cold olive oil.
How to make rotel dip?
Why we love this
Rotel dip is the ultimate comfort food that bridges the gap between sophisticated hosting and nostalgic snacking. The texture is impossibly creamy and molten, with little pops of heat from the green chilies that dance across your palate. It’s a social dish that demands a crowd, sitting at the center of the table as a warm, gooey invitation to dig in and enjoy life’s simple pleasures. The savory, salty profile is perfectly balanced by the acidity of the tomatoes, making it addictive from the first scoop.
Ingredients
- 16 oz Processed cheese (like Velveeta), cubed
- 1 Can (10 oz) Ro-Tel Diced Tomatoes and Green Chilies
- 1 Pound of ground sausage or beef
- 1 Teaspoon chili powder
- Tortilla chips for serving
How to make it
- In a large skillet over medium-high heat, brown the ground sausage or beef until it is completely cooked through and no pink remains.
- Drain the excess fat from the skillet thoroughly; this ensures your dip stays creamy and doesn’t become oily or separated.
- Transfer the cooked meat to a slow cooker or a heavy-bottomed saucepan set over low heat.
- Add the cubed cheese and the entire can of Ro-Tel (including the liquid, as that provides the flavor base and necessary moisture).
- Stir the mixture frequently as the cheese melts to ensure a smooth, uniform consistency throughout the dip.
- Once the dip is completely melted and bubbling slightly, sprinkle in the chili powder for an extra layer of depth and serve warm.
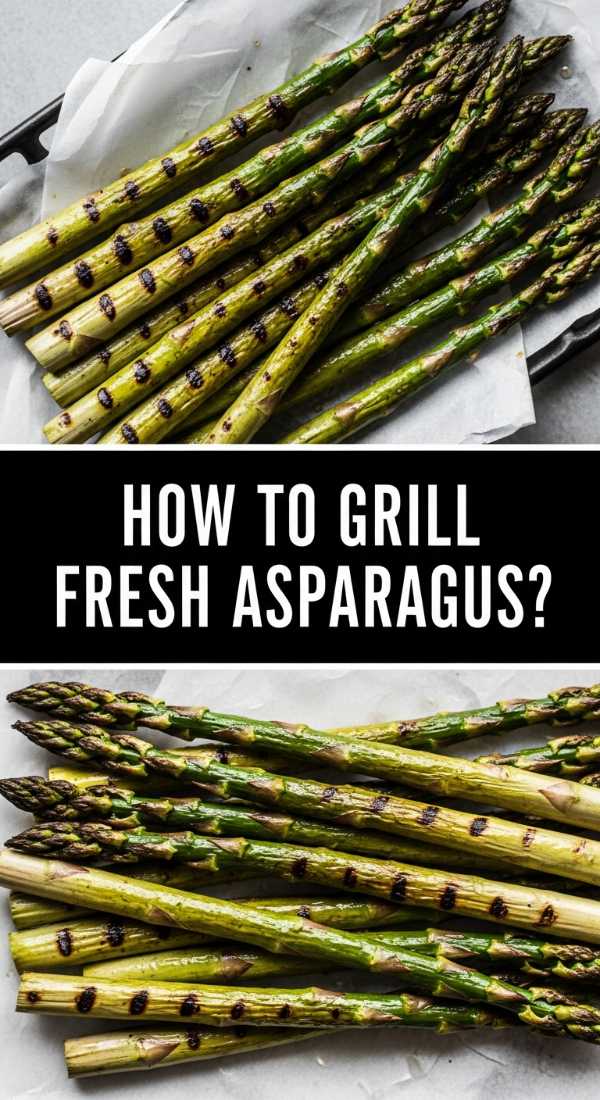
How to grill fresh asparagus?

Why we love this
There is a specific, smoky sweetness that only comes from charring fresh asparagus over an open flame. The tips become slightly crispy and caramelized, while the stalks remain tender yet firm with a satisfying snap. It’s a side dish that looks elegant on any board, providing a vibrant pop of green and an earthy aroma that screams ‘barbecue season.’ Drizzled with a bit of lemon, it becomes a bright, refreshing highlight that cuts through richer flavors on your plate.
Ingredients
- 1 Bunch of fresh green asparagus
- 2 Tablespoons olive oil
- 1 Lemon (cut into wedges)
- 1/2 Teaspoon sea salt
- 1/4 Cup shaved Parmesan cheese (optional)
How to make it
- Start by prepping the asparagus: hold a stalk at both ends and snap it; it will naturally break where the woody part ends. Use this as a guide to trim the rest of the bunch.
- Toss the trimmed stalks in a bowl with olive oil and salt until they are evenly coated, which helps prevent sticking and promotes even browning.
- Preheat your grill to medium-high heat (about 400°F) and ensure the grates are clean and lightly oiled.
- Place the asparagus stalks across the grates (perpendicularly) so they don’t fall through, and grill for about 3-5 minutes.
- Use tongs to roll the stalks occasionally; you are looking for distinct grill marks and a bright green color that has just begun to soften.
- Remove from the heat immediately, squeeze fresh lemon juice over the top, and sprinkle with Parmesan while still hot.
How to bake strawberry pie?

Why we love this
Biting into a slice of homemade strawberry pie is like tasting the very essence of early summer—it’s sweet, slightly tart, and deeply nostalgic. The filling is a glistening, ruby-red jammy delight that oozes out from beneath a flaky, buttery crust that shatters with every forkful. The aroma of baking berries and toasted pastry is enough to bring anyone to the kitchen table. It’s a rustic masterpiece that doesn’t need to be perfect to be absolutely beautiful, celebrating the messy, delicious joy of seasonal baking.
Ingredients
- 2 Refrigerated or homemade pie crusts
- 5 Cups fresh strawberries (hulled and halved)
- 3/4 Cup granulated sugar
- 1/4 Cup cornstarch
- 1 Tablespoon lemon juice
How to make it
- Preheat your oven to 400°F (200°C) and place one pie crust into a 9-inch pie plate, trimming the edges to fit.
- In a large mixing bowl, gently toss the strawberries with the sugar, cornstarch, and lemon juice until the berries are well coated and a slight syrup begins to form.
- Pour the strawberry mixture into the prepared bottom crust, piling the berries slightly higher in the center.
- Place the second crust on top; you can do a full cover with vent holes or a lattice design if you’re feeling adventurous and want a viral look.
- Crimp the edges of the top and bottom crusts together tightly to seal in the juices, and brush the top with a bit of milk or egg wash for a golden finish.
- Bake for 45-50 minutes. It is vital to let the pie cool for at least 3 hours before slicing so the cornstarch can set the filling into a sliceable consistency.
How to cook dirty spaghetti?

Why we love this
Dirty spaghetti is a soulful, umami-packed twist on traditional pasta that brings deep, savory flavors to the forefront of your palate. It’s rich, hearty, and layered with the complex tastes of browned meats and aromatic vegetables, reminiscent of a classic Cajun dirty rice but with the satisfying chew of pasta. Every strand of spaghetti is coated in a dark, flavorful sauce that feels indulgent and comforting. It’s the perfect ‘secret’ recipe to add to a food board for those who love a bit of culinary mystery and a whole lot of flavor.
Ingredients
- 1 Pound spaghetti
- 1/2 Pound ground beef
- 1/2 Pound ground pork or chicken livers (finely chopped)
- 1 Bell pepper and 1 onion (finely diced)
- 2 Tablespoons Worcestershire sauce
How to make it
- Boil your spaghetti in salted water until just shy of al dente, as it will finish cooking in the sauce later.
- In a large heavy skillet, brown the ground beef and the finely chopped livers (or pork) over medium-high heat until deeply browned and slightly crispy.
- Add the diced bell pepper and onion to the meat, sautéing them in the rendered fat until they are soft and translucent, picking up all the browned bits from the pan.
- Stir in the Worcestershire sauce and a splash of pasta water to create a thick, savory base that coats the meat and vegetables.
- Add the cooked spaghetti to the skillet and toss everything together over medium heat for 2-3 minutes, allowing the pasta to absorb the flavors of the ‘dirty’ base.
- Serve with a sprinkle of fresh parsley or green onions to add a bright contrast to the deep, savory notes of the dish.
How to make spring desserts?

Why we love this
Spring desserts are defined by their lightness and their ability to mimic the blooming world outside with floral notes and airy textures. Think of delicate mousses, lemon-infused tarts, or soft meringues that practically melt on the tongue. They offer a gentle sweetness that isn’t overpowering, making them the perfect conclusion to a sun-drenched brunch. The visual appeal of pastel colors and edible flowers makes these treats a viral sensation, turning any food board into a literal work of art that feels almost too pretty to eat.
Ingredients
- 1 Cup heavy whipping cream
- 1/2 Cup lemon curd (store-bought or homemade)
- 1 Cup fresh raspberries
- 1 Tablespoon powdered sugar
- Shortbread cookies for serving
How to make it
- Place a metal mixing bowl in the freezer for 10 minutes; a cold bowl helps the cream whip faster and creates more stable peaks.
- Pour the heavy cream into the chilled bowl and whisk vigorously (or use a hand mixer) until soft peaks begin to form.
- Gently fold the lemon curd into the whipped cream using a spatula; do this slowly to maintain the airy volume of the cream.
- Sift the powdered sugar over the mixture and give it one final, gentle fold to ensure a smooth, sweet finish.
- Spoon the lemon mousse into small individual glasses or a decorative bowl in the center of your dessert board.
- Garnish with fresh raspberries and serve alongside shortbread cookies for dipping into the light, citrusy cloud.
How to make summer salad?

Why we love this
A true summer salad is a masterclass in balance, playing with the contrast between creamy fats, acidic dressings, and the crunch of peak-season produce. It’s incredibly refreshing, acting as a palate cleanser that still feels like a substantial part of the meal. The scent of fresh mint or cilantro mingling with ripe peaches or cucumbers is enough to transport you to a poolside cabana. It’s the kind of dish that makes healthy eating feel like a luxury, providing a burst of hydration and sunshine in every forkful.
Ingredients
- 4 Cups baby arugula or spinach
- 2 Ripe peaches (sliced)
- 4 oz Burrata cheese or fresh mozzarella
- 1/4 Cup balsamic glaze
- 1/2 Cup toasted pecans
How to make it
- Layer the baby arugula on a large, shallow platter to create a lush green bed for the other ingredients.
- Arrange the peach slices over the greens; if you have a grill running, you can sear the peaches for 1 minute per side first to intensify their sweetness.
- Place the burrata cheese in the center and gently break the outer skin so the creamy interior begins to spill out over the leaves.
- Sprinkle the toasted pecans evenly over the salad to provide a necessary crunch and earthy depth.
- Just before serving, drizzle the balsamic glaze in a decorative zigzag pattern over the entire board.
- Season with a final pinch of sea salt and freshly cracked black pepper to make all the flavors pop.
How to grill perfect steak?

Why we love this
There is a primal satisfaction in a perfectly grilled steak—the way the charred, salty exterior gives way to a butter-soft, pink center. The aroma of woodsmoke and rendered fat is the quintessential smell of a summer gathering. When sliced thin and placed on a food board, it becomes a shareable luxury that feels both grand and intimate. It’s all about the texture: that initial resistance of the sear followed by the melt-in-your-mouth tenderness that makes steak the undisputed king of the grill.
Ingredients
- 2 Ribeye or New York Strip steaks (at least 1.5 inches thick)
- 2 Tablespoons coarse kosher salt
- 1 Tablespoon black peppercorns (crushed)
- 2 Tablespoons unsalted butter
- 2 Garlic cloves (smashed)
How to make it
- Remove the steaks from the refrigerator at least 45 minutes before cooking; bringing the meat to room temperature ensures even cooking throughout.
- Pat the steaks bone-dry and coat them heavily with the salt and crushed pepper, pressing the seasoning into the meat to form a crust.
- Preheat your grill to its highest setting (500°F+) and lightly oil the grates.
- Place the steaks on the grill and sear for about 4-5 minutes per side for medium-rare, or until an internal thermometer reads 130°F (54°C).
- During the last minute of cooking, place a small heat-proof pan on the grill with the butter and garlic, and brush the melting garlic butter over the steaks.
- The most critical step: let the steaks rest on a cutting board for a full 10 minutes before slicing to keep the juices locked inside.
How to brew sun tea?
[IMAGE_10]
Why we love this
Sun tea is the ultimate lesson in patience and the gentle power of nature. Unlike boiled tea, which can sometimes turn bitter, sun tea is brewed slowly by the sun’s rays, resulting in a smooth, mellow flavor that is incredibly refreshing. It’s a nostalgic ritual—watching the clear water slowly transform into a deep amber hue over the course of an afternoon. Served over a mountain of ice with a sprig of mint, it’s the most honest expression of summer hydration, tasting like pure, unadulterated sunshine in a glass.
Ingredients
- 1 Gallon of purified water
- 8 Black tea bags (or 4 large cold-brew bags)
- 1 Lemon (sliced)
- Fresh mint sprigs
- Honey or simple syrup to taste
How to make it
- Fill a large, clean glass jar with one gallon of room-temperature purified water. Do not use plastic, as the sun can cause chemicals to leach into the tea.
- Add the tea bags to the water, draped so the strings hang outside the jar for easy removal later.
- Secure the lid and place the jar in a spot that receives direct, unobstructed sunlight for 3 to 5 hours.
- Check the color of the tea; once it reaches a rich, dark amber, bring the jar inside—don’t leave it out too long or it may develop bacteria.
- Remove and discard the tea bags, then stir in your sweetener while the tea is still slightly warm from the sun.
- Pour over ice, add lemon slices and fresh mint, and store any leftover tea in the refrigerator for up to 24 hours.
The Simple Secret to Viral Hosting
At the end of the day, the reason everyone is obsessed with these boards isn’t because they are perfect—it’s because they are approachable. They take the stress out of the kitchen and put the focus back on the people sitting around your table. By choosing five high-quality ingredients and treating them with a little bit of care, you create something far more memorable than a complicated five-course meal. So, grab a board, pick a season, and start sharing the joy.