
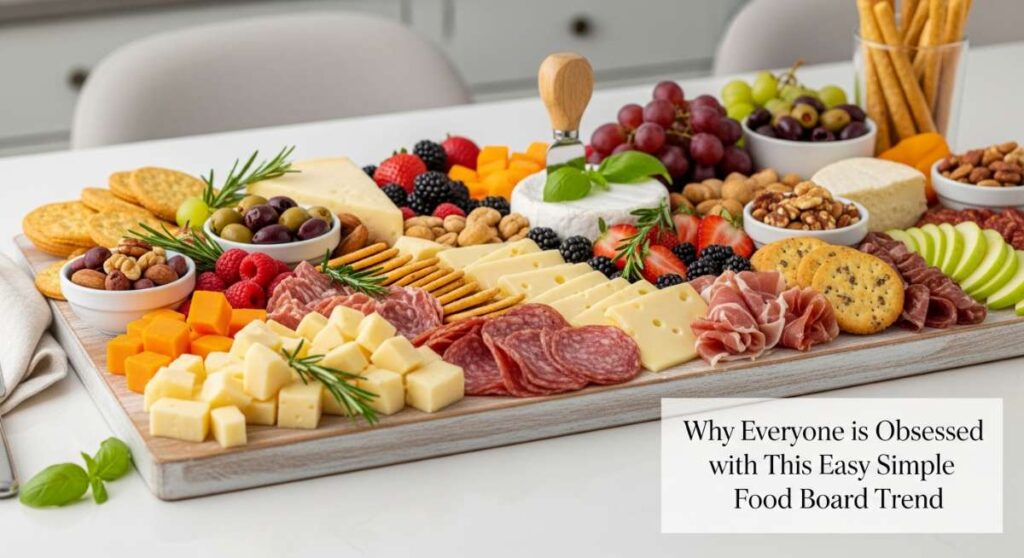
There’s something truly magical about the way food brings us together, especially when it’s presented in a way that invites everyone to dig in and linger. Lately, my social feed has been flooded with these stunning, effortless Simple Food Boards, and honestly, I’ve never been more in love with a trend. It’s not just about the aesthetic; it’s about the feeling of abundance and the ease of grazing through a sunny afternoon with your favorite people. No more stiff formal dinners—just pure, communal joy on a platter.
I’ve spent the last few weeks experimenting with different versions of these boards, from savory snack spreads to vibrant dessert platters, and I finally understand the obsession. They are the ultimate stress-free solution for the busy host who still wants to wow their guests. Whether you are hosting a backyard BBQ or just looking for a way to make your weeknight meals feel special, these simple food board inspirations are about to become your new best friend.
10 Best Summer Meal Preps (Step-by-Step Guide)

Why we love this
This meal prep strategy transforms your fridge into a vibrant apothecary of health and flavor, making those busy summer weekdays feel like a breeze. We adore the combination of chilled grains, snappy garden vegetables, and zesty dressings that only get better as they marinate over time. The aroma of fresh basil and lemon zest hitting a warm bowl of quinoa creates an earthy, bright sensory experience that feels incredibly indulgent yet light enough for the heat of July. Every bite offers a satisfying crunch followed by the smooth, creamy texture of perfectly ripened avocado.
Ingredients
- 2 cups dry quinoa or farro
- 1 pound grilled chicken breast or chickpeas
- 2 English cucumbers, diced
- 1 pint cherry tomatoes, halved
- 1 cup crumbled feta cheese
- Lemon-tahini dressing
- Fresh parsley and mint
How to make it
- Rinse your grains thoroughly under cold water to remove any bitterness, then toast them in a dry pot for 2 minutes until they smell nutty.
- Add the appropriate amount of salted water (usually 2:1 ratio), bring to a vigorous boil, then reduce the heat to the lowest setting, cover tightly, and simmer for 15 minutes until the water is absorbed and grains are fluffy.
- While the grains cool, dice your cucumbers and tomatoes into uniform 1/2-inch pieces to ensure every forkful has a bit of everything.
- Slice your protein (chicken or chickpeas) and season generously with dried oregano, garlic powder, and a pinch of red pepper flakes for a subtle kick.
- Layer your containers starting with the dressing at the bottom (to prevent sogginess), followed by the grains, then the protein, and finally the fresh vegetables and herbs on top.
7 Easy Ways to Make Rotel Dip (Step-by-Step Guide)

Why we love this
There is a nostalgic, irresistible comfort in a warm bowl of Rotel dip that brings everyone straight to the center of the party. The way the molten cheese stretches and clings to a salty tortilla chip is pure sensory bliss, offering a creamy, velvety texture with a spicy, tomato-infused bite. As the steam rises, you catch the savory, smoky scent of browned sausage mingled with the bright, sharp notes of green chilies. It’s a crowd-pleaser that feels like home, no matter where you are or who you are with.
Ingredients
- 16 oz Velveeta or high-melt American cheese
- 1 can (10 oz) Rotel Original Diced Tomatoes and Green Chilies
- 1 lb ground pork sausage or chorizo
- 1/2 cup heavy cream (optional for extra silkiness)
- Fresh cilantro for garnish
How to make it
- Place a large skillet over medium-high heat and add the ground sausage, breaking it apart with a wooden spoon into small crumbles.
- Cook the meat until it is deeply browned and no pink remains, which usually takes about 7-9 minutes; drain the excess fat carefully but leave a tiny bit for flavor.
- Cube your cheese into 1-inch squares to ensure even melting, then add them to a slow cooker or a heavy-bottomed pot over low heat.
- Pour the undrained can of Rotel directly over the cheese; the juices from the tomatoes are essential for the perfect consistency.
- Stir continuously as the cheese melts to prevent scorching, and once smooth, fold in the browned sausage and a splash of heavy cream if you want a professional, dip-fountain finish.
10 Fresh Summer Pasta Dishes (Step-by-Step Guide)

Why we love this
Summer pasta is all about celebrating the harvest, trading heavy cream sauces for the liquid gold of olive oil and the juice of sun-drenched vegetables. We love how a simple bowl of linguine can carry the perfume of roasted garlic and the peppery snap of fresh arugula so effortlessly. The texture is a beautiful dance between the al dente bite of the pasta and the bursting, jammy consistency of blistered cherry tomatoes. It’s a meal that feels elegant and light, perfect for dining alfresco while the sun sets.
Ingredients
- 1 lb Spaghetti or Fusilli
- 3 cloves garlic, thinly sliced
- 2 cups cherry tomatoes
- 1/2 cup extra virgin olive oil
- 1 bunch fresh basil
- Freshly grated Parmesan cheese
How to make it
- Bring a large pot of water to a rolling boil and salt it heavily—it should taste like the sea to properly season the pasta from the inside out.
- Cook the pasta 1 minute less than the package instructions suggest; this ensures it stays firm when tossed with the hot oil.
- In a cold, wide skillet, add the olive oil and sliced garlic, then turn the heat to medium-low to slowly infuse the oil without burning the garlic.
- Once the garlic is golden and fragrant, add the whole cherry tomatoes and increase the heat to medium, cooking until they start to pop and release their juices.
- Transfer the pasta directly from the water into the skillet, adding a half-cup of starchy pasta water, and toss vigorously for 2 minutes until a silky, emulsified sauce coats every strand.
12 Healthy Summer Dinner Recipes (Step-by-Step Guide)

Why we love this
Healthy summer dinners should never feel like a sacrifice, and these vibrant recipes prove that nutrition and flavor go hand in hand. We love the smoky charred edges of grilled salmon paired with a crisp, cooling cucumber salad that cleanses the palate. The aroma of lemon zest and cracked black pepper filling the kitchen creates an atmosphere of wellness and vitality. It’s about the satisfying feeling of being full but light on your feet, fueled by whole ingredients that look like a rainbow on your plate.
Ingredients
- 4 Salmon fillets (6 oz each)
- 1 bunch asparagus, woody ends trimmed
- 2 tablespoons olive oil
- 1 lemon, thinly sliced
- Sea salt and cracked black pepper
- Fresh dill for finishing
How to make it
- Preheat your oven to 400°F (200°C) or prepare your grill for medium-high direct heat cooking.
- Pat the salmon fillets completely dry with paper towels; moisture is the enemy of a good sear or crisp skin.
- Place the salmon and asparagus on a large baking sheet, drizzle with olive oil, and season generously with salt and pepper, tossing the asparagus to coat.
- Top each salmon fillet with a slice of lemon and a sprig of dill to infuse the fat of the fish with bright citrus notes during the cooking process.
- Roast for 12-15 minutes or grill for 4-5 minutes per side until the salmon flakes easily with a fork and the asparagus is tender-crisp with charred tips.
8 Viral Summer Party Dips (Step-by-Step Guide)

Why we love this
Party dips are the heartbeat of any gathering, and these viral sensations take the experience to a whole new level of luxury. We are obsessed with the whipped textures—think creamy feta beaten until it’s as light as a cloud, topped with a pool of spicy honey and toasted pistachios. The contrast between the cold, tangy base and the warm, crunchy toppings creates an explosion of flavor that keeps guests coming back. It’s an edible centerpiece that looks as good as it tastes, turning a simple cracker into a gourmet bite.
Ingredients
- 8 oz block of feta cheese
- 1/2 cup Greek yogurt
- 1 tablespoon honey
- 1 teaspoon lemon zest
- Red pepper flakes and olive oil for garnish
- Toasted pita chips
How to make it
- Crumble the feta into a food processor or high-speed blender, ensuring it is at room temperature for the smoothest possible texture.
- Add the Greek yogurt and lemon zest, then pulse until the mixture begins to break down and look like thick whipped cream.
- Stream in a tablespoon of olive oil while the motor is running to add a glossy sheen and a rich mouthfeel to the dip.
- Spread the mixture onto a shallow bowl or a wooden board using the back of a spoon to create deep swirls and “wells” for the toppings.
- Drizzle with honey, sprinkle with red pepper flakes and fresh herbs, and serve immediately with warm, toasted pita chips or crisp crudités.
9 Simple Summer Dessert Recipes (Step-by-Step Guide)
Why we love this
Summer desserts should feel like a celebration of the sun, focusing on the natural sweetness of peak-season fruit. We love the simplicity of a berry galette, where the crust is perfectly imperfect and the filling is a bubbling, ruby-red pool of strawberry and balsamic bliss. The scent of buttery pastry browning in the oven combined with the floral aroma of ripening peaches is pure nostalgia in a pan. It’s a tactile, messy, and wonderful way to end a meal, especially when topped with a melting scoop of vanilla bean ice cream.
Ingredients
- 1 store-bought or homemade pie crust
- 3 cups fresh strawberries or peaches, sliced
- 1/4 cup granulated sugar
- 1 tablespoon cornstarch
- 1 egg (for egg wash)
- Coarse sanding sugar
How to make it
- Preheat your oven to 375°F (190°C) and line a baking sheet with parchment paper to prevent the fruit juices from sticking.
- In a medium bowl, gently toss your sliced fruit with the sugar and cornstarch; the cornstarch is vital as it thickens the juices so the crust doesn’t get soggy.
- Roll out the dough into a rough 12-inch circle on the parchment paper—don’t worry about it being perfectly round, as the rustic look is part of the charm.
- Mound the fruit in the center of the dough, leaving a 2-inch border all the way around, then fold that border up and over the fruit, pleating the dough as you go.
- Brush the edges with a beaten egg and sprinkle heavily with sanding sugar before baking for 35-40 minutes until the crust is a deep golden brown and the fruit is bubbling.
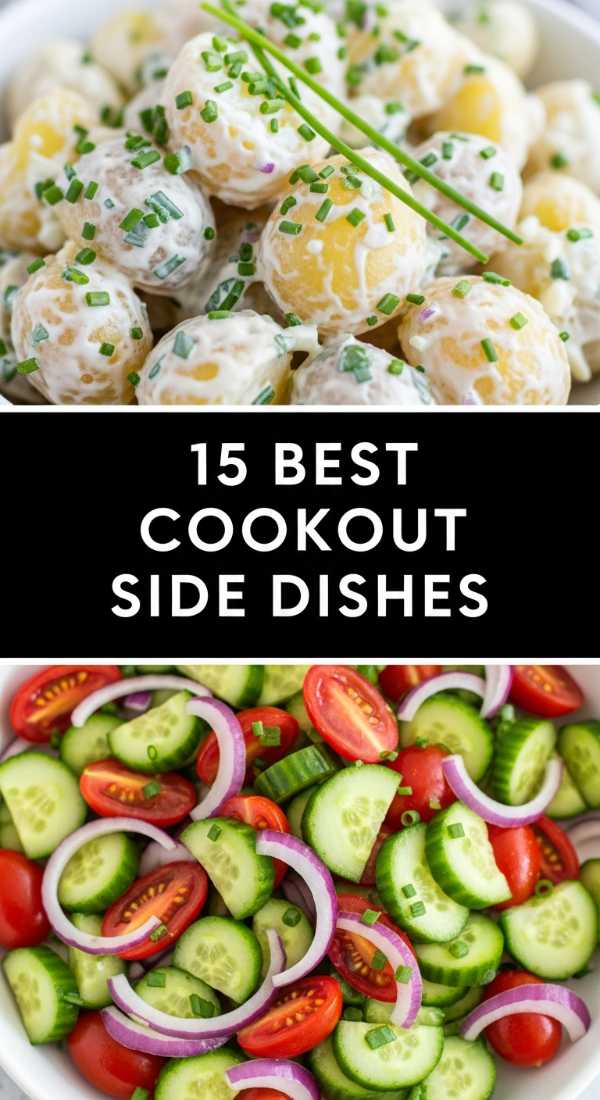
15 Best Cookout Side Dishes (Step-by-Step Guide)

Why we love this
While the grill gets all the glory, the side dishes are the true stars of a summer cookout, providing the necessary balance to smoky meats. We love a classic potato salad that’s elevated with a mustard-vinegar tang and plenty of fresh dill, offering a creamy yet sharp contrast to charred burgers. The sight of a giant bowl of Mexican Street Corn salad, flecked with cotija and chili powder, is enough to make anyone’s mouth water. These dishes bring the color, the crunch, and the variety that turns a meal into a feast.
Ingredients
- 4 cups charred corn kernels (fresh or frozen)
- 1/4 cup mayonnaise
- 1/2 cup crumbled cotija cheese
- 1/4 cup chopped cilantro
- 1 lime, juiced
- 1 teaspoon smoked paprika
How to make it
- If using fresh corn, grill the ears over high heat until charred on all sides, then carefully cut the kernels off the cob once cooled.
- In a large mixing bowl, whisk together the mayonnaise, lime juice, and smoked paprika until the dressing is smooth and slightly pink.
- Fold in the charred corn and chopped cilantro, ensuring every kernel is lightly coated in the creamy dressing.
- Add the cotija cheese last, tossing very gently so the cheese stays in visible chunks rather than melting into the sauce.
- Refrigerate for at least 30 minutes before serving to allow the smokiness of the corn and the acidity of the lime to meld together perfectly.
10 Quick Summer Lunch Ideas (Step-by-Step Guide)
Why we love this
Quick summer lunches are all about maximum flavor with minimum effort, keeping you out of a hot kitchen and back into the sunshine. We love the crisp, refreshing bite of a Caprese flatbread, where the creaminess of fresh mozzarella meets the acidic pop of balsamic glaze. The smell of fresh basil being torn over warm bread is the ultimate midday pick-me-up. It’s a meal that feels like a mini-vacation on a plate, providing a sophisticated flavor profile that takes less than ten minutes to assemble.
Ingredients
- 2 pre-made flatbreads or naan
- 1 cup cherry tomatoes, halved
- 8 oz fresh mozzarella pearls
- Fresh basil leaves
- Balsamic glaze for drizzling
- Olive oil
How to make it
- Lightly brush your flatbreads with olive oil and toast them in a toaster oven or on a dry skillet for 2-3 minutes until the edges are golden and crisp.
- Immediately top the warm bread with the mozzarella pearls so they just begin to soften and become slightly gooey from the residual heat.
- Scatter the halved cherry tomatoes over the cheese, pressing them down slightly so they stay in place.
- Tear the fresh basil leaves by hand rather than chopping them; this prevents the edges from bruising and releases more of the aromatic oils.
- Finish with a generous drizzle of balsamic glaze and a sprinkle of flaky sea salt, then cut into wedges for an easy, handheld meal.
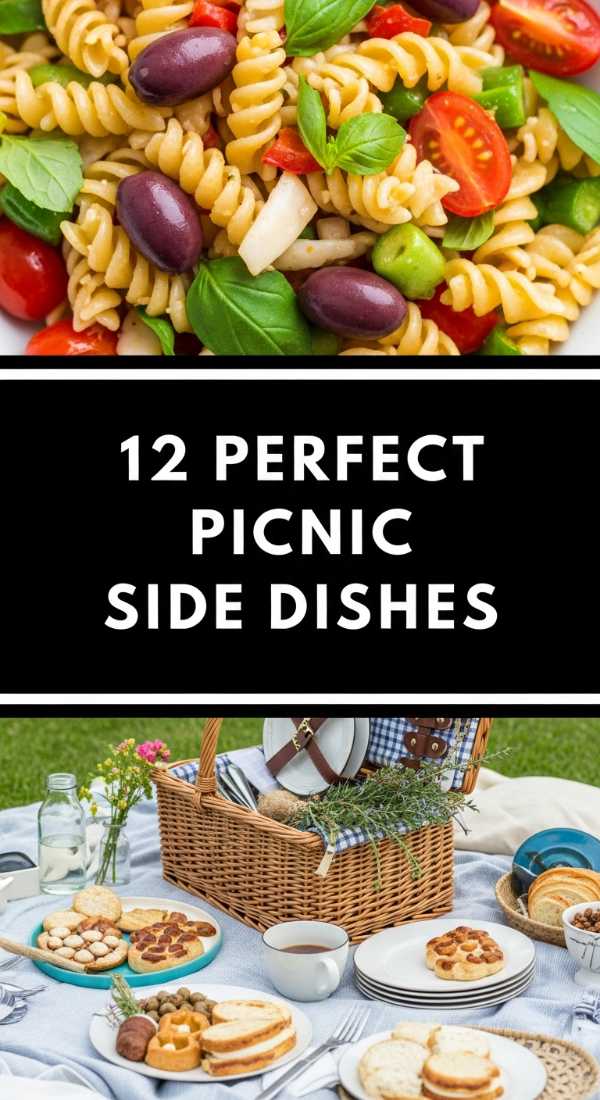
12 Perfect Picnic Side Dishes (Step-by-Step Guide)

Why we love this
Picnic sides need to be durable, portable, and absolutely delicious at room temperature, and these recipes hit every mark. We love the heartiness of a tortellini pesto salad, where the cheese-filled pasta acts like a sponge for vibrant green herbs and salty parmesan. The texture is a delightful mix of chewy pasta, crunchy pine nuts, and juicy sun-dried tomatoes. It’s a dish that looks beautiful in a glass jar and tastes like an Italian garden, making even a simple park bench feel like a luxury dining spot.
Ingredients
- 1 lb cheese tortellini
- 1/2 cup basil pesto
- 1/4 cup sun-dried tomatoes, chopped
- 1/4 cup toasted pine nuts
- 2 cups baby spinach
- Fresh lemon juice
How to make it
- Boil the tortellini in salted water according to the package directions, but be careful not to overcook them, as they will soften further once dressed.
- Drain the pasta and immediately rinse with cold water to stop the cooking process and prevent the tortellini from sticking together.
- In a large bowl, whisk the pesto with a squeeze of fresh lemon juice to brighten the flavor and thin the consistency slightly for easier coating.
- Add the cooled pasta, sun-dried tomatoes, and toasted pine nuts to the bowl and toss thoroughly until every fold of the pasta is filled with pesto.
- Fold in the baby spinach last; the leaves will wilt just slightly from the pasta, creating a beautiful texture without becoming mushy.
8 Best Kabobs On Grill (Step-by-Step Guide)
[IMAGE_10]
Why we love this
Kabobs are the ultimate grill-master’s tool, offering a perfect ratio of charred protein to caramelized vegetables in every single bite. We love the visual appeal of these colorful skewers, lined up on a platter like edible jewels. The sound of the sizzle as the fat hits the coals, combined with the sweet and savory aroma of a honey-garlic glaze, is the quintessence of summer cooking. There’s something so satisfying about the smoky, charred edges of a bell pepper paired with tender, juicy steak or shrimp.
Ingredients
- 1.5 lbs top sirloin or large shrimp
- 2 bell peppers (any color), cut into chunks
- 1 red onion, cut into wedges
- 1 cup pineapple chunks
- 1/2 cup teriyaki or BBQ sauce
- Wooden or metal skewers
How to make it
- If using wooden skewers, soak them in water for at least 30 minutes to prevent them from catching fire on the grill.
- Cut your meat and vegetables into uniform 1-inch pieces; this is the most important step for ensuring that everything cooks at the same rate.
- Thread the ingredients onto the skewers in a repeating pattern, leaving just a tiny bit of space between each item so the heat can circulate and brown all sides.
- Preheat the grill to medium-high heat and lightly oil the grates to prevent the lean meat from sticking.
- Grill the skewers for 8-10 minutes, turning every 2-3 minutes, and only brush on the sauce during the last 2 minutes of cooking to prevent the sugars in the sauce from burning.
Conclusion: The Art of the Simple Board
As we’ve seen, the simple food board trend is so much more than just a viral moment—it’s a philosophy of eating that celebrates freshness, variety, and the joy of sharing. By taking these individual summer recipes and arranging them thoughtfully on a board, you transform a standard meal into an interactive experience. I hope these guides inspire you to slow down, fire up the grill, and create your own beautiful spreads this season. Happy hosting!