

Why Everyone is Obsessed With These Easy DIY Food Boards
There is something inherently magical about gathering around a table, eyes widening as you behold a sprawling, colorful board overflowing with life. It’s more than just a snack; it’s a sensory experience that grounds us in the present moment, inviting us to linger over conversations and shared tastes. Lately, my obsession has pivoted from simple cheese platters to something much more vibrant and soulful: boards that feature the aromatic, living beauty of home-grown herbs. It’s that ‘just-picked’ fragrance that transforms a standard Tuesday dinner into a curated event.
We’ve all seen the viral posts of lush, green-flecked spreads, but the real secret isn’t just the arrangement—it’s the freshness of the ingredients. When you snip a sprig of rosemary or a leaf of basil from your own windowsill to place next to a wedge of brie, you’re not just styling; you’re infusing your home with a sustainable, earthy luxury. It’s about that tactile joy of digging in the dirt and then reaping the flavorful rewards, creating a bridge between your living space and your plate.
How to Grow a Lush Herb Garden for Fresh Kitchen Flavors
Why we love this
The sheer decadence of walking three steps to your garden to harvest vibrant, oil-rich herbs is a game-changer for any home cook. Imagine the scent of crushed mint mingling with the steam of your morning tea, or the sharp, woody aroma of thyme as you prep a savory board for friends. This process connects you to the seasons, providing a deep sense of satisfaction as you watch tiny seeds transform into a lush canopy of green that tastes infinitely better than anything found in a plastic grocery store clamshell.
Essential Elements:
- High-quality organic potting mix
- A sunny windowsill or patio space
- Seeds or starter plugs (Basil, Thyme, Rosemary)
- A watering can with a fine rose attachment
- Balanced liquid organic fertilizer
How to make it
- Begin by selecting a location that receives at least 6 to 8 hours of bright, indirect sunlight daily, as most culinary herbs are sun-worshippers. If you are planting outdoors, ensure the soil is well-draining by mixing in compost and a bit of perlite to prevent root rot.
- Fill your chosen containers with the potting mix, leaving about an inch of space from the rim to allow for watering without overflow. Gently tamp down the soil to remove large air pockets but keep it light and fluffy for root expansion.
- When transplanting starter plugs, dig a small hole twice the width of the root ball and place the plant so the top of the root ball is level with the soil surface. Press the soil firmly around the base to ensure good root-to-soil contact.
- Water the plants immediately using a gentle stream; you want the soil to be moist like a wrung-out sponge, never soggy. Watch for the first signs of new growth, which usually appears within 7-10 days, signaling that the roots have successfully established.
- Prune your herbs regularly by snipping just above a leaf node; this encourages the plant to branch out and become bushier rather than leggy. Aim to harvest in the morning when the essential oils are at their peak concentration for the best flavor profile.
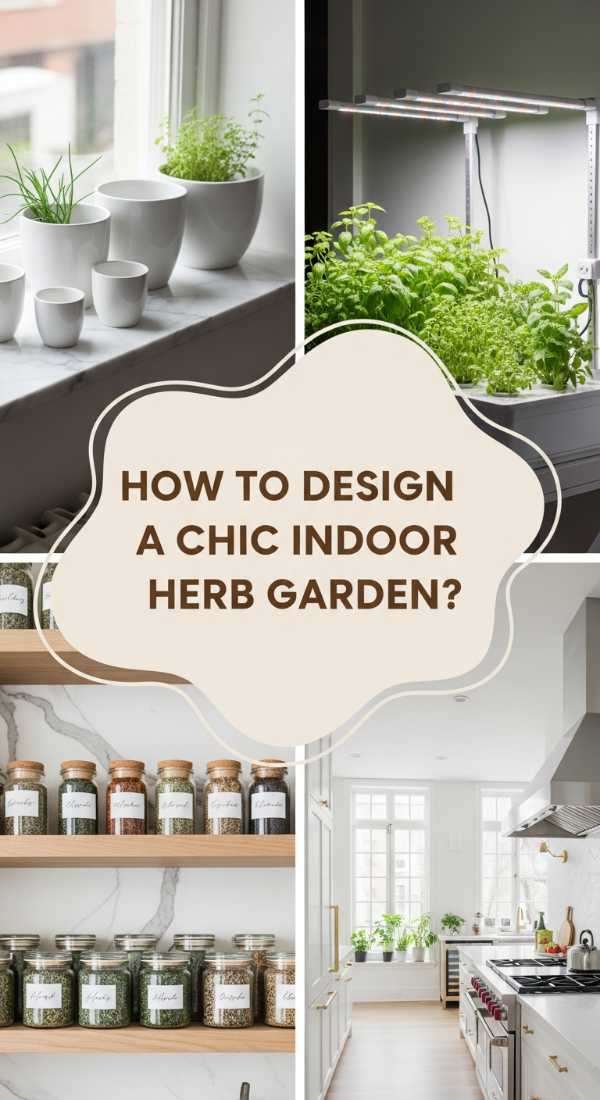
How to Design a Chic Indoor Herb Garden for Sustainable Urban Living
Why we love this
For those of us in urban apartments, an indoor herb garden is a living piece of art that purifies the air and softens the hard lines of modern decor. There is a profound coziness in seeing a row of sleek, ceramic pots lined up on a marble countertop, their emerald leaves glowing under the soft hum of grow lights. It turns a functional kitchen into a sanctuary, where the act of garnishing a food board becomes a meditative ritual of snipping and arranging fresh life into your daily routine.
Essential Elements:
- Uniform ceramic or stone pots with drainage holes
- Drip trays to protect surfaces
- Full-spectrum LED grow lights (if natural light is low)
- Slow-release organic fertilizer granules
- Dwarf herb varieties (like ‘Spicy Globe’ basil or ‘Chives’)
How to make it
- Choose containers that match your interior aesthetic but prioritize function by ensuring they have adequate drainage holes. Place a layer of small pebbles at the bottom of the tray to catch excess water and increase local humidity around the plants.
- If your apartment lacks southern-facing windows, install a full-spectrum LED grow light approximately 6-12 inches above the tops of the plants. Set a timer for 12-14 hours a day to simulate a natural summer sun cycle, which is crucial for preventing the herbs from reaching and becoming weak.
- Use a high-quality indoor-specific potting mix that is sterile to avoid bringing gnats into your living space. When planting, leave enough room between different herbs to allow for air circulation, which prevents fungal issues in enclosed environments.
- Monitor moisture levels by sticking your finger an inch into the soil; if it feels dry, apply room-temperature water directly to the soil, avoiding the leaves to prevent spotting. Visual cues like drooping leaves in cilantro or pale colors in basil usually indicate a need for more light or specific nutrients.
- Fertilize sparingly—every 4-6 weeks—using a half-strength liquid solution. Over-fertilizing can lead to fast growth with very little flavor, so the goal is steady, robust development rather than explosive size.
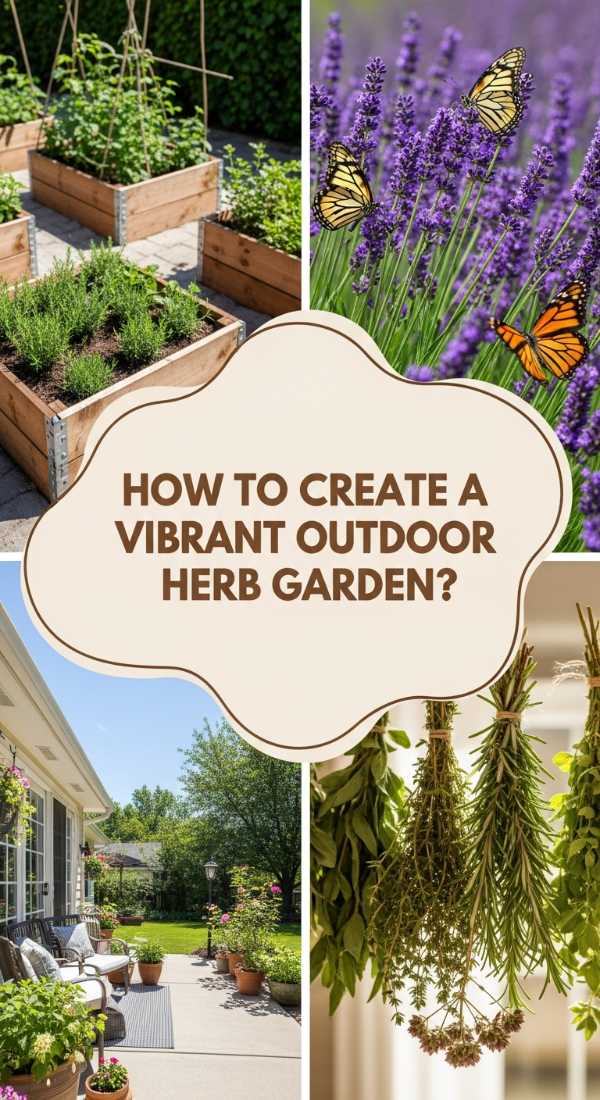
How to Create a Vibrant Herb Garden Outdoor for Summer Harvest Joy
Why we love this
There is nothing quite like the feeling of stepping barefoot into a sun-drenched backyard to gather herbs for a summer solstice food board. The outdoor garden is a riot of texture and scent, where the heat of the sun coaxes out the sticky resins of rosemary and the peppery bite of oregano. It is a place of abundance where the buzzing of bees and the rustle of leaves create a soundtrack for your culinary creativity, making every meal feel like a rustic farm-to-table celebration.
Essential Elements:
- Raised garden bed or dedicated garden plot
- Rich garden soil mixed with aged manure
- Mulch (straw or wood chips)
- Drip irrigation system or soaker hose
- Tall herb varieties (Dill, Fennel, Lovage)
How to make it
- Prepare your garden site by clearing all weeds and tilling the soil to a depth of 10-12 inches. Incorporate a generous amount of organic compost to provide a nutrient-rich foundation that will support heavy summer growth.
- Design your layout with height in mind: place taller herbs like dill and fennel at the back and shorter, creeping herbs like thyme and oregano at the front edges. This ensures every plant receives maximum sunlight and creates a beautiful, tiered visual effect.
- Install a drip irrigation system to deliver water directly to the base of the plants. This is the most efficient method to keep the roots hydrated during peak summer heat while keeping the foliage dry to prevent powdery mildew.
- Apply a 2-inch layer of mulch around the base of the plants to retain moisture and suppress weed competition. This also keeps the roots cool, which is essential for temperature-sensitive herbs like cilantro that tend to bolt in the heat.
- Monitor for pests like aphids or caterpillars; if you spot them, use a sharp blast of water from the hose or an organic neem oil spray in the evening. Harvest frequently to keep the plants from flowering, as the flavor of the leaves often becomes bitter once the plant shifts its energy to seed production.
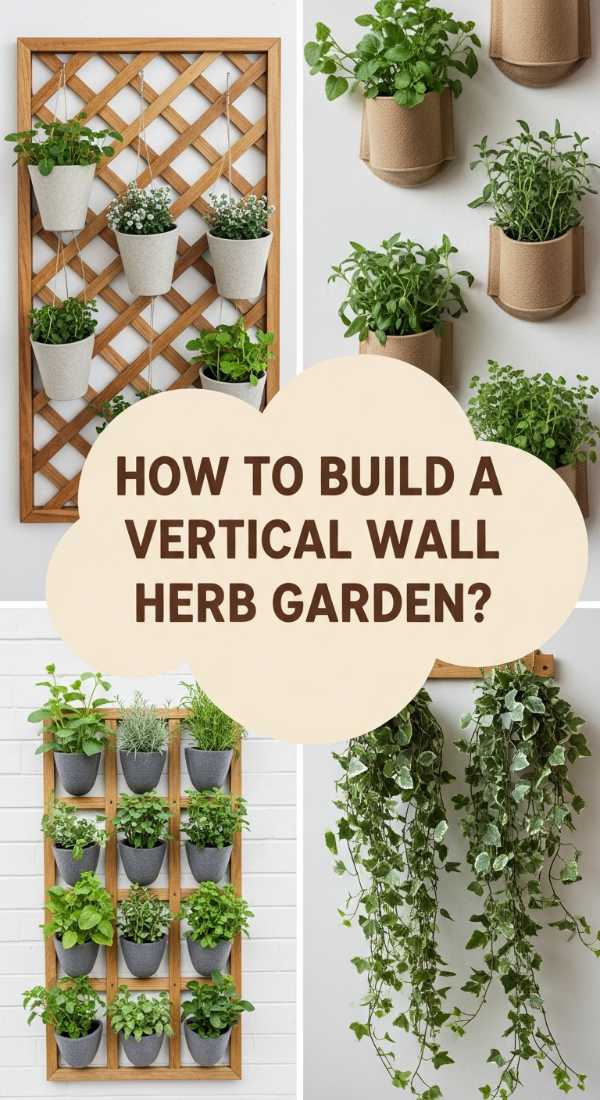
How to Build a Vertical Wall Herb Garden for Small Space Efficiency
Why we love this
The vertical wall garden is a true architectural marvel for the modern minimalist, turning a blank wall into a cascading waterfall of edible greens. It’s the perfect solution for balconies or tiny kitchens, maximizing every square inch of space while creating a stunning visual focal point. There is something incredibly satisfying about reaching up to pluck a leaf of sage, the velvety texture soft against your fingertips, knowing you’ve mastered the art of high-density gardening with style.
Essential Elements:
- Wall-mounted planters or felt pocket system
- Secure wall anchors and brackets
- Lightweight potting medium (coco coir based)
- Moisture-wicking mats
- Compact herb varieties (Mint, Parsley, Chervil)
How to make it
- Securely mount your vertical structure to a wall that receives adequate light, using heavy-duty anchors to support the weight of wet soil. Ensure the structure is perfectly level to allow for even water distribution across all levels of the garden.
- Fill the pockets or containers with a lightweight, coco-coir-based potting medium. Standard garden soil is often too heavy for vertical systems and may compact too much, choking the delicate root systems of your herbs.
- Insert your plants into the pockets, ensuring the root balls are fully covered and the plants are angled slightly outward. This positioning allows the foliage to drape naturally and ensures that lower levels aren’t completely shaded by the growth above.
- Watering a vertical garden requires a ‘top-down’ approach; water the top row and allow the excess to slowly saturate the lower levels. Many systems include a built-in reservoir or wicking mat to help regulate this process and prevent the bottom plants from becoming waterlogged.
- Check the moisture levels daily, as vertical systems tend to dry out faster due to increased air exposure. If the felt or containers feel light, it’s time to hydrate. Rotate the plants every few weeks if the light source is one-sided to ensure balanced, symmetrical growth.
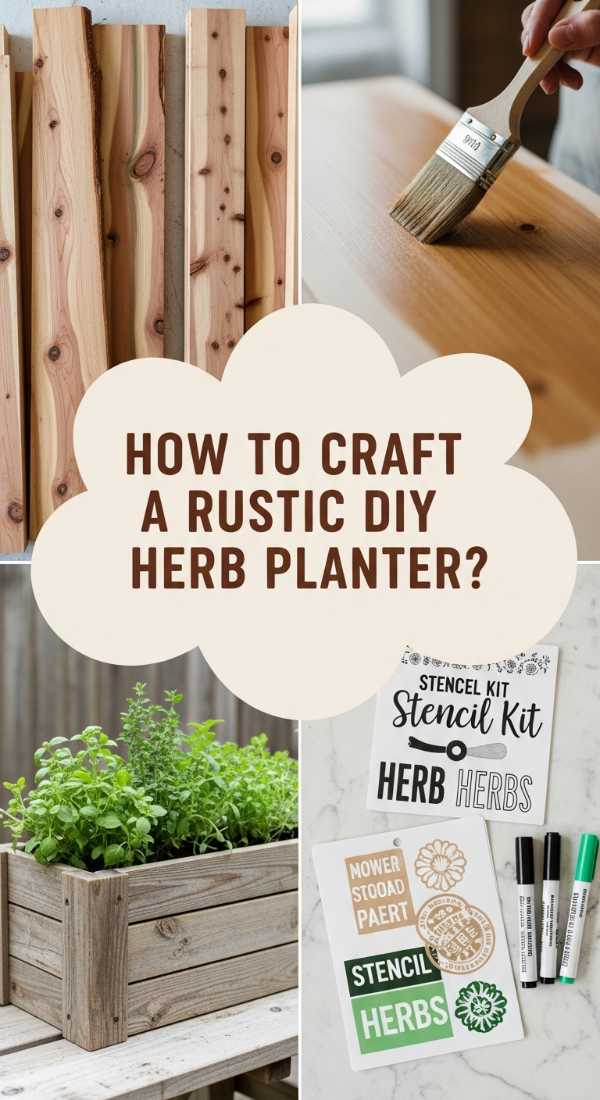
How to Craft a Rustic DIY Herb Planter for Personalized Garden Style
Why we love this
Crafting your own rustic planter adds a layer of soul and story to your home that store-bought items simply can’t match. The scent of fresh-cut cedar or the weathered texture of reclaimed wood provides a beautiful, organic contrast to the delicate lace of cilantro leaves. It’s a project that celebrates the ‘perfectly imperfect,’ resulting in a piece of decor that feels like a cherished heirloom, perfectly suited for showcasing on a kitchen island during a brunch gathering.
Essential Elements:
- Untreated Cedar or Reclaimed wood planks
- Galvanized nails or wood screws
- Plastic liner or landscape fabric
- Wood stain or outdoor sealant (food-safe)
- Hand saw and power drill
How to make it
- Measure and cut your wood planks into four sides and a base; cedar is highly recommended because it is naturally rot-resistant and doesn’t require chemical treatments. Sand the edges of the wood to remove any splinters while maintaining the natural grain’s character.
- Assemble the box by pre-drilling holes to prevent the wood from splitting, then secure the sides to the base using galvanized screws. For a truly rustic look, you can use decorative corner brackets or leave the joinery simple and clean.
- Drill several 1/2-inch drainage holes in the bottom of the planter. Line the interior with heavy-duty plastic (poking holes through the drainage spots) or landscape fabric to protect the wood from direct contact with moist soil, extending the life of your planter.
- Apply a food-safe wood sealant or a natural oil like linseed to the exterior of the wood. This protects the planter from graying in the sun and helps it repel water, keeping the rustic finish looking vibrant for years.
- Fill with your herb-ready soil mix and plant a variety of textures—think the spiky needles of rosemary next to the broad, soft leaves of sage. This creates a mini-landscape that is as beautiful to look at as it is functional for your cooking.
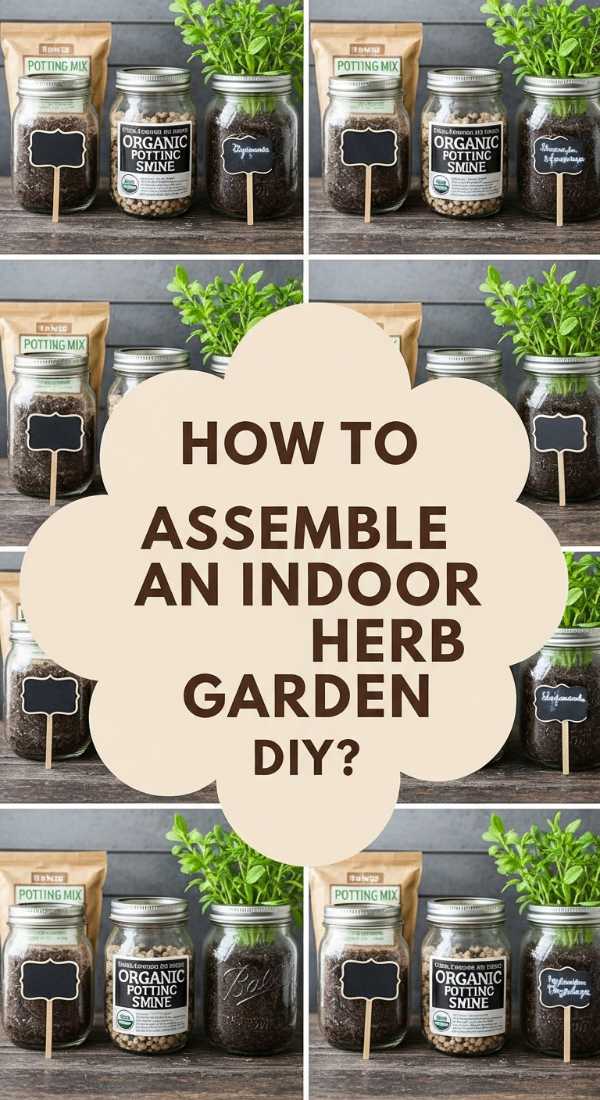
How to Assemble an Indoor Herb Garden DIY for Year Round Freshness

Why we love this
An indoor DIY herb assembly is the ultimate luxury for the home chef who refuses to let the seasons dictate their flavor palette. Even when snow is piling up outside, your kitchen can smell like a Mediterranean summer, filled with the spicy, clove-like scent of fresh basil. This setup provides a constant, reliable source of greens that are tender and mild, perfect for folding into soft cheeses or scattering over a charcuterie board to add a pop of life and a hit of zingy freshness.
Essential Elements:
- Glass mason jars or recycled tins
- Active charcoal (for drainage-less containers)
- Potting soil with perlite
- Chalkboard labels and markers
- Variety of herb seeds (Chives, Oregano, Basil)
How to make it
- If using containers without drainage holes, like mason jars, place a 1-inch layer of aquarium gravel or pebbles at the bottom, followed by a thin layer of active charcoal. This ‘false bottom’ prevents water from sitting against the roots and causing rot.
- Fill the remaining space with a high-quality potting mix, leaving about an inch at the top. Use a mix that is specifically designed for container gardening to ensure it has the right balance of nutrients and aeration for indoor growth.
- Sow your seeds according to the depth on the packet—usually quite shallow for herbs. Mist the surface of the soil with a spray bottle to hydrate without displacing the seeds, and cover the top of the jar with plastic wrap to create a mini-greenhouse until sprouts appear.
- Place the jars in the brightest spot in your home. If growth appears ‘leggy’ or pale, it’s a visual cue that the plants need more light; consider moving them closer to the window or supplementing with a desk lamp fitted with a grow bulb.
- Thin the seedlings once they reach two inches tall, leaving only the strongest plant per jar. This prevents competition for nutrients and ensures the remaining plant has enough space to develop a robust root system and plenty of flavorful leaves.
How to Plan an Aesthetic Herb Garden Design for Elevated Backyard Beauty

Why we love this
Designing an aesthetic herb garden is about elevating the functional into the realm of high art. Imagine a parterre garden where purple-leafed basil sits alongside silvery sage and the bright yellow flowers of blooming dill. It’s a tapestry of color and form that delights the eye before it ever touches the palate. This approach turns your backyard into a curated gallery of nature, where every path and every plant choice is a deliberate step toward a more beautiful, delicious lifestyle.
Essential Elements:
- Flagstone or gravel for pathways
- Evergreen hedging (like Boxwood) for structure
- Decorative urns or statuary
- A mix of herb colors (Purple Basil, Golden Oregano)
- Solar-powered garden lighting
How to make it
- Start with a formal layout, such as a cross or a circle, using paths made of pea gravel or flagstone to define the growing areas. This ‘bones’ of the garden provide year-round visual interest even when the herbs are harvested back in the winter.
- Incorporate ‘anchor’ plants that provide structure; woody herbs like rosemary can be pruned into formal cones or globes, while lavender can be planted in long, sweeping drifts to create a sense of movement and soft, purple haze.
- Play with color theory by grouping plants with contrasting foliage. Place the deep, dark burgundy of ‘Purple Ruffles’ basil next to the bright, neon chartreuse of golden oregano. This contrast makes the garden feel vibrant and intentionally designed.
- Use decorative elements like a central birdbath or weathered stone markers to add a touch of timeless elegance. These focal points draw the eye through the garden and create a sense of ‘place’ rather than just a patch of dirt.
- Maintain the aesthetic by keeping the paths clear and the edges of the beds sharp. Regular deadheading of flowers (unless you want the seeds) keeps the foliage looking lush and prevents the ‘scraggly’ look that can happen to herbs late in the season.
How to Master Growing Herbs Indoors for Constant Culinary Inspiration
Why we love this
Mastering the indoor herb garden is like having a secret ingredient always at the ready, a direct line to culinary inspiration that never sleeps. The tactile experience of running your hands through a pot of mint and inhaling that cool, refreshing scent can spark a hundred new ideas for your next food board. It’s about the empowerment of being a producer, not just a consumer, and the joy that comes from the simple, quiet act of nurturing something green and watching it thrive under your care.
Essential Elements:
- Hygrometer (to monitor humidity)
- Small oscillating fan for air circulation
- Liquid seaweed fertilizer
- Precision pruning shears
- Self-watering pots
How to make it
- Invest in a hygrometer to track the humidity in your home; indoor air is often too dry for herbs, especially in winter. Aim for 40-50% humidity, which you can achieve by grouping plants together or using a small humidifier nearby.
- Set up a small fan to blow gently over your plants for a few hours a day. This ‘mechanical stress’ mimics the wind outdoors, which actually strengthens the stems of the plants and prevents the buildup of stagnant air where pests like spider mites thrive.
- Use self-watering pots to provide a consistent level of moisture. These pots have a reservoir at the bottom that the plant ‘drinks’ from as needed, taking the guesswork out of watering and preventing the cycle of wilting and over-saturating.
- Prune with intention. Instead of just taking the leaves you need, cut the stems back to just above a set of new leaves. This signals the plant to produce two new stems from that point, effectively doubling your harvest over time.
- Every two weeks, add a small dose of liquid seaweed fertilizer to your water. This provides trace minerals that help the plants maintain their vibrant green color and intense flavor profiles even when grown in the limited environment of a pot.
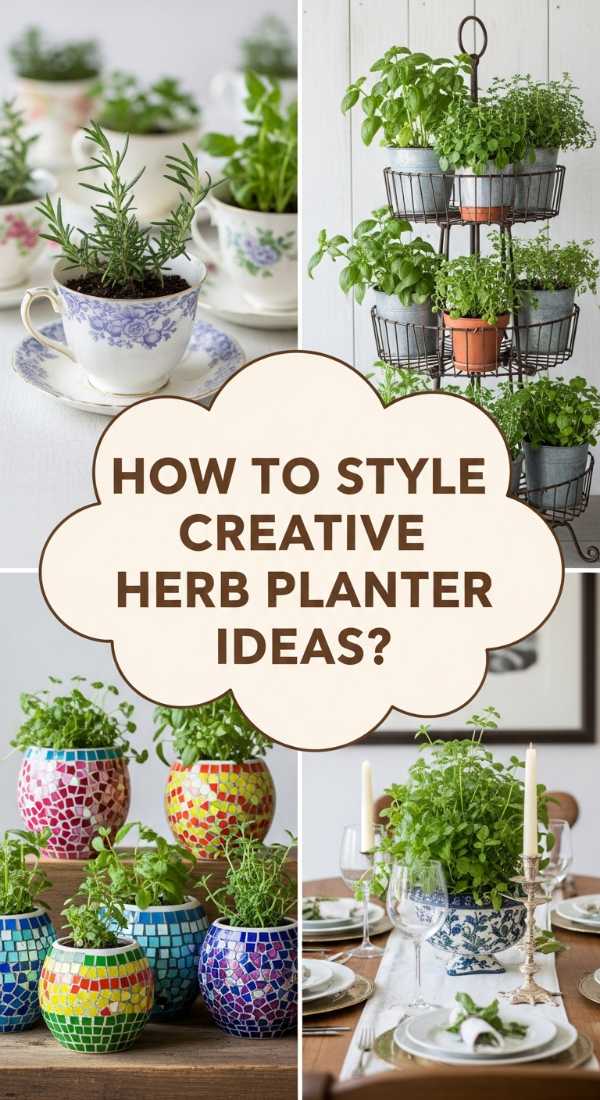
How to Style Creative Herb Planter Ideas for Unique Home Decor
Why we love this
Creative styling turns your herb garden into a conversation piece, a way to express your personality through living decor. Whether it’s herbs growing out of a vintage tea tin or a hanging macrame installation of trailing mint, these unique touches make your home feel layered and lived-in. It’s about the whimsy of finding beauty in the unexpected, and the delight your guests will feel when they realize the ‘decor’ on your sideboard is actually the garnish for their appetizers.
Essential Elements:
- Upcycled containers (tins, crates, teapots)
- Macrame plant hangers
- Decorative moss or river stones
- Copper plant labels
- Assorted herbs with different growth habits
How to make it
- Scour thrift stores for unique vessels like vintage metal breadboxes or ceramic teapots. If the item doesn’t have a drainage hole, use a diamond-tipped drill bit to carefully add one, or use the ‘double-pot’ method where the herb stays in a plastic nursery pot inside the decorative vessel.
- Create a ‘living wall’ or a ‘floating garden’ by using macrame hangers at varying heights in front of a sunny window. This adds vertical interest and keeps your counters clear for food prep while still keeping the herbs within arm’s reach.
- Top the soil with decorative moss or smooth river stones. Not only does this look polished and professional, but it also helps retain soil moisture and prevents soil from splashing onto the leaves when you water.
- Use elegant copper or slate labels to identify your herbs. Hand-writing the names adds a personal, artisanal touch that makes the collection feel like a curated botanical exhibit.
- Group your creative planters in ‘vignettes’ of three or five. Vary the heights by using books or small wooden blocks to create a dynamic, tiered look that draws the eye and makes the herb collection feel like a cohesive part of your home’s design.
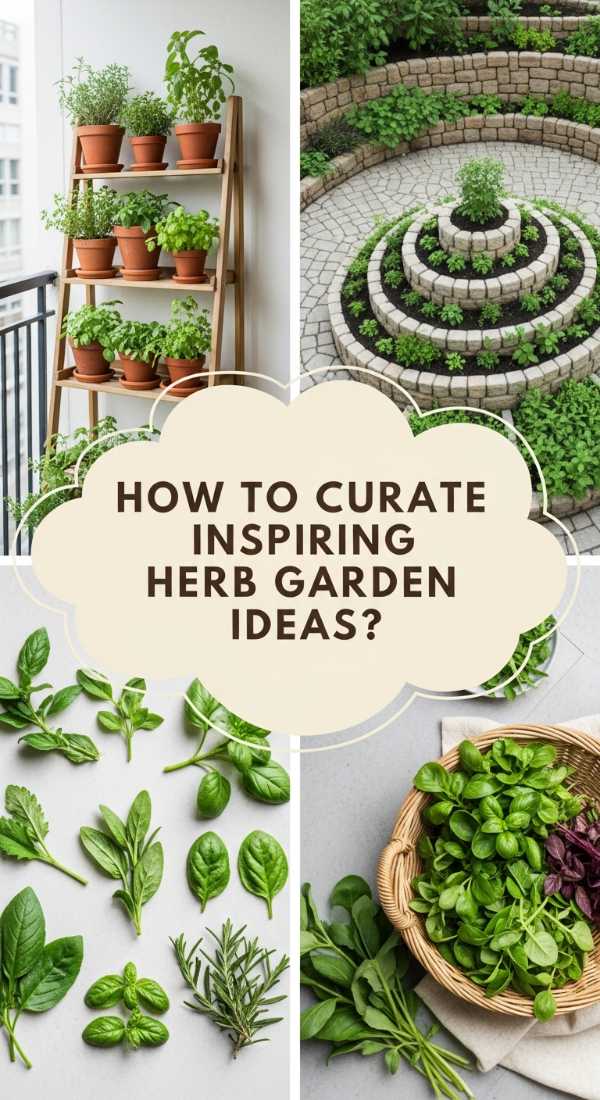
How to Curate Inspiring Herb Garden Ideas for Every Green Space
[IMAGE_10]
Why we love this
Curating your herb garden is the final step in creating a space that truly reflects your culinary soul. It’s about more than just growing plants; it’s about choosing themes—an ‘Italian Garden’ with basil and oregano, or a ‘Tea Garden’ with chamomile and lemon balm. This intentionality brings a sense of harmony and purpose to your gardening, making every harvest feel like a curated selection for a specific mood or occasion, and turning your food boards into a storytelling medium.
Essential Elements:
- Themed herb collections (Culinary, Medicinal, Aromatic)
- Seasonal planting calendar
- Journal for tracking growth and recipes
- Companion plants (like Marigolds or Nasturtiums)
- Ergonomic gardening tools
How to make it
- Define the ‘vibe’ of your garden space based on your favorite flavors. If you love spicy food, curate a collection of Thai basil, cilantro, and chives; if you prefer relaxation, focus on lavender, lemon verbena, and mint.
- Incorporate edible flowers like nasturtiums or pansies into your herb beds. These ‘companion plants’ provide a splash of brilliant color and are a stunning, peppery addition to any food board, bridging the gap between the garden and the plate.
- Keep a garden journal to record which varieties thrived and which recipes they inspired. This helps you refine your curation year after year, ensuring that your ‘green space’ becomes more productive and more beautiful with every season.
- Practice ‘succession planting’ by starting new seeds every few weeks. This ensures you always have young, tender leaves ready for harvest, preventing the gap that occurs when older plants begin to go to seed or become woody.
- Invest in high-quality, ergonomic tools that make the act of gardening a pleasure. A sharp pair of snips and a comfortable trowel encourage you to spend more time in your garden, fostering that deep connection to the earth that makes your food boards so special.
The Final Sprig: Embracing the Herb-Infused Lifestyle
As we’ve explored, the obsession with DIY food boards isn’t just about the food—it’s about the lifestyle of freshness, creativity, and connection. By bringing an herb garden into your home, whether on a vast backyard plot or a tiny kitchen windowsill, you are claiming a piece of the natural world for yourself. You are choosing to slow down, to smell the rosemary, and to share something truly handcrafted with the people you love. So, go ahead—plant that first seed, snip that first leaf, and watch as your table transforms into a viral-worthy masterpiece of living flavor.