

Why Every Child Needs a Trip to the Ultimate Play Haven
There is a specific kind of magic that happens when the screen goes dark and the screen door slams shut. It is the sound of pure, unadulterated freedom—the rhythm of sneakers hitting the grass and the high-pitched chorus of ‘watch me!’ that defines the golden years of childhood. As a parent, I’ve realized that providing a space for this energy isn’t just about keeping them busy; it’s about nurturing their souls in a world that often moves too fast.
The ‘Ultimate Play Haven’ isn’t just a physical location; it’s a feeling. It’s the scent of sun-warmed cedar, the cool splash of water on a humid afternoon, and the tactile wonder of digging for buried treasure in a patch of dirt. By creating these dedicated spaces, we are giving our children the tools to build their own worlds, develop their bodies, and foster a lifelong love for exploration and creativity. Let’s dive into how you can bring this haven home.
How to Build a DIY Playground for Endless Summer Fun

Why we love this
There is an incredible sense of pride that comes from watching your kids swing on something you built with your own two hands. We love this project because it transforms a standard backyard into a custom destination, smelling of fresh sawdust and sun-bleached wood. The tactile experience of the smooth, sanded timber under tiny palms and the rhythmic creak of the chains create a sensory backdrop for those long, hazy July afternoons that stay in your memory forever.
Essential Elements:
- Pressure-treated or cedar lumber
- Heavy-duty swing hangers and chains
- Stainless steel hardware and carriage bolts
- A-frame brackets for stability
- Rubber mulch or wood chips for safety surfacing
How to make it
- Measure and mark your site to ensure a 6-foot safety buffer around all equipment. Clear the grass and level the ground completely using a spirit level; this visual cue is critical to prevent the structure from tilting during use.
- Construct the A-frame legs by bolting the 4×4 posts into the top brackets. Ensure the bolts are tightened until the washer is slightly recessed into the wood for a secure, flush finish that won’t snag clothing.
- Raise the crossbeam with the help of a partner, sliding it into the brackets. Check for levelness again; the beam should be perfectly horizontal to ensure the swings track straight.
- Drill pilot holes for the swing hangers, spacing them at least 20 inches apart to prevent mid-air collisions. Screw them in until the threads are no longer visible and the hanger is rock-solid.
- Attach your swings and test the tension. Finish the wood with a child-safe, weather-resistant sealant. Let it cure for at least 48 hours until the surface no longer feels tacky to the touch.
How to Design a Natural Outdoor Playground for Earthy Creative Play
Why we love this
A natural playground feels like a secret garden where the boundaries between play and the environment blur beautifully. We love the earthy palette of deep greens, slate grays, and bark browns that blend seamlessly into your landscaping. The aroma of crushed mint and damp earth fills the air as children navigate log balance beams and stone stepping paths, encouraging a grounded, calm form of play that fosters a deep connection to the living world around them.
Essential Elements:
- Locally sourced wooden logs (de-barked)
- Large, smooth river boulders
- Child-safe aromatic plants like lavender and mint
- Woven willow tunnels or teepees
- Pea gravel or sand for texture transitions
How to make it
- Map out a winding path through your existing garden, using visual cues like natural slopes to dictate where a log beam or a stone cluster should go. Excavate the path to a depth of 4 inches.
- Install your heavy elements first. Sink logs at least 1/3 of their diameter into the ground and pack the surrounding soil tightly; the log should not wiggle when stepped on by an adult.
- Arrange boulders in ‘nodes’ for sitting or climbing. Ensure each stone is ‘self-seated’—meaning it won’t shift. If a stone wobbles, use smaller gravel underneath to shim it into a permanent, stable position.
- Plant a ‘sensory border’ using sturdy perennials. Space them so they can grow into a lush thicket that provides natural shade and a fragrant aroma when brushed against during play.
- Fill the remaining path areas with pea gravel. Rake it smooth and check that the depth is consistent across the entire play zone to prevent tripping hazards on hidden roots.
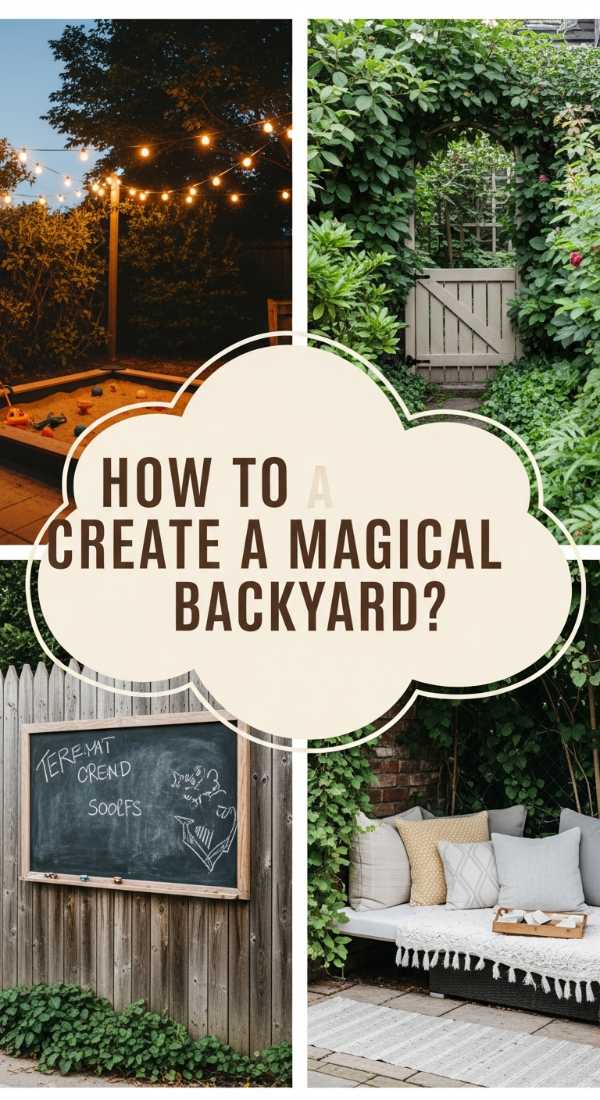
How to Create Backyard Ideas for Kids for a Magical Garden Retreat
Why we love this
This approach is all about whimsy and the feeling of stepping into a storybook. We love the way fairy lights twinkle against the twilight sky and the soft rustle of ribbons hanging from low-hanging branches. It’s a space that feels curated yet wild, where the air is filled with the sweet scent of jasmine and the soft glow of lanterns, creating a sanctuary for quiet reading, tea parties, and the kind of magic that only happens at dusk.
Essential Elements:
- Weatherproof fairy lights or festoon lighting
- Outdoor-grade rugs and floor cushions
- A low-profile wooden pallet table
- Sheer outdoor curtains or bunting
- Potted flowering plants (sunflowers or snapdragons)
How to make it
- Select a corner of the yard with overhead tree canopy or a pergola to create a sense of enclosure. Sweep the area clean of debris and lay down a moisture-barrier tarp before placing your outdoor rug.
- Sand down a wooden pallet until it is silky smooth, then paint it in a soft pastel or a vibrant jewel tone. This serves as your central ‘gathering hub’ for snacks and crafts.
- String your lights high enough to be out of reach but low enough to cast a warm, golden glow. Use plastic clips instead of staples to avoid damaging the wires; a visual cue of a successful setup is a gentle ‘drape’ rather than a tight pull.
- Layer your floor cushions around the table. Choose high-density foam inserts that provide comfort and won’t flatten immediately under weight.
- Hang bunting or ribbons from the branches. Ensure they are secured with slip-knots so they can be easily moved or adjusted as the trees grow through the season.
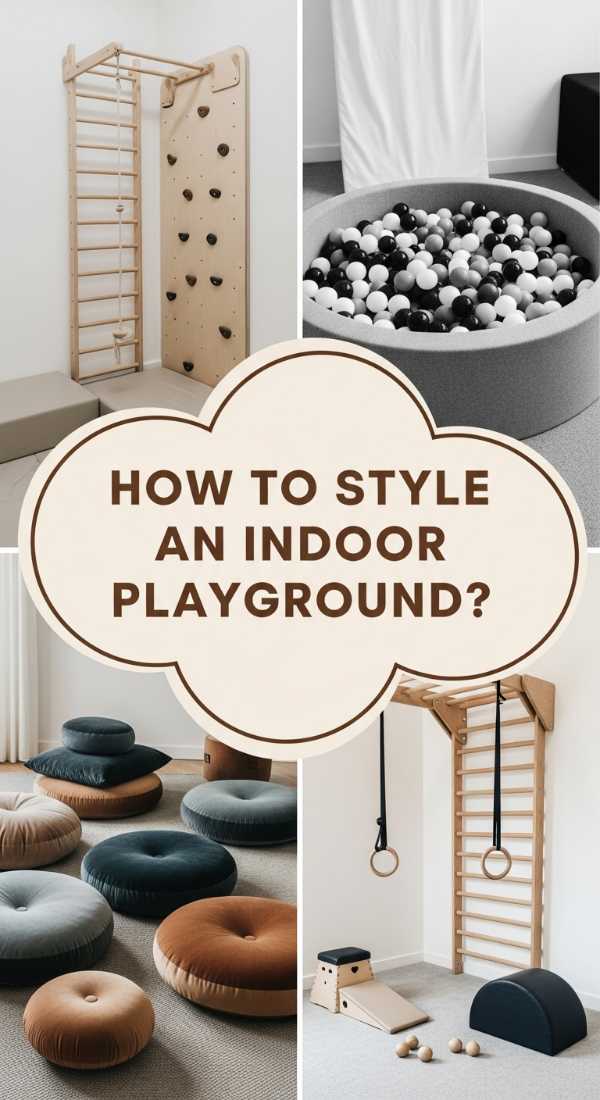
How to Style an Indoor Playground for Active Rainy Day Adventures
Why we love this
When the clouds roll in, the energy doesn’t have to stay bottled up. We love this indoor haven because it uses soft textures and vibrant colors to create a safe harbor for movement. The muffled ‘thump’ of a soft landing, the smooth slide of a wooden ramp, and the bright, clean aesthetic make the indoors feel just as expansive as the outdoors, turning a rainy Tuesday into an epic adventure in agility and joy.
Essential Elements:
- Modular foam play blocks
- A wall-mounted Swedish ladder or climbing ribs
- Thick, high-impact gymnastic mats
- An indoor fabric swing or ‘pod’
- Neutral-toned storage bins for quick cleanup
How to make it
- Identify a ‘high-impact’ zone in your home, preferably away from glass windows. Secure a Swedish ladder to the wall studs using heavy-duty lag bolts; the ladder must feel immovable when you pull on it with your full body weight.
- Lay down the gymnastic mats. If using multiple mats, use industrial-strength Velcro strips on the underside to keep them from sliding apart, which is a major visual cue for a safe landing zone.
- Arrange the modular foam blocks into a ‘course.’ Group them by height to encourage climbing and then jumping onto the softest center mat.
- Install a ceiling hook for a fabric swing. Ensure the hook is screwed directly into a ceiling joist—never just the drywall. Test the swing with a heavy weight (like a bag of salt) before letting a child climb in.
- Organize toys into low-profile bins. This keeps the center of the room clear for movement while making the ‘reset’ phase of the day quick and easy.
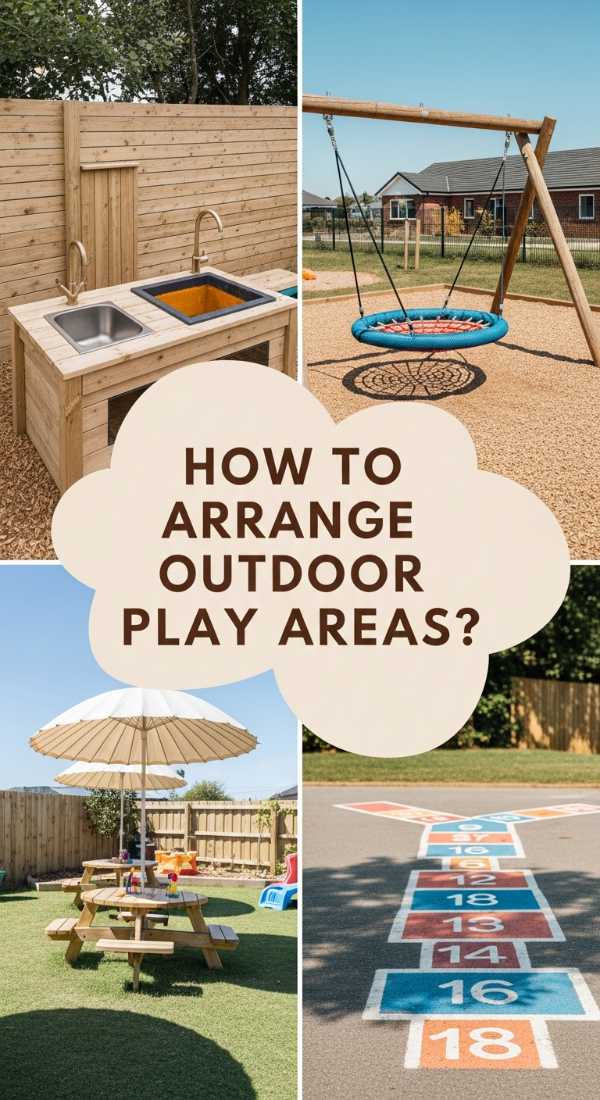
How to Arrange Outdoor Play Areas for Perfect Neighborhood Playdates

Why we love this
There is nothing quite like the collective hum of a neighborhood playdate, where the yard becomes a community hub. We love the social architecture of this setup—the way it encourages sharing, turn-taking, and collaborative games. The smell of popcorn or fresh fruit on a communal table and the sight of multiple kids engaged in different ‘stations’ create a vibrant, bustling atmosphere that feels like a mini-festival right in your own backyard.
Essential Elements:
- A large, sturdy picnic table
- Multiple ‘zones’ (art station, sandbox, ball pit)
- A chalkboard wall or large outdoor easel
- Ample seating for adults within eyesight
- A dedicated ‘hydration station’ for water and juice
How to make it
- Divide your yard into clear ‘activity zones’ to prevent overcrowding in one area. Use visual markers like different colored outdoor rugs or hula hoops on the grass to define each station.
- Set up the ‘Art Zone’ with a weather-sealed chalkboard. Position it against a fence and ensure it is at eye level for the average age of the kids attending.
- Place the picnic table in a central, shaded spot. This acts as the ‘Home Base’ for snacks and collective activities. Check the benches for stability; they should not tip even if three kids sit on one side.
- Fill a large galvanized tub with ice and drinks for the ‘Hydration Station.’ This allows kids to self-serve without tracking dirt into the house, keeping the flow of the playdate seamless.
- Create a ‘Social Circle’ for the parents. Arrange Adirondack chairs in a semi-circle with a clear line of sight to all play zones, ensuring the adults are relaxed while the kids are safe.
How to Plan Kids Backyard Ideas for Ultimate Imaginative Roleplay
Why we love this
This is where the magic of ‘pretend’ takes center stage. We love the mud kitchens with their clinking metal pots and the smell of ‘herb soup’ (water and marigolds), and the wooden playhouses that transform into rocket ships or castles. It’s a sensory-rich environment where the texture of sand, the sound of wooden spoons on iron pans, and the freedom to get messy allow a child’s imagination to run completely wild and unrestrained.
Essential Elements:
- A wooden mud kitchen with a real sink basin
- Old pots, pans, and wooden spoons
- A small playhouse or ‘market stall’
- Costume trunk with weather-resistant fabrics
- Natural materials like pinecones, acorns, and pebbles
How to make it
- Build or buy a mud kitchen and place it near a water source. Ensure the height is comfortable—the ‘countertop’ should be about waist-high for the child to prevent back strain during vigorous ‘cooking.’
- Stock the kitchen with stainless steel pots. These offer a satisfying ‘clang’ and are much more durable for outdoor use than plastic versions.
- Set up a ‘Resource Bin’ nearby filled with natural loose parts like dried lavender, smooth stones, and wood chips. These serve as the ‘ingredients’ for their imaginative play.
- Place the playhouse on a level wooden deck or gravel pad. This keeps the interior dry and prevents the wood from rotting, ensuring the ‘castle’ stays in prime condition for years.
- Include a ‘Market Chalkboard’ where kids can write the daily menu or shop prices. Use dustless chalk for a cleaner experience that won’t irritate sensitive noses.
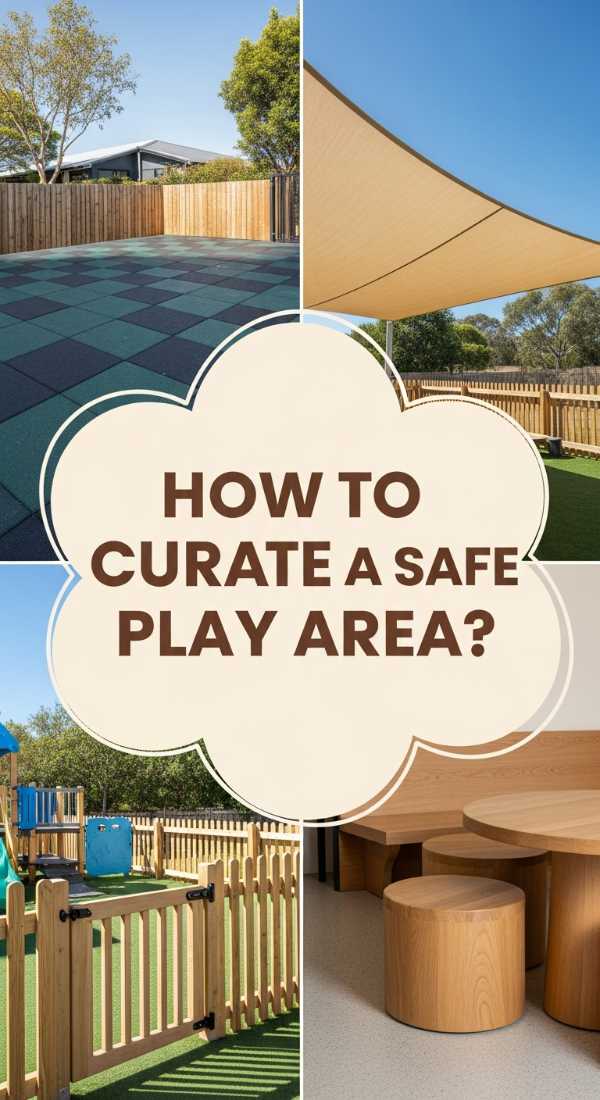
How to Curate a Backyard Play Area for Kids for Safe Outdoor Exploration
Why we love this
Safety and exploration don’t have to be at odds. We love this setup because it provides a controlled environment for kids to push their limits and discover the world. The soft, bouncy feel of high-quality rubber mulch underfoot and the sturdy, rounded edges of the equipment provide peace of mind for parents, while the hidden paths and ‘insect hotels’ provide endless fascination for little explorers with magnifying glasses in hand.
Essential Elements:
- ASTM-certified playground equipment
- Impact-absorbing ground cover (IPEMA certified)
- No-climb fencing with child-proof latches
- Magnifying glasses and ‘bug jars’
- Solar-powered pathway lighting
How to make it
- Perform a ‘Safety Sweep’ of the perimeter. Remove any poisonous plants (like oleander) and fill in any holes or uneven ground that could cause a twisted ankle.
- Install your ground cover. If using rubber mulch, aim for a depth of 6 inches for maximum impact absorption. A visual cue of proper depth is when the mulch reaches the first ‘safety line’ on the playground’s support posts.
- Upgrade all gate latches to ‘Pool-Safe’ gravity latches. These are positioned high and require a specific pull-up motion that toddlers cannot replicate, ensuring the haven stays secure.
- Place an ‘Insect Hotel’ (a wooden structure filled with bamboo and bark) in a quiet corner. This creates a specific destination for gentle exploration and observation of the natural world.
- Inspect all equipment for ‘head entrapment’ hazards. Use a 9-inch probe to ensure no gaps exist between 3.5 and 9 inches, which is a professional standard for playground safety.
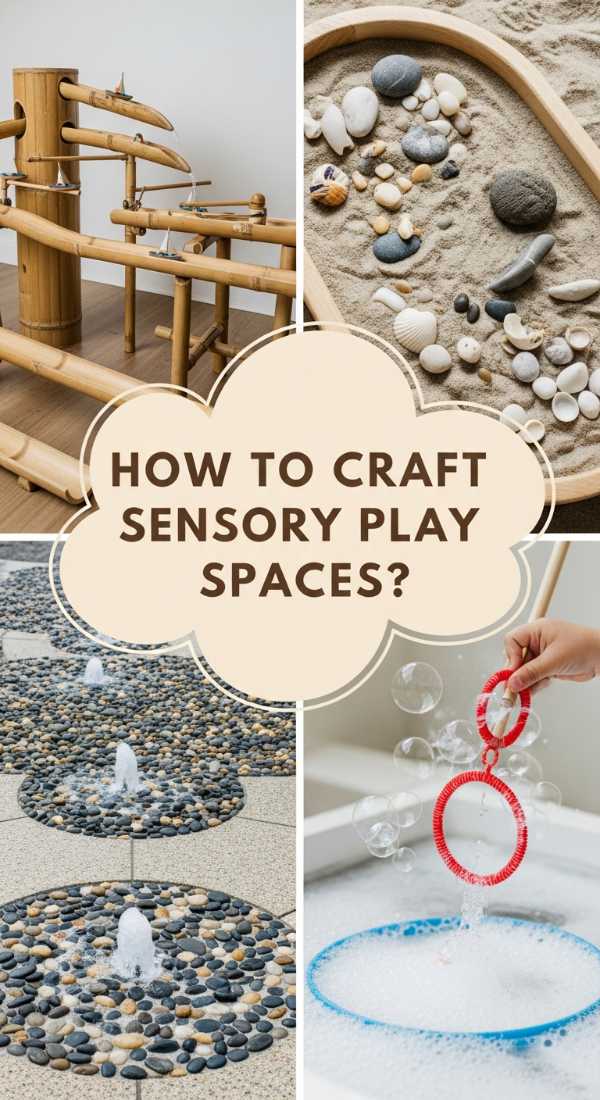
How to Craft Kids Outdoor Play Area Ideas for Sensory Water Fun

Why we love this
Water is the ultimate sensory medium. We love the cool, sparkling flow of a water table and the way it instantly lowers the temperature of a hot afternoon. The sound of trickling water is naturally soothing, while the tactile play of pouring, splashing, and watching ripples provides a meditative quality that can calm even the most high-energy child, all while smelling like sun-drenched jasmine and clean, fresh rain.
Essential Elements:
- Multi-level water table or ‘water wall’
- Soft-touch water toys and scoops
- Non-slip outdoor mats or decking
- Retractable shade sail or umbrella
- Small watering cans and misting nozzles
How to make it
- Position the water table on a non-slip surface, like a textured outdoor rug or a cedar deck. Ensure it is perfectly level so the water channels and drains function as intended.
- Mount a ‘Water Wall’ to a fence or stand. Use clear tubing and funnels so kids can see the water moving; the visual cue of a successful setup is a steady, gravity-fed flow from top to bottom.
- Install a shade sail overhead. Position it so that it blocks the 2 PM sun—the hottest part of the day. The anchors for the sail must be tensioned until the fabric is taut and doesn’t flap in the wind.
- Provide various ‘flow tools’ like sponges, cups with holes, and sieves. This encourages children to explore different physics properties like volume and surface tension.
- Check the water daily for cleanliness. Empty the table after every use to prevent mosquitoes from breeding, and give it a quick scrub with a vinegar-water solution to keep the surface fresh.
How to Boost Kids Outdoor Play for Healthy Physical Growth

Why we love this
This is the ‘Gym’ of the play haven, focused on building strength and confidence. We love the sight of a child finally reaching the top of a climbing wall or mastering the monkey bars. The feeling of rough climbing holds, the cool steel of the bars, and the sheer physical effort followed by a triumphant ‘I did it!’ creates a powerful sense of self-efficacy and physical wellness that sticks with a child long after they’ve come inside for dinner.
Essential Elements:
- Climbing wall with textured hand-holds
- Monkey bars or overhead rings
- Horizontal ‘ninja’ line or tightrope
- Agility cones and hurdles
- Soft landing pads
How to make it
- Install a climbing wall using 3/4 inch marine-grade plywood. Secure the hand-holds with T-nuts from the back before mounting the plywood to a sturdy frame; this ensures the bolts won’t pull through the wood under weight.
- Space monkey bars exactly 10-12 inches apart. This is the ‘sweet spot’ for most children’s reach, allowing them to swing comfortably without overstretching.
- Tension a ‘Ninja Line’ between two mature, healthy trees. Use tree protectors to prevent bark damage and use a heavy-duty ratchet to get the line ‘guitar-string tight’ so it doesn’t sag when used.
- Set up an agility course with cones. Change the layout weekly to challenge their motor planning and keep the physical activity fresh and engaging.
- Test the ‘Grip’ factor. Ensure bars are not slippery and that climbing holds are tightened until they cannot be rotated by hand, a crucial visual cue for safety.
How to Elevate a Playground Backyard for a Luxury Family Oasis
[IMAGE_10]
Why we love this
Luxury is about the seamless integration of beauty and function. We love this approach because it treats the play area with the same design respect as the rest of the home. Think high-end hardwoods like Ipe, integrated lighting, and lush, professional landscaping. It’s a space that smells of expensive outdoor candles and blooming gardenias, where the play equipment feels like a piece of modern art and the whole family feels equally pampered and relaxed.
Essential Elements:
- Custom-built architectural play structures
- Integrated LED deck and accent lighting
- Designer outdoor fabrics and upholstery
- Perimeter landscaping with ornamental grasses
- A built-in fire pit for family evening gatherings
How to make it
- Choose a unified material palette. Use the same wood species and metal finishes for the playground as you have on your home’s exterior to create a ‘designed’ look.
- Install low-voltage LED lighting into the steps and posts of the play structure. This not only looks high-end but extends the ‘playability’ of the yard into the evening hours.
- Surround the play area with ‘soft’ landscaping like Mexican Feather Grass. This creates a visual barrier that is soft to the touch and moves beautifully in the wind, hiding the structural elements of the playground.
- Incorporate a ‘Parent Zone’ within the oasis. Use high-quality outdoor sofas with weather-resistant Sunbrella fabric so you can supervise in total comfort.
- Apply a high-gloss, UV-resistant finish to all wooden elements. This gives the structures a polished, furniture-like appearance that resists fading and keeps the ‘oasis’ looking brand new.
Conclusion: Your Haven Awaits
Building the ultimate play haven is an investment in your child’s future, one afternoon of laughter at a time. Whether you’re crafting a natural retreat or a high-tech physical challenge, the goal remains the same: to create a space where magic is possible and growth is inevitable. So grab a hammer, find a sunny spot, and start building the memories that will last a lifetime.