
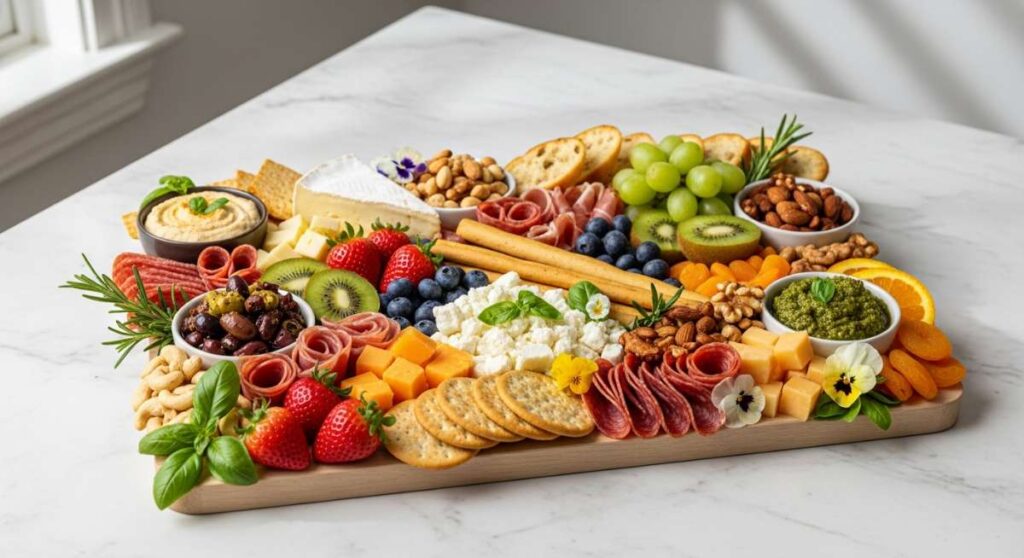
Viral Snack Boards: Simple Ingredients, Maximum Impact
There is something inherently magical about a shared platter that brings people together, isn’t there? I remember the first time I set out a messy, overflowing board for my friends; the room instantly transformed from a quiet gathering into a vibrant, laughter-filled feast. It’s not just about the food; it’s about the permission to graze, the tactile joy of picking up a sun-ripened cherry, and the visual feast that greets your eyes before you even take a bite.
In today’s fast-paced world, the ‘Viral Simple Food Board’ has become my go-to for effortless hosting. We’re moving away from fussy, multi-course meals and embracing the beauty of high-quality ingredients arranged with a little bit of soul. Whether you are prepping for a breezy beach day or a cozy spring evening on the porch, these ideas are designed to maximize impact while keeping your stress levels at an absolute minimum. Let’s dive into how we can turn everyday ingredients into something truly extraordinary.
How to top cherry cakes?
Why we love this
Topping a cherry cake is the final flourish that transforms a simple bake into a showstopping centerpiece. We love the contrast between the deep, ruby-red juices of the cherries and the pristine, snowy white of a fresh glaze or whipped topping. As you bite through, the slightly tart skin of the cherry snaps, releasing a burst of sweetness that mingles with the aromatic vanilla of the cake. It feels like a celebration of summer’s bounty, offering a texture that is both soft and juicy, leaving a lingering scent of almond and stone fruit in the air.
Ingredients
- Fresh Bing or Rainier cherries (pitted)
- Maraschino cherries with stems (for vintage flair)
- A dusting of confectioners’ sugar
- Fresh mint sprigs
- Cherry preserves for a glossy finish
How to make it
- Begin by washing and thoroughly drying your fresh cherries; any residual water will cause your glaze or frosting to run and look messy.
- If you want a professional, high-gloss finish, heat two tablespoons of cherry preserves in a small saucepan over low heat until liquid, then strain out the solids.
- Using a pastry brush, gently coat each fresh cherry with the warm preserves to give them a jewel-like shine that won’t dull in the fridge.
- Arrange the glazed cherries in a tight, concentric circle starting from the outer edge of the cake and working your way inward to create a full, lush appearance.
- For a final touch of whimsy, place three or four stemmed Maraschino cherries right in the center and give the entire board a light, airy dusting of powdered sugar through a fine-mesh sieve.
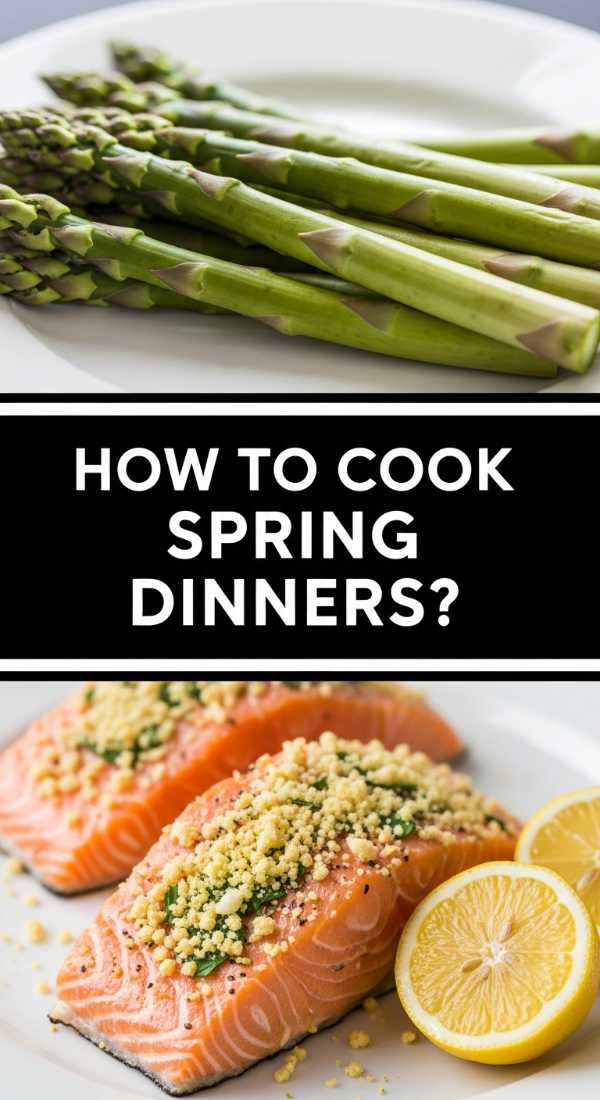
How to cook spring dinners?

Why we love this
Spring dinners are all about the transition from the heavy, earthy tones of winter to the bright, crisp energy of new growth. There is something incredibly therapeutic about the sound of a sharp knife slicing through a bunch of fresh asparagus or the zesty aroma of lemon zest hitting a hot pan. These meals feel light on the palate but deeply nourishing, utilizing tender greens and delicate proteins that don’t weigh you down. Enjoying a spring dinner feels like taking a deep breath of fresh air after a long sleep, full of vibrant greens and soft, buttery textures.
Ingredients
- Thin-stalked asparagus
- New potatoes (baby golds)
- Fresh peas or snap peas
- Lemon halves and zest
- Wild-caught salmon or organic chicken breast
- Fresh dill and parsley
How to make it
- Preheat your oven to 400°F (200°C) and prepare a large sheet pan with parchment paper to ensure even cooking and easy cleanup.
- Toss your halved new potatoes in olive oil, sea salt, and cracked pepper, roasting them alone for 15 minutes since they require more time than the delicate greens.
- Push the potatoes to one side and add your protein (salmon or chicken) to the center; season generously with lemon zest and a rub of fresh dill.
- In the final 8-10 minutes of cooking, scatter the asparagus and peas around the protein, drizzling them lightly with olive oil to keep them vibrant and snappy.
- Watch for the salmon to turn opaque and flake easily with a fork, or for the chicken to reach an internal temperature of 165°F, then pull the pan and rest for 5 minutes before serving.
How to bake spring cookies?
Why we love this
Baking spring cookies is a sensory delight that fills the kitchen with the scent of butter, citrus, and sweet sugar. These aren’t the heavy, spiced cookies of winter; they are light, often infused with floral notes or bright fruit flavors that dance on the tongue. The texture is usually a perfect balance of a crisp, golden edge and a soft, pillowy center that melts away instantly. Holding a warm cookie that has been decorated with pastel shades or edible petals feels like holding a small piece of the season’s first bloom in your hand.
Ingredients
- All-purpose flour
- Unsalted butter (softened to room temperature)
- Granulated sugar and egg yolks
- Lemon juice and zest
- Dried culinary lavender or edible pansies
How to make it
- Cream your softened butter and sugar together for at least 3-5 minutes until the mixture is pale and extremely fluffy; this aeration is key to a light spring texture.
- Incorporate your lemon zest and lavender into the sugar mixture early so the oils from the aromatics can fully permeate the dough.
- Slowly fold in your dry ingredients until just combined—overmixing at this stage will develop gluten and result in a tough, bready cookie rather than a delicate one.
- Chill the dough for at least 30 minutes; this prevents the cookies from spreading too thin and helps the flavors meld into a cohesive, sophisticated profile.
- Bake at 350°F (175°C) until the very edges are just beginning to turn a pale golden brown, then let them cool on the baking sheet for 5 minutes to set their structure.
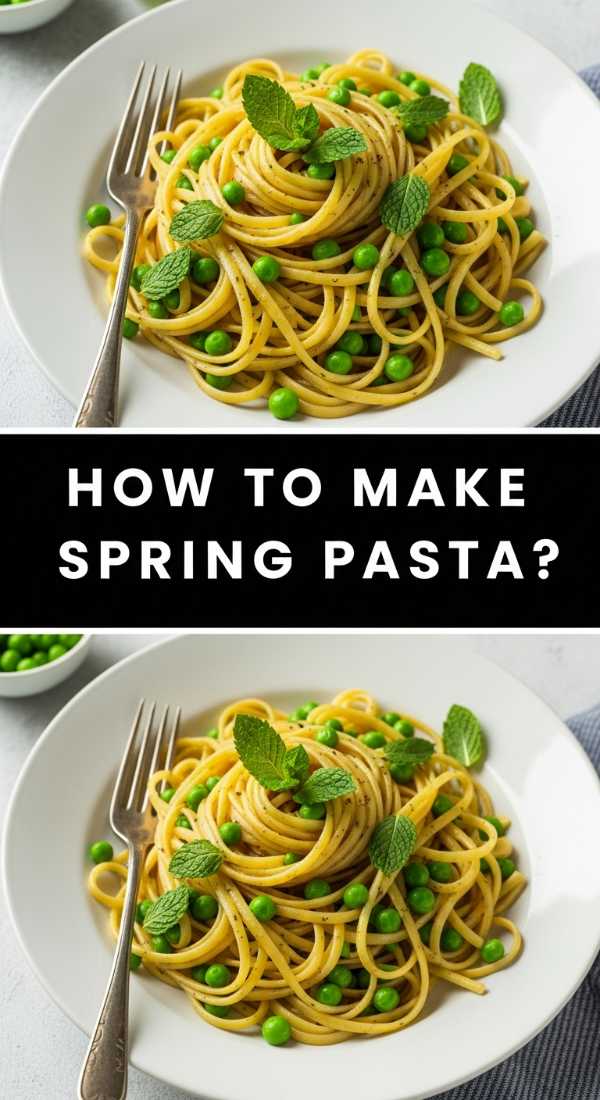
How to make spring pasta?

Why we love this
Spring pasta is the ultimate comfort food for those days when the air is still a bit chilly but the sun is shining brightly. It relies on a ‘less is more’ philosophy, where the quality of the olive oil and the freshness of the herbs do all the heavy lifting. The aroma of garlic sautéing alongside vibrant green peas and mint is intoxicating and fresh. Each forkful offers a variety of textures—from the al dente bite of the pasta to the pop of a sweet pea—creating a culinary experience that is both sophisticated and incredibly grounded.
Ingredients
- Linguine or Pappardelle
- Fresh garden peas
- Garlic cloves (thinly sliced)
- Pecorino Romano or Parmesan cheese
- Fresh mint leaves and lemon juice
- High-quality extra virgin olive oil
How to make it
- Bring a large pot of heavily salted water to a rolling boil; the water should taste like the sea to properly season the pasta from the inside out.
- While the pasta cooks, gently sauté your sliced garlic in olive oil over medium-low heat; you want it to become translucent and fragrant without browning or becoming bitter.
- Two minutes before the pasta is done, drop your fresh peas directly into the pasta water to blanch them quickly until they are bright green and tender.
- Reserve a cup of the starchy pasta water before draining; this ‘liquid gold’ is the secret to creating a silky, emulsified sauce that clings to every strand.
- Toss the pasta and peas into the garlic oil, adding splashes of the reserved water and a generous handful of cheese, stirring vigorously until a glossy sauce forms.
How to style crawfish boils?

Why we love this
Styling a crawfish boil is all about embracing a ‘perfectly imperfect’ aesthetic that encourages communal eating and relaxed vibes. It’s a riot of color—bright reds from the crawfish, sunny yellows from the corn, and earthy tones from the potatoes and sausage. There is something so satisfying about seeing a long table covered in butcher paper, piled high with steaming, spicy seafood. It signals to guests that they can roll up their sleeves, put away their phones, and get messy in the best way possible, creating an atmosphere of pure, unpretentious joy.
Ingredients
- Brown kraft paper or newspaper
- Galvanized metal buckets
- Wooden crates or cutting boards
- Fresh lemons and bunches of parsley for garnish
- Small bowls for melted butter and extra spice rub
How to make it
- Cover a long outdoor table with two layers of heavy-duty kraft paper, securing the edges with tape to ensure it doesn’t move during the feast.
- Instead of using plates, create ‘zones’ of food directly on the paper, placing the crawfish in long mounds down the center of the table for easy access.
- Interspersed among the seafood, place clusters of corn on the cob and halved red potatoes to create visual variety and color contrast.
- Place galvanized buckets at both ends of the table to serve as easy-access spots for discarded shells, keeping the eating area relatively tidy.
- Garnish the entire spread with halved lemons and scattered fresh herbs to provide a pop of green against the red and to offer a fresh scent that balances the spicy steam.
How to enjoy crawfish boils?
Why we love this
Enjoying a crawfish boil is a full-sensory, hands-on experience that defines the start of the warm season. The air is thick with the scent of cayenne, garlic, and bay leaves, and there is a rhythmic, hypnotic quality to the act of peeling and eating. It’s slow food at its finest—you can’t rush a boil. It forces you to linger over conversation, sip on a cold drink, and appreciate the company around you. The heat of the spice on your lips followed by the sweetness of the tail meat is a flavor profile that feels like a party in your mouth.
Ingredients
- A large group of friends and family
- Cold beverages (iced tea or light beer)
- Plenty of paper towels or wet wipes
- Extra Old Bay or Cajun seasoning for dipping
- Music and a sunny afternoon
How to make it
- Approach the table with the mindset that things are going to get messy; tuck a napkin into your collar and keep a cold drink within arm’s reach to temper the spice.
- To eat like a pro, pinch the head of the crawfish and twist the tail to separate; suck the head for the flavorful ‘fat’ and juices if you’re feeling adventurous.
- Peel away the first two or three rings of the tail shell, then pinch the end of the tail to pop the succulent meat right out into your mouth.
- Alternate your seafood bites with pieces of corn and potato to reset your palate and enjoy the different levels of spice absorbed by the vegetables.
- Keep the conversation flowing and don’t be afraid to use the communal butter bowls; the slow pace is the entire point of the gathering!
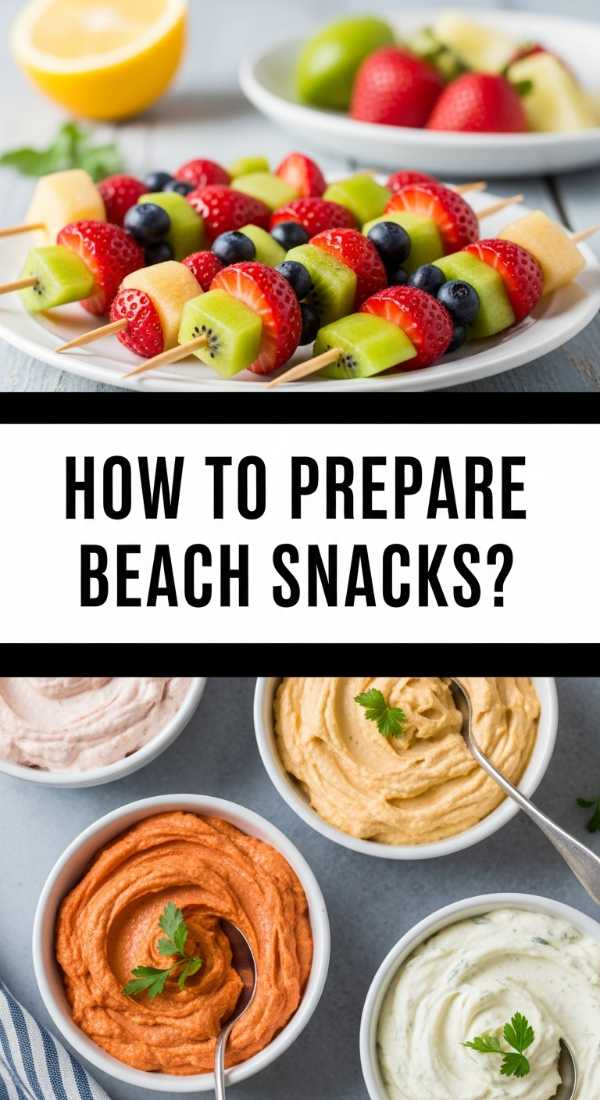
How to prepare beach snacks?

Why we love this
Beach snacks need to be the ultimate multitaskers: refreshing, hydrating, and impervious to a little bit of sand. We love snacks that feel like a cooling reward after a dip in the salt water—think crisp cucumbers, juicy watermelon, and salty nuts that replenish your energy. There is a specific kind of magic in opening a cooler to find neatly packed, colorful containers of food that look as good as they taste. It turns a simple day on the sand into a curated picnic experience that keeps everyone fueled and happy under the sun.
Ingredients
- Firm fruits (grapes, watermelon cubes, berries)
- Crunchy vegetables (bell pepper strips, carrots)
- Individual hummus or dip cups
- Pretzels or sturdy crackers
- Insulated containers and ice packs
How to make it
- Choose fruits and vegetables that have a high water content to help with hydration, but avoid anything too soft (like overripe peaches) that will turn to mush in a warm cooler.
- Slice your vegetables into uniform batons that are easy to grab with one hand while you’re lounging in a beach chair.
- Portion out dips into small, individual lidded containers; this prevents cross-contamination and ensures that if a little sand gets in one, the whole batch isn’t ruined.
- Freeze your water bottles or juice boxes overnight; they will act as extra ice packs in the morning and turn into perfectly chilled drinks by mid-afternoon.
- Use airtight, hard-sided containers rather than bags to prevent your snacks from being crushed by heavier items in your beach tote.
How to frost cherry cakes?

Why we love this
Frosting a cherry cake is like putting the final coat of paint on a masterpiece. Whether it’s a silky buttercream or a light whipped ganache, the frosting acts as the perfect canvas for those bright red cherries. The texture of the frosting should be velvety and smooth, providing a creamy counterpoint to the dense crumb of the cake. There is a deep satisfaction in watching the offset spatula glide through the frosting, creating soft peaks and swirls that catch the light and make the cake look irresistible even before the first slice is cut.
Ingredients
- Softened unsalted butter
- Sifted powdered sugar
- Heavy cream or whole milk
- Vanilla bean paste or cherry extract
- A pinch of fine sea salt
How to make it
- Ensure your cake layers are completely cold—even a hint of warmth will melt your frosting and cause it to slide right off the sides.
- Beat your butter alone for 5 minutes until it is almost white in color; this removes the ‘yellow’ look and creates a much lighter, professional mouthfeel.
- Add your powdered sugar one cup at a time on low speed, then increase the speed to high and whip in the heavy cream and flavoring until it reaches a spreadable, cloud-like consistency.
- Apply a very thin ‘crumb coat’ of frosting over the entire cake and chill for 20 minutes; this seals in any loose crumbs so your final layer is perfectly clean.
- Use an offset spatula to apply the final layer, using long, smooth strokes and leaving some natural texture on the top to cradle your cherry toppings.
How to serve spring dinners?
Why we love this
Serving a spring dinner is about capturing the light, airy mood of the season. We love using large, shallow bowls or platters that allow the ingredients to spread out and breathe, rather than being piled high. The presentation should feel intentional but relaxed, perhaps with a few loose herbs scattered over the top or a lemon wedge tucked into the side. Serving these meals family-style encourages a sense of sharing and abundance, making the dinner feel like an event rather than just a meal, all while the golden hour light filters through the window.
Ingredients
- Large ceramic platters or shallow bowls
- Linen napkins in soft, muted tones
- Extra virgin olive oil for drizzling
- Flaky sea salt (like Maldon)
- Fresh lemon wedges and herb sprigs
How to make it
- Warm your serving platters in a low oven for a few minutes before plating; this keeps the food at the optimal temperature without continuing to cook it.
- Transfer your main dish to the center of the platter, then arrange your roasted vegetables around the perimeter to showcase the different colors and textures.
- Just before bringing the dish to the table, give everything a final ‘finish’ with a drizzle of high-quality olive oil and a sprinkle of flaky sea salt for a professional crunch.
- Place the platter in the center of the table and provide large serving spoons so guests can help themselves to exactly what they want.
- Keep a small bowl of extra lemon wedges and fresh herbs on the side so people can customize the acidity and freshness of their individual portions.
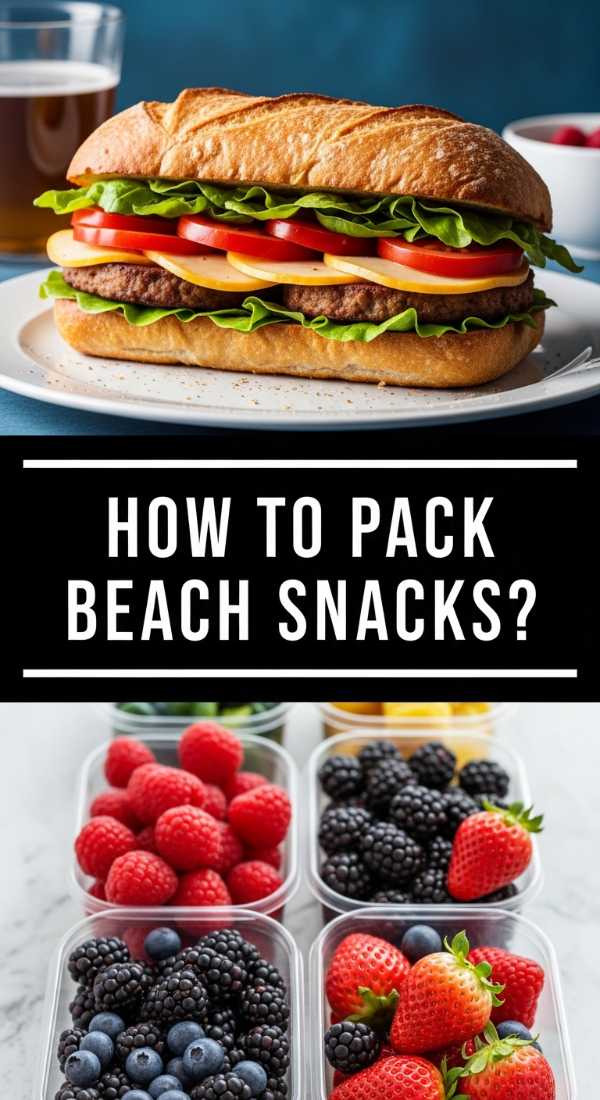
How to pack beach snacks?
[IMAGE_10]
Why we love this
The art of packing beach snacks is the secret to a stress-free day by the ocean. There is a deep sense of organization and preparedness that comes with a perfectly packed cooler. We love the clever use of space—the way the cold drinks sit at the bottom while the delicate fruits rest safely on top. It’s about more than just transport; it’s about ensuring that when you finally reach for that snack after hours of sun and surf, it is still crisp, cool, and completely refreshing. It’s the ultimate hallmark of a seasoned beach-goer.
Ingredients
- A high-quality insulated cooler bag
- Reusable ice packs (gel-filled work best)
- Stackable, airtight containers
- Individual silicone bags for dry snacks
- Small trash bags for easy cleanup
How to make it
- Layer your cooler strategically: place heavy drinks and hard ice packs at the very bottom to create a cold foundation that lasts all day.
- Use stackable containers for your ‘wet’ snacks like fruit and veggies, placing them in the middle layer where the temperature is most stable.
- Keep ‘dry’ items like crackers or pretzels in silicone bags and place them at the very top or in an external pocket to ensure they stay crunchy and far away from any melting ice.
- Wrap your individual containers in a small kitchen towel; this provides extra insulation and gives you something to wipe your hands on before eating.
- Pack a separate small bag for your trash right inside the cooler so you can clean up as you go, leaving the beach as beautiful as you found it.
Conclusion
Creating a viral-worthy snack board or a seasonal feast isn’t about complicated techniques or expensive ingredients—it’s about the heart and the details. Whether you’re topping a cherry cake with a glossy finish or packing the perfect beach cooler, the goal is always the same: to create a moment of connection and joy through food. I hope these tips inspire you to gather your favorite people, clear off a table, and start building something delicious. Remember, the best ingredient you can add to any board is the love you put into sharing it!