
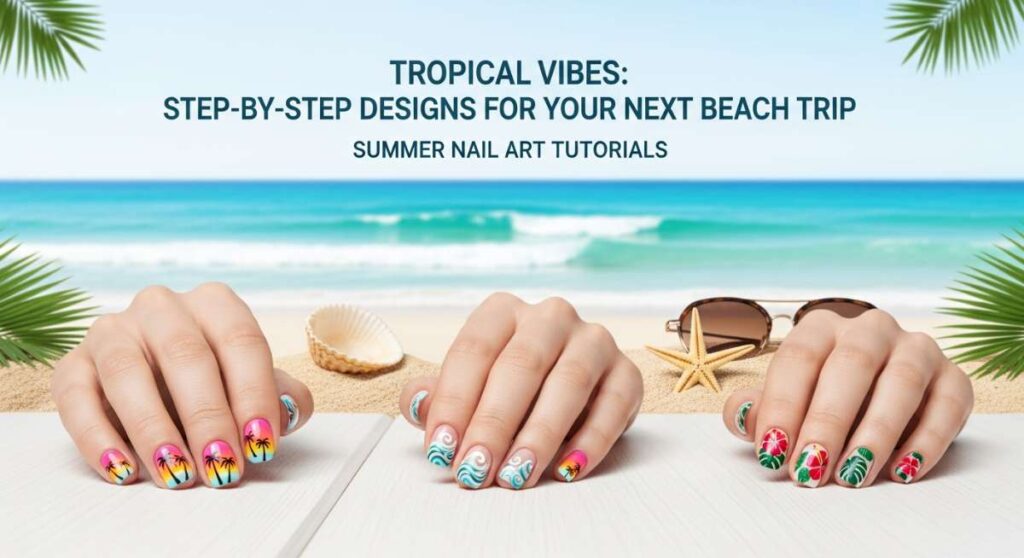
Tropical Vibes: Step-by-Step Designs for Your Next Beach Trip
Hello, my beautiful sun-seekers! I can almost feel the warm breeze on my face and the soft sand between my toes as I write this. There is something so magical about that transition into summer—it is like the world is giving us a giant, cloud-soft embrace after the long winter months. I wanted to share a little piece of that sunshine with you today because you deserve to feel as bright and vibrant as a tropical sunset.
For me, self-care has always been about those tiny, joyful details that make us smile when we look down at our hands. Whether you are sipping a cold lemonade by the pool or heading out for a long-awaited seaside getaway, your nails are the perfect canvas to express your inner glow. So, grab a comfy seat, your favorite iced tea, and let’s dive into these dreamy summer designs together. I’ve gathered my absolute favorite looks to help you feel like the tropical queen you are!
4 quick steps to perfect lemon nails

Why to love these Nails:
These lemon nails are like a refreshing glass of lemonade for your soul! They are bright, zesty, and instantly elevate your mood, making them the perfect companion for a sunny brunch or a day at the farmer’s market.
Essential Items:
- Bright yellow nail polish
- Crisp white polish for detailing
- A fine-tip nail art brush
- Glossy top coat
How to Prepare:
- Apply two coats of your favorite sunny yellow polish and let dry completely.
- Use your fine-tip brush to paint small white semi-circles near the base or tips.
- Add tiny white lines radiating from the center of the semi-circles to create segments.
- Seal the look with a high-shine top coat to make those lemons pop!
Budget Range
- Essie ‘Check Your Baggage’ Yellow ($10)
- OPI ‘Alpine Snow’ ($11.50)
- Snail Art Detail Brush Set ($6)
5 easy tips for bumble bee nails
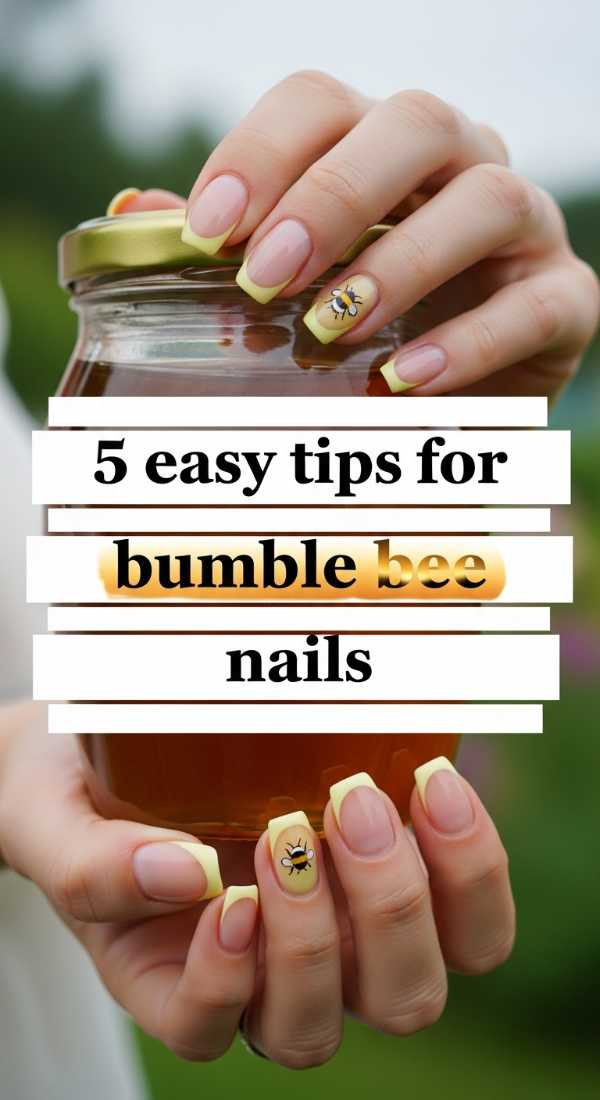
Why to love these Nails:
There is nothing sweeter than the gentle hum of summer bees! These bumble bee nails bring a touch of whimsical nature to your fingertips, reminding us to stay busy being happy and soaking up the sweetness of life.
Essential Items:
- Opaque yellow polish
- Jet black striper or polish
- Dotting tool
- Gold glitter (optional)
How to Prepare:
- Paint your nails a solid, honey-toned yellow.
- Tip 1: Use a black striper to create two or three thin horizontal stripes across the middle.
- Tip 2: Use your dotting tool to create a larger black circle for the head.
- Tip 3: Add tiny white dots for the wings.
- Tip 4: If you’re feeling fancy, add a dab of gold glitter to the ‘honey’ accents.
Budget Range
- Sally Hansen Insta-Dri ‘Short Circuit’ ($6)
- Holo Taco ‘One-Coat Black’ ($11)
- Generic Nail Dotting Tools ($5)
3 simple ways to rock neon yellow nails

Why to love these Nails:
If you want to be the light of the party, neon yellow is your go-to! It is high-energy, bold, and looks absolutely stunning against a sun-kissed glow. It’s for the loves who aren’t afraid to stand out and shine.
Essential Items:
- Neon yellow lacquer
- White base coat (to make the neon pop)
- Matte or Glossy top coat
How to Prepare:
- Method 1: Apply a white base coat first; this acts like a primer to make the neon neon-er!
- Method 2: Try a matte top coat for a modern, ‘velvet’ highlighter look.
- Method 3: Create an accent nail with a chunky silver glitter to balance the intensity.
Budget Range
- China Glaze ‘Celtic Sun’ ($8)
- Orly ‘Glowstick’ ($10)
- Seche Vite Dry Fast Top Coat ($9)
6 steps for the ultimate summer nails
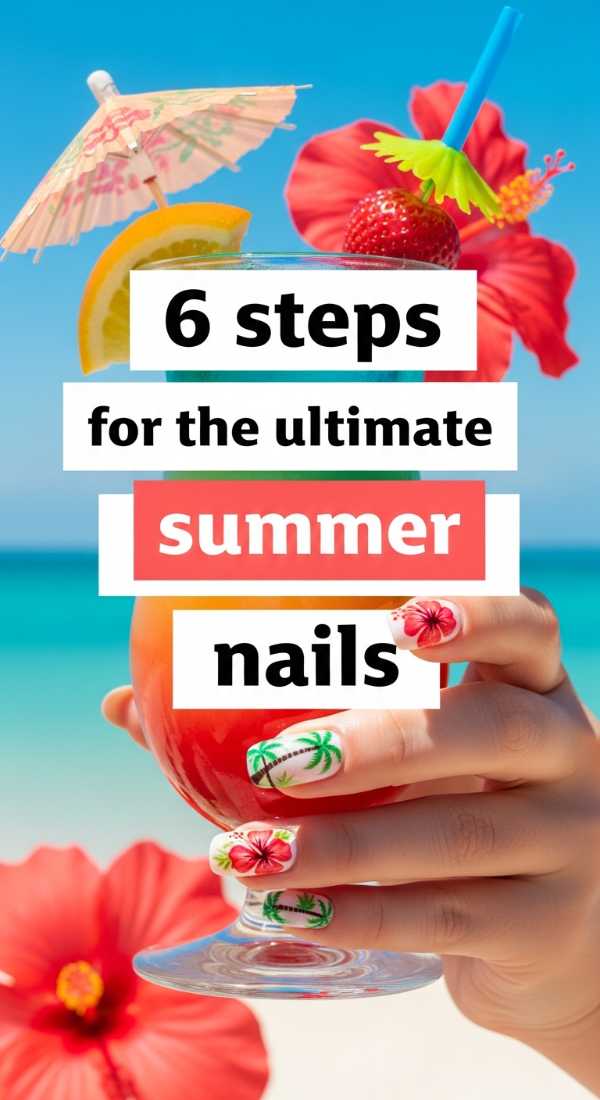
Why to love these Nails:
This is the ‘everything’ look for the girl who wants it all! Combining gradients, palm silhouettes, and sunset hues, these nails encapsulate the entire feeling of a tropical vacation in one beautiful manicure.
Essential Items:
- Sponge for gradients
- Pink, orange, and purple polishes
- Black nail art pen
- Clear base coat
How to Prepare:
- Prep with a clear base coat to protect your natural nails.
- Paint a white base to ensure your sunset colors stay vivid.
- Dab pink, orange, and purple onto a sponge and press onto nails for a gradient effect.
- Wait for the gradient to dry fully.
- Using a black pen, draw a simple vertical line for a palm tree trunk.
- Add wispy diagonal lines for the leaves and seal with a top coat.
Budget Range
- Beetles Gel Polish Summer Set ($20 for 6 colors)
- Nail Art Sponges ($4)
- Isadora Black Nail Art Liner ($9)
4 beginner tricks for strawberry nails
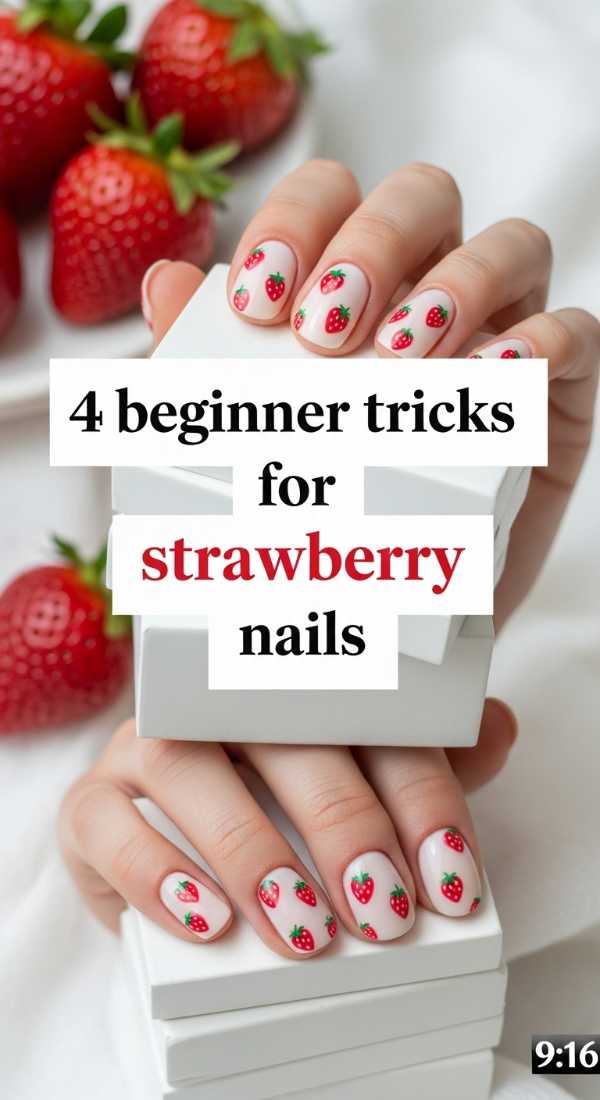
Why to love these Nails:
Sweet, juicy, and perfectly ‘cottage-core,’ strawberry nails are a total summer classic. They feel nostalgic and feminine, like a picnic in the park or a berry-picking adventure with your best friends.
Essential Items:
- Vibrant red polish
- Leafy green polish
- Yellow or white dotting tool
- Small detail brush
How to Prepare:
- Trick 1: Paint the entire nail red, then use green at the cuticle to create the ‘stem’ leaves.
- Trick 2: Use a toothpick if you don’t have a dotting tool to create the tiny ‘seeds’.
- Trick 3: Don’t worry about symmetry; natural strawberries are unique and imperfect!
- Trick 4: Add a ‘glossy red’ jelly polish over the seeds for a 3D realistic effect.
Budget Range
- Olive & June ‘CV’ Red ($9)
- Zoya ‘Tilda’ Green ($12)
- Essie ‘Gel Couture’ Top Coat ($13)
5 fast steps for sunflower nails

Why to love these Nails:
Sunflowers always turn toward the light, and these nails will help you do the same! They are warm, bohemian, and bring a sense of grounded peace to your summer look.
Essential Items:
- Mustard yellow polish
- Chocolate brown polish
- Fine detail brush
- Clear top coat
How to Prepare:
- Place a large brown dot in the corner or center of your nail.
- Dip your brush in mustard yellow and pull petals outward from the brown center.
- Add a second layer of slightly lighter yellow petals for dimension.
- Use a dotting tool to add tiny black or dark brown dots in the center for ‘seeds’.
- Finish with a protective top coat.
Budget Range
- Zoya ‘Darcy’ Yellow ($12)
- Revlon ‘Hot for Chocolate’ ($7)
- Pure Ice ‘Black Rage’ ($3)
3 easy secrets to lime green nails
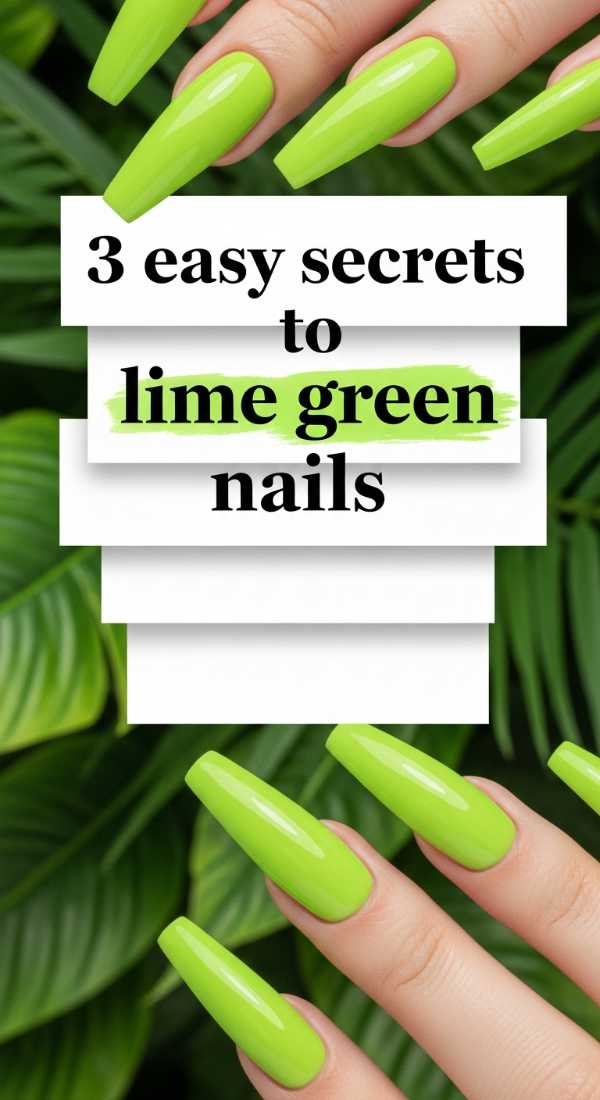
Why to love these Nails:
Lime green is the refreshing twist we all need when the temperatures rise! It’s cool, edgy, and gives off major tropical mojito vibes that are just perfect for a poolside lounge session.
Essential Items:
- Lime or chartreuse polish
- Silver foil or stickers
- Nail buffer
How to Prepare:
- Secret 1: Buff your nails well first; lime green can show ridges, so a smooth surface is key.
- Secret 2: Use a silver foil accent on one finger to break up the color and add ‘ice cube’ sparkle.
- Secret 3: Apply thin coats; lime pigment can be streaky, so three thin layers beat two thick ones!
Budget Range
- Orly ‘Sour Apple’ ($10)
- Sinful Colors ‘lawless’ ($4)
- Maniology Silver Foil ($7)
7 steps to create unique french tip nails
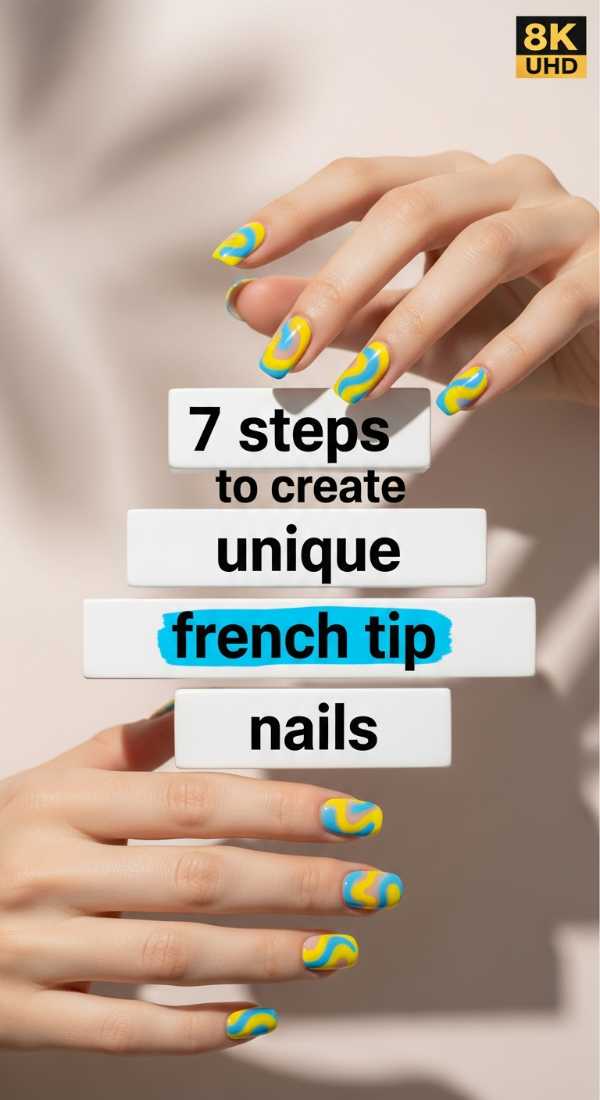
Why to love these Nails:
The French tip is back, but with a tropical makeover! By using neon or pastel colors instead of white, you get a look that is sophisticated yet playful and totally ready for the beach.
Essential Items:
- Nail tip guides or tape
- Various tropical pastel polishes
- Nude or sheer pink base color
- Cleanup brush with acetone
How to Prepare:
- Apply your sheer pink base and let it dry 100%.
- Place tip guides slightly below the free edge of your nail.
- Paint each tip a different tropical color (mint, coral, lemon, etc.).
- Carefully peel the guides away while the polish is still slightly tacky.
- Use a cleanup brush dipped in acetone to crisp up the edges.
- Add a tiny rhinestone at the base for extra sparkle.
- Seal with a thick, gel-like top coat.
Budget Range
- Kiss French Manicure Guides ($3)
- Essie ‘Soothe Move’ Pastel ($10)
- Beetles Top Gel ($8)
5 simple methods for beach nails
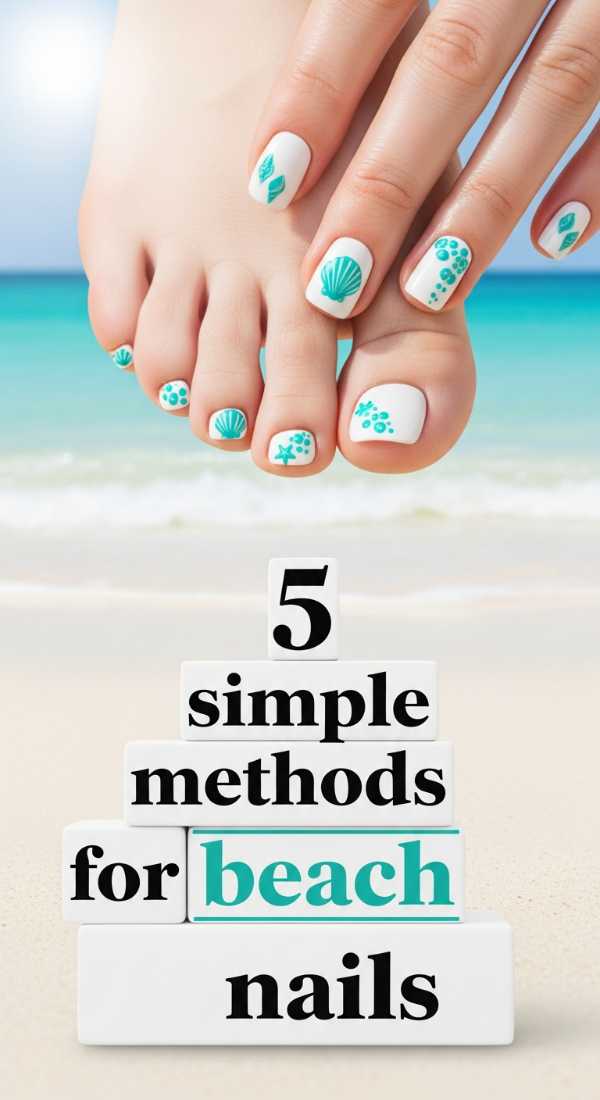
Why to love these Nails:
Capture the essence of the ocean! These nails use ‘water marble’ or ‘seafoam’ techniques to make your hands look like they belong underwater, catching the light of the waves.
Essential Items:
- Turquoise and white polishes
- Small bowl of room-temp water
- Hairspray (for the foam effect)
- Toothpick
How to Prepare:
- Method 1: Drop turquoise and white into water, spray with hairspray to break the film, then dip your nail!
- Method 2: Use a dry brush technique with sand-colored glitter at the base.
- Method 3: Stick on a tiny 3D starfish charm for a vacation-ready finish.
- Method 4: Sponge a dark-to-light blue gradient for deep sea vibes.
- Method 5: Mix white polish with a bit of clear to create ‘cloud’ foam.
Budget Range
- Wet n Wild ‘Blue Lagoon’ ($2)
- OPI ‘It’s a Boy!’ Blue ($11)
- Beach-themed Nail Charms ($6/pack)
4 easy steps to dainty ladybug nails
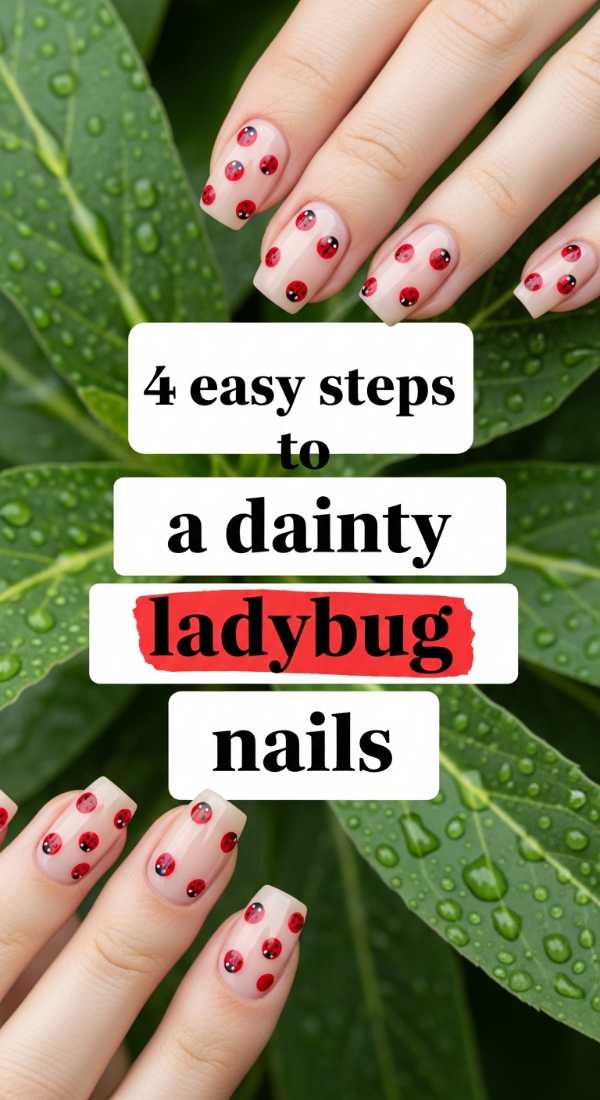
Why to love these Nails:
Ladybugs are a symbol of good luck and the sweet simplicity of a summer garden. These dainty little friends on your nails are sure to spark a conversation and bring a little extra luck to your beach trip!
Essential Items:
- Classic red polish
- Black polish
- Dotting tool
- Clear top coat
How to Prepare:
- Paint a red oval or the whole nail red as your base.
- Draw a black line down the center of the red area.
- Use your dotting tool to add 3-4 black spots on each side of the line.
- Add a black ‘head’ at the tip or base and two tiny white eyes.
Budget Range
- Sally Hansen ‘Red-y Response’ ($7)
- L.A. Colors Art Deco Black ($3)
- Essence Extreme Gel Gloss ($4)
Embrace Your Summer Glow
I hope these designs inspired you to take a little moment for yourself today, my loves. Summer is so much more than a season; it is a feeling of freedom, warmth, and joy. Whether you chose the zesty lemons or the tranquil beach waves, remember that your beauty shines from the inside out—your nails are just the cherry on top! I can’t wait to hear which design you choose for your next adventure. Stay bright, stay beautiful, and keep chasing those sunsets. Sending you all my love!