
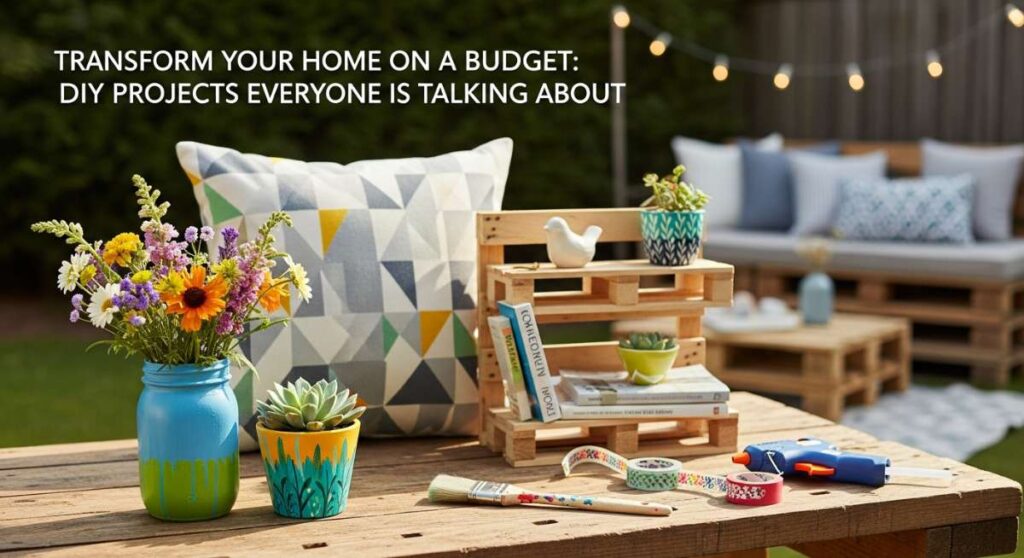
We all know that feeling—the itch to change our surroundings, to breathe new life into the corners of our homes where we spend our most precious moments. But often, the gap between our Pinterest dreams and our bank accounts feels like a canyon. I’ve been there, staring at a dated hallway or a patchy backyard, wondering if I’d ever find the time or money to make it truly mine. That is the magic of the DIY movement: it’s not just about saving money; it’s about the soul-satisfying transformation of the mundane into the extraordinary with your own two hands.
Lately, social media has been buzzing with projects that feel both high-end and remarkably achievable. Whether you are looking to boost your home’s first impression or create a hidden sanctuary in your backyard, these viral projects have captured our collective imagination for a reason. They rely on creativity, smart materials, and a bit of elbow grease rather than a massive renovation budget. Today, I am sharing ten of the most talked-about DIY projects that will help you fall in love with your home all over again.
How to Modernize a Retro Ranch for an Elevated Curb Appeal

Why we love this
There is something incredibly satisfying about taking a humble, mid-century ranch and giving it a sophisticated, modern edge that makes neighbors stop and stare. Imagine the crisp, clean scent of fresh charcoal paint mingling with the earthy aroma of cedar accents under the warm afternoon sun. The texture of smooth matte finishes against rugged brick creates a visual depth that feels expensive and intentional. It’s that feeling of pride when you pull into your driveway and see a home that looks like a high-end architectural boutique rather than a dated relic of the past.
Essential Elements:
- Matte black or charcoal exterior paint
- Natural cedar wood slats for shutters or porch accents
- Modern, oversized house numbers in a sans-serif font
- Black gooseneck or minimalist LED porch lights
- Modern mailbox with a clean silhouette
How to make it
- Begin by power-washing the entire exterior to remove decades of dust and loose debris; ensure the surface is bone-dry (usually 24-48 hours) before proceeding to ensure maximum paint adhesion.
- Apply a high-quality masonry or wood primer depending on your siding material, using a sprayer for even coverage or a thick-nap roller to get into the grooves of the brick.
- Paint the main body in a deep, sophisticated neutral like ‘Iron Ore’ or ‘Tricorn Black,’ checking for ‘doneness’ by watching for a uniform matte finish without streaks; do not apply in direct midday sun to prevent the paint from drying too quickly and cracking.
- Measure and cut cedar slats for your shutters, staining them with a clear UV-protectant to maintain that warm, honey-colored glow that contrasts so beautifully with dark paint.
- Install your new modern hardware, ensuring your house numbers are leveled perfectly and the lighting fixtures are sealed with outdoor-grade silicone to prevent moisture intrusion.
How to Style Magical Glass Art for a Dreamy Garden Glow
Why we love this
Walking into a garden adorned with hand-styled glass art feels like stepping into a living watercolor painting. As the sun begins to set, the glass catches the amber light, casting prismatic rainbows across the emerald leaves and velvet flower petals. The smooth, cool touch of the glass balances the wild, organic textures of the garden, creating a sense of whimsical luxury. There is a gentle, melodic clinking when the breeze catches the pieces, and the visual ‘glow’ of colored glass against the deep shadows of twilight is nothing short of therapeutic.
Essential Elements:
- Upcycled glass vases, bowls, and plates in various colors
- Heavy-duty glass adhesive (clear-drying)
- Copper pipes or sturdy rebar for staking
- Solar-powered fairy lights
- Glass beads or marbles for added texture
How to make it
- Select a variety of glass pieces—think cobalt blues, emerald greens, and sunset oranges—and clean them thoroughly with rubbing alcohol to ensure the adhesive creates a permanent bond.
- Apply a bead of industrial-strength, clear-drying waterproof adhesive to the base of your focal piece, pressing it firmly onto your support structure (like a glass plate or vase).
- Allow the adhesive to ‘cure’ for at least 24 hours in a room-temperature environment; you will know it is ready when the glue is no longer tacky and the pieces feel like a single, solid unit.
- Integrate solar fairy lights inside the hollow glass vessels, ensuring the solar panel is positioned at the top or on an exterior edge where it can soak up maximum daily sunlight.
- Drive your copper stakes into the garden soil at varying heights to create a tiered visual effect, then carefully mount your glass creations onto the stakes using a specialized adapter or more adhesive.
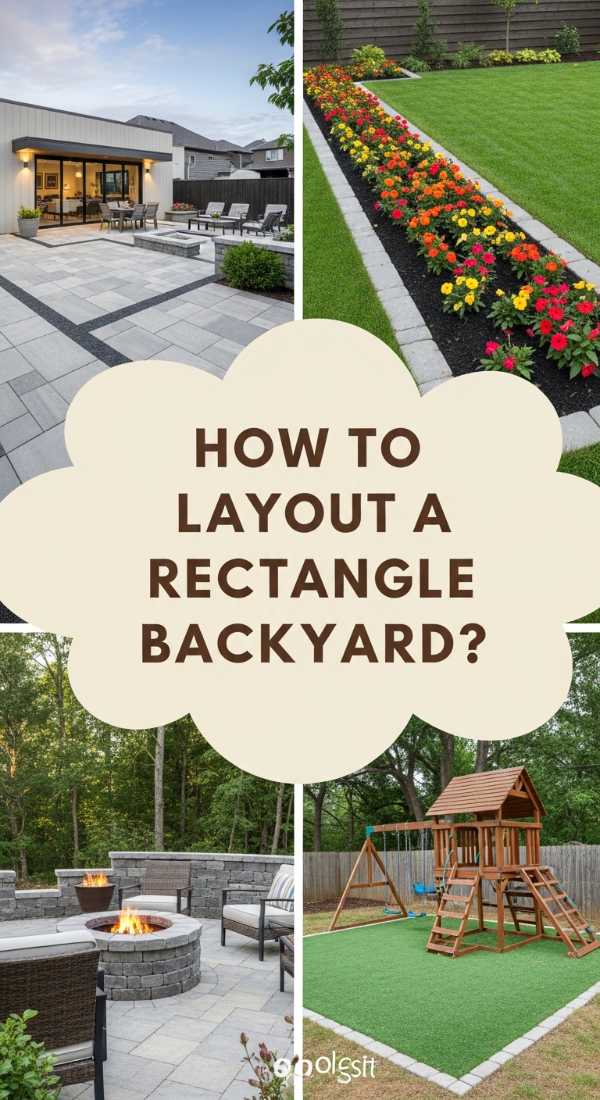
How to Design a Rectangular Backyard for a Functional Outdoor Oasis
Why we love this
The challenge of a long, narrow backyard is transformed into a sophisticated journey of discovery through clever zoning and textured layers. Imagine the cool, smooth feel of slate pavers under your bare feet as you walk from a sun-drenched dining area into a cozy, shaded lounge. The scent of lavender and rosemary planted along the borders fills the air, while the structural geometry of the yard provides a sense of calm and order. It’s about maximizing every square inch to create a flow that feels both expansive and intimate, like a private resort tailored just for you.
Essential Elements:
- Pavers or gravel for distinct flooring zones
- Horizontal wood fencing to create the illusion of width
- Outdoor rugs to define seating areas
- Tall, narrow trees (like Italian Cypress) for vertical interest
- Ambient string lighting or lanterns
How to make it
- Divide your rectangular space into three distinct ‘rooms’—typically a dining area nearest the house, a central play or lawn area, and a private lounging zone at the far end.
- Excavate the ground for your hardscaped zones, laying a base of compacted crushed stone and leveling sand; use a spirit level to ensure a slight 1% slope away from the house for drainage.
- Install your pavers or pour gravel, checking the ‘doneness’ of your layout by walking the path to ensure the transition between zones feels natural and unobstructed.
- Construct or install horizontal slat fencing along the long sides of the yard; the horizontal lines draw the eye across the space, making the narrow yard feel significantly wider.
- Add your finishing touches like weather-resistant furniture and potted plants, using warm-toned lighting at different heights to create a layered glow that draws people outside after dark.
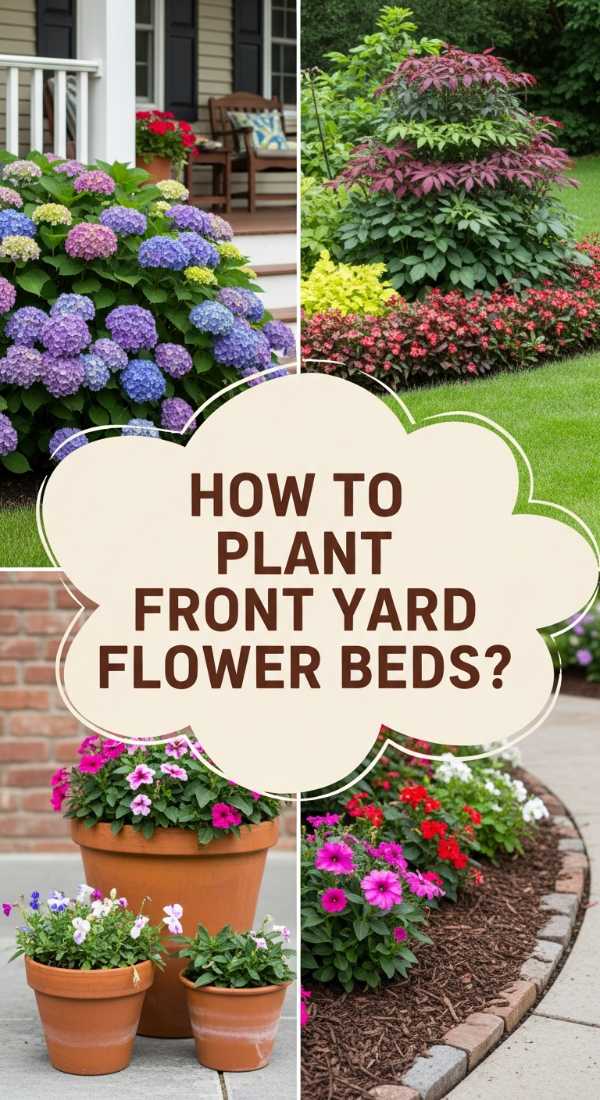
How to Plan Lush Front Yard Flower Beds for a Welcoming Home
Why we love this
A well-planned flower bed is a fragrant embrace that welcomes you home every single day. The rich, damp scent of high-quality mulch and the sweet perfume of blooming jasmine create an olfactory heaven that greets you at the gate. Visually, the soft, fluttering textures of ornamental grasses contrast with the bold, waxy leaves of hostas, creating a tapestry of greens and vibrant blooms. It’s the feeling of a living, breathing landscape that evolves with the seasons, offering a burst of joy and a sense of pride in your home’s presentation.
Essential Elements:
- A mix of perennials (for longevity) and annuals (for seasonal color)
- Nutrient-rich garden soil and organic compost
- Shredded hardwood mulch
- Edging materials (stone, brick, or metal)
- A variety of heights (thrillers, fillers, and spillers)
How to make it
- Outline your bed shape using a garden hose to create soft, organic curves, then use a sharp spade to cut a clean edge into the turf.
- Amend the existing soil with at least 3 inches of organic compost, tilling it in to a depth of 6-8 inches to ensure a nutrient-dense ‘cooking’ environment for your new plant roots.
- Arrange your plants while they are still in their pots, placing ‘thrillers’ (tall focal points) in the back, ‘fillers’ (mounding plants) in the middle, and ‘spillers’ (trailing plants) at the front edge.
- Dig holes twice as wide as the root ball, ensuring the plant sits level with the surrounding soil; visual cues for a healthy transplant include firm stems and avoiding any buried foliage.
- Apply a 2-3 inch layer of mulch over the entire bed to retain moisture and suppress weeds, ensuring you leave a small gap around the base of each plant to prevent rot.
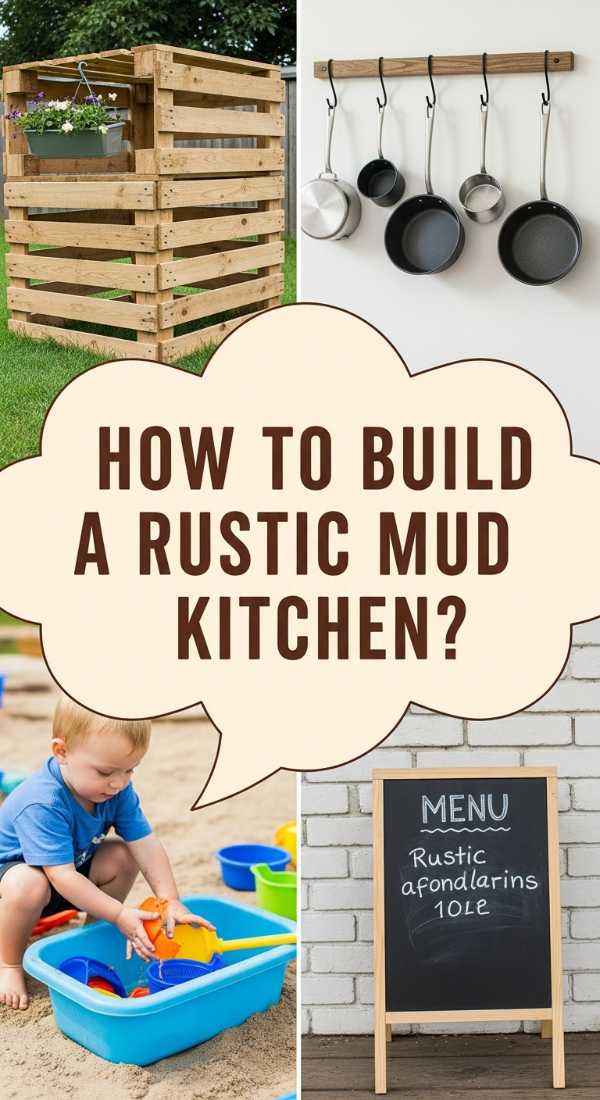
How to Create a Pallet Mud Kitchen for an Imaginative Play Zone
Why we love this
There is nothing quite like the unbridled joy of a child ‘baking’ a mud pie under the shade of a backyard tree. The mud kitchen is a sensory wonderland, where the gritty texture of wet sand and the cool splash of water meet the rustic, splinter-free warmth of sanded wood. It’s a space that smells like damp earth and pine needles, where stainless steel bowls ring out with every stir of a wooden spoon. This project turns simple, upcycled materials into a gateway for imagination, fostering a connection with nature that screen time simply cannot match.
Essential Elements:
- Two or three heat-treated (HT) wooden pallets
- Stainless steel mixing bowls (to serve as sinks)
- Old kitchen utensils and plastic ‘ingredients’ (pinecones, pebbles)
- Outdoor-rated wood screws and brackets
- Weatherproof wood stain or paint
How to make it
- Source ‘HT’ marked pallets to ensure they haven’t been treated with harmful chemicals, then sand them thoroughly with 80-grit followed by 120-grit sandpaper until the wood is smooth to the touch.
- Disassemble one pallet to use the planks for a tabletop and shelving; use a jigsaw to cut a circular hole in the tabletop that is slightly smaller than the lip of your stainless steel bowl.
- Assemble the base using two upright pallets, securing them with heavy-duty L-brackets and outdoor screws for a rock-solid, wobble-free foundation.
- Apply two coats of exterior-grade stain or a fun, vibrant paint; you will know it’s ‘done’ when the color is uniform and the wood no longer absorbs water droplets during a ‘bead test.’
- Install the ‘sink’ and add hooks for spoons and whisks, finishing with a small chalkboard where the daily ‘mud menu’ can be displayed.
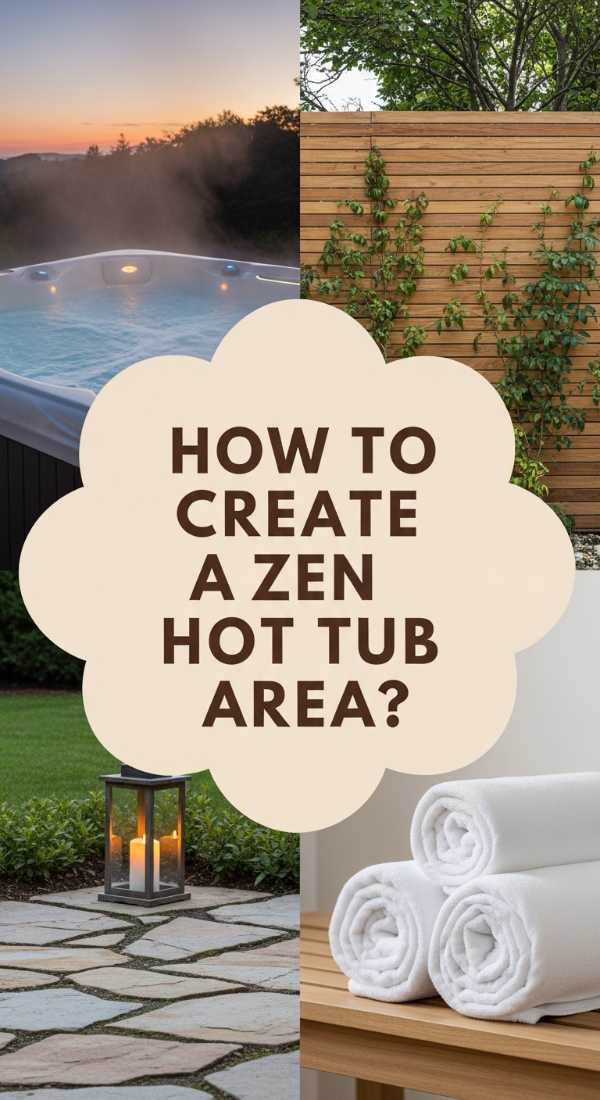
How to Set Up a Zen Hot Tub Area for a Luxurious Spa Night

Why we love this
Imagine the steam rising in lazy curls against the cool night air as the gentle hum of bubbles lulls you into total relaxation. The scent of eucalyptus or lavender essential oils drifts from nearby candles, while the soft, warm glow of bamboo lanterns creates an atmosphere of pure serenity. This is the ultimate self-care sanctuary, where the tactile sensation of hot, swirling water eases tired muscles and the surrounding natural textures of wood and stone ground your spirit. It’s a spa-worthy retreat located just steps from your back door.
Essential Elements:
- Hot tub (plug-and-play or permanent)
- Bamboo or cedar privacy screens
- Pebble or river rock flooring for drainage and texture
- Outdoor towel rack and shelving
- String lights and waterproof Bluetooth speakers
How to make it
- Level the ground perfectly using a compactable base like fine gravel or a dedicated hot tub pad; a level surface is critical to ensure even water pressure and prevent structural stress on the tub.
- Install privacy screens in a U-shape around the area, using bamboo for a lightweight Zen feel or cedar for a more permanent, architectural look.
- Surround the base of the tub with smooth river rocks; this serves as a visual ‘frame’ and also manages any water splash-back to prevent the area from becoming muddy.
- Set up your lighting at a low ‘heat’ or warmth level (around 2700K) to maintain a relaxing ambiance; avoid bright, blue-toned lights which can disrupt the spa-like mood.
- Add a final layer of luxury with a nearby waterproof bench for towels and a small table for drinks, ensuring everything is within easy reach so you never have to leave the warmth of the water.
How to Install a Rock River Bed for a Beautiful Natural Landscape

Why we love this
A dry creek bed is a masterclass in functional beauty, mimicking the organic flow of water through a mountain pass. The varied textures of smooth river stones, jagged boulders, and fine pebbles create a visual feast that feels grounded and eternal. As you walk near it, the sun glints off the different shades of grey, tan, and blue stones, providing a cooling visual effect even in the heat of summer. It is a brilliant way to solve drainage issues while adding a rugged, naturalistic charm to your garden that requires almost zero maintenance.
Essential Elements:
- River rocks in varying sizes (small pebbles to large boulders)
- Heavy-duty landscape fabric
- Edging stakes or larger ‘anchor’ rocks
- Drought-tolerant plants for the ‘banks’ (like grasses or succulents)
- Shovel and metal rake
How to make it
- Trench out a meandering path through your yard, following the natural low points where water tends to collect; keep the ‘river’ about twice as wide as it is deep for a realistic look.
- Line the entire trench with high-quality landscape fabric, securing it with garden staples to prevent weeds from ‘cooking’ under the rocks and pushing through later.
- Place your largest boulders first at ‘bends’ in the river to act as natural anchors; these should look partially buried as if they’ve been there for centuries.
- Fill in the spaces with medium-sized river rocks and then finish with a top layer of smaller pebbles to create a ‘finished’ look that mimics a real streambed.
- Tuck ornamental grasses and groundcovers along the edges to soften the rock lines, checking for ‘doneness’ by pouring a bucket of water at the high end to ensure it flows smoothly through the stones.
How to Arrange a Realistic Pantry for a Perfectly Organized Home

Why we love this
There is a profound sense of calm that comes from opening a pantry door to find everything in its rightful place. The crisp, clean look of glass jars filled with colorful lentils, pasta, and grains creates a visual harmony that feels both sophisticated and practical. You can hear the satisfying ‘click’ of airtight lids and the soft rustle of organized baskets. It’s about more than just aesthetics; it’s the peace of mind knowing exactly what you have on hand, reducing food waste and making the daily ritual of cooking feel like a creative joy rather than a cluttered chore.
Essential Elements:
- Uniform glass or BPA-free plastic canisters
- Woven or wire baskets for larger items
- Custom labels with a consistent font
- Tiered shelving for canned goods
- Lazy Susans for oils and vinegars
How to make it
- Empty the entire pantry and wipe down every shelf with a mild cleaner; this ‘clean slate’ phase allows you to see the true potential of the space.
- Categorize your items into groups (baking, snacks, dinner staples, etc.) and discard anything that has passed its ‘doneness’ or expiration date.
- Decant dry goods into your uniform canisters; this not only looks better but also keeps food fresher for longer by creating an airtight seal.
- Apply your labels at the same height on every jar for a professional, high-end look; use a ruler to ensure they are perfectly straight and centered.
- Place your most frequently used items at eye level, using Lazy Susans in the corners to ensure no bottle gets ‘lost’ in the back, resulting in a pantry that is as functional as it is beautiful.
How to Decorate a Nostalgic Teen Room for a Creative Personal Sanctuary
Why we love this
A nostalgic teen room is a soulful blend of retro charm and modern self-expression, creating a space that feels like a warm hug. Think of the soft, fuzzy texture of a shag rug underfoot, the gentle glow of neon signs, and the tactile history of a vinyl record collection. It’s a room that smells like a favorite scented candle—perhaps vanilla or sandalwood—and is filled with layers of soft textiles, from velvet pillows to chunky knit throws. It provides a creative sanctuary where a teenager can dream, create, and feel completely at home in their own skin.
Essential Elements:
- Vintage-inspired posters or a gallery wall of prints
- String lights or neon wall art
- Record player and vinyl storage
- Layered textiles (rugs, throws, floor cushions)
- Modular desk for creative projects
How to make it
- Choose a color palette that feels ‘grounded’ but creative—think dusty rose, mustard yellow, or deep forest green mixed with neutral creams.
- Create a focal wall using a mix of nostalgic elements like polaroid photos, retro art prints, and a statement neon sign; use ‘command’ strips to ensure the layout can evolve without damaging the walls.
- Layer the lighting to create a ‘mood’; use a warm-toned floor lamp for reading, string lights for a whimsical glow, and a task lamp for the desk area.
- Incorporate a ‘chill zone’ with a bean bag chair or oversized floor cushions on top of a plush rug, focusing on textures that invite relaxation and comfort.
- Display personal collections—whether it’s vintage cameras, books, or records—on open shelving, ensuring the ‘doneness’ of the room feels curated rather than cluttered.
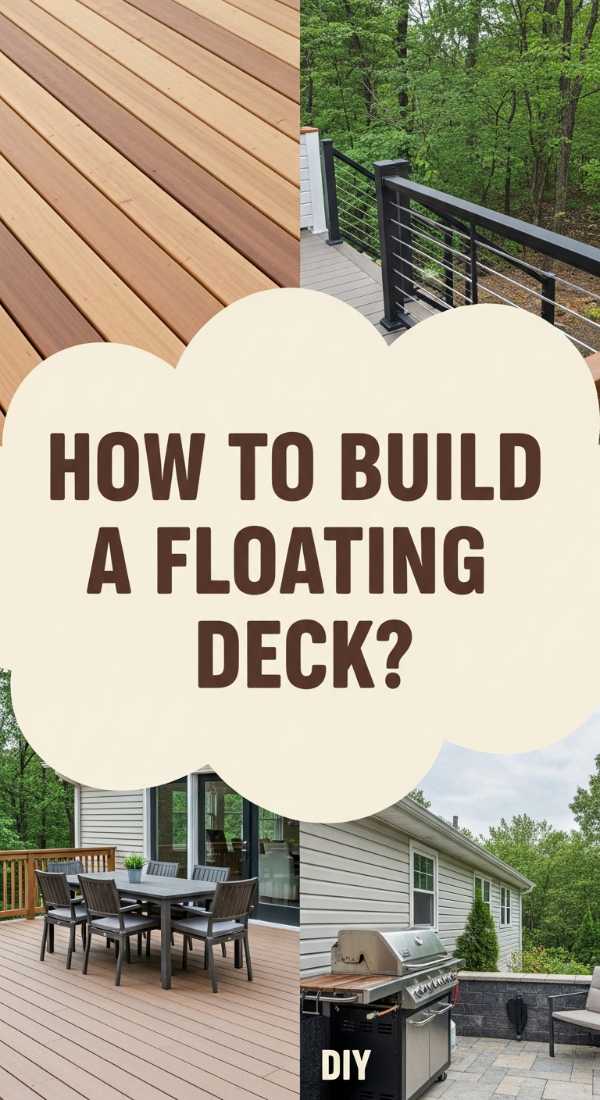
How to Build a Floating Deck for a Stylish Outdoor Entertainment Hub
[IMAGE_10]
Why we love this
A floating deck is the ultimate DIY flex, offering a high-impact platform for summer BBQ’s and quiet morning coffees. The smell of freshly cut pressure-treated timber and the smooth, solid feel of the boards underfoot create an immediate sense of craftsmanship. Visually, the low profile of the deck seamlessly connects the indoor living space with the outdoor greenery, making the whole property feel more expansive. It’s a dedicated stage for life’s best moments, from lively dinner parties to sunset cocktails, all built by your own hands.
Essential Elements:
- Pressure-treated 2×6 boards for the frame and decking
- Deck blocks or concrete footings
- Joist hangers and galvanized deck screws
- Spirit level and speed square
- High-quality exterior wood stain
How to make it
- Clear and level the area where the deck will sit, laying down landscape fabric and a thin layer of gravel to prevent weed growth and provide drainage under the structure.
- Place your deck blocks in a grid pattern (usually every 4-5 feet), using a long straight-edge and a spirit level to ensure every block is perfectly level with its neighbors.
- Construct the outer frame and internal joists (spaced 16 inches apart on center), securing them with galvanized screws; use a speed square to ensure every corner is a perfect 90-degree angle.
- Lay your decking boards across the joists, using a spacer (like a large nail) to maintain a consistent 1/8-inch gap for wood expansion and water drainage.
- Sand any rough edges and apply a high-quality stain or sealer; you’ll know it’s ‘done’ when the wood has a rich, deep color and the sealer causes water to bead on the surface during the first rain.
The Power of a Personalized Home
At the end of the day, our homes are more than just four walls and a roof; they are the backdrops to our lives. Taking the time to craft these spaces with your own hands brings a level of satisfaction that buying something off a shelf simply cannot match. Whether you start small with an organized pantry or go big with a floating deck, each project is a step toward a more beautiful, functional, and joyful life. So, grab your tools, find your inspiration, and start creating the home you’ve always dreamed of—one DIY project at a time.