
There is something about the transition from the soft blossoms of spring to the golden heat of early summer that makes my heart swell. It is the season of massive milestones—graduations, garden parties, and long afternoons spent with doors flung wide open to catch the breeze. Lately, my kitchen has been a whirlwind of flour, fresh stalks of ruby-red rhubarb, and the sweet smell of vanilla buttercream as I prepare for the celebrations that define this time of year.
I have noticed a trend taking over my social feeds lately: the ‘Viral Simple Food Board.’ It is an effortless yet stunning way to host, focusing on high-quality ingredients arranged with an artist’s eye. Whether you are celebrating a high school graduate or simply the arrival of the first rhubarb harvest, these boards and bakes are designed to make your guests gasp in delight. Today, I am sharing the secrets to the bakes and boards that everyone is currently obsessed with, so you can bring a little bit of that magic into your own home.
From the tart snap of homemade jam to the elegant height of a tiered graduation cake, these recipes are more than just food; they are memories in the making. Grab your apron and let’s dive into these ten show-stopping projects that are guaranteed to go viral in your friend group!
How to design stunning graduation cakes

Why we love this
A graduation cake is the crowning jewel of a monumental achievement, and designing one feels like weaving together years of hard work into a single, beautiful centerpiece. There is an incredible satisfaction in smoothing out that final layer of silky Swiss meringue buttercream and watching the gold leaf catch the light as you place it delicately on the edges. The contrast of the soft, moist sponge against the structural elegance of a well-leveled tier creates a sensory experience that is both grand and deeply personal. It is the kind of dessert that stops people in their tracks, prompting a flurry of photos before the first delicious slice is even served.
Ingredients
- Three layers of 8-inch vanilla or chocolate sponge cake
- 4 cups of Swiss meringue buttercream
- Edible gold leaf or metallic luster dust
- Clear vanilla extract (for mixing with dust)
- Fresh flowers or custom acrylic cake toppers
- Cardboard cake rounds and dowels for stability
How to make it
- Begin by leveling your chilled cake layers with a serrated knife to ensure they are perfectly flat; this prevents leaning later. Place your first layer on a cardboard round and apply a generous 1/2 cup of buttercream, spreading it to the edges with an offset spatula.
- Repeat the stacking process, ensuring each layer is centered. Apply a thin ‘crumb coat’ of frosting over the entire cake to lock in moisture and stray crumbs, then chill in the refrigerator for at least 30 minutes until the frosting is firm to the touch.
- Apply the final layer of buttercream using a bench scraper to achieve those sharp, professional edges; hold the scraper at a 45-degree angle against the cake and spin your turntable steadily.
- Mix your luster dust with a few drops of clear vanilla extract to create a ‘paint’ and use a fine-tipped food-safe brush to gild the top edges or create an ombre splatter effect.
- Carefully place your topper and any floral accents, using a straw to insert flower stems into the cake to keep them food-safe, ensuring the height of the decorations complements the scale of the tiers.
How to make homemade rhubarb jam
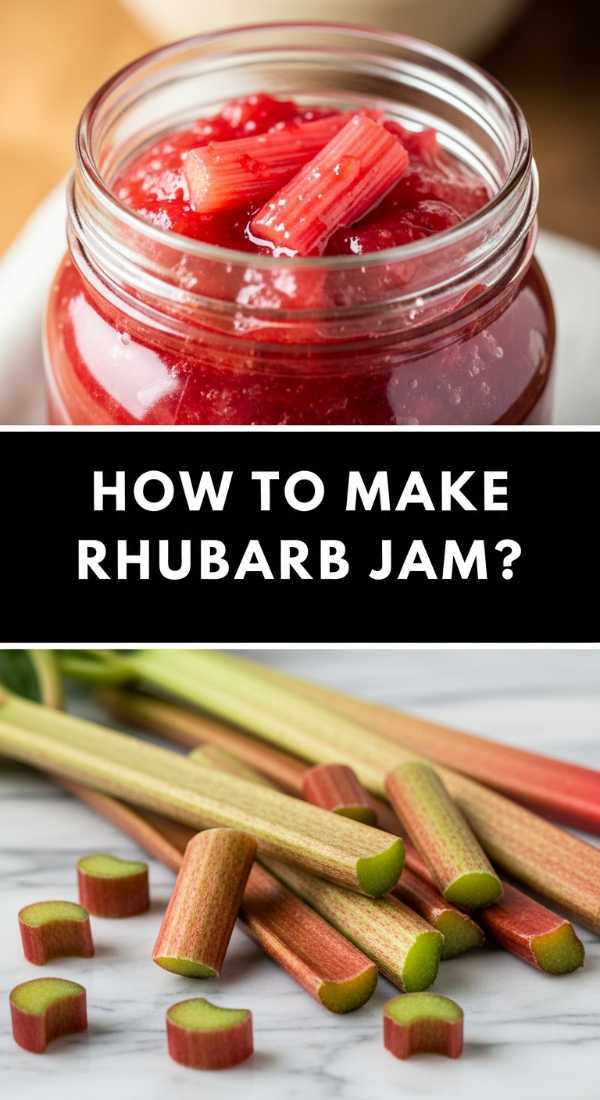
Why we love this
Rhubarb jam is like capturing the very essence of spring in a glass jar, offering a vibrant, neon-pink hue that looks stunning on any breakfast table. The texture is a delightful balance of thick, spreadable fruit and tiny, tender fibers that melt away on the tongue, releasing a sharp tang that is perfectly tempered by caramelized sugar. Opening a jar months later brings back the scent of fresh garden soil and sunshine, making it a true labor of love. It is the perfect companion for a warm scone or a piece of sourdough, providing a bright acidity that cuts through rich butter beautifully.
Ingredients
- 2 lbs fresh rhubarb stalks, chopped into 1/2-inch pieces
- 3 cups granulated sugar
- 1 tablespoon lemon juice
- 1 teaspoon lemon zest
- 1/2 teaspoon pure vanilla bean paste
How to make it
- In a large, heavy-bottomed pot, combine your chopped rhubarb and sugar; let this mixture sit for about 2 hours at room temperature until the sugar draws the juices out and forms a thick syrup.
- Place the pot over medium-high heat and bring the mixture to a rolling boil, stirring constantly with a wooden spoon to prevent the sugar from scorching on the bottom.
- Add the lemon juice and zest, which provide the natural pectin needed for the jam to set; continue boiling for 15-20 minutes, or until the mixture reaches 220°F (104°C) on a candy thermometer.
- Perform the ‘plate test’ by placing a small spoonful of jam on a chilled saucer; let it sit for a minute, then push it with your finger—if it wrinkles, it is ready.
- Stir in the vanilla bean paste for depth, then carefully ladle the hot jam into sterilized jars, leaving a 1/4-inch headspace before sealing with lids and processing in a water bath for 10 minutes for long-term storage.
How to bake graduation cupcakes
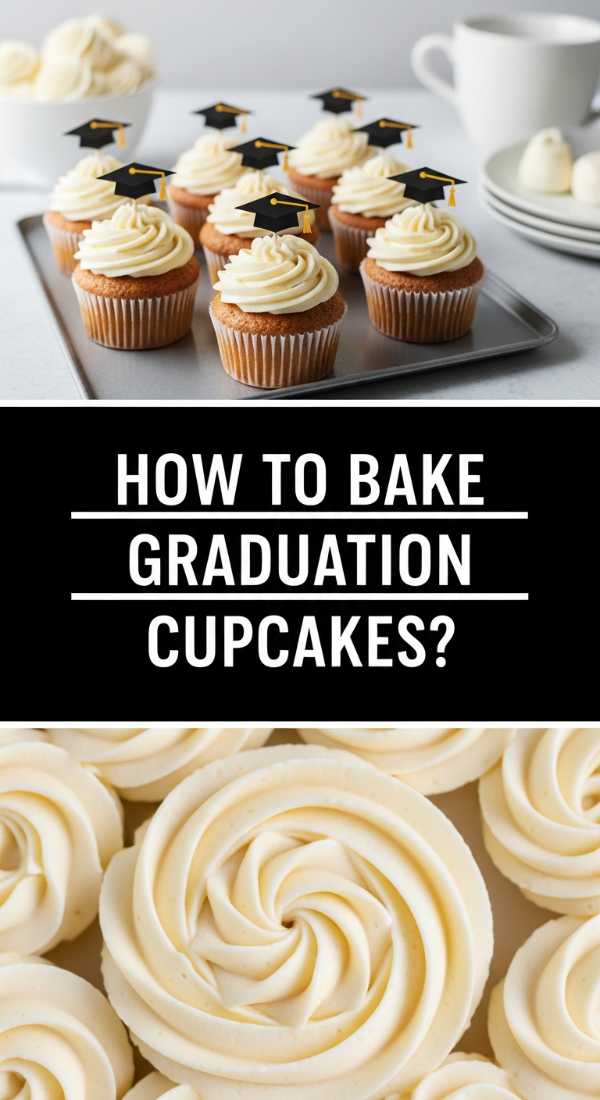
Why we love this
Graduation cupcakes offer a playful, individualized way to celebrate that takes the pressure off the traditional cake-cutting ceremony. We love how the dark, cocoa-rich crumb of a perfectly baked cupcake provides a sturdy base for creative decorations like miniature chocolate mortarboards. The aroma of baking chocolate fills the house with a sense of festive anticipation, and the bite-sized nature allows guests to mingle while enjoying a decadent treat. They are the ultimate crowd-pleaser, easily customized with school colors to make every graduate feel like the star of the show.
Ingredients
- 2 cups all-purpose flour
- 1/2 cup dark cocoa powder
- 1 1/2 teaspoons baking soda
- 2 large eggs
- 1 cup buttermilk
- Ghirardelli chocolate squares and miniature Reese’s cups (for the ‘hats’)
- Sour patch straws or licorice (for the tassels)
How to make it
- Preheat your oven to 350°F (175°C) and line a muffin tin with high-quality paper liners; whisk your dry ingredients together in one bowl and your wet ingredients in another until fully incorporated.
- Slowly fold the dry mixture into the wet, being careful not to overmix, which can result in a tough, rubbery cupcake; fill each liner about two-thirds full to allow for a perfect domed top.
- Bake for 18-22 minutes; check for doneness by inserting a toothpick—it should come out clean or with just a few moist crumbs attached. Let them cool completely on a wire rack.
- To make the ‘caps,’ melt a small amount of chocolate to act as glue; attach a flat chocolate square to an inverted miniature peanut butter cup and let it set until firm.
- Pipe a swirl of buttercream onto the cooled cupcake, place the chocolate ‘cap’ on top, and attach a small piece of licorice as the tassel using another dot of melted chocolate for a professional, themed finish.
How to bake a classic rhubarb pie
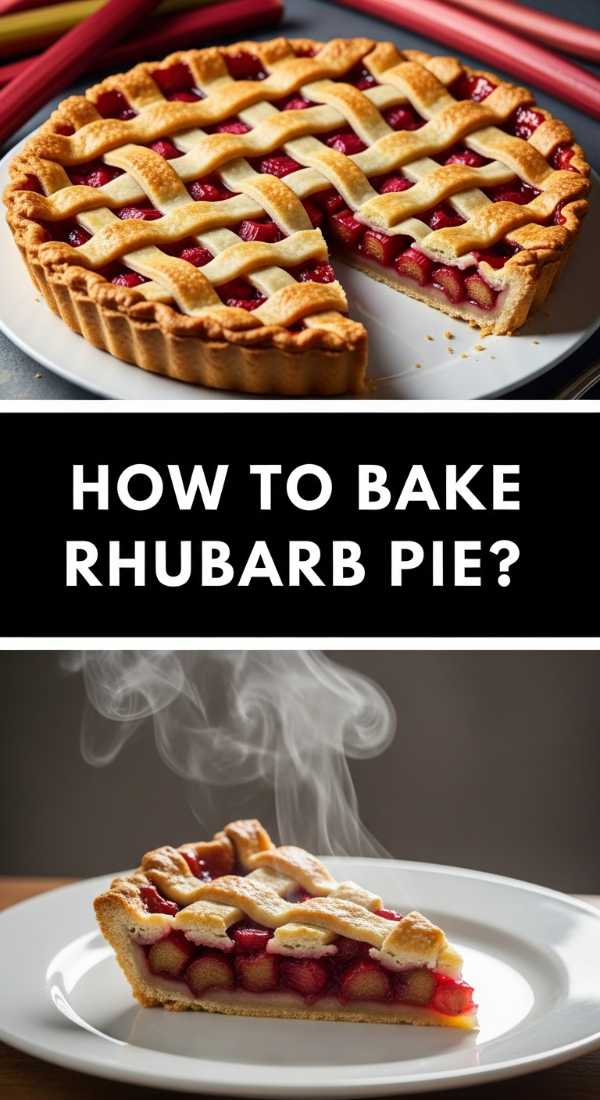
Why we love this
There is nothing quite as nostalgic as a classic rhubarb pie, with its architectural lattice crust and the way the bubbling ruby juices escape through the vents during baking. The scent of buttery pastry mingling with the sharp, vegetal aroma of cooking rhubarb is enough to draw anyone into the kitchen with a hungry heart. Every bite offers a sophisticated play of textures—the shatteringly crisp, salted crust against the soft, jammy interior that dances between sweet and sour. It is a rustic masterpiece that celebrates the simplicity of seasonal produce in its purest, most comforting form.
Ingredients
- Double pie crust (homemade with cold butter)
- 5 cups sliced rhubarb (1/2 inch thick)
- 1 1/4 cups granulated sugar
- 1/4 cup cornstarch
- 1/2 teaspoon cinnamon
- 1 tablespoon cold butter, cubed
- 1 egg (for egg wash)
How to make it
- Roll out your bottom crust and fit it into a 9-inch pie plate; keep it chilled in the fridge while you prepare the filling to ensure the butter stays cold for a flakier result.
- In a large bowl, toss the rhubarb with sugar, cornstarch, and cinnamon; let it sit for 15 minutes so the cornstarch can begin to absorb the moisture, which prevents a soggy bottom.
- Pour the filling into the prepared shell and dot the top with the small cubes of cold butter to add a rich, silky mouthfeel to the filling as it bakes.
- Create a lattice top by cutting your second crust into 1-inch strips and weaving them over the fruit; crimp the edges firmly to seal the juices inside.
- Brush the lattice with an egg wash and sprinkle with coarse sugar; bake at 425°F for 15 minutes, then reduce the heat to 375°F and bake for another 45-50 minutes until the filling is thick and bubbling vigorously.
How to decorate summer sugar cookies
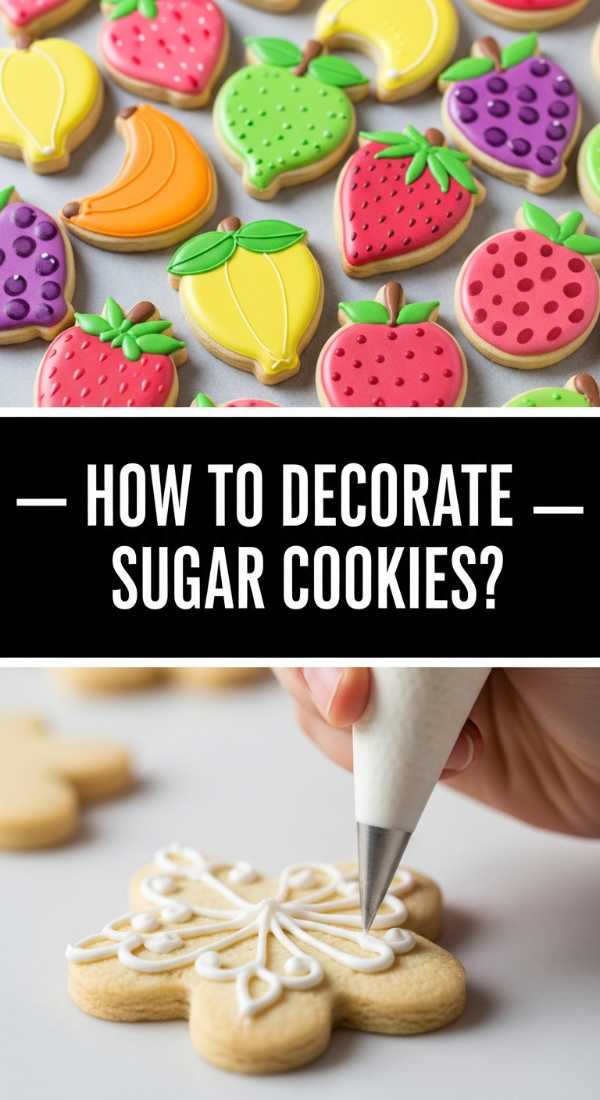
Why we love this
Summer sugar cookies are a canvas for pure sunshine, allowing for vibrant colors and playful designs that capture the carefree spirit of the season. We love the smooth, matte finish of royal icing when it dries, providing a satisfying snap when you bite into the soft, buttery sugar cookie underneath. The process of piping tiny lemon wedges or bright sunflowers is incredibly meditative, turning a simple snack into a work of edible art. They are the perfect addition to a picnic basket, holding their shape and beauty even in the summer heat, and bringing a smile to everyone who sees them.
Ingredients
- Batch of chilled sugar cookie dough
- Royal icing (stiff and flood consistencies)
- Gel food coloring (bright yellow, leaf green, and sky blue)
- Piping bags and small round tips
- Fine mist spray bottle (for thinning icing)
How to make it
- Roll out your chilled dough to a consistent 1/4-inch thickness and cut into summer shapes like suns or citrus slices; bake until the edges are just barely golden, then cool completely on a flat surface.
- Outline your shapes using the stiff consistency icing; this acts as a ‘dam’ to hold the thinner icing in place. Allow the outline to dry for about 10 minutes.
- Thin your remaining icing with a few drops of water until it reaches ‘flood’ consistency (it should disappear into itself in 10 seconds); fill the centers of the cookies and use a toothpick to pop any tiny air bubbles.
- For a ‘wet-on-wet’ technique, immediately add dots or stripes of a different color into the wet flood icing to create seamless patterns like polka dots or marble swirls.
- Let the cookies dry undisturbed for at least 12 hours in a cool, dry place before adding any final fine-line details with your stiff icing to ensure the base is completely hard.
How to style graduation cookies
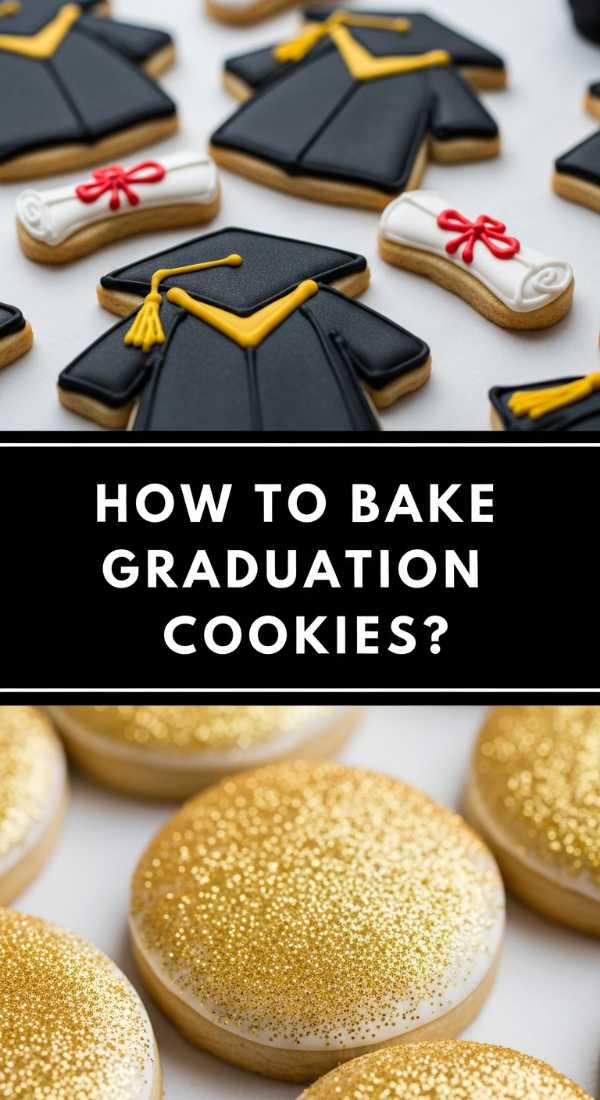
Why we love this
Styling graduation cookies is all about the little details that celebrate a specific journey, from the year of the class to the colors of the alma mater. There is a profound sense of pride in seeing a set of cookies that features ‘Class of 2024’ scripted in elegant calligraphy or diplomas tied with delicate icing ribbons. The texture is key here—the combination of a soft-baked cookie with the intricate, raised details of the icing creates a luxury feel that store-bought treats simply can’t match. They serve as both a delicious dessert and a personalized party favor that guests will be talking about long after the party ends.
Ingredients
- Graduate-themed cookie cutters (cap, diploma, gown)
- Royal icing in school colors
- Edible ink markers (for fine script)
- Silver or gold sanding sugar
- Scribe tool or toothpick
How to make it
- Bake your cookies using a recipe that doesn’t spread, ensuring the sharp angles of the graduation cap and diploma stay defined; chill them thoroughly before you begin decorating.
- Apply a base coat of flood icing in the primary school color; while the icing is still wet, you can dip the edges into sanding sugar to create a sparkling border that hides any imperfections.
- Once the base layer is completely dry (after about 4 hours), use an edible ink marker to write the graduate’s name or the graduation year onto the ‘diploma’ cookies for a highly personalized touch.
- Use a medium-consistency icing to pipe the tassel on the cap, starting from the center button and pulling the line down and over the edge to create a sense of movement.
- Arrange the cookies on a tiered stand or a flat marble slab, layering them slightly to create depth and using extra sanding sugar scattered on the board to mimic confetti.
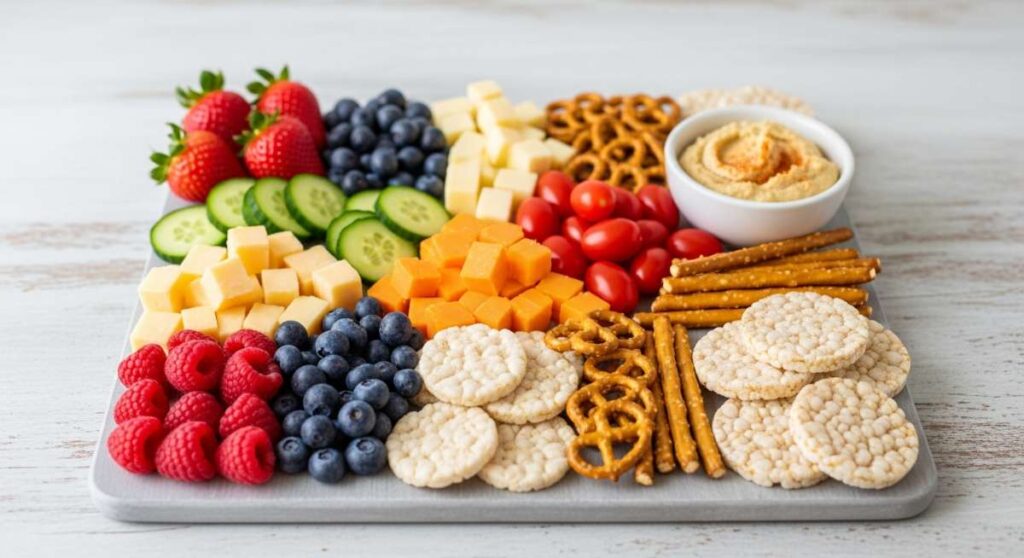
How to assemble graduation charcuterie boards
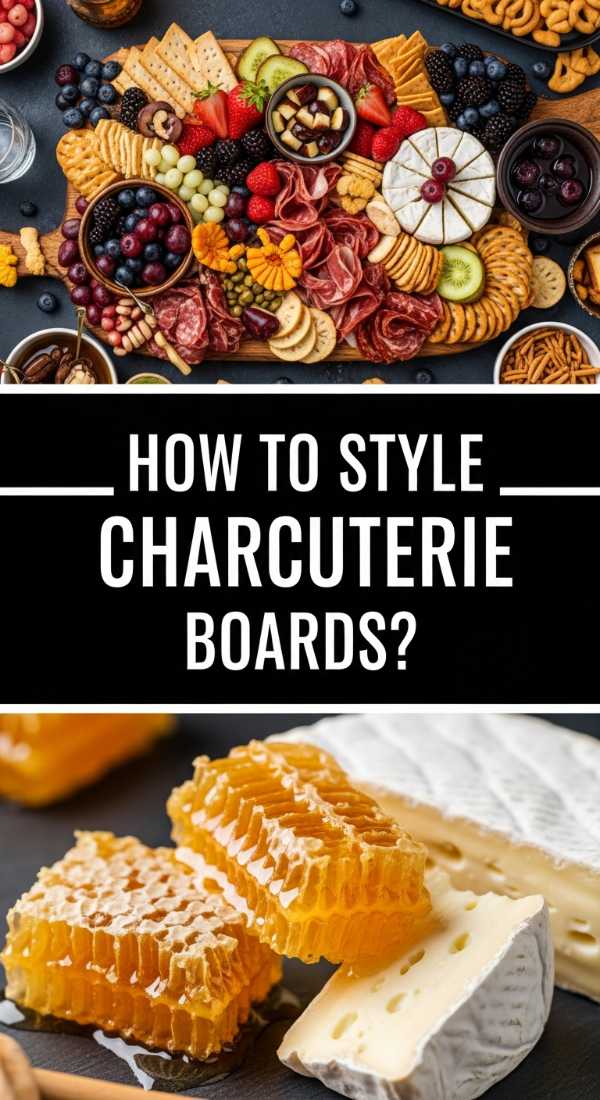
Why we love this
The viral graduation charcuterie board is the ultimate ‘Simple Food Board’ because it combines the sophistication of a cheese plate with the festive spirit of a celebration. We love the abundance of colors—the deep purples of grapes, the creamy whites of brie, and the pops of school-colored fruits like strawberries or blueberries. It’s a tactile, communal experience where guests can graze at their own pace, discovering hidden treats like chocolate-covered pretzels styled as diplomas. It’s visually overwhelming in the best way possible, creating a focal point for the party that feels both bountiful and meticulously curated.
Ingredients
- 3 types of cheese (Brie, Sharp Cheddar, Manchego)
- Cured meats (Prosciutto, Salami rosettes)
- Seasonal fruits (Grapes, berries, dried apricots)
- Crackers and baguette slices
- Miniature graduation caps or themed picks
- Nuts and honey for pairing
How to make it
- Select a large wooden board or marble slab; start by placing your largest items first—the bowls of honey and the cheeses—at diagonal points to create a balanced visual anchor.
- Fold your salami into ‘rosettes’ by layering slices over the rim of a wine glass and pressing them down before flipping onto the board; this adds height and a professional, viral-worthy aesthetic.
- Fill in the large gaps with clusters of grapes and piles of crackers, ensuring you alternate colors and textures to keep the eye moving across the board.
- Add the ‘graduation’ elements: tie small ribbons around rolled-up slices of prosciutto to look like diplomas and scatter a few miniature mortarboards among the nuts.
- Finally, fill any tiny remaining ‘holes’ with sprigs of fresh rosemary or edible flowers to give the board a lush, overflowing look that appears effortless yet intentional.
How to mix homemade spice blends

Why we love this
Creating your own spice blends is like discovering a secret language of flavor that transforms your cooking from ordinary to extraordinary. There is a visceral joy in toasted whole seeds—like cumin or coriander—until they release their aromatic oils, filling the kitchen with an earthy, intoxicating scent. The texture of a hand-ground blend, with its varying grains and vibrant colors, is far superior to the dust-like consistency of pre-packaged jars. It allows you to control the heat and the salt, ensuring every dish you make is a perfect reflection of your personal palate.
Ingredients
- Whole cumin seeds and coriander seeds
- Smoked paprika
- Dried oregano and thyme
- Garlic powder and onion powder
- Coarse sea salt and cracked black pepper
- Dried chili flakes (optional for heat)
How to make it
- Place your whole seeds (cumin and coriander) in a dry skillet over medium heat; toast them for 2-3 minutes, shaking the pan constantly, until they are fragrant and slightly darkened in color.
- Transfer the toasted seeds to a mortar and pestle or a clean spice grinder; pulse until you achieve a coarse powder, which preserves the texture and punch of the spices.
- In a glass mixing bowl, combine the ground seeds with the paprika, dried herbs, and powders; use a small whisk to ensure the colors are evenly distributed throughout the blend.
- Taste a tiny amount of the blend on a piece of bread or a plain cracker to check the salt balance, adjusting with more sea salt as needed to make the flavors pop.
- Store your custom blend in an airtight glass jar away from direct sunlight; for the best flavor, use within three months while the oils are still potent and the aroma is sharp.
How to bake fluffy rhubarb scones
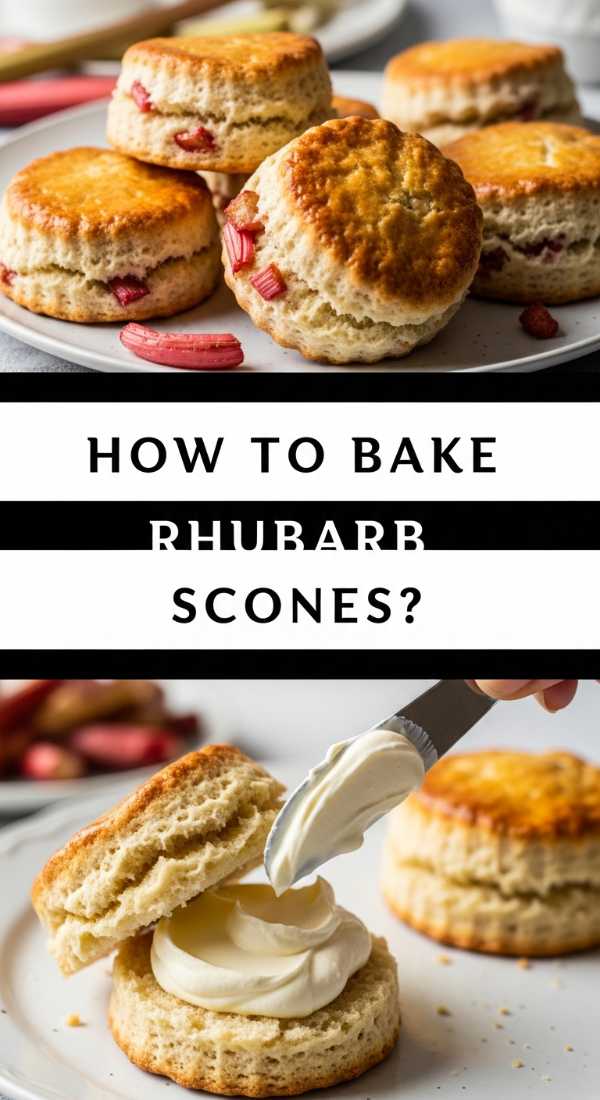
Why we love this
Rhubarb scones are the quintessential spring brunch treat, offering a crumb that is incredibly tender and flaky, interspersed with tart, juicy bursts of fruit. We love the contrast between the golden, sugar-crusted exterior and the soft, pillowy middle that practically begs for a thick layer of clotted cream. The aroma of cold butter melting into flour in a hot oven is the ultimate comfort, and the addition of rhubarb adds a modern, sophisticated twist to a traditional bake. They are best enjoyed warm, with the steam carrying the scent of vanilla and fruit directly to your senses.
Ingredients
- 3 cups all-purpose flour
- 1/2 cup granulated sugar
- 1 tablespoon baking powder
- 1/2 cup cold salted butter, grated
- 1 cup fresh rhubarb, finely diced
- 1 cup heavy cream (plus extra for brushing)
- Coarse sparkling sugar for the top
How to make it
- Whisk your dry ingredients together in a large chilled bowl; grate your cold butter directly into the flour and use your fingertips to quickly rub it in until the mixture resembles coarse crumbs.
- Gently fold in the finely diced rhubarb; the small pieces ensure that the fruit cooks through and releases its moisture evenly without making the dough soggy.
- Make a well in the center and pour in the heavy cream; use a fork to bring the dough together until it just clings, being extremely careful not to overwork the gluten.
- Turn the dough onto a floured surface and pat it into a 1-inch thick circle; cut into 8 wedges using a sharp bench scraper or knife, pressing straight down without sawing.
- Place the scones on a parchment-lined sheet, brush with cream, and sprinkle generously with sparkling sugar; bake at 400°F (200°C) for 18-22 minutes until they are tall, golden, and firm to the touch.
How to make fresh lemon pesto
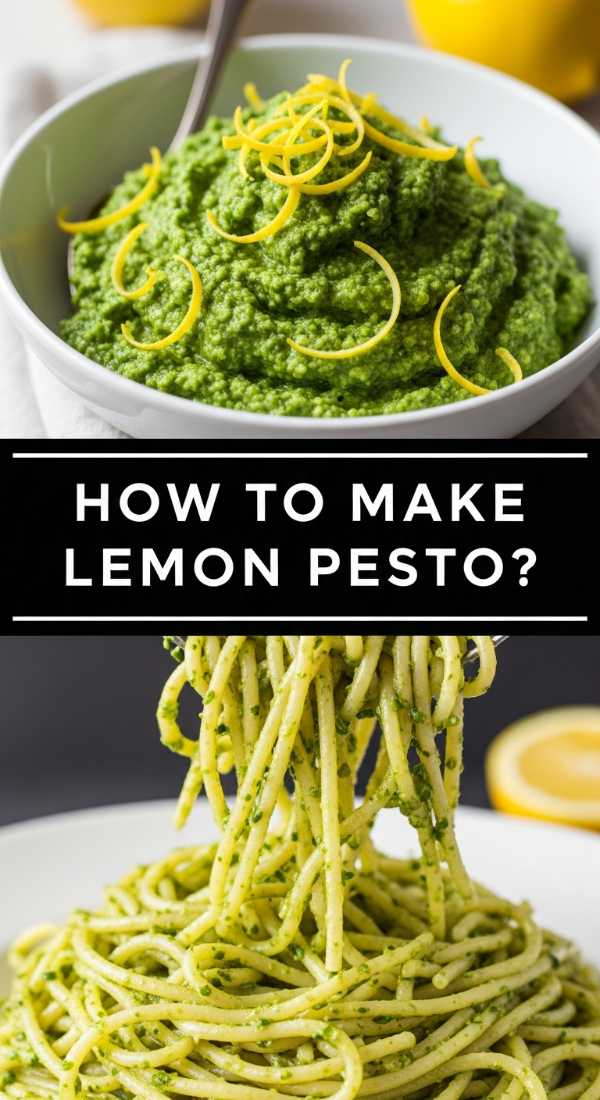
Why we love this
Fresh lemon pesto is a bright, zingy revelation that breathes new life into the traditional basil sauce, making it taste like a sunny afternoon in a bowl. The aroma of freshly torn basil leaves combined with the sharp, clean scent of lemon zest is instantly uplifting and incredibly fresh. We love the coarse, nutty texture of the parmesan and pine nuts, which provides a satisfying bite against the silkiness of high-quality olive oil. It is a versatile powerhouse, equally at home tossed with linguine, drizzled over grilled chicken, or served as a dip on your viral food board.
Ingredients
- 2 cups fresh basil leaves, packed
- 1/2 cup freshly grated Parmesan cheese
- 1/3 cup pine nuts (toasted)
- 2 cloves garlic, minced
- 1/2 cup extra-virgin olive oil
- Zest and juice of one large lemon
- Pinch of red pepper flakes
How to make it
- Toast your pine nuts in a small pan over low heat for 3-5 minutes until golden brown; this step is crucial as it releases the natural oils and adds a deep, nutty complexity to the pesto.
- In a food processor, pulse the basil, garlic, and toasted pine nuts until they are coarsely chopped; avoid over-processing at this stage to maintain a rustic, textured feel.
- With the motor running on low, slowly drizzle in the olive oil in a steady stream; this creates an emulsion that results in a creamy, cohesive sauce rather than an oily mess.
- Add the lemon zest, lemon juice, and grated Parmesan; pulse just a few more times to incorporate, ensuring the bright yellow zest is visible throughout the green sauce.
- Season with a pinch of red pepper flakes for a subtle heat and serve immediately, or store in a jar with a thin layer of olive oil on top to prevent the basil from oxidizing.
The Magic of Sharing
As the sun sets on another beautiful day of baking and styling, I am reminded that the true heart of these viral trends is the connection they foster. Whether you are building a massive graduation board or simply stirring a pot of rhubarb jam, you are creating an environment where people feel seen and celebrated. These recipes are your toolkit for making this season unforgettable. I can’t wait to see how you make them your own!